

Instruction Manual
Page 2
Close attention is necessary when the sewing machine is used by the manufac- t!Jrer as threading the needle, changing the needl\3, threading the bobbin, or changing the presser foot. 15. Keep the ventilation openings of the air openings blocked. To disconnect, turn the main switch to the ...
Close attention is necessary when the sewing machine is used by the manufac- t!Jrer as threading the needle, changing the needl\3, threading the bobbin, or changing the presser foot. 15. Keep the ventilation openings of the air openings blocked. To disconnect, turn the main switch to the ...

Instruction Manual
Page 6
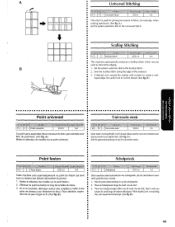
...only 26 Reverse Sewing Lever 27 Drop Feed Lever 27 THREADING THE MACHINE 28 Winding the Bobbin 28 Lower Threading 29 Upper (Needle) Threading 30 Using the Needle Threader (75 only 32 Quick Thread-setting System FAST START BOBBIN (75 only 34 Drawing Up Lower Thread (50, 60 and 70 only) ..... 35 Twin-...Needle Sewing (60, 70 and 75 only 36 Thread Tension 37 CHART OF SEWING FABRICS, NEEDLES AND THREAD COMBINATIONS 39 Making a Buttonhole (70 and 75 only 52 Making a Buttonhole (50 and 60 only 54 Buttonhole Fine Adjustment 57 Button Sewfng 59 , . ...
...only 26 Reverse Sewing Lever 27 Drop Feed Lever 27 THREADING THE MACHINE 28 Winding the Bobbin 28 Lower Threading 29 Upper (Needle) Threading 30 Using the Needle Threader (75 only 32 Quick Thread-setting System FAST START BOBBIN (75 only 34 Drawing Up Lower Thread (50, 60 and 70 only) ..... 35 Twin-...Needle Sewing (60, 70 and 75 only 36 Thread Tension 37 CHART OF SEWING FABRICS, NEEDLES AND THREAD COMBINATIONS 39 Making a Buttonhole (70 and 75 only 52 Making a Buttonhole (50 and 60 only 54 Buttonhole Fine Adjustment 57 Button Sewfng 59 , . ...
Instruction Manual
Page 9
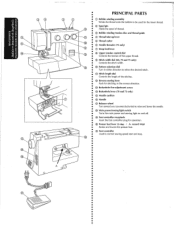
... (j) Bobbin winding assembly • • Winds the thread onto the bobbin to be used for the lower thread. • ®Spool pin • • Holds the spool of thread. • ® Bobbin winding tension disc and thread guide @ Thread take-up lever ® Thread cutter ® Needle threader (75 only) IJ) Drop ...feed lever ® Upper tension control dial Controls the tension of the upper thread. ® Stitch width dial (60, 70 and 75 only) Controls the stitch width. (@ Pattern selection dial Turn in either direction to select ...
... (j) Bobbin winding assembly • • Winds the thread onto the bobbin to be used for the lower thread. • ®Spool pin • • Holds the spool of thread. • ® Bobbin winding tension disc and thread guide @ Thread take-up lever ® Thread cutter ® Needle threader (75 only) IJ) Drop ...feed lever ® Upper tension control dial Controls the tension of the upper thread. ® Stitch width dial (60, 70 and 75 only) Controls the stitch width. (@ Pattern selection dial Turn in either direction to select ...

Instruction Manual
Page 33
...; Makes rough stitches NOTE: The dial cannot be sewn at the standard position "B". not forcefully turn the B • stitch length dial out of fabric or thread are used or the pattern does not have the correct shape, turn the dial toward either"+" or"-" to a stretch stitch. (See fig. Elastische steek Kiezen...
...; Makes rough stitches NOTE: The dial cannot be sewn at the standard position "B". not forcefully turn the B • stitch length dial out of fabric or thread are used or the pattern does not have the correct shape, turn the dial toward either"+" or"-" to a stretch stitch. (See fig. Elastische steek Kiezen...
Instruction Manual
Page 36
...8226;Gde•En•N 1. G) Bobbin winding tension disc ® Bobbi~ winding 2. Pass the end of the bobbin and • continue winding the thread onto the bobbin by pressing down on •• the foot controller. •• NOTE: • The machine stops automatically when the bobbin is ... balance wheel will con- • tinue to the left • and remove the full bobbin from the inside. 3. When the machine stops, cut the thread, push the shaft to turn. a • Tourner Ia canette dans le sens des aiguilles d'une montre, Ia • main, jusqu'a ce que le...
...8226;Gde•En•N 1. G) Bobbin winding tension disc ® Bobbi~ winding 2. Pass the end of the bobbin and • continue winding the thread onto the bobbin by pressing down on •• the foot controller. •• NOTE: • The machine stops automatically when the bobbin is ... balance wheel will con- • tinue to the left • and remove the full bobbin from the inside. 3. When the machine stops, cut the thread, push the shaft to turn. a • Tourner Ia canette dans le sens des aiguilles d'une montre, Ia • main, jusqu'a ce que le...
Instruction Manual
Page 37
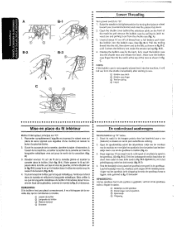
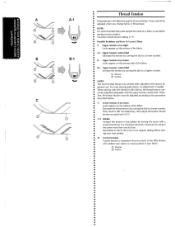
A B-2 8-3 c lower Threading Turn power switch to its latch toward you and pulling it enters the delivery eye under the tension spring (fig. Unwind about 10 em (4'') of ... spoelbaan komt te a 4. Make sure the bobbin case finger fits into the notch at the top of thread from a full bobbin and insert the bobbin into the bobbin case. (See fig. 8-1.) Pull the trailing thread into the slot, then down and to sew. NOTE: If the bobbin case is , tot in fig...
A B-2 8-3 c lower Threading Turn power switch to its latch toward you and pulling it enters the delivery eye under the tension spring (fig. Unwind about 10 em (4'') of ... spoelbaan komt te a 4. Make sure the bobbin case finger fits into the notch at the top of thread from a full bobbin and insert the bobbin into the bobbin case. (See fig. 8-1.) Pull the trailing thread into the slot, then down and to sew. NOTE: If the bobbin case is , tot in fig...

Instruction Manual
Page 38
... the slit by pulling it behind the thread guide. ® Thread guide 7. B.) While holding the thread as shbwn in fig. Bring the thread through both thread guides: the rear one first, then the front one. (See fig. A.) ."."I II ~ -I I I I CD Spool pin ® Thread guide (rear) • @ Thread guide (front) • @ Thread take -up lever to the left (fig...
... the slit by pulling it behind the thread guide. ® Thread guide 7. B.) While holding the thread as shbwn in fig. Bring the thread through both thread guides: the rear one first, then the front one. (See fig. A.) ."."I II ~ -I I I I CD Spool pin ® Thread guide (rear) • @ Thread guide (front) • @ Thread take -up lever to the left (fig...

Instruction Manual
Page 40
Turn the balance wheel toward you {counterclockwise) until the bottom of th~ needle holder aligns with the bottom of the needlethreading-hook holder. Using the Needle Threader (75 only) Turn power switch to "0". 1. Lower the presser foot.lever. 2.
Turn the balance wheel toward you {counterclockwise) until the bottom of th~ needle holder aligns with the bottom of the needlethreading-hook holder. Using the Needle Threader (75 only) Turn power switch to "0". 1. Lower the presser foot.lever. 2.
Instruction Manual
Page 42
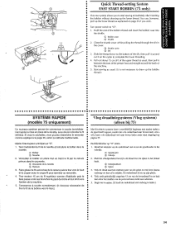
... permet de commencer coudre i.mm8diate- • ment aprSs Ia mise en place de !a canette, sans devoir remonter !e fit •• infSrieur. Quick Thread-setting System FAST START BOBBIN (75 only) This new system allows you wish . Hold the end of ~" •• the machine. • 5. Slide...You can, however, pull up and • cut it • between the toes of the presser foot and straight toward the back of the bobbin thread and insert the bobbin case into the shuttle. Si vous le souhaitez, vous pouvez neanffioins 16 remonter a • comme explique !a page 35, selon...
... permet de commencer coudre i.mm8diate- • ment aprSs Ia mise en place de !a canette, sans devoir remonter !e fit •• infSrieur. Quick Thread-setting System FAST START BOBBIN (75 only) This new system allows you wish . Hold the end of ~" •• the machine. • 5. Slide...You can, however, pull up and • cut it • between the toes of the presser foot and straight toward the back of the bobbin thread and insert the bobbin case into the shuttle. Si vous le souhaitez, vous pouvez neanffioins 16 remonter a • comme explique !a page 35, selon...

Instruction Manual
Page 43
... moves down and back up from the bobbin in a loop. The upper thread should pass between the toes of the machine straight behind the presser foot. Pull the upper thread toward you and ~he lower thread will come • up again to their highest positions. 2. Raise the presser... foot and the needle to its highest position. 3. The upper •• thread should have caught the lower thread in a large loop . • 4. Pull out about 15 em (6~') of both threads and place them toward • the back of the presser foot. • • • ...
... moves down and back up from the bobbin in a loop. The upper thread should pass between the toes of the machine straight behind the presser foot. Pull the upper thread toward you and ~he lower thread will come • up again to their highest positions. 2. Raise the presser... foot and the needle to its highest position. 3. The upper •• thread should have caught the lower thread in a large loop . • 4. Pull out about 15 em (6~') of both threads and place them toward • the back of the presser foot. • • • ...
Instruction Manual
Page 45
lt may need to be made on a fabric scrap before sewing on your stitches. The.basic thread tension setting is too tight. A~1 Upper tension cOntrol dial Decrease the tension by turning the dial to a lower number. B-1 - NOTE: It is too loose. 1 locks... fabric . B~1 Upper tension control dial Increase the tension by turning the dial to a higher number. Possible Problems and How To Correct Them A Upper tension is "5". Thread Tension Thread tension will affect the quality of the fabric . B Upper tension is recommended that a test sample be adjusted when you change fabric or...
lt may need to be made on a fabric scrap before sewing on your stitches. The.basic thread tension setting is too tight. A~1 Upper tension cOntrol dial Decrease the tension by turning the dial to a lower number. B-1 - NOTE: It is too loose. 1 locks... fabric . B~1 Upper tension control dial Increase the tension by turning the dial to a higher number. Possible Problems and How To Correct Them A Upper tension is "5". Thread Tension Thread tension will affect the quality of the fabric . B Upper tension is recommended that a test sample be adjusted when you change fabric or...

Instruction Manual
Page 47
...le tableau ci-dessus Ia tame de fil et le calibre d'aiguille adequats. 2. Polyester enrobe de eaton CHART OF SEWING FABRICS, NEEDLES AND THREAD COMBINATIONS KNITS Single knit, Double knit, jersey, Tricot NOTE: 1. Utiliser Ia meme tame de fil pour les fils inf8rieur (canette) et... superieur (bobine). Select the correct needle and "thread size from the above chart. 2. Use the same size thread for the upper (spool) and lower {bobbin) threads. #90/14 Cotton-Wrapped Polyester TABLEAU DES COMBINAISONS TISSUIAIGUILLE/FIL TRICOTS Tricot simple, double...
...le tableau ci-dessus Ia tame de fil et le calibre d'aiguille adequats. 2. Polyester enrobe de eaton CHART OF SEWING FABRICS, NEEDLES AND THREAD COMBINATIONS KNITS Single knit, Double knit, jersey, Tricot NOTE: 1. Utiliser Ia meme tame de fil pour les fils inf8rieur (canette) et... superieur (bobine). Select the correct needle and "thread size from the above chart. 2. Use the same size thread for the upper (spool) and lower {bobbin) threads. #90/14 Cotton-Wrapped Polyester TABLEAU DES COMBINAISONS TISSUIAIGUILLE/FIL TRICOTS Tricot simple, double...
Instruction Manual
Page 49
... druk het voetpedaal !angzaam in en druk tegelijkertijd Iicht • op bet voetpedaal. Pull up the .lower thread by turning the balance wheel toward you (counterclockwise) and place both the upper and lower threads behind the presser foot. 4. Press down on the foot controller. Abaisser compl9teroent le levier de couture en marche...
... druk het voetpedaal !angzaam in en druk tegelijkertijd Iicht • op bet voetpedaal. Pull up the .lower thread by turning the balance wheel toward you (counterclockwise) and place both the upper and lower threads behind the presser foot. 4. Press down on the foot controller. Abaisser compl9teroent le levier de couture en marche...
Instruction Manual
Page 51
Stop the machine. 2. Cut both threads with the thread cutter located on the left side. 4. To prepare the machine for the next seam, puf! lift the presser foot and pull the fabric out gently to its highest position and make sure that the thread take-up lever is also in its highest position. 3. about 10 em (4'~) of thread through the toes of the presser foot toward the back of the face plate. 5. Raise the needle to the left side of the machine . •• Removing the Material From the Machine 1.
Stop the machine. 2. Cut both threads with the thread cutter located on the left side. 4. To prepare the machine for the next seam, puf! lift the presser foot and pull the fabric out gently to its highest position and make sure that the thread take-up lever is also in its highest position. 3. about 10 em (4'~) of thread through the toes of the presser foot toward the back of the face plate. 5. Raise the needle to the left side of the machine . •• Removing the Material From the Machine 1.
Instruction Manual
Page 53
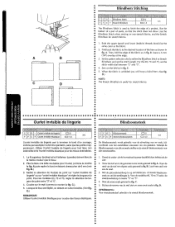
... de Blindzoomsteek voor allc nonnale stoffen en de stretch blindzoomsteek voor aile stretchstoffen. 1. A. geur de point entre "3" et "5". 4. Both the upper (spool) and lower {bobbin) threads should be the satne color as in fig. For the 60, 70 and 75, set the stitch length. als de bovendraad moeten dezelfde kleur hebben...
... de Blindzoomsteek voor allc nonnale stoffen en de stretch blindzoomsteek voor aile stretchstoffen. 1. A. geur de point entre "3" et "5". 4. Both the upper (spool) and lower {bobbin) threads should be the satne color as in fig. For the 60, 70 and 75, set the stitch length. als de bovendraad moeten dezelfde kleur hebben...
Instruction Manual
Page 56
... stukken stof, bijvoor beeld voor patchwork. (Zie fig. Naai de Schelpsteek langs de rand van de stof. 3. Set the pattern selection dial to cut the thread. (See fig. 8.) • • • • • Point universe! Stel de patroonkeuzeknop in op de universele steek. B • • This stitch is used as decorative...
... stukken stof, bijvoor beeld voor patchwork. (Zie fig. Naai de Schelpsteek langs de rand van de stof. 3. Set the pattern selection dial to cut the thread. (See fig. 8.) • • • • • Point universe! Stel de patroonkeuzeknop in op de universele steek. B • • This stitch is used as decorative...
Instruction Manual
Page 60
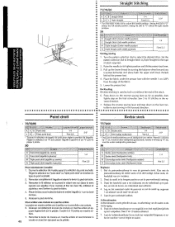
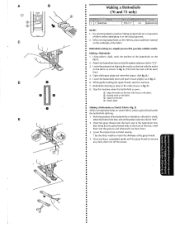
...dial to "CJ". 3. Making a Buttonhole 1. D. 8. Open the button plate and insert the button. (See fig. While gently holding the upper thread, start sewing. • * Set the stitch width to match the diameter of the foot, insert • them into the grooves and temporarily tie...on Stretch Fabrics (fig. Attach the buttonhole foot and set the pattern selection dial to "c::J". •• 2. Buttonhole stitching is completed, gently pull the gimp thread to remove any slack, then trim off the excess. A B (j) c D E Making a Buttonhole (70 and 75 only) NOTE: 1, It is ...
...dial to "CJ". 3. Making a Buttonhole 1. D. 8. Open the button plate and insert the button. (See fig. While gently holding the upper thread, start sewing. • * Set the stitch width to match the diameter of the foot, insert • them into the grooves and temporarily tie...on Stretch Fabrics (fig. Attach the buttonhole foot and set the pattern selection dial to "c::J". •• 2. Buttonhole stitching is completed, gently pull the gimp thread to remove any slack, then trim off the excess. A B (j) c D E Making a Buttonhole (70 and 75 only) NOTE: 1, It is ...
Instruction Manual
Page 67
... between the holes is 1.5 mm (1/1 611 ), set the appropriate • stitch width with the pattern selection diaL 2. Cut the upper and lower • threads and tie the two threads at the back of the fabric . • 59 lower the feed dogs by setting the drop feed lever to "1 .5" . 50 1. If it hits...
... between the holes is 1.5 mm (1/1 611 ), set the appropriate • stitch width with the pattern selection diaL 2. Cut the upper and lower • threads and tie the two threads at the back of the fabric . • 59 lower the feed dogs by setting the drop feed lever to "1 .5" . 50 1. If it hits...

Instruction Manual
Page 69
... of the material 2 em (3/4") and place the zipper un~ der the folded portion. 4. Set the stitch length between "2" and "3". 2. Loosen the tension of the upper thread (to break. 1. For the 60, 70 and 75, use the stitch width dial to the Straight Stitch. the material. 61 The zipper foot is used... to sew various types of zippers and can cause the needle to about "2"} so that the •• lower thread lies on the zipper side of the zipper •• Check for • best results. (See fig. Set the pattern selection dial to adjustthe ...
... of the material 2 em (3/4") and place the zipper un~ der the folded portion. 4. Set the stitch length between "2" and "3". 2. Loosen the tension of the upper thread (to break. 1. For the 60, 70 and 75, use the stitch width dial to the Straight Stitch. the material. 61 The zipper foot is used... to sew various types of zippers and can cause the needle to about "2"} so that the •• lower thread lies on the zipper side of the zipper •• Check for • best results. (See fig. Set the pattern selection dial to adjustthe ...

Instruction Manual
Page 76
... d'alimentation de Ia prise de courant. •• a 2. De juiste olie voor naaimachines is verkrijgbaar bij uw plaatselijke Jeverancier of oil at a fast speed without thread installed for a short time . 5. Essuyer tout excedent d'huile. •• REMARQUE: • Si Ia machine est utilie environ une heure par jour, e!!e doit Btre hui...
... d'alimentation de Ia prise de courant. •• a 2. De juiste olie voor naaimachines is verkrijgbaar bij uw plaatselijke Jeverancier of oil at a fast speed without thread installed for a short time . 5. Essuyer tout excedent d'huile. •• REMARQUE: • Si Ia machine est utilie environ une heure par jour, e!!e doit Btre hui...


