User Guide
Page 1
... to the nearest authorized BERNINA dealer or service center for its intended use as threading or changing the needle, threading the bobbin or changing the presser foot etc. 10. Keep ventilation openings of burns, fire, electric shock or injury to break. 7. Use this sewing computer only for examination, repair, electrical or mechanical adjustment. 4. Safety Instructions 1 When the sewing computer is not working properly • it has been dropped or damaged •...
... to the nearest authorized BERNINA dealer or service center for its intended use as threading or changing the needle, threading the bobbin or changing the presser foot etc. 10. Keep ventilation openings of burns, fire, electric shock or injury to break. 7. Use this sewing computer only for examination, repair, electrical or mechanical adjustment. 4. Safety Instructions 1 When the sewing computer is not working properly • it has been dropped or damaged •...
User Guide
Page 12
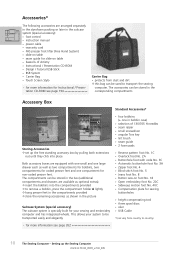
... Standard Accessories* A Storing Accessories ™ set up the Sewing Computer Accessories* The following accessories are equipped with code No. 3C • Automatic buttonhole foot No. 3A • Zipper foot No. 4 • Blind stitch foot No. 5 • Jeans foot No. 8 • Button sew-on table • Seasons of 130/705 H needles • seam ripper • small screwdriver • angular Torx key • lint brush • seam guide • 2 foam pads • Reverse pattern foot No. 1C • Overlock foot...
... Standard Accessories* A Storing Accessories ™ set up the Sewing Computer Accessories* The following accessories are equipped with code No. 3C • Automatic buttonhole foot No. 3A • Zipper foot No. 4 • Blind stitch foot No. 5 • Jeans foot No. 8 • Button sew-on table • Seasons of 130/705 H needles • seam ripper • small screwdriver • angular Torx key • lint brush • seam guide • 2 foam pads • Reverse pattern foot No. 1C • Overlock foot...

User Guide
Page 13
...;) The sewing light is switched on the foot control with the power switch. Operating Instructions 11 Setting up automatically as soon as the first stitch is sewn Attaching the Free Hand System ™ insert the free hand system into the opening in the base plate ™ you should be able to operate the FHS in your normal sitting position with your knee Note: Your dealer can adjust the position of...
...;) The sewing light is switched on the foot control with the power switch. Operating Instructions 11 Setting up automatically as soon as the first stitch is sewn Attaching the Free Hand System ™ insert the free hand system into the opening in the base plate ™ you should be able to operate the FHS in your normal sitting position with your knee Note: Your dealer can adjust the position of...

User Guide
Page 23
... machine-fed sewing Button depressed = feed dog lowered, darning position • for freehand sewing (darning, freehand embroidery, freehand quilting) • for firm fabrics; Operating Instructions 21 Changing the Presser Foot ! improves fabric feed Feed Dog Button on the left of Sewing Computer Button flush with base plate = feed dog up, sewing position • for all normal sewing Reduced Pressure • for jerseys and loose knits, quilting • prevents fabric from stretching ™ adjust pressure so that the fabric still feeds correctly Increased Pressure •...
... machine-fed sewing Button depressed = feed dog lowered, darning position • for freehand sewing (darning, freehand embroidery, freehand quilting) • for firm fabrics; Operating Instructions 21 Changing the Presser Foot ! improves fabric feed Feed Dog Button on the left of Sewing Computer Button flush with base plate = feed dog up, sewing position • for all normal sewing Reduced Pressure • for jerseys and loose knits, quilting • prevents fabric from stretching ™ adjust pressure so that the fabric still feeds correctly Increased Pressure •...

User Guide
Page 24
... Compensating Tool The feed dog can work normally when the foot is level again and remove the plates. Correct this by placing one or more compensating plates as close as required behind the needle under the foot quite slowly, even at an angle, e.g. Buttonholes, satin stitch and decorative stitches are also very short. Sew until the foot is level. Operating Instructions Important • let the fabric feed evenly! •...
... Compensating Tool The feed dog can work normally when the foot is level again and remove the plates. Correct this by placing one or more compensating plates as close as required behind the needle under the foot quite slowly, even at an angle, e.g. Buttonholes, satin stitch and decorative stitches are also very short. Sew until the foot is level. Operating Instructions Important • let the fabric feed evenly! •...

User Guide
Page 47
Practical Stitches - Applications 45 Zipper tape or firm fabric For even stitch formation use a 90 - 100 needle. Open zipper, pulling the tab below the needle; lower presser foot and continue to sew TIPS Starting to sew Hold threads firmly when starting to sew and pull the fabric gently behind the needle for all fabrics with nap or grain (e.g. Zippers Stitch: Needle: Thread: Feed dog: Presser foot: Needle position: Straight stitch No. 1 size and type suitable for the type of fabric selected cotton or polyester up to about 2" (5cm...
Practical Stitches - Applications 45 Zipper tape or firm fabric For even stitch formation use a 90 - 100 needle. Open zipper, pulling the tab below the needle; lower presser foot and continue to sew TIPS Starting to sew Hold threads firmly when starting to sew and pull the fabric gently behind the needle for all fabrics with nap or grain (e.g. Zippers Stitch: Needle: Thread: Feed dog: Presser foot: Needle position: Straight stitch No. 1 size and type suitable for the type of fabric selected cotton or polyester up to about 2" (5cm...

User Guide
Page 52
...). Zig-zag Stitch Stitch: Needle: Thread: Feed dog: Presser foot: Zig-zag stitch No. 2 size and type suitable for the fabric selected cotton or polyester up (sewing position) Reverse pattern foot No. 1C Zig-zag Stitch • suitable for appliqué, embroidery, etc. • shorten stitch length, satin stitch setting will be indicated by parallel lines on the other side ™ use the Vari-overlock stitch and foot No. 2A. TIP Embroidery with satin stitch Experiment with zig-zag stitch Satin Stitch • filled-in stitch used for all fabrics • overcasting • elastic...
...). Zig-zag Stitch Stitch: Needle: Thread: Feed dog: Presser foot: Zig-zag stitch No. 2 size and type suitable for the fabric selected cotton or polyester up (sewing position) Reverse pattern foot No. 1C Zig-zag Stitch • suitable for appliqué, embroidery, etc. • shorten stitch length, satin stitch setting will be indicated by parallel lines on the other side ™ use the Vari-overlock stitch and foot No. 2A. TIP Embroidery with satin stitch Experiment with zig-zag stitch Satin Stitch • filled-in stitch used for all fabrics • overcasting • elastic...

User Guide
Page 55
... Use a Stretch Needle (130/705 H-S) if Necessary • the needle point slides easily between the fibers Use a Fine Sewing Thread • coarse threads can damage knits and cause holes when the garment is washed When Basting, Use a Darning Thread • very lightweight (80 weight) darning thread is easier to remove once the seam is complete Sew a Test if Necessary • the elasticity of today's knit fabrics varies greatly ™ adjust basic settings...
... Use a Stretch Needle (130/705 H-S) if Necessary • the needle point slides easily between the fibers Use a Fine Sewing Thread • coarse threads can damage knits and cause holes when the garment is washed When Basting, Use a Darning Thread • very lightweight (80 weight) darning thread is easier to remove once the seam is complete Sew a Test if Necessary • the elasticity of today's knit fabrics varies greatly ™ adjust basic settings...

User Guide
Page 70
... same direction as this prevents holes and thread breakage) ™ work in irregular lengths ™ turn work by a quarter turn -180° 1 3. Manual Darning Stitch: Neddle: Thread: Feed dog: Presser foot: Straight stitch No. 1 size and type suitable for a soft finish ™ turn work by a half turn - 90° 2. Stitch Over the Hole ™ sew the first rows to cover the hole (not too close for the fabric selected lightweight darning thread down (darning position) Darning foot No. 9 (optional accessory) Manual Darning • darning holes or...
... same direction as this prevents holes and thread breakage) ™ work in irregular lengths ™ turn work by a quarter turn -180° 1 3. Manual Darning Stitch: Neddle: Thread: Feed dog: Presser foot: Straight stitch No. 1 size and type suitable for a soft finish ™ turn work by a half turn - 90° 2. Stitch Over the Hole ™ sew the first rows to cover the hole (not too close for the fabric selected lightweight darning thread down (darning position) Darning foot No. 9 (optional accessory) Manual Darning • darning holes or...
User Guide
Page 72
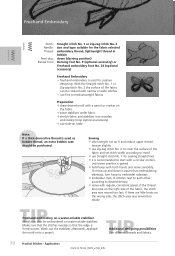
Freehand Embroidery Stitch: Needle: Thread: Feed dog: Presser foot: Straight stitch No. 1 or Zig-zag stitch No. 2 size and type suitable for the fabric selected embroidery thread, lightweight thread in bobbin down is gained ™ hold hoop with both hands and move smoothly. Make sure that the stitches overlap so that the edge is used as bobbin thread, an extra bobbin case should be covered with narrow or wide stitches • use fine to mediumweight fabrics Preparation ™ draw desired motif with a pencil...
Freehand Embroidery Stitch: Needle: Thread: Feed dog: Presser foot: Straight stitch No. 1 or Zig-zag stitch No. 2 size and type suitable for the fabric selected embroidery thread, lightweight thread in bobbin down is gained ™ hold hoop with both hands and move smoothly. Make sure that the stitches overlap so that the edge is used as bobbin thread, an extra bobbin case should be covered with narrow or wide stitches • use fine to mediumweight fabrics Preparation ™ draw desired motif with a pencil...

User Guide
Page 96
... 16 Directional Sewing Stitch: Needle: Thread: Feed dog: Presser foot: Straight stitch No. 39 / Zig-zag stitch No. 40 size and type suitable for the fabric selected cotton or decorative up (sewing position) Sideways motion foot No. 40C 16 Directional Sewing • sew automatically in 16 directions without turning fabric • for many decorative projects • for quilting without turning the fabric Screen Display ™ select «16 Directional Sewing» screen display ™ touch straight stitch or zig-zag ™ a presser foot symbol with the 16 sewing directions...
... 16 Directional Sewing Stitch: Needle: Thread: Feed dog: Presser foot: Straight stitch No. 39 / Zig-zag stitch No. 40 size and type suitable for the fabric selected cotton or decorative up (sewing position) Sideways motion foot No. 40C 16 Directional Sewing • sew automatically in 16 directions without turning fabric • for many decorative projects • for quilting without turning the fabric Screen Display ™ select «16 Directional Sewing» screen display ™ touch straight stitch or zig-zag ™ a presser foot symbol with the 16 sewing directions...

User Guide
Page 98
... ™ sew one step at a time • stitch length can only be altered for forward and reverse stitching Preparation ™ place square on fabric, pin and baste if required ™ first place double-sided fusible stabilizer under square, then press onto fabric • for the fabric selected cotton or decorative up (sewing position) Sideways motion foot No. 40C 4 Sewing directions • 4 directional automatic sewing without turning fabric • sewing decorative squares • appliqué...
... ™ sew one step at a time • stitch length can only be altered for forward and reverse stitching Preparation ™ place square on fabric, pin and baste if required ™ first place double-sided fusible stabilizer under square, then press onto fabric • for the fabric selected cotton or decorative up (sewing position) Sideways motion foot No. 40C 4 Sewing directions • 4 directional automatic sewing without turning fabric • sewing decorative squares • appliqué...

User Guide
Page 125
... Stitch Counter Buttonholes for All Buttonhole Types Stitch: Needle: Thread: Feed dog: Presser foot: Buttonholes (all types) size and type suitable for the fabric selected cotton or polyester up (sewing position) Buttonhole foot No. 3C or Automatic buttonhole foot No. 3A Stitch Counter Buttonholes ™ select buttonhole ™ touch the Stitch Counter function, the sewing computer recognizes the Stitch Counter buttonhole program • the length of First Bead ™ sew the first bead the desired length ™ stop the sewing computer ™ press Quick Reverse button...
... Stitch Counter Buttonholes for All Buttonhole Types Stitch: Needle: Thread: Feed dog: Presser foot: Buttonholes (all types) size and type suitable for the fabric selected cotton or polyester up (sewing position) Buttonhole foot No. 3C or Automatic buttonhole foot No. 3A Stitch Counter Buttonholes ™ select buttonhole ™ touch the Stitch Counter function, the sewing computer recognizes the Stitch Counter buttonhole program • the length of First Bead ™ sew the first bead the desired length ™ stop the sewing computer ™ press Quick Reverse button...

User Guide
Page 151
... (BERNINA Stitch Regulator) optional Stitch: Needle: Thread: Feed dog: Presser foot: Straight stich No. 1 or Zig-zag stitch No. 2 size and type suitable for free-motion quilting fabric under the foot and the fabric is turned off after approx. 7 seconds For an even sewing and the red light goes off on The zig-zag stitch can be pressed sing an additional button • touch the button «BSR1» to enga- interchangeable soles (closed, open, transparent) BSR (BERNINA Stitch BSR Function With Straight Stitch...
... (BERNINA Stitch Regulator) optional Stitch: Needle: Thread: Feed dog: Presser foot: Straight stich No. 1 or Zig-zag stitch No. 2 size and type suitable for free-motion quilting fabric under the foot and the fabric is turned off after approx. 7 seconds For an even sewing and the red light goes off on The zig-zag stitch can be pressed sing an additional button • touch the button «BSR1» to enga- interchangeable soles (closed, open, transparent) BSR (BERNINA Stitch BSR Function With Straight Stitch...

User Guide
Page 152
... sewing computer stops with needle down " func- Applications After the sequence is sewn the set the desired stitch length • when sewing small forms and stippling, stitch length of the BSR foot is moved under the presser foot, lower presser foot • hold upper and lower thread tight and press Quick Reverse button to start BSR mode • sew 5 to 6 securing stitches • stop the BSR mode by pressing the Quick Reverse button • cut threads Free Hand Quilting...
... sewing computer stops with needle down " func- Applications After the sequence is sewn the set the desired stitch length • when sewing small forms and stippling, stitch length of the BSR foot is moved under the presser foot, lower presser foot • hold upper and lower thread tight and press Quick Reverse button to start BSR mode • sew 5 to 6 securing stitches • stop the BSR mode by pressing the Quick Reverse button • cut threads Free Hand Quilting...
User Guide
Page 180
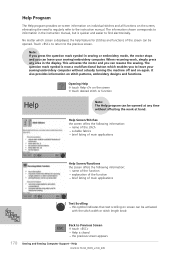
... need to regularly refer to the previous screen. It also provides information on again. No matter which enables you to information in sewing or embroidery mode, the motor stops and you can resume the sewing. Note: If you can leave your sewing/embroidery computer without affecting the work , simply press any time without actually turning the machine off and on stitch patterns, embroidery designs...
... need to regularly refer to the previous screen. It also provides information on again. No matter which enables you to information in sewing or embroidery mode, the motor stops and you can resume the sewing. Note: If you can leave your sewing/embroidery computer without affecting the work , simply press any time without actually turning the machine off and on stitch patterns, embroidery designs...
User Guide
Page 188
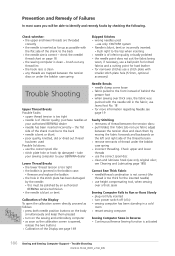
... 18 • the sewing computer is clean - purchase needles at your BERNINA dealer Lower Thread Breaks • the lower thread tension is too tight • the bobbin is jammed in the bobbin case: • Remove and replace the bobbin • the hole in the stitch plate has been damaged by the needle: • this must be to the front instead of behind the presser foot • when sewing over a thick seam Sewing Computer Fails to...
... 18 • the sewing computer is clean - purchase needles at your BERNINA dealer Lower Thread Breaks • the lower thread tension is too tight • the bobbin is jammed in the bobbin case: • Remove and replace the bobbin • the hole in the stitch plate has been damaged by the needle: • this must be to the front instead of behind the presser foot • when sewing over a thick seam Sewing Computer Fails to...

User Guide
Page 190
... to sewing position. Lower presser foot. • Needle will penetrate stitch plate or presser foot. Messages In special cases messages may appear on the screen. • Please lower presser foot. Check the settings in the Setup Program and try again. Messages Notes • Security Program active. Turn sewing/embroidery computer off and on again. • The BERNINA Modem cannot be selected in another stitch number. • Combi Mode does not support this pattern...
... to sewing position. Lower presser foot. • Needle will penetrate stitch plate or presser foot. Messages In special cases messages may appear on the screen. • Please lower presser foot. Check the settings in the Setup Program and try again. Messages Notes • Security Program active. Turn sewing/embroidery computer off and on again. • The BERNINA Modem cannot be selected in another stitch number. • Combi Mode does not support this pattern...
User Guide
Page 283
... Needle Position 24 Altering Stitch Length 23 Altering Stitch Width 23 Attaching the Embroidery Hoop 204 Attaching the Embroidery Module 199 B Balance • Buttonholes 113 • Practical and Decorative Stitches 183 • Sideways Motion Stitches 184 Bartack Program 71 Basting Stitch 49 Blind Hem 52 Bobbin case: removing/inserting 13 Bringing up the Lower Thread 15 Buttonholes 109-133 • Automatic Buttonhole Standard and Stretch 119-120 • Automatic Buttonhole with Direct Entry Length 116 • Automatic Buttonhole with Button Measuring on Screen 117 • Automatic...
... Needle Position 24 Altering Stitch Length 23 Altering Stitch Width 23 Attaching the Embroidery Hoop 204 Attaching the Embroidery Module 199 B Balance • Buttonholes 113 • Practical and Decorative Stitches 183 • Sideways Motion Stitches 184 Bartack Program 71 Basting Stitch 49 Blind Hem 52 Bobbin case: removing/inserting 13 Bringing up the Lower Thread 15 Buttonholes 109-133 • Automatic Buttonhole Standard and Stretch 119-120 • Automatic Buttonhole with Direct Entry Length 116 • Automatic Buttonhole with Button Measuring on Screen 117 • Automatic...
User Guide
Page 285
... Stretch/Stretch Seam 56 T Temporary Altered Stitch Memory 24, 39 Thread Breakage 254 Thread Cutter • Automatic Thread Cutter 28, 213 • on Bobbin Winder 13 • on Head Frame 15 Thread Tension 34 Thread, Needle, Fabric 17 Threading the Bobbin Thread 201 Threading the Upper Thread 14, 201 • Double Needle, Triple Needle 16 Triple Straight Stitch 48 Trouble Shooting 186, 255 Tutorial 179-180 Tutorial USB Stick 193 V Vari-Overlock Seam 55 Visible Hem With Jersey Stitch 58 Visible Hem With Triple Zig-zag 51 W Winding the Bobbin 13 Z Zig-zag Stitch...
... Stretch/Stretch Seam 56 T Temporary Altered Stitch Memory 24, 39 Thread Breakage 254 Thread Cutter • Automatic Thread Cutter 28, 213 • on Bobbin Winder 13 • on Head Frame 15 Thread Tension 34 Thread, Needle, Fabric 17 Threading the Bobbin Thread 201 Threading the Upper Thread 14, 201 • Double Needle, Triple Needle 16 Triple Straight Stitch 48 Trouble Shooting 186, 255 Tutorial 179-180 Tutorial USB Stick 193 V Vari-Overlock Seam 55 Visible Hem With Jersey Stitch 58 Visible Hem With Triple Zig-zag 51 W Winding the Bobbin 13 Z Zig-zag Stitch...


