
Manual
Page 3
... HEM STITCH 23. THREE STEP ZIG-ZAG UPPER THREADING 10. DARNING 20. OVERSEWING EDGES 22. STRAIGHT STRETCH STITCH NEEDLE (Not for Modal 3201 13. COLOUR CODING 25. SELECTION AND FITTING OF 24. FOOT PRESSURE DROP FEED CONTROL TWO-STEP PRESSER FOOT LIFTER 12. THREAD TENSION 11. WINDING BOBBIN 8. SEWING IN ZIPS 21. ACCESSORIES 5. SAFETY REGULATIONS 7. STRETCH OVERLOCK AND OVERLOCK {Not lot Models 3201 26. STRAIGHT STITCHING REVERSE STITCHING REMOVING FABRIC THREAD CUTTER 17. CONTENTS PART NAMES 4. INSERTING BOBBIN AND BOBBIN CASE. CONTENTS INSTRUCTION BOOK MODELS...
... HEM STITCH 23. THREE STEP ZIG-ZAG UPPER THREADING 10. DARNING 20. OVERSEWING EDGES 22. STRAIGHT STRETCH STITCH NEEDLE (Not for Modal 3201 13. COLOUR CODING 25. SELECTION AND FITTING OF 24. FOOT PRESSURE DROP FEED CONTROL TWO-STEP PRESSER FOOT LIFTER 12. THREAD TENSION 11. WINDING BOBBIN 8. SEWING IN ZIPS 21. ACCESSORIES 5. SAFETY REGULATIONS 7. STRETCH OVERLOCK AND OVERLOCK {Not lot Models 3201 26. STRAIGHT STITCHING REVERSE STITCHING REMOVING FABRIC THREAD CUTTER 17. CONTENTS PART NAMES 4. INSERTING BOBBIN AND BOBBIN CASE. CONTENTS INSTRUCTION BOOK MODELS...

Manual
Page 4
PART NAMES 1 Fete plate 2 Tension dial 3 Throodtoko.up lover Thread regulator 5 Twooep presser fool lifter 6 Needle clomp screw 7 Presser bar thread cutter B Needle plate 4 Hook covet 10 Reverse stitching button 11 Stitch length dial 12 Ponern selector dial 13 Carrying handle 14 Spool holder pins 15 Hoed wheel 16 Bobbin winder cover 17 Bobbin winder 18 Socket 19 Bobbin winder thread guide 20 Accessory box 71 Bobbin winder thread cutter 22 Presser loot pressure control Iinside lace plate) 23 Drop feed control ;inside hook cover) 24 Power switch 25 Hot -bed extension table and accessory box
PART NAMES 1 Fete plate 2 Tension dial 3 Throodtoko.up lover Thread regulator 5 Twooep presser fool lifter 6 Needle clomp screw 7 Presser bar thread cutter B Needle plate 4 Hook covet 10 Reverse stitching button 11 Stitch length dial 12 Ponern selector dial 13 Carrying handle 14 Spool holder pins 15 Hoed wheel 16 Bobbin winder cover 17 Bobbin winder 18 Socket 19 Bobbin winder thread guide 20 Accessory box 71 Bobbin winder thread cutter 22 Presser loot pressure control Iinside lace plate) 23 Drop feed control ;inside hook cover) 24 Power switch 25 Hot -bed extension table and accessory box
Manual
Page 5
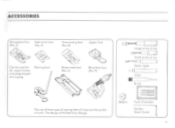
ACCESSORIES All purpose foal, Sohn stitch fool (No. 3) No. 4} OverC0SImg fool (No el Zipper fool Can be used lot all usual >filches including straight and oafag Darning loot Button hole fool (No.5) Blind hem foot (No 91 The use of these speciol sewing feel will improve roe quality al stitch The design of the feet may change Large screwdriver Small screw dove, Seam ripper C-11 Oiler I D Bobbin Brush I tL_.a=1 Pack of needle,. ()wilier/ Seem Guide
ACCESSORIES All purpose foal, Sohn stitch fool (No. 3) No. 4} OverC0SImg fool (No el Zipper fool Can be used lot all usual >filches including straight and oafag Darning loot Button hole fool (No.5) Blind hem foot (No 91 The use of these speciol sewing feel will improve roe quality al stitch The design of the feet may change Large screwdriver Small screw dove, Seam ripper C-11 Oiler I D Bobbin Brush I tL_.a=1 Pack of needle,. ()wilier/ Seem Guide
Manual
Page 6
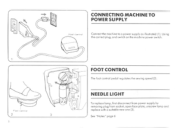
FOOT Using the correct plug, and switch on the machine power switch. CONNECTING MACHINE TO POWER SUPPLY Feel control Connect the machine too power supply as illustroted (1).
FOOT Using the correct plug, and switch on the machine power switch. CONNECTING MACHINE TO POWER SUPPLY Feel control Connect the machine too power supply as illustroted (1).

Manual
Page 7
... plug, proceed as changing the needle or threading the machine and all manipulations with the ma• chine switched off (main switch set must bodisconnedeclfrom thepowor supply by removing the plug from the supply by pulling out the mains plug. When servicing the sewing machine, or when removing covers or changing lamps, the machine or the electrical set to the foot control unil,may not correspond...
... plug, proceed as changing the needle or threading the machine and all manipulations with the ma• chine switched off (main switch set must bodisconnedeclfrom thepowor supply by removing the plug from the supply by pulling out the mains plug. When servicing the sewing machine, or when removing covers or changing lamps, the machine or the electrical set to the foot control unil,may not correspond...
Manual
Page 8
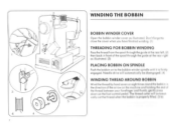
... cover when you hove finished winding. (1) THREADING FOR BOBBIN WINDING Dossthe thread from the spool through the guideat therearleft (21 then bock in the direction of the arrow on the machine end holding the end of the rear right os illustrated (3) PLACING BOBBIN ON SPINDLE Push the bobbin on the foot control podol. ically co the thread when the bobbin is firmly engaged.Needle&ire will automat...
... cover when you hove finished winding. (1) THREADING FOR BOBBIN WINDING Dossthe thread from the spool through the guideat therearleft (21 then bock in the direction of the arrow on the machine end holding the end of the rear right os illustrated (3) PLACING BOBBIN ON SPINDLE Push the bobbin on the foot control podol. ically co the thread when the bobbin is firmly engaged.Needle&ire will automat...

Manual
Page 9
... bobbin into case os decoded. (2) Molding the hinged latch (3) insert bobbin and case into the hook making sure the tinge' "A" is located inside the section 14) Leave about 10cm (4")ofthreadfrom the bobbin case andalways ensure that the needle's raised to adjust the top thread tension when some altetation is desired. IIis usually only necessary to its highest position when removing or inserting the bobbin. BOBBIN THREAD TENSION Measure the bobbin threod tension...
... bobbin into case os decoded. (2) Molding the hinged latch (3) insert bobbin and case into the hook making sure the tinge' "A" is located inside the section 14) Leave about 10cm (4")ofthreadfrom the bobbin case andalways ensure that the needle's raised to adjust the top thread tension when some altetation is desired. IIis usually only necessary to its highest position when removing or inserting the bobbin. BOBBIN THREAD TENSION Measure the bobbin threod tension...

Manual
Page 11
THREAD TENSION To increase the top tension turn dial to o higher number, to decreosethe tension turn too lower number. the tension is 4. or t. t A Normal thread tension is achieved when the upper and lower threods ore equally set (cross rn the middle of the fabric) on top of the fabric IA). Thenormol setting is too loose or too tight. If too much of the upper thread shows underneath the fabric (8) or too much of the lower *treed shows on both sides of the fabric (CI.
THREAD TENSION To increase the top tension turn dial to o higher number, to decreosethe tension turn too lower number. the tension is 4. or t. t A Normal thread tension is achieved when the upper and lower threods ore equally set (cross rn the middle of the fabric) on top of the fabric IA). Thenormol setting is too loose or too tight. If too much of the upper thread shows underneath the fabric (8) or too much of the lower *treed shows on both sides of the fabric (CI.

Manual
Page 12
... the presser lever o second stage. (2) DROP FEED CONTROL For normal sewing the feed dogs should be lowered. When the fabric is not required to be in the raised position (31 Push -- For very thick fabric such os denim and leather. Set the dial at 4 for heavier fabrics. o for free hand embroidery or darning etc., the feeddog should be fed through the mochine. Push 13( * Oft8B 3 1/.4 11 HOW TO ADJUST FOOT PRESSURE...
... the presser lever o second stage. (2) DROP FEED CONTROL For normal sewing the feed dogs should be lowered. When the fabric is not required to be in the raised position (31 Push -- For very thick fabric such os denim and leather. Set the dial at 4 for heavier fabrics. o for free hand embroidery or darning etc., the feeddog should be fed through the mochine. Push 13( * Oft8B 3 1/.4 11 HOW TO ADJUST FOOT PRESSURE...
Manual
Page 13
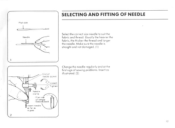
Usually the heavier the fabric, the thicker the thread and lorger the needle Make sure the needle is straight and not damaged. Si to suit the fabric and thread. II) Env of ^mole !Achy Chonge the needle regularly and at the first sign of sowing problems. Insert os illustrolod. 141 Loon /VI IP Ten '.2 Neta.t Oaf^P Flaf irde of well, kraorch boa law% natl. SELECTING AND FITTING OF NEEDLE Select the correct size needle to 9001 IP Fist ..0* -roosts.
Usually the heavier the fabric, the thicker the thread and lorger the needle Make sure the needle is straight and not damaged. Si to suit the fabric and thread. II) Env of ^mole !Achy Chonge the needle regularly and at the first sign of sowing problems. Insert os illustrolod. 141 Loon /VI IP Ten '.2 Neta.t Oaf^P Flaf irde of well, kraorch boa law% natl. SELECTING AND FITTING OF NEEDLE Select the correct size needle to 9001 IP Fist ..0* -roosts.
Manual
Page 16
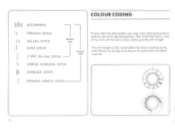
Then match the colour code of the stitch with the some colour mocking on the dials Choose the settings accoriSng to the desired position. COLOUR CODING Ann BUTTONHOLE 0 STRAIGHT STITCH 1.5 ZIG-ZAG STITCH Model 320 BLIND STITCH 3 STEP ZIGZAG STITCH Model 330 STRETCH OVERLOCK STITCH OVERLOCK STITCH Simply select the stitch pollens yourequire by rotating the pattern selector dial to the application and effect required. I** STRAIGHT STRETCH STITCH Is The stitch length con be varied within the c *low mocking, on the stitch length.
Then match the colour code of the stitch with the some colour mocking on the dials Choose the settings accoriSng to the desired position. COLOUR CODING Ann BUTTONHOLE 0 STRAIGHT STITCH 1.5 ZIG-ZAG STITCH Model 320 BLIND STITCH 3 STEP ZIGZAG STITCH Model 330 STRETCH OVERLOCK STITCH OVERLOCK STITCH Simply select the stitch pollens yourequire by rotating the pattern selector dial to the application and effect required. I** STRAIGHT STRETCH STITCH Is The stitch length con be varied within the c *low mocking, on the stitch length.
Manual
Page 17
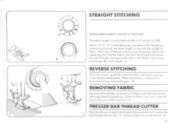
... the foot to the rear of sewing. PRESSER BAR THREAD CUTTER 3 er Hold the thread in both hand; the finer the thread and shade, the stitch length, the !scouter the fabric, the thicker the 'hoped -r and longer the stitch length. (I) REVERSE STITCHING To finish a scam, push the reverse button and hold it, sewing a few stitches bockwords When the button is contioiled with the stitch length dial (B) "r while ' 7" or on the dial gives a sum:able stitch length...
... the foot to the rear of sewing. PRESSER BAR THREAD CUTTER 3 er Hold the thread in both hand; the finer the thread and shade, the stitch length, the !scouter the fabric, the thicker the 'hoped -r and longer the stitch length. (I) REVERSE STITCHING To finish a scam, push the reverse button and hold it, sewing a few stitches bockwords When the button is contioiled with the stitch length dial (B) "r while ' 7" or on the dial gives a sum:able stitch length...
Manual
Page 19
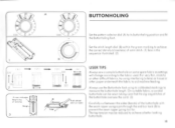
... stitches of the buttonhole oversew the cord (3) Carefully cut between the sides (becidst of satin ditch. (I Afton .nehiCab" f tyr ei 'mesas MNJ LeM 3 -14 -°\ 11A` 330 3 / BUTTONHOLING Set the pattern selector dial IA) to its calibrated markings to TeOftle 0 the buttonhole length. Always use the Buttonhole fool using its buttonholing positron and fit the Buttonholing loot. A y 310 1 I I ) Sew in the seouence illustrated (21 USER TIPS Always sew o sample buttonhole...
... stitches of the buttonhole oversew the cord (3) Carefully cut between the sides (becidst of satin ditch. (I Afton .nehiCab" f tyr ei 'mesas MNJ LeM 3 -14 -°\ 11A` 330 3 / BUTTONHOLING Set the pattern selector dial IA) to its calibrated markings to TeOftle 0 the buttonhole length. Always use the Buttonhole fool using its buttonholing positron and fit the Buttonholing loot. A y 310 1 I I ) Sew in the seouence illustrated (21 USER TIPS Always sew o sample buttonhole...
Manual
Page 20
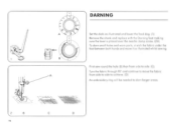
Turn the fabric through 90' ond continue to move ',OS ollustroied whilst sewi ng First sew round the hole (8) then from side to side to achieve. (DI An embroidery ring w,lt be needed to side (Cl. p = 1 2 8 19 DARNING Set the (loots os illustrated and lower the feed dog Remove the shank and reploce w,th the Doming fool making sure the lever IS placed over the needle clomp screw. (2A} To darn small holes ond worn ports, st.etch the fobnc under rho foot between both bonds and move the fabric from side to dorm larger areas.
Turn the fabric through 90' ond continue to move ',OS ollustroied whilst sewi ng First sew round the hole (8) then from side to side to achieve. (DI An embroidery ring w,lt be needed to side (Cl. p = 1 2 8 19 DARNING Set the (loots os illustrated and lower the feed dog Remove the shank and reploce w,th the Doming fool making sure the lever IS placed over the needle clomp screw. (2A} To darn small holes ond worn ports, st.etch the fobnc under rho foot between both bonds and move the fabric from side to dorm larger areas.

Manual
Page 22
OVERSEWING EDGES AA Oversewing edges prevents the fabric from fraying and creates r14 a neat edge Set the machine as illustrated selecting a 'unable stitch width and length. ill When sewing, the needle should just pass over the edge of the labac. 12) I On fabrics that ate opt to pucker, use the P4r. 8 overcasting loot Note: The 3 step zig-log stitch con also be used, but use the All Purpose foot not Ilse Hr. Woof.
OVERSEWING EDGES AA Oversewing edges prevents the fabric from fraying and creates r14 a neat edge Set the machine as illustrated selecting a 'unable stitch width and length. ill When sewing, the needle should just pass over the edge of the labac. 12) I On fabrics that ate opt to pucker, use the P4r. 8 overcasting loot Note: The 3 step zig-log stitch con also be used, but use the All Purpose foot not Ilse Hr. Woof.
Manual
Page 23
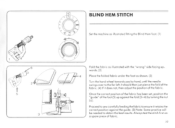
... set, position the "guide'of the foot (S) upagainst the fold (3.4)by hand, until the needle swingsover to the for left. BLIND HEM STITCH Set the machine os illustrated fitting the Blind Horn foot, Fold the fabric os illustrated with the - I31 Turn the hand wheel towards you by turning the nut 161 Proceed tosewcarefully feeding the fabric toensure it does not, then adjust the position of the fabric...
... set, position the "guide'of the foot (S) upagainst the fold (3.4)by hand, until the needle swingsover to the for left. BLIND HEM STITCH Set the machine os illustrated fitting the Blind Horn foot, Fold the fabric os illustrated with the - I31 Turn the hand wheel towards you by turning the nut 161 Proceed tosewcarefully feeding the fabric toensure it does not, then adjust the position of the fabric...
Manual
Page 24
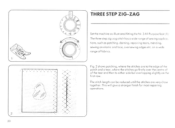
repairing tears, mending. Fig. 2 shows patching, where the shiches are to the edge of rho porch and o tear, where the stitches go firstly over the centre: of of the teat and then to either side but overtopping slightly on a ...oversewing edges etc. such as illustrated fitting the Na 3 All Purpose foot ' I mc0. sewing on elastic and lace. THREE STEP ZIG-ZAG Set the machine as patching. The stitch length con be reduced until the stitches ore very close together This will give a stronger finish For most repairing operations The ihr ee slepligizag stitch hose wide range of fabrics.
repairing tears, mending. Fig. 2 shows patching, where the shiches are to the edge of rho porch and o tear, where the stitches go firstly over the centre: of of the teat and then to either side but overtopping slightly on a ...oversewing edges etc. such as illustrated fitting the Na 3 All Purpose foot ' I mc0. sewing on elastic and lace. THREE STEP ZIG-ZAG Set the machine as patching. The stitch length con be reduced until the stitches ore very close together This will give a stronger finish For most repairing operations The ihr ee slepligizag stitch hose wide range of fabrics.

Manual
Page 25
Use it for stretch fabricsmixt for areas of "stress" where a strong stitch is required (2A) 24 STRAIGHT STRETCH STITCH (Not ler Model 320) Set the machine as illustroted fitting the All Purpose foot. (I) 1he straight stretch sews two stitches forward and one stitch back words. thereby giving "triple" strength.
Use it for stretch fabricsmixt for areas of "stress" where a strong stitch is required (2A) 24 STRAIGHT STRETCH STITCH (Not ler Model 320) Set the machine as illustroted fitting the All Purpose foot. (I) 1he straight stretch sews two stitches forward and one stitch back words. thereby giving "triple" strength.
Manual
Page 26
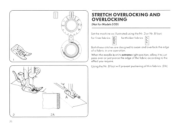
Ec; STRETCH OVERLOCKING AND OVERLOCKING fry (Not for thicker fabrics Both these stitches a e designed to she effect you require. allow d to just pass over or just pierce the edge of the fabric according to seam and Overlock the edge of a labia in one operation. Using the Nr, 8 foot will prevent puckering of its ernenie right position. When the needle is of thin fabrics. (2Ai sv. 2 2A 2b I for finer fabrics 11 for Models 320) Set the machine as illust Toted using the Nr. 3 or Ni. 8 foot. /".
Ec; STRETCH OVERLOCKING AND OVERLOCKING fry (Not for thicker fabrics Both these stitches a e designed to she effect you require. allow d to just pass over or just pierce the edge of the fabric according to seam and Overlock the edge of a labia in one operation. Using the Nr, 8 foot will prevent puckering of its ernenie right position. When the needle is of thin fabrics. (2Ai sv. 2 2A 2b I for finer fabrics 11 for Models 320) Set the machine as illust Toted using the Nr. 3 or Ni. 8 foot. /".
Manual
Page 27
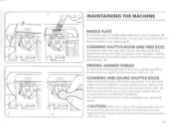
... (pub. (3) CLEANING AND OILING SHUTTLE HOOK Cleon and oil the hook in use 26 CMG rn ➢0C 9 cnoueo.l a 4 MAINTAINING THE MACHINE NEEDLE PLATE To remove snap-on needle plate open hook cover and prise off From thebottom-fromleft corner - Your mochiee should be serviced regularly by your specialist dealer. (CAUTION) when servicing or changing mechanical ports or accessories, the machine must be disconnected from around the feed dog. Remove the bobbin case and clean every pod...
... (pub. (3) CLEANING AND OILING SHUTTLE HOOK Cleon and oil the hook in use 26 CMG rn ➢0C 9 cnoueo.l a 4 MAINTAINING THE MACHINE NEEDLE PLATE To remove snap-on needle plate open hook cover and prise off From thebottom-fromleft corner - Your mochiee should be serviced regularly by your specialist dealer. (CAUTION) when servicing or changing mechanical ports or accessories, the machine must be disconnected from around the feed dog. Remove the bobbin case and clean every pod...


