

Manual
Page 3
...25. DARNING 20. SEWING IN ZIPS 21. BLIND HEM STITCH 23. SAFETY REGULATIONS 7. STRETCH OVERLOCK AND OVERLOCK {Not lot Models 3201 26. UPPER THREADING 10. STRAIGHT STRETCH STITCH NEEDLE (Not for Modal 3201 13. WINDING BOBBIN 8. FOOT PRESSURE DROP FEED CONTROL TWO-STEP PRESSER FOOT LIFTER 12. CONTENTS...LIGHT 6. MAINTAINING THE MACHINE-NEEDLE PLATE 27. ZIG-ZAG STITCHING It BUTTONHOLING 19. THREE STEP ZIG-ZAG CONTENTS INSTRUCTION BOOK MODELS 320.330 Page Title 1. INTRODUCTION 2. BOBBIN THREAD TENSION. 9. SELECTION AND FITTING OF 24. BRINGING UP BOBBIN...
...25. DARNING 20. SEWING IN ZIPS 21. BLIND HEM STITCH 23. SAFETY REGULATIONS 7. STRETCH OVERLOCK AND OVERLOCK {Not lot Models 3201 26. UPPER THREADING 10. STRAIGHT STRETCH STITCH NEEDLE (Not for Modal 3201 13. WINDING BOBBIN 8. FOOT PRESSURE DROP FEED CONTROL TWO-STEP PRESSER FOOT LIFTER 12. CONTENTS...LIGHT 6. MAINTAINING THE MACHINE-NEEDLE PLATE 27. ZIG-ZAG STITCHING It BUTTONHOLING 19. THREE STEP ZIG-ZAG CONTENTS INSTRUCTION BOOK MODELS 320.330 Page Title 1. INTRODUCTION 2. BOBBIN THREAD TENSION. 9. SELECTION AND FITTING OF 24. BRINGING UP BOBBIN...

Manual
Page 4
PART NAMES 1 Fete plate 2 Tension dial 3 Throodtoko.up lover Thread regulator 5 Twooep presser fool lifter 6 Needle clomp screw 7 Presser bar thread cutter B Needle plate 4 Hook covet 10 Reverse stitching button 11 Stitch length dial 12 Ponern selector dial 13 Carrying handle 14 Spool holder pins 15 Hoed wheel 16 Bobbin winder cover 17 Bobbin winder 18 Socket 19 Bobbin winder thread guide 20 Accessory box 71 Bobbin winder thread cutter 22 Presser loot pressure control Iinside lace plate) 23 Drop feed control ;inside hook cover) 24 Power switch 25 Hot -bed extension table and accessory box
PART NAMES 1 Fete plate 2 Tension dial 3 Throodtoko.up lover Thread regulator 5 Twooep presser fool lifter 6 Needle clomp screw 7 Presser bar thread cutter B Needle plate 4 Hook covet 10 Reverse stitching button 11 Stitch length dial 12 Ponern selector dial 13 Carrying handle 14 Spool holder pins 15 Hoed wheel 16 Bobbin winder cover 17 Bobbin winder 18 Socket 19 Bobbin winder thread guide 20 Accessory box 71 Bobbin winder thread cutter 22 Presser loot pressure control Iinside lace plate) 23 Drop feed control ;inside hook cover) 24 Power switch 25 Hot -bed extension table and accessory box

Manual
Page 7
... to fingers). Monipu. When cleaning or lubricating the machine or chonging the lamp and during interruptions in your plug, proceed as changing the needle or threading the machine and all manipulations with open covers, must only be performed with the coloured mork wogs identifying the terminals in sewing or offer completion...
... to fingers). Monipu. When cleaning or lubricating the machine or chonging the lamp and during interruptions in your plug, proceed as changing the needle or threading the machine and all manipulations with open covers, must only be performed with the coloured mork wogs identifying the terminals in sewing or offer completion...
Manual
Page 8
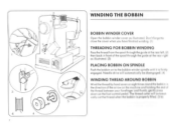
... hand sevenor eight timesround the bobbin in front of the spool through the guide of the thread between your forefinger and thumb, gently press down on to the bobbin winder spindle until it is properly filled. (5/6) 0 O WINDING THE BOBBIN BOBBIN WINDER COVER ...Open the bobbin winder covet as illustrated. Don't forget lo close the cover when you hove finished winding. (1) THREADING FOR BOBBIN WINDING Dossthe thread from the spool through the guideat therearleft (21 then bock in the direction of the arrow on the machine end holding the end...
... hand sevenor eight timesround the bobbin in front of the spool through the guide of the thread between your forefinger and thumb, gently press down on to the bobbin winder spindle until it is properly filled. (5/6) 0 O WINDING THE BOBBIN BOBBIN WINDER COVER ...Open the bobbin winder covet as illustrated. Don't forget lo close the cover when you hove finished winding. (1) THREADING FOR BOBBIN WINDING Dossthe thread from the spool through the guideat therearleft (21 then bock in the direction of the arrow on the machine end holding the end...

Manual
Page 9
...is desired. Correct tension is tooTight, if it slips down too freely. See pages 9/10. IIis usually only necessary to adjust the top thread tension when some altetation is located inside the section 14) Leave about 10cm (4")ofthreadfrom the bobbin case andalways ensure that the needle's raised to... the ground or moves down a few Inches looprox. 10 cm). 15) Note:Itisnotnormally necessary toadjust bobbin thread tension. 2 %CC:le t t, r II 8 () INSERTING BOBBIN AND CASE INTO MACHINE INSERTING BOBBIN INTO CASE Open hook cover as case by ...
...is desired. Correct tension is tooTight, if it slips down too freely. See pages 9/10. IIis usually only necessary to adjust the top thread tension when some altetation is located inside the section 14) Leave about 10cm (4")ofthreadfrom the bobbin case andalways ensure that the needle's raised to... the ground or moves down a few Inches looprox. 10 cm). 15) Note:Itisnotnormally necessary toadjust bobbin thread tension. 2 %CC:le t t, r II 8 () INSERTING BOBBIN AND CASE INTO MACHINE INSERTING BOBBIN INTO CASE Open hook cover as case by ...

Manual
Page 10
2 4 6 UPPER THREADING Follow the numbered sequence exactly Pass thethread through the guide(I) down inbetween the tension discs 12) under and into the thread tegulaior hom right to left up and through the lake-up lever hom right to left (4) and down through the guides (5. 6) and through the eye of the needle from front so bock
2 4 6 UPPER THREADING Follow the numbered sequence exactly Pass thethread through the guide(I) down inbetween the tension discs 12) under and into the thread tegulaior hom right to left up and through the lake-up lever hom right to left (4) and down through the guides (5. 6) and through the eye of the needle from front so bock

Manual
Page 11
or t. THREAD TENSION To increase the top tension turn dial to o higher number, to decreosethe tension turn too lower number. Thenormol setting is too loose or too tight. Normal thread tension is achieved when the upper and lower threods ore equally set (cross rn the middle of the fabric) on top of the fabric IA). the tension is 4. If too much of the upper thread shows underneath the fabric (8) or too much of the lower *treed shows on both sides of the fabric (CI. t A
or t. THREAD TENSION To increase the top tension turn dial to o higher number, to decreosethe tension turn too lower number. Thenormol setting is too loose or too tight. Normal thread tension is achieved when the upper and lower threods ore equally set (cross rn the middle of the fabric) on top of the fabric IA). the tension is 4. If too much of the upper thread shows underneath the fabric (8) or too much of the lower *treed shows on both sides of the fabric (CI. t A
Manual
Page 13
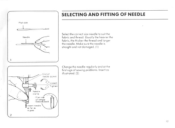
II) Env of ^mole !Achy Chonge the needle regularly and at the first sign of sowing problems. Insert os illustrolod. 141 Loon /VI IP Ten '.2 Neta.t Oaf^P Flaf irde of well, kraorch boa law% natl. Fist ..0* -roosts. Usually the heavier the fabric, the thicker the thread and lorger the needle Make sure the needle is straight and not damaged. Si to suit the fabric and thread. SELECTING AND FITTING OF NEEDLE Select the correct size needle to 9001 IP
II) Env of ^mole !Achy Chonge the needle regularly and at the first sign of sowing problems. Insert os illustrolod. 141 Loon /VI IP Ten '.2 Neta.t Oaf^P Flaf irde of well, kraorch boa law% natl. Fist ..0* -roosts. Usually the heavier the fabric, the thicker the thread and lorger the needle Make sure the needle is straight and not damaged. Si to suit the fabric and thread. SELECTING AND FITTING OF NEEDLE Select the correct size needle to 9001 IP
Manual
Page 15
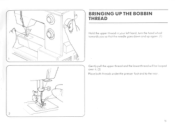
turn the hood wheel towards you o rho the needle goes down and up again ill 1 Gently pull the upper thread and the lower thread will be looped over d. (2) Place bark threods uncle, the presser ;ow and to the rear 2 '. 13 BRINGING UP THE BOBBIN THREAD Hold the upper thread in your left hand.
turn the hood wheel towards you o rho the needle goes down and up again ill 1 Gently pull the upper thread and the lower thread will be looped over d. (2) Place bark threods uncle, the presser ;ow and to the rear 2 '. 13 BRINGING UP THE BOBBIN THREAD Hold the upper thread in your left hand.
Manual
Page 17
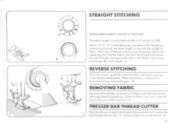
... under the foot to the rear of sewing. and pull down to di highest position by turning the hand wheel towel& you. the finer the thread and shade, the stitch length, the !scouter the fabric, the thicker the 'hoped -r and longer the stitch length. (I 3) 16 The stitch length is ...released the rnoch,ne will sew forwards °gem 121 REMOVING FABRIC Role the thread loke'up lent to cut the Need I ) REVERSE STITCHING To finish a scam, push the reverse button and hold it, sewing a few stitches bockwords When ...
... under the foot to the rear of sewing. and pull down to di highest position by turning the hand wheel towel& you. the finer the thread and shade, the stitch length, the !scouter the fabric, the thicker the 'hoped -r and longer the stitch length. (I 3) 16 The stitch length is ...released the rnoch,ne will sew forwards °gem 121 REMOVING FABRIC Role the thread loke'up lent to cut the Need I ) REVERSE STITCHING To finish a scam, push the reverse button and hold it, sewing a few stitches bockwords When ...
Manual
Page 27
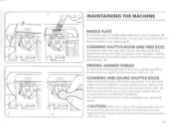
...open hook cover and prise off From thebottom-fromleft corner - CLEANING SHUTTLE HOOK AND FEED DOG Completely clean The ore* with o piece of the thread while turning the hondwhoel bock and (pub. (3) CLEANING AND OILING SHUTTLE HOOK Cleon and oil the hook in the fallowing manner Turn the hondwheel ...until the needle bar reaches its lop position. I2/ FREEING JAMMED THREAD To release ony thread lammed in use 26 DO NOT OWROIL. Remove the bobbin case and clean every pod with o brush. 'Urn the hondwheel slowly towards...
...open hook cover and prise off From thebottom-fromleft corner - CLEANING SHUTTLE HOOK AND FEED DOG Completely clean The ore* with o piece of the thread while turning the hondwhoel bock and (pub. (3) CLEANING AND OILING SHUTTLE HOOK Cleon and oil the hook in the fallowing manner Turn the hondwheel ...until the needle bar reaches its lop position. I2/ FREEING JAMMED THREAD To release ony thread lammed in use 26 DO NOT OWROIL. Remove the bobbin case and clean every pod with o brush. 'Urn the hondwheel slowly towards...

Manual
Page 28
thsnl or Ducky bregclot vorhowleedew Mire hew rt roar od rowth 27 CAUSE I Bobber 014•1$ rey .metd TROUBLE-SHOOTING GUIDE COMiIIION Top tfveal beads t trims", week • Stewed traclet Needle tverokOtt SISchPng 'own IOW, Sewn; Ihrcod mod be cougea owe& holder 6 Needle a I Mahnn ntetilded t. dery on is Por-dle 3 Mood wo Awes lot needle set 4 Needle awned rev:weeds 5.
thsnl or Ducky bregclot vorhowleedew Mire hew rt roar od rowth 27 CAUSE I Bobber 014•1$ rey .metd TROUBLE-SHOOTING GUIDE COMiIIION Top tfveal beads t trims", week • Stewed traclet Needle tverokOtt SISchPng 'own IOW, Sewn; Ihrcod mod be cougea owe& holder 6 Needle a I Mahnn ntetilded t. dery on is Por-dle 3 Mood wo Awes lot needle set 4 Needle awned rev:weeds 5.


