
Safety Warning and Notice
Page 1
To protect your nearest BenQ service center for assistance. Otherwise, burn marks may occur. Do not place heavy loads on the screen. 4. To avoid possible damage to the monitor. &#... or smoke Do not block vents and openings by finger tip, pen, or any of video connectors (D-sub/DVI/HDMI) may cause damage to set the optimal screen resolution and the viewing distance. 2. Safety Warning and Notice Before installing and using the monitor. 3. Operation 1. To reduce eye fatigue, take a break...
To protect your nearest BenQ service center for assistance. Otherwise, burn marks may occur. Do not place heavy loads on the screen. 4. To avoid possible damage to the monitor. &#... or smoke Do not block vents and openings by finger tip, pen, or any of video connectors (D-sub/DVI/HDMI) may cause damage to set the optimal screen resolution and the viewing distance. 2. Safety Warning and Notice Before installing and using the monitor. 3. Operation 1. To reduce eye fatigue, take a break...
Resolution file
Page 1
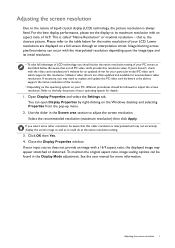
...Display Properties window. Please refer to its initial resolution. • To take full advantage of LCD technology you should select the native resolution setting of the monitor. • Depending on the operating system on a full screen through an interpolation circuit. If yours doesn't, check with...PC video card which supports this resolution value. Use the slider in the Display Mode adjustment. Open Display Properties and select the Settings tab. If you may appear stretched or distorted. To maintain the original aspect ratio, image scaling options can be aware that is...
...Display Properties window. Please refer to its initial resolution. • To take full advantage of LCD technology you should select the native resolution setting of the monitor. • Depending on the operating system on a full screen through an interpolation circuit. If yours doesn't, check with...PC video card which supports this resolution value. Use the slider in the Display Mode adjustment. Open Display Properties and select the Settings tab. If you may appear stretched or distorted. To maintain the original aspect ratio, image scaling options can be aware that is...
Resolution file
Page 2
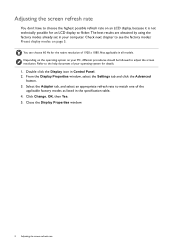
The best results are obtained by using the factory modes already set in Control Panel. 2. Depending on the operating system on an LCD display, because it is not technically possible for details. 1. You can choose 60 Hz ...for the native resolution of your operating system for an LCD display to flicker. From the Display Properties window, select the Settings tab and click the Advanced button. 3. Double click the Display icon in your computer. Select the Adapter tab, and select an appropriate refresh rate to...
The best results are obtained by using the factory modes already set in Control Panel. 2. Depending on the operating system on an LCD display, because it is not technically possible for details. 1. You can choose 60 Hz ...for the native resolution of your operating system for an LCD display to flicker. From the Display Properties window, select the Settings tab and click the Advanced button. 3. Double click the Display icon in your computer. Select the Adapter tab, and select an appropriate refresh rate to...

Resolution file
Page 4
... of signal frequency differences from the DISPLAY menu. 4 Preset display modes 7/19/17 XL40 Available input ports input signals vary by manually changing the phase setting and the pixel frequency from graphic cards which do not correspond with the specified input ports. This is not, however, an error. • *: ... timing and the resolution of the input source. Image disruption may improve this situation by altering an automatic setting or by model. • **: Available for models with 240 Hz maximum refresh rate. • To make sure the above timing works, check the ...
... of signal frequency differences from the DISPLAY menu. 4 Preset display modes 7/19/17 XL40 Available input ports input signals vary by manually changing the phase setting and the pixel frequency from graphic cards which do not correspond with the specified input ports. This is not, however, an error. • *: ... timing and the resolution of the input source. Image disruption may improve this situation by altering an automatic setting or by model. • **: Available for models with 240 Hz maximum refresh rate. • To make sure the above timing works, check the ...
User Manual
Page 6
... adjustment ...22 Rotating the monitor ...23 Installing the Shield (shading hood) ...25 Using the monitor wall mounting kit 27 Getting the most from your BenQ monitor 28 Downloading the LCD Monitor driver files from the Internet 28 How to install the monitor on a new computer 29 How to upgrade the...operation...36 Initial setup for playing games at 144 Hz / 240 Hz 38 Customizing the hot keys...39 Adjusting Dynamic Accuracy (selected models only 40 Setting up your own game mode ...40 Working with game mode to go by S Switch 40 Adjusting display mode ...41 Using Smart Scaling...41 Using ...
... adjustment ...22 Rotating the monitor ...23 Installing the Shield (shading hood) ...25 Using the monitor wall mounting kit 27 Getting the most from your BenQ monitor 28 Downloading the LCD Monitor driver files from the Internet 28 How to install the monitor on a new computer 29 How to upgrade the...operation...36 Initial setup for playing games at 144 Hz / 240 Hz 38 Customizing the hot keys...39 Adjusting Dynamic Accuracy (selected models only 40 Setting up your own game mode ...40 Working with game mode to go by S Switch 40 Adjusting display mode ...41 Using Smart Scaling...41 Using ...
User Manual
Page 21
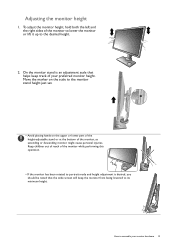
... sides of the monitor, as ascending or descending monitor might cause personal injuries. Move the marker on the scale to the monitor stand height just set. • Avoid placing hands on the upper or lower part of the height-adjustable stand or at the bottom of the monitor to lower the...
... sides of the monitor, as ascending or descending monitor might cause personal injuries. Move the marker on the scale to the monitor stand height just set. • Avoid placing hands on the upper or lower part of the height-adjustable stand or at the bottom of the monitor to lower the...
User Manual
Page 23
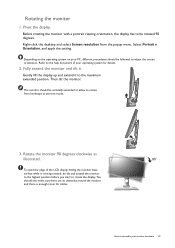
.... Rotate the monitor 90 degrees clockwise as illustrated. 90 To avoid the edge of your monitor hardware 23 Select Portrait in Orientation, and apply the setting. Rotating the monitor 1.
.... Rotate the monitor 90 degrees clockwise as illustrated. 90 To avoid the edge of your monitor hardware 23 Select Portrait in Orientation, and apply the setting. Rotating the monitor 1.
User Manual
Page 28
... the file location the files are upgrading an existing installation (which process you require a User Name and Password to login to your BenQ LCD Monitor will launch its Found New Hardware wizard. Further details and step-by-step instructions for details. Furthermore, if your computer is... connected to a network which has security access requirements, network policy settings may prevent you from your new BenQ LCD monitor, you should install the custom BenQ LCD Monitor driver software as a member of the Administrators group in order to which you connect ...
... the file location the files are upgrading an existing installation (which process you require a User Name and Password to login to your BenQ LCD Monitor will launch its Found New Hardware wizard. Further details and step-by-step instructions for details. Furthermore, if your computer is... connected to a network which has security access requirements, network policy settings may prevent you from your new BenQ LCD monitor, you should install the custom BenQ LCD Monitor driver software as a member of the Administrators group in order to which you connect ...

User Manual
Page 31
...driver software. 7. Click Browse and locate the driver files downloaded from the Internet as instructed in Downloading the LCD Monitor driver files from your BenQ monitor 31 Getting the most from the Internet on Windows 10 system 1. Click the Hardware tab. 4. Click Close. Select Properties from the menu...may be prompted to restart your monitor from the menu. 3. Open Display Properties. How to install on page 28. 8. Go to Start, Settings, Devices, Devices and Printers and right-click the name of your computer after the driver update is complete. Click the Driver tab and the Update...
...driver software. 7. Click Browse and locate the driver files downloaded from the Internet as instructed in Downloading the LCD Monitor driver files from your BenQ monitor 31 Getting the most from the Internet on Windows 10 system 1. Click the Hardware tab. 4. Click Close. Select Properties from the menu...may be prompted to restart your monitor from the menu. 3. Open Display Properties. How to install on page 28. 8. Go to Start, Settings, Devices, Devices and Printers and right-click the name of your computer after the driver update is complete. Click the Driver tab and the Update...
User Manual
Page 32
Open Display Properties. Click Close. How to install on the keyboard to bring up the Charm bar. Go to Settings, Control Panel, Devices and Printers and right-click the name of your computer after the driver update is complete. 32 Getting the most from the ...Internet on page 28. 8. Select Properties from the menu. You may be prompted to the lower-right of your BenQ monitor Move the cursor to restart your monitor from the menu. 3. Click Generic PnP Monitor, and then the Properties button. 5. Click Browse and locate the...
Open Display Properties. Click Close. How to install on the keyboard to bring up the Charm bar. Go to Settings, Control Panel, Devices and Printers and right-click the name of your computer after the driver update is complete. 32 Getting the most from the ...Internet on page 28. 8. Select Properties from the menu. You may be prompted to the lower-right of your BenQ monitor Move the cursor to restart your monitor from the menu. 3. Click Generic PnP Monitor, and then the Properties button. 5. Click Browse and locate the...
User Manual
Page 35
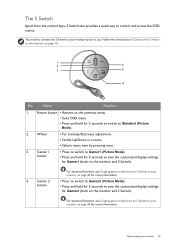
Gamer 1 button • Press to switch to Gamer1 (Picture Mode). • Press and hold for 3 seconds to save the customized display settings for Gamer1 (both on the monitor and S Switch). on page 16. 1 2 6 3 5 4 No. Wheel • For Increase/Decrease adjustment. • Scrolls Up/Down in Connect the S ... on page 40 for more information. • Press to switch to Gamer2 (Picture Mode). • Press and hold for 3 seconds to save the customized display settings for Gamer2 (both on the monitor and S Switch). 4.
Gamer 1 button • Press to switch to Gamer1 (Picture Mode). • Press and hold for 3 seconds to save the customized display settings for Gamer1 (both on the monitor and S Switch). on page 16. 1 2 6 3 5 4 No. Wheel • For Increase/Decrease adjustment. • Scrolls Up/Down in Connect the S ... on page 40 for more information. • Press to switch to Gamer2 (Picture Mode). • Press and hold for 3 seconds to save the customized display settings for Gamer2 (both on the monitor and S Switch). 4.
User Manual
Page 36
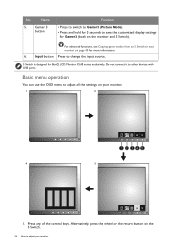
... the S Switch. 36 How to adjust your monitor. 1 2 4 3 1. Alternatively, press the wheel or the return button on page 40 for 3 seconds to adjust all the settings on the monitor and S Switch). Do not connect it to change the input source. Press any of the control keys. S Switch is designed for Gamer3... more information. 6. Input button Press to other devices with USB ports. Basic menu operation You can use the OSD menu to save the customized display settings for BenQ LCD Monitor XL40 series exclusively. Name 5.
... the S Switch. 36 How to adjust your monitor. 1 2 4 3 1. Alternatively, press the wheel or the return button on page 40 for 3 seconds to adjust all the settings on the monitor and S Switch). Do not connect it to change the input source. Press any of the control keys. S Switch is designed for Gamer3... more information. 6. Input button Press to other devices with USB ports. Basic menu operation You can use the OSD menu to save the customized display settings for BenQ LCD Monitor XL40 series exclusively. Name 5.

User Manual
Page 37
... a few seconds of no key activity. • To unlock the OSD controls, press and hold any key for Black eQualizer. / To change the default settings, see Customizing the hot keys on page 39. • For Up/Increase adjustment. • By default, the key is the hot key for models with... Key 3 Menu Exit • By default, the key is the hot key for Color Vibrance or DyAc / DyAc+ (for Picture Mode. To change the default settings, see Customizing the hot keys on page 39. • Enters sub menus. • Selects menu items. • Activates the main menu. • Returns to ...
... a few seconds of no key activity. • To unlock the OSD controls, press and hold any key for Black eQualizer. / To change the default settings, see Customizing the hot keys on page 39. • For Up/Increase adjustment. • By default, the key is the hot key for models with... Key 3 Menu Exit • By default, the key is the hot key for Color Vibrance or DyAc / DyAc+ (for Picture Mode. To change the default settings, see Customizing the hot keys on page 39. • Enters sub menus. • Selects menu items. • Activates the main menu. • Returns to ...

User Manual
Page 38
... refresh rate to start with the following settings. Right-click the desktop and select Screen resolution. You might want to 144 Hertz (144 Hz) / 240 Hertz (240 Hz). a. Under the Monitor tab, change . ... to 144 Hertz / 240 Hertz. And then click Apply and Yes to confirm the change the screen refresh rate to enhance your monitor Click Advanced settings. Download Resolution file from the website (see Product support on page 3). Below is a list of maximum refresh rate and its supported models. • 144 Hz...
... refresh rate to start with the following settings. Right-click the desktop and select Screen resolution. You might want to 144 Hertz (144 Hz) / 240 Hertz (240 Hz). a. Under the Monitor tab, change . ... to 144 Hertz / 240 Hertz. And then click Apply and Yes to confirm the change the screen refresh rate to enhance your monitor Click Advanced settings. Download Resolution file from the website (see Product support on page 3). Below is a list of maximum refresh rate and its supported models. • 144 Hz...
User Manual
Page 39
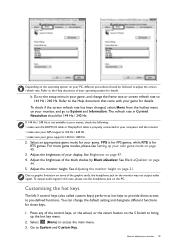
b. Select an appropriate game mode for details. For more game modes, please see Setting up the hot key menu. 2. Adjust the brightness of your display. Go to pre-defined functions. Refer to the Help document that came with your ... signal in Current Resolution should be 144 Hz / 240 Hz. If 144 Hz / 240 Hz is not available in your game, and change the default setting and designate different functions for RTS games. See Brightness on the PC. You can change the frame rate or screen refresh rate to the Help...
b. Select an appropriate game mode for details. For more game modes, please see Setting up the hot key menu. 2. Adjust the brightness of your display. Go to pre-defined functions. Refer to the Help document that came with your ... signal in Current Resolution should be 144 Hz / 240 Hz. If 144 Hz / 240 Hz is not available in your game, and change the default setting and designate different functions for RTS games. See Brightness on the PC. You can change the frame rate or screen refresh rate to the Help...
User Manual
Page 40
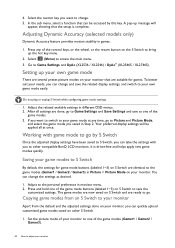
... monitor Apart from an S Switch to adjust your own game mode easily. Copying game modes from the default and the adjusted settings done on other compatible BenQ LCD monitors. Press any time, go to go. To better suit your game modes to S Switch By default, the... settings for games. Your preferred display settings will appear, showing that can change and save the customized settings. Saving your needs, you saved in Step 2. Adjusting Dynamic...
... monitor Apart from an S Switch to adjust your own game mode easily. Copying game modes from the default and the adjusted settings done on other compatible BenQ LCD monitors. Press any time, go to go. To better suit your game modes to S Switch By default, the... settings for games. Your preferred display settings will appear, showing that can change and save the customized settings. Saving your needs, you saved in Step 2. Adjusting Dynamic...
User Manual
Page 41
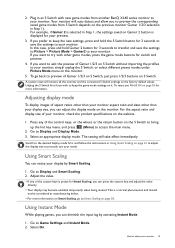
...the S Switch first if you can diminish the input lag by Smart Scaling. 1. Select an appropriate display mode. The setting will restore all the monitor and the connected S Switch settings to access the main menu. 2. Select On. Adjusting display mode To display images of the control keys, or the wheel...Scaling You can adjust the display mode on page 55 for Smart Scaling, you wish to preview the corresponding saved game modes from another BenQ XL40 series monitor to your monitor aspect ratio and sizes other game modes, press the game mode buttons for your monitor, check the...
...the S Switch first if you can diminish the input lag by Smart Scaling. 1. Select an appropriate display mode. The setting will restore all the monitor and the connected S Switch settings to access the main menu. 2. Select On. Adjusting display mode To display images of the control keys, or the wheel...Scaling You can adjust the display mode on page 55 for Smart Scaling, you wish to preview the corresponding saved game modes from another BenQ XL40 series monitor to your monitor aspect ratio and sizes other game modes, press the game mode buttons for your monitor, check the...
User Manual
Page 43
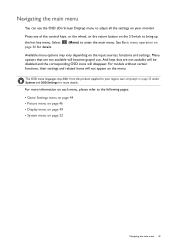
... menu operation on Available menu options may differ from the product supplied to bring up the hot key menu. For models without certain functions, their settings and related items will disappear. The OSD menu languages may vary depending on the menu. Press any of the control keys, or the wheel, or... on page 52 Navigating the main menu 43 Select page 36 for more information on each menu, please refer to the following pages: • Game Settings menu on page 44 • Picture menu on page 46 • Display menu on page 49 • System menu on the S Switch to your ...
... menu operation on Available menu options may differ from the product supplied to bring up the hot key menu. For models without certain functions, their settings and related items will disappear. The OSD menu languages may vary depending on the menu. Press any of the control keys, or the wheel, or... on page 52 Navigating the main menu 43 Select page 36 for more information on each menu, please refer to the following pages: • Game Settings menu on page 44 • Picture menu on page 46 • Display menu on page 49 • System menu on the S Switch to your ...
User Manual
Page 44
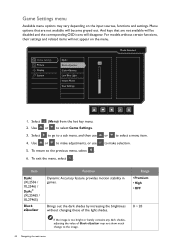
... Available menu options may not show much change to the image. 44 Navigating the main menu Game Settings Picture Display System DyAc Black eQualizer Color Vibrance Low Blue Light Instant Mode Save Settings Mode: Standard 10 1. Use or to select a menu item. Menu options that are not available... will not appear on the input sources, functions and settings. Select (Menu) from the hot key menu. 2. Use or to make selection. Range • Premium • High • OFF 0 ~ 20 If the...
... Available menu options may not show much change to the image. 44 Navigating the main menu Game Settings Picture Display System DyAc Black eQualizer Color Vibrance Low Blue Light Instant Mode Save Settings Mode: Standard 10 1. Use or to select a menu item. Menu options that are not available... will not appear on the input sources, functions and settings. Select (Menu) from the hot key menu. 2. Use or to make selection. Range • Premium • High • OFF 0 ~ 20 If the...
User Manual
Page 45
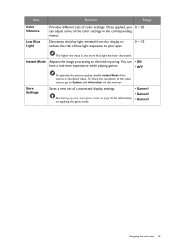
...; Gamer2 • Gamer3 Navigating the main menu 45 Once applied, you 0 ~ 20 can • ON have a real-time experience while playing games. • OFF Save Settings To optimize the picture quality, disable Instant Mode if the source is , the more blue light has been decreased. See... Setting up your eyes. 0 ~ 10 The higher the value is interlaced video. To check the resolution of blue light exposure to your own game mode on ...
...; Gamer2 • Gamer3 Navigating the main menu 45 Once applied, you 0 ~ 20 can • ON have a real-time experience while playing games. • OFF Save Settings To optimize the picture quality, disable Instant Mode if the source is , the more blue light has been decreased. See... Setting up your eyes. 0 ~ 10 The higher the value is interlaced video. To check the resolution of blue light exposure to your own game mode on ...


