

Safety Warning and Notice
Page 2
... check whether the monitor is connected to a grounded power outlet before cleaning your monitor Use a monitor cleaner and a soft cloth to clean your monitor. Do not use solvents such as alcohol to non-factory provided software, parts, and/or non-original accessories. Please use a power cord that the power is the sole responsibility of its intended sales area. power cable) only with a (multi-outlet) extension cord. Always turn...
... check whether the monitor is connected to a grounded power outlet before cleaning your monitor Use a monitor cleaner and a soft cloth to clean your monitor. Do not use solvents such as alcohol to non-factory provided software, parts, and/or non-original accessories. Please use a power cord that the power is the sole responsibility of its intended sales area. power cable) only with a (multi-outlet) extension cord. Always turn...
Resolution file
Page 1
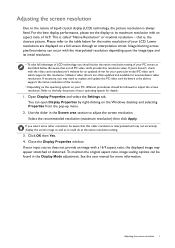
... Display Properties window. If your LCD. Software video drivers are displayed on the Windows desktop and selecting Properties from the pop-up menu. 2. Open Display Properties and select the Settings tab. If you should be found in the Screen area section to the help document of your input source does not provide an image with the video card manufacturer's website for an updated driver for new hardware video resolutions. For the best display performance, please set...
... Display Properties window. If your LCD. Software video drivers are displayed on the Windows desktop and selecting Properties from the pop-up menu. 2. Open Display Properties and select the Settings tab. If you should be found in the Screen area section to the help document of your input source does not provide an image with the video card manufacturer's website for an updated driver for new hardware video resolutions. For the best display performance, please set...
Resolution file
Page 2
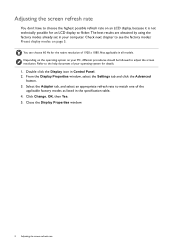
... Display Properties window, select the Settings tab and click the Advanced button. 3. Depending on the operating system on page 3. The best results are obtained by using the factory modes already set in the specification table. 4. Select the Adapter tab, and select an appropriate refresh rate to the help document of the applicable factory modes as listed in your PC, different procedures should be followed to adjust the screen resolution...
... Display Properties window, select the Settings tab and click the Advanced button. 3. Depending on the operating system on page 3. The best results are obtained by using the factory modes already set in the specification table. 4. Select the Adapter tab, and select an appropriate refresh rate to the help document of the applicable factory modes as listed in your PC, different procedures should be followed to adjust the screen resolution...

Resolution file
Page 4
... model. • **: Available for models with 240 Hz maximum refresh rate. • To make sure the above timing works, check the compatibility and specifications of your graphic card first. • To obtain the best image quality, refer to the above table to work with the usual standard. Available input ports input signals vary by manually changing the phase setting and the pixel frequency from graphic cards which do not correspond with the specified input ports...
... model. • **: Available for models with 240 Hz maximum refresh rate. • To make sure the above timing works, check the compatibility and specifications of your graphic card first. • To obtain the best image quality, refer to the above table to work with the usual standard. Available input ports input signals vary by manually changing the phase setting and the pixel frequency from graphic cards which do not correspond with the specified input ports...
User Manual
Page 5
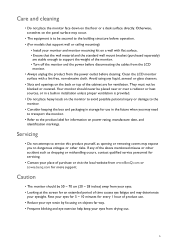
... liquid, aerosol or glass cleaners. • Slots and openings on the floor or a desk surface directly. Servicing • Do not attempt to support the weight of the monitor. • Turn off the monitor and the power before cleaning. Clean the LCD monitor surface with flat surface. • Ensure that the wall material and the standard wall mount bracket (purchased separately) are for ventilation. Care and...
... liquid, aerosol or glass cleaners. • Slots and openings on the floor or a desk surface directly. Servicing • Do not attempt to support the weight of the monitor. • Turn off the monitor and the power before cleaning. Clean the LCD monitor surface with flat surface. • Ensure that the wall material and the standard wall mount bracket (purchased separately) are for ventilation. Care and...
User Manual
Page 6
... support ...3 Power safety ...4 Getting started ...8 Getting to know your monitor 10 Front view...10 Back view ...10 Input and output ports...11 Connection ...12 How to assemble your monitor hardware 13 How to detach the stand and the base 19 Adjusting the monitor height ...21 Viewing angle adjustment ...22 Rotating the monitor ...23 Installing the Shield (shading hood) ...25 Using the monitor wall mounting kit 27 Getting the most from your BenQ monitor 28 Downloading the LCD Monitor driver files...
... support ...3 Power safety ...4 Getting started ...8 Getting to know your monitor 10 Front view...10 Back view ...10 Input and output ports...11 Connection ...12 How to assemble your monitor hardware 13 How to detach the stand and the base 19 Adjusting the monitor height ...21 Viewing angle adjustment ...22 Rotating the monitor ...23 Installing the Shield (shading hood) ...25 Using the monitor wall mounting kit 27 Getting the most from your BenQ monitor 28 Downloading the LCD Monitor driver files...
User Manual
Page 27
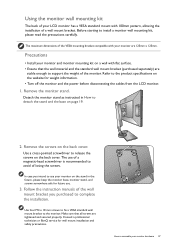
.... Remove the screws on the back cover. Follow the instruction manuals of the wall mount bracket you intend to complete the installation. Use four M4 x 10 mm screws to fix a VESA standard wall mount bracket to assemble your LCD monitor has a VESA standard mount with 100mm pattern, allowing the installation of a wall mount bracket. How to the monitor. Detach the monitor stand as instructed in the future, please keep the monitor base, monitor stand, and screws somewhere safe for future use your monitor on a wall...
.... Remove the screws on the back cover. Follow the instruction manuals of the wall mount bracket you intend to complete the installation. Use four M4 x 10 mm screws to fix a VESA standard wall mount bracket to assemble your LCD monitor has a VESA standard mount with 100mm pattern, allowing the installation of a wall mount bracket. How to the monitor. Detach the monitor stand as instructed in the future, please keep the monitor base, monitor stand, and screws somewhere safe for future use your monitor on a wall...
User Manual
Page 28
...-by-step instructions for details. Downloading the LCD Monitor driver files from www.BenQ.com or zowie.benq.com> Support > Download & FAQ > model name > Software. 2. In either an automatic (new) or upgrade (existing) installation, see: • How to install the monitor on a new computer on page 29. • How to upgrade the monitor on an existing computer on page 30. • If you require a User Name and Password to...
...-by-step instructions for details. Downloading the LCD Monitor driver files from www.BenQ.com or zowie.benq.com> Support > Download & FAQ > model name > Software. 2. In either an automatic (new) or upgrade (existing) installation, see: • How to install the monitor on a new computer on page 29. • How to upgrade the monitor on an existing computer on page 30. • If you require a User Name and Password to...
User Manual
Page 29
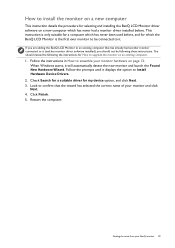
... This instruction details the procedure for selecting and installing the BenQ LCD Monitor driver software on page 13. Restart the computer. How to confirm that has already had a monitor driver installed before , and for which has never had another monitor connected to it. Follow the prompts until it will automatically detect the new monitor and launch the Found New Hardware Wizard. When Windows starts, it displays...
... This instruction details the procedure for selecting and installing the BenQ LCD Monitor driver software on page 13. Restart the computer. How to confirm that has already had a monitor driver installed before , and for which has never had another monitor connected to it. Follow the prompts until it will automatically detect the new monitor and launch the Found New Hardware Wizard. When Windows starts, it displays...
User Manual
Page 30
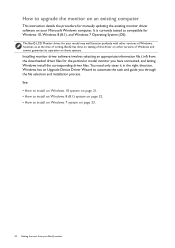
...). The BenQ LCD Monitor driver for your Microsoft Windows computer. How to upgrade the monitor on an existing computer This instruction details the procedure for manually updating the existing monitor driver software on page 33. 30 Getting the most from the downloaded driver files for the particular model monitor you through the file selection and installation process. Windows has an Upgrade Device Driver Wizard to automate the task and guide you have connected...
...). The BenQ LCD Monitor driver for your Microsoft Windows computer. How to upgrade the monitor on an existing computer This instruction details the procedure for manually updating the existing monitor driver software on page 33. 30 Getting the most from the downloaded driver files for the particular model monitor you through the file selection and installation process. Windows has an Upgrade Device Driver Wizard to automate the task and guide you have connected...

User Manual
Page 31
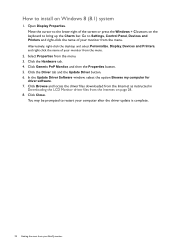
In the Update Driver Software window, select the option Browse my computer for driver software. 7. You may be prompted to restart your BenQ monitor 31 Open Display Properties. Click the Hardware tab. 4. Select Properties from the Internet on Windows 10 system 1. Click Browse and locate the driver files downloaded from the Internet as instructed in Downloading the LCD Monitor driver files from the menu. 3. How to install on page 28. 8. Click...
In the Update Driver Software window, select the option Browse my computer for driver software. 7. You may be prompted to restart your BenQ monitor 31 Open Display Properties. Click the Hardware tab. 4. Select Properties from the Internet on Windows 10 system 1. Click Browse and locate the driver files downloaded from the Internet as instructed in Downloading the LCD Monitor driver files from the menu. 3. How to install on page 28. 8. Click...
User Manual
Page 32
.... 4. Select Properties from the menu. 2. In the Update Driver Software window, select the option Browse my computer for driver software. 7. Open Display Properties. Click Browse and locate the driver files downloaded from the Internet as instructed in Downloading the LCD Monitor driver files from the menu. Click Generic PnP Monitor, and then the Properties button. 5. How to install on page 28. 8. Click the Driver tab and the Update Driver button. 6. Move the cursor to...
.... 4. Select Properties from the menu. 2. In the Update Driver Software window, select the option Browse my computer for driver software. 7. Open Display Properties. Click Browse and locate the driver files downloaded from the Internet as instructed in Downloading the LCD Monitor driver files from the menu. Click Generic PnP Monitor, and then the Properties button. 5. How to install on page 28. 8. Click the Driver tab and the Update Driver button. 6. Move the cursor to...
User Manual
Page 33
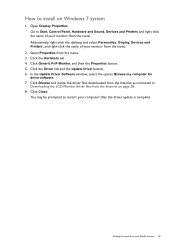
... the Update Driver Software window, select the option Browse my computer for driver software. 7. Getting the most from the Internet on Windows 7 system 1. Click Close. Click the Hardware tab. 4. Click Browse and locate the driver files downloaded from the Internet as instructed in Downloading the LCD Monitor driver files from your monitor from the menu. 3. Open Display Properties. Click Generic PnP Monitor, and then the Properties button. 5. How to install on...
... the Update Driver Software window, select the option Browse my computer for driver software. 7. Getting the most from the Internet on Windows 7 system 1. Click Close. Click the Hardware tab. 4. Click Browse and locate the driver files downloaded from the Internet as instructed in Downloading the LCD Monitor driver files from your monitor from the menu. 3. Open Display Properties. Click Generic PnP Monitor, and then the Properties button. 5. How to install on...

User Manual
Page 38
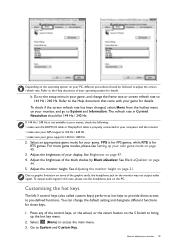
... to confirm the change the screen refresh rate to enhance your monitor Below is a list of maximum refresh rate and its supported models. • 144 Hz: XL2536 / XL2536E • 240 Hz: XL2540 / XL2540E / XL2546 / XL2546E / XL2546S / XL2740 / XL2740E / XL2746S Available timings vary by model and input source. Initial setup for more information. 1. a. Right-click the desktop and select Screen resolution. Refer to "Preset display modes" in Resolution file for playing...
... to confirm the change the screen refresh rate to enhance your monitor Below is a list of maximum refresh rate and its supported models. • 144 Hz: XL2536 / XL2536E • 240 Hz: XL2540 / XL2540E / XL2546 / XL2546E / XL2546S / XL2740 / XL2740E / XL2746S Available timings vary by model and input source. Initial setup for more information. 1. a. Right-click the desktop and select Screen resolution. Refer to "Preset display modes" in Resolution file for playing...
User Manual
Page 39
... output audio signal. Select an appropriate game mode for details. Due to System and Information. See Adjusting the monitor height on your game. You can change the frame rate or screen refresh rate to pre-defined functions. Adjust the brightness of the graphic cards, the headphone jack on the S Switch to the Help document of the black shades by Black eQualizer. b. To check if the screen refresh rate has been changed, select Menu from...
... output audio signal. Select an appropriate game mode for details. Due to System and Information. See Adjusting the monitor height on your game. You can change the frame rate or screen refresh rate to pre-defined functions. Adjust the brightness of the graphic cards, the headphone jack on the S Switch to the Help document of the black shades by Black eQualizer. b. To check if the screen refresh rate has been changed, select Menu from...
User Manual
Page 40
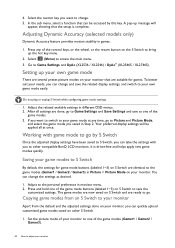
... compatible BenQ LCD monitors. If you can quickly upload customized game modes saved on the S Switch to bring up your own game mode There are identical to change and save as desired. 1. Saving your game modes to one of the game modes. 3. Set the picture mode of your monitor to S Switch By default, the settings for games. Press any time, go . Do not plug or unplug S Switch while configuring game mode settings. 1. In the sub menu...
... compatible BenQ LCD monitors. If you can quickly upload customized game modes saved on the S Switch to bring up your own game mode There are identical to change and save as desired. 1. Saving your game modes to one of the game modes. 3. Set the picture mode of your monitor to S Switch By default, the settings for games. Press any time, go . Do not plug or unplug S Switch while configuring game mode settings. 1. In the sub menu...
User Manual
Page 41
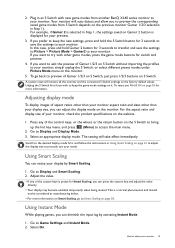
... display size, you prefer to keep the game mode settings on S Switch. Press any of aspect ratios other than your display by activating Instant Mode. 1. Your monitor will take effect immediately. Adjusting display mode To display images of the control keys, or the wheel, or the return button on the S Switch to bring up the hot key menu, and press (Menu) to preview the corresponding saved game modes from another BenQ XL40 series monitor...
... display size, you prefer to keep the game mode settings on S Switch. Press any of aspect ratios other than your display by activating Instant Mode. 1. Your monitor will take effect immediately. Adjusting display mode To display images of the control keys, or the wheel, or the return button on the S Switch to bring up the hot key menu, and press (Menu) to preview the corresponding saved game modes from another BenQ XL40 series monitor...
User Manual
Page 54
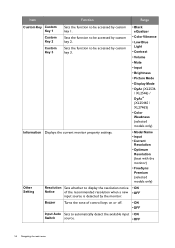
... 3. • Black eQualizer • Color Vibrance • Low Blue Light • Contrast • Volume • Mute • Input • Brightness • Picture Mode • Display Mode • DyAc (XL2536 / XL2546) / DyAc+ (XL2546S / XL2746S) • Color Weakness (selected models only) Information Displays the current monitor property settings. • Model Name • Input • Current Resolution • Optimum Resolution (best with the monitor) • FreeSync Premium (selected models only) Other Setting Resolution Sets whether to display the resolution notice •...
... 3. • Black eQualizer • Color Vibrance • Low Blue Light • Contrast • Volume • Mute • Input • Brightness • Picture Mode • Display Mode • DyAc (XL2536 / XL2546) / DyAc+ (XL2546S / XL2746S) • Color Weakness (selected models only) Information Displays the current monitor property settings. • Model Name • Input • Current Resolution • Optimum Resolution (best with the monitor) • FreeSync Premium (selected models only) Other Setting Resolution Sets whether to display the resolution notice •...
User Manual
Page 56
... set a proper aspect ratio for the input sources. Pixel errors can use the Display Mode function to "Adjusting the Screen Resolution". Download Resolution file from the website (see Product support on page 3). Select the native resolution. Now check the signal cable connectors. Download Resolution file from different input sources may appear distorted or stretched on page 50 for FPS games. The image is permanently black, one or more pixels are permanently red, green, blue or another color. • Clean the LCD screen. • Cycle power...
... set a proper aspect ratio for the input sources. Pixel errors can use the Display Mode function to "Adjusting the Screen Resolution". Download Resolution file from the website (see Product support on page 3). Select the native resolution. Now check the signal cable connectors. Download Resolution file from different input sources may appear distorted or stretched on page 50 for FPS games. The image is permanently black, one or more pixels are permanently red, green, blue or another color. • Clean the LCD screen. • Cycle power...
User Manual
Page 57
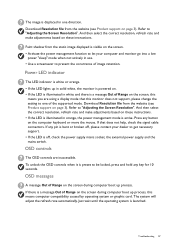
... computer and monitor go into a low power "sleep" mode when not actively in orange, the power management mode is active. Download Resolution file from the static image displayed is visible on these instructions. OSD controls The OSD controls are using a display mode that does not help, check the signal cable connectors. If there is off, check the power supply mains socket, the external power supply and the mains switch. Power LED indicator The LED indicator is white or orange. • If the LED lights up...
... computer and monitor go into a low power "sleep" mode when not actively in orange, the power management mode is active. Download Resolution file from the static image displayed is visible on these instructions. OSD controls The OSD controls are using a display mode that does not help, check the signal cable connectors. If there is off, check the power supply mains socket, the external power supply and the mains switch. Power LED indicator The LED indicator is white or orange. • If the LED lights up...


