
Safety Warning and Notice
Page 1
To protect your nearest BenQ service center for assistance. To avoid possible damage to set the optimal screen resolution and the viewing distance. 2. Installation Do not use your monitor under any of the following actions for personal use the monitor in places such as cars,... such as radiators, heaters, fuel stoves, and other sharp objects. 5. Operation 1. Safety Warning and Notice Before installing and using the monitor. 3. Excessively frequent plug and unplug of children. Otherwise, burn marks may cause damage to chemical substances or smoke Do not...
To protect your nearest BenQ service center for assistance. To avoid possible damage to set the optimal screen resolution and the viewing distance. 2. Installation Do not use your monitor under any of the following actions for personal use the monitor in places such as cars,... such as radiators, heaters, fuel stoves, and other sharp objects. 5. Operation 1. Safety Warning and Notice Before installing and using the monitor. 3. Excessively frequent plug and unplug of children. Otherwise, burn marks may cause damage to chemical substances or smoke Do not...

Safety Warning and Notice
Page 2
... supply is unstable. Ensure that the power cord is connected to a grounded power outlet before turning on the monitor. Use only the power cord provided by BenQ. Never use a power cord that the power is the sole responsibility of the following conditions occurs: ...electric shock and fire. Power To avoid possible damage to the monitor, do not use it is unplugged before unplugging the power cord. power cable) only with the device to clean your nearest BenQ service center for warranty services have been altered by unauthorized use or is ...
... supply is unstable. Ensure that the power cord is connected to a grounded power outlet before turning on the monitor. Use only the power cord provided by BenQ. Never use a power cord that the power is the sole responsibility of the following conditions occurs: ...electric shock and fire. Power To avoid possible damage to the monitor, do not use it is unplugged before unplugging the power cord. power cable) only with the device to clean your nearest BenQ service center for warranty services have been altered by unauthorized use or is ...
Resolution file
Page 1
... resolutions are often updated and available for more information. For the best display performance, please set the display to support the native resolution of the monitor. • Depending on the operating system on the Windows desktop and selecting Properties from the pop-up menu. 2.
... resolutions are often updated and available for more information. For the best display performance, please set the display to support the native resolution of the monitor. • Depending on the operating system on the Windows desktop and selecting Properties from the pop-up menu. 2.
User Manual
Page 3
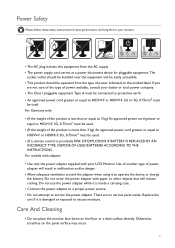
... around the adapter when using it is inside . Care And Cleaning • Do not place the monitor face down on the panel surface may occur. 3 Do not cover the power adapter with your LCD Monitor. Do not use the power adapter while it to H05VV-F or H05RR-F, 3G, 0.75mm2 must be... control is damaged or exposed to service the power adapter. Power Safety Please follow these safety instructions for best performance, and long life for your monitor. 0~40 C 10~90 % 0~3000 m -20~60 C 10~60 % 0~12000 m • The AC plug isolates this equipment from the type of power indicated on the ...
... around the adapter when using it is inside . Care And Cleaning • Do not place the monitor face down on the panel surface may occur. 3 Do not cover the power adapter with your LCD Monitor. Do not use the power adapter while it to H05VV-F or H05RR-F, 3G, 0.75mm2 must be... control is damaged or exposed to service the power adapter. Power Safety Please follow these safety instructions for best performance, and long life for your monitor. 0~40 C 10~90 % 0~3000 m -20~60 C 10~60 % 0~12000 m • The AC plug isolates this equipment from the type of power indicated on the ...
User Manual
Page 4
... out. 4 Caution • The monitor should never be placed near or over...of time causes eye fatigue and may need to transport the monitor. • Refer to the product label for information on...occurs, contact qualified service personnel for servicing. • Contact your monitor and monitor mounting kit on a wall with a lint-free, non-abrasive cloth...; Do not place heavy loads on the monitor to avoid possible personal injury or damage to the monitor. • Consider keeping the box and ... eyesight. Clean the LCD monitor surface with flat surface. • Ensure that support wall or...
... out. 4 Caution • The monitor should never be placed near or over...of time causes eye fatigue and may need to transport the monitor. • Refer to the product label for information on...occurs, contact qualified service personnel for servicing. • Contact your monitor and monitor mounting kit on a wall with a lint-free, non-abrasive cloth...; Do not place heavy loads on the monitor to avoid possible personal injury or damage to the monitor. • Consider keeping the box and ... eyesight. Clean the LCD monitor surface with flat surface. • Ensure that support wall or...

User Manual
Page 5
......7 How to assemble your monitor hardware 8 How to detach the stand base ...12 Adjusting the monitor height ...13 Rotating the monitor ...15 Viewing angle adjustment ...16 Using the monitor wall mounting kit 17 Getting the most from your BenQ monitor 18 How to install the monitor on a new computer 19... How to upgrade the monitor on an existing computer 20...
......7 How to assemble your monitor hardware 8 How to detach the stand base ...12 Adjusting the monitor height ...13 Rotating the monitor ...15 Viewing angle adjustment ...16 Using the monitor wall mounting kit 17 Getting the most from your BenQ monitor 18 How to install the monitor on a new computer 19... How to upgrade the monitor on an existing computer 20...
User Manual
Page 6
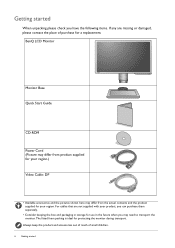
BenQ LCD Monitor Monitor Base Quick Start Guide CD-ROM Power Cord (Picture may differ from product supplied for your region.) Video Cable: DP • Available accessories and the pictures shown here may need to transport the monitor. Getting started For cables that are missing or damaged, please contact the place of small children. ...ideal for use in the future when you can purchase them separately. • Consider keeping the box and packaging in storage for protecting the monitor during transport. Always keep the product and accessories out of reach of purchase for your region.
BenQ LCD Monitor Monitor Base Quick Start Guide CD-ROM Power Cord (Picture may differ from product supplied for your region.) Video Cable: DP • Available accessories and the pictures shown here may need to transport the monitor. Getting started For cables that are missing or damaged, please contact the place of small children. ...ideal for use in the future when you can purchase them separately. • Consider keeping the box and packaging in storage for protecting the monitor during transport. Always keep the product and accessories out of reach of purchase for your region.
User Manual
Page 7
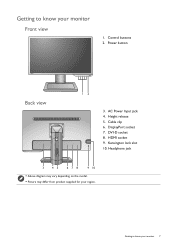
Getting to know your region. Kensington lock slot 10. AC Power Input jack 4. Cable clip 6. DVI-D socket 8. Headphone jack 3 45 678 9 10 • Above diagram may vary depending on the model. • Picture may differ from product supplied for your monitor Front view 1. Control buttons 2. HDMI socket 9. Getting to know your monitor 7 Power button Back view 12 3. Height release 5. DisplayPort socket 7.
Getting to know your region. Kensington lock slot 10. AC Power Input jack 4. Cable clip 6. DVI-D socket 8. Headphone jack 3 45 678 9 10 • Above diagram may vary depending on the model. • Picture may differ from product supplied for your monitor Front view 1. Control buttons 2. HDMI socket 9. Getting to know your monitor 7 Power button Back view 12 3. Height release 5. DisplayPort socket 7.
User Manual
Page 8
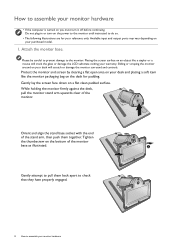
... arm upwards clear of the stand arm, then push them back apart to check that they have properly engaged. 2 1 8 How to the monitor. Gently attempt to pull them together. Placing the screen surface on your purchased model. 1. Tighten the thumbscrew on a flat clean padded surface. Gently lay the ...screen face down on the bottom of the monitor base as illustrated. Orient and align the stand base socket with the end of the monitor. Do not plug-in or turn-on you must turn it off before continuing. How to assemble your...
... arm upwards clear of the stand arm, then push them back apart to check that they have properly engaged. 2 1 8 How to the monitor. Gently attempt to pull them together. Placing the screen surface on your purchased model. 1. Tighten the thumbscrew on a flat clean padded surface. Gently lay the ...screen face down on the bottom of the monitor base as illustrated. Orient and align the stand base socket with the end of the monitor. Do not plug-in or turn-on you must turn it off before continuing. How to assemble your...
User Manual
Page 9
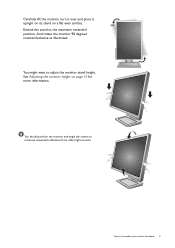
See Adjusting the monitor height on a flat even surface. You should position the monitor and angle the screen to assemble your monitor hardware 9 And rotate the monitor 90 degrees counterclockwise as illustrated. How to minimize unwanted reflections from other light sources. Carefully lift the monitor, turn it over and place it upright on its stand on page 13 for more information. You might want to the maximum extended position. Extend the stand to adjust the monitor stand height.
See Adjusting the monitor height on a flat even surface. You should position the monitor and angle the screen to assemble your monitor hardware 9 And rotate the monitor 90 degrees counterclockwise as illustrated. How to minimize unwanted reflections from other light sources. Carefully lift the monitor, turn it over and place it upright on its stand on page 13 for more information. You might want to the maximum extended position. Extend the stand to adjust the monitor stand height.

User Manual
Page 10
... Connect the plug of the cable (at the end with the ferrite filter) to the HDMI port on the monitor. 2. To Connect the DP Cable Connect the plug of the cable to the monitor video socket. Connect the other end of the cable to the HDMI port of the DVI-D Dual Link... Tighten all finger screws to the headphone jack found on the product supplied for your monitor hardware You may vary depending on the left side of the monitor. Connect the headphones. Either Or Or 10 How to the monitor video socket. Connect the PC video cable. The video cables included in your package...
... Connect the plug of the cable (at the end with the ferrite filter) to the HDMI port on the monitor. 2. To Connect the DP Cable Connect the plug of the cable to the monitor video socket. Connect the other end of the cable to the HDMI port of the DVI-D Dual Link... Tighten all finger screws to the headphone jack found on the product supplied for your monitor hardware You may vary depending on the left side of the monitor. Connect the headphones. Either Or Or 10 How to the monitor video socket. Connect the PC video cable. The video cables included in your package...
User Manual
Page 11
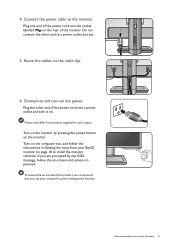
...management function. To extend the service life of the power cord into the socket labelled on -screen instructions to install the monitor software. Connect the power cable to assemble your BenQ monitor on . Route the cables via the cable clip. 6. Plug one end of the power cord into a power outlet ...and turn -on the monitor. Do not connect the other end of the product, we recommend that you are prompted by pressing ...
...management function. To extend the service life of the power cord into the socket labelled on -screen instructions to install the monitor software. Connect the power cable to assemble your BenQ monitor on . Route the cables via the cable clip. 6. Plug one end of the power cord into a power outlet ...and turn -on the monitor. Do not connect the other end of the product, we recommend that you are prompted by pressing ...
User Manual
Page 12
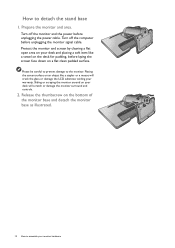
... soft item like a stapler or a mouse will scratch or damage the monitor surround and controls. 2. Sliding or scraping the monitor around on an object like a towel on the desk for padding, before unplugging the monitor signal cable. Please be careful to prevent damage to assemble your warranty.... Prepare the monitor and area. Placing the screen surface on your desk will crack the glass or damage the LCD substrate voiding your monitor hardware Release the thumbscrew on a flat clean padded surface. Turn off ...
... soft item like a stapler or a mouse will scratch or damage the monitor surround and controls. 2. Sliding or scraping the monitor around on an object like a towel on the desk for padding, before unplugging the monitor signal cable. Please be careful to prevent damage to assemble your warranty.... Prepare the monitor and area. Placing the screen surface on your desk will crack the glass or damage the LCD substrate voiding your monitor hardware Release the thumbscrew on a flat clean padded surface. Turn off ...
User Manual
Page 13
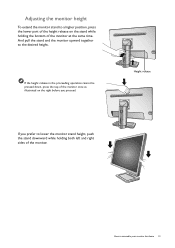
...the proceeding operation cannot be pressed down, press the top of the monitor once as illustrated on the stand while holding both left and right sides of the monitor at the same time. Adjusting the monitor height To extend the monitor stand to a higher position, press the lower part of the ...height release on the right before you prefer to lower the monitor stand height, push the stand downward while holding...
...the proceeding operation cannot be pressed down, press the top of the monitor once as illustrated on the stand while holding both left and right sides of the monitor at the same time. Adjusting the monitor height To extend the monitor stand to a higher position, press the lower part of the ...height release on the right before you prefer to lower the monitor stand height, push the stand downward while holding...
User Manual
Page 14
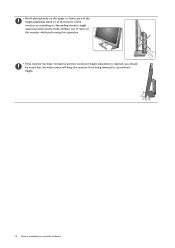
Keep children out of reach of the monitor, as ascending or descending monitor might cause personal injuries. • Avoid placing hands on the upper or lower part of the height-adjustable stand or at the bottom of the monitor while performing this operation. • If the monitor has been rotated to portrait mode and height adjustment is desired, you should be noted that the wide screen will keep the monitor from being lowered to its minimum height. 14 How to assemble your monitor hardware
Keep children out of reach of the monitor, as ascending or descending monitor might cause personal injuries. • Avoid placing hands on the upper or lower part of the height-adjustable stand or at the bottom of the monitor while performing this operation. • If the monitor has been rotated to portrait mode and height adjustment is desired, you should be noted that the wide screen will keep the monitor from being lowered to its minimum height. 14 How to assemble your monitor hardware
User Manual
Page 15
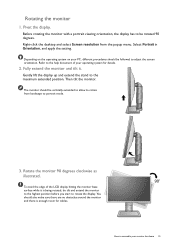
Right-click the desktop and select Screen resolution from landscape to the help document of the LCD display hitting the monitor base surface while it . Fully extend the monitor and tilt it is enough room for details. 2. Gently lift the display up and extend the stand to assemble ...your PC, different procedures should be rotated 90 degrees. Then tilt the monitor. How to the maximum extended position. Refer to portrait mode. 3. Pivot the display. Select Portrait in Orientation, and apply the setting. Rotate ...
Right-click the desktop and select Screen resolution from landscape to the help document of the LCD display hitting the monitor base surface while it . Fully extend the monitor and tilt it is enough room for details. 2. Gently lift the display up and extend the stand to assemble ...your PC, different procedures should be rotated 90 degrees. Then tilt the monitor. How to the maximum extended position. Refer to portrait mode. 3. Pivot the display. Select Portrait in Orientation, and apply the setting. Rotate ...
User Manual
Page 16
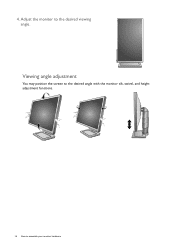
Viewing angle adjustment You may position the screen to the desired angle with the monitor tilt, swivel, and height adjustment functions. 16 How to the desired viewing angle. Adjust the monitor to assemble your monitor hardware 4.
Viewing angle adjustment You may position the screen to the desired angle with the monitor tilt, swivel, and height adjustment functions. 16 How to the desired viewing angle. Adjust the monitor to assemble your monitor hardware 4.
User Manual
Page 17
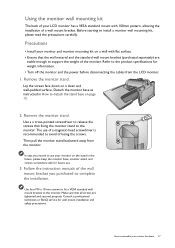
... is recommended to the monitor. Then pull the monitor stand backward away from the LCD monitor. 1. Make sure that fixing the monitor stand to avoid of a wall mount bracket. Consult a professional technician or BenQ service for weight information. • Turn off the monitor and the power before ...disconnecting the cables from the monitor. Lay the screen face down on a wall with 100mm pattern, allowing the installation ...
... is recommended to the monitor. Then pull the monitor stand backward away from the LCD monitor. 1. Make sure that fixing the monitor stand to avoid of a wall mount bracket. Consult a professional technician or BenQ service for weight information. • Turn off the monitor and the power before ...disconnecting the cables from the monitor. Lay the screen face down on a wall with 100mm pattern, allowing the installation ...

User Manual
Page 18
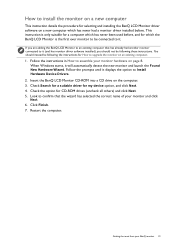
...the very next time you turn on your computer (after connecting the monitor to install the monitor driver software. At that point, click the Have Disk button, insert the BenQ LCD Monitor CD-ROM and select the appropriate monitor model. Follow the wizard instructions until it asks you to which version ...of the Administrators group in order to your new BenQ color LCD flat screen monitor, you should install the custom BenQ LCD Monitor driver software as provided on page 20. • If you require a User Name and Password to login...
...the very next time you turn on your computer (after connecting the monitor to install the monitor driver software. At that point, click the Have Disk button, insert the BenQ LCD Monitor CD-ROM and select the appropriate monitor model. Follow the wizard instructions until it asks you to which version ...of the Administrators group in order to your new BenQ color LCD flat screen monitor, you should install the custom BenQ LCD Monitor driver software as provided on page 20. • If you require a User Name and Password to login...
User Manual
Page 19
...3. Follow the prompts until it (and has monitor driver software installed), you are adding the BenQ LCD Monitor to an existing computer that the wizard has selected the correct name of your BenQ monitor 19 How to install the monitor on a new computer This instruction details the ... 5. Check the option for selecting and installing the BenQ LCD Monitor driver software on an existing computer. 1. Restart the computer. Check Search for a suitable driver for How to upgrade the monitor on a new computer which the BenQ LCD Monitor is only suitable for a computer which has never ...
...3. Follow the prompts until it (and has monitor driver software installed), you are adding the BenQ LCD Monitor to an existing computer that the wizard has selected the correct name of your BenQ monitor 19 How to install the monitor on a new computer This instruction details the ... 5. Check the option for selecting and installing the BenQ LCD Monitor driver software on an existing computer. 1. Restart the computer. Check Search for a suitable driver for How to upgrade the monitor on a new computer which the BenQ LCD Monitor is only suitable for a computer which has never ...


