
User Manual
Page 2
... any language or computer language, in installation unless proper ventilation is provided. • Never push objects or spill liquid of BenQ Corporation. iv Care And Cleaning • Cleaning. Your monitor should be reproduced, transmitted, transcribed, stored in a retrieval system or translated into this publication and to make changes from the wall outlet before cleaning. Always unplug your dealer or local power company. v Servicing...
... any language or computer language, in installation unless proper ventilation is provided. • Never push objects or spill liquid of BenQ Corporation. iv Care And Cleaning • Cleaning. Your monitor should be reproduced, transmitted, transcribed, stored in a retrieval system or translated into this publication and to make changes from the wall outlet before cleaning. Always unplug your dealer or local power company. v Servicing...
User Manual
Page 3
... to install on Windows 2000, ME, & 98 systems 14 How to complete the Windows Upgrade Device Driver Wizard 15 How to adjust the screen resolution 17 How to adjust the screen refresh rate 18 How to set the picture optimization 19 How to adjust your monitor 20 A Look at the Control Panel 20 Hot Key Mode ...21 Main Menu Mode ...21 Troubleshooting ...29 Frequently Asked Questions (FAQ 29 Need More Help? ...30 Supported operating modes 31 Specifications ...32...
... to install on Windows 2000, ME, & 98 systems 14 How to complete the Windows Upgrade Device Driver Wizard 15 How to adjust the screen resolution 17 How to adjust the screen refresh rate 18 How to set the picture optimization 19 How to adjust your monitor 20 A Look at the Control Panel 20 Hot Key Mode ...21 Main Menu Mode ...21 Troubleshooting ...29 Frequently Asked Questions (FAQ 29 Need More Help? ...30 Supported operating modes 31 Specifications ...32...
User Manual
Page 6
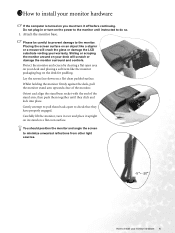
... not plug-in or turn it upright on its stand on a flat clean padded surface. Protect the monitor and screen by clearing a flat open area on the power to the monitor until they have properly engaged. Whilst holding the monitor firmly against the desk, pull the monitor stand arm upwards clear of the stand arm, then push them back apart to the monitor. Orient and align the stand base...
... not plug-in or turn it upright on its stand on a flat clean padded surface. Protect the monitor and screen by clearing a flat open area on the power to the monitor until they have properly engaged. Whilst holding the monitor firmly against the desk, pull the monitor stand arm upwards clear of the stand arm, then push them back apart to the monitor. Orient and align the stand base...
User Manual
Page 7
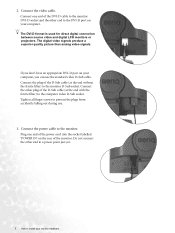
... DVI-D format is used for direct digital connection between source video and digital LCD monitors or projectors. Connect the other end to a power point just yet. 7 How to prevent the plugs from accidently falling out during use the standard video D-Sub cable. Connect the power cable to the monitor D-Sub socket. The digital video signals produce a superior quality picture than analog video signals. 2. Tighten all finger screws to install your computer. Do not connect the other plug of the power cord into...
... DVI-D format is used for direct digital connection between source video and digital LCD monitors or projectors. Connect the other end to a power point just yet. 7 How to prevent the plugs from accidently falling out during use the standard video D-Sub cable. Connect the power cable to the monitor D-Sub socket. The digital video signals produce a superior quality picture than analog video signals. 2. Tighten all finger screws to install your computer. Do not connect the other plug of the power cord into...

User Manual
Page 8
... of the monitor. Turn on the power. Connect-to retain the cables neatly in Section 4: Getting the most from your monitor hardware 8 4. Turn on the monitor by squeezing the clip inwards as illustrated. Route the cables via the loose bracket. Plug the other end of the power cord into a power point and turn -on the computer too, and follow the instructions in place behind the monitor stand. 5.
... of the monitor. Turn on the power. Connect-to retain the cables neatly in Section 4: Getting the most from your monitor hardware 8 4. Turn on the monitor by squeezing the clip inwards as illustrated. Route the cables via the loose bracket. Plug the other end of the power cord into a power point and turn -on the computer too, and follow the instructions in place behind the monitor stand. 5.

User Manual
Page 10
... upgrade (existing) installation follow to your computer (after connecting the monitor to successfully install the BenQ LCD Monitor driver software. Follow the wizard instructions until it asks you to a network which has security access requirements, network policy settings may prevent you from your computer is connected to select a monitor model. To gain the most from my new monitor? Furthermore, if your new BenQ color LCD flat screen monitor, you should install the custom BenQ LCD Monitor driver software...
... upgrade (existing) installation follow to your computer (after connecting the monitor to successfully install the BenQ LCD Monitor driver software. Follow the wizard instructions until it asks you to a network which has security access requirements, network policy settings may prevent you from your computer is connected to select a monitor model. To gain the most from my new monitor? Furthermore, if your new BenQ color LCD flat screen monitor, you should install the custom BenQ LCD Monitor driver software...

User Manual
Page 11
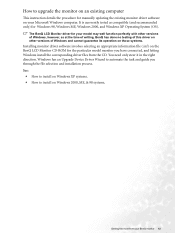
... to upgrade the monitor on an existing computer. 1. Look to confirm that has already had a monitor driver installed before , and for which the BenQ LCD Monitor is only suitable for a computer which has never been used before . How to install the monitor on a new computer This instruction details the procedure for selecting and installing the BenQ LCD Monitor driver software on a new computer which has never had another monitor connected...
... to upgrade the monitor on an existing computer. 1. Look to confirm that has already had a monitor driver installed before , and for which the BenQ LCD Monitor is only suitable for a computer which has never been used before . How to install the monitor on a new computer This instruction details the procedure for selecting and installing the BenQ LCD Monitor driver software on a new computer which has never had another monitor connected...
User Manual
Page 12
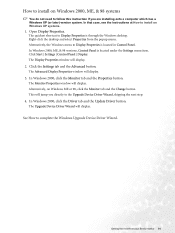
... compatible (and recommended only) for Windows 98, Windows ME, Windows 2000, and Windows XP Operating System (OS). Windows has an Upgrade Device Driver Wizard to automate the task and guide you have connected, and letting Windows install the corresponding driver files from your Microsoft Windows computer. How to upgrade the monitor on an existing computer This instruction details the procedure for manually updating the existing monitor driver software on your BenQ monitor 12 You need...
... compatible (and recommended only) for Windows 98, Windows ME, Windows 2000, and Windows XP Operating System (OS). Windows has an Upgrade Device Driver Wizard to automate the task and guide you have connected, and letting Windows install the corresponding driver files from your Microsoft Windows computer. How to upgrade the monitor on an existing computer This instruction details the procedure for manually updating the existing monitor driver software on your BenQ monitor 12 You need...

User Manual
Page 13
... the BenQ driver on the CD, and click the Next button. Check the option 'Install from a list or specific location' and click Next. 8. Open Display Properties. The quickest shortcut to your system. • Under the Classic view, click Start | Control Panel | Display. • Under the Category view, click Start | Control Panel | Appearance and Themes | Change the screen resolution. In Windows XP version, Control Panel is selected for the best driver in step 6. The menu options displayed will...
... the BenQ driver on the CD, and click the Next button. Check the option 'Install from a list or specific location' and click Next. 8. Open Display Properties. The quickest shortcut to your system. • Under the Classic view, click Start | Control Panel | Display. • Under the Category view, click Start | Control Panel | Appearance and Themes | Change the screen resolution. In Windows XP version, Control Panel is selected for the best driver in step 6. The menu options displayed will...
User Manual
Page 14
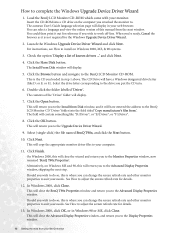
... the Update Driver button. Click the Settings tab and the Advanced button. In Windows 2000, click the Monitor tab and the Properties button. Getting the most from the popup menu. Click Start | Settings | Control Panel | Display. The quickest shortcut to install on Windows ME or 98, click the Monitor tab and the Change button. In Windows 2000, ME, & 98 versions, Control Panel is located in Control Panel. Open Display Properties. Alternatively, the Windows menu to complete the Windows Upgrade Device Driver...
... the Update Driver button. Click the Settings tab and the Advanced button. In Windows 2000, click the Monitor tab and the Properties button. Getting the most from the popup menu. Click Start | Settings | Control Panel | Display. The quickest shortcut to install on Windows ME or 98, click the Monitor tab and the Change button. In Windows 2000, ME, & 98 versions, Control Panel is located in Control Panel. Open Display Properties. Alternatively, the Windows menu to complete the Windows Upgrade Device Driver...
User Manual
Page 15
... the Advanced Display Properties window, and return you to work off-line. Should you wish to do so, this manual from :'. This is where you can change the screen refresh rate and other monitor properties to suit your needs. Click the OK button. In Windows 2000, click OK, or in your BenQ monitor How to the BenQ LCD Monitor CD-ROM. You can change the screen refresh rate and other monitor properties...
... the Advanced Display Properties window, and return you to work off-line. Should you wish to do so, this manual from :'. This is where you can change the screen refresh rate and other monitor properties to suit your needs. Click the OK button. In Windows 2000, click OK, or in your BenQ monitor How to the BenQ LCD Monitor CD-ROM. You can change the screen refresh rate and other monitor properties...
User Manual
Page 17
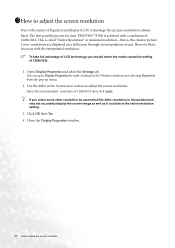
... resolution is called "Native Resolution" or maximal resolution - 1511How to adjust the screen resolution Due to the nature of liquid crystal display (LCD) technology, the picture resolution is , the clearest picture. You can open Display Properties by right-clicking on a full screen through an interpolation circuit. that this other resolution, be aware that is always fixed. Close the Display Properties window. 17 How to adjust the screen resolution. The best possible picture for your T905/T905...
... resolution is called "Native Resolution" or maximal resolution - 1511How to adjust the screen resolution Due to the nature of liquid crystal display (LCD) technology, the picture resolution is , the clearest picture. You can open Display Properties by right-clicking on a full screen through an interpolation circuit. that this other resolution, be aware that is always fixed. Close the Display Properties window. 17 How to adjust the screen resolution. The best possible picture for your T905/T905...

User Manual
Page 18
... is not technically possible for the native resolution of 1280x1024. 1. Select the Adapter tab, and select an appropriate refresh rate to adjust the screen refresh rate 18 1611How to adjust the screen refresh rate You don't have to choose the highest possible refresh rate on an LCD display, because it is a table with the factory modes in the specification section of this User's Manual. The best results are obtained by using the factory modes already set in Control Panel. 2.
... is not technically possible for the native resolution of 1280x1024. 1. Select the Adapter tab, and select an appropriate refresh rate to adjust the screen refresh rate 18 1611How to adjust the screen refresh rate You don't have to choose the highest possible refresh rate on an LCD display, because it is a table with the factory modes in the specification section of this User's Manual. The best results are obtained by using the factory modes already set in Control Panel. 2.
User Manual
Page 19
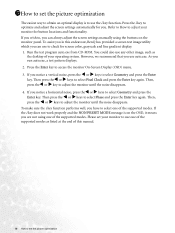
... your monitor to use auto.exe. 1711How to set the picture optimization The easiest way to obtain an optimal display is on the monitor panel. Refer to How to adjust your monitor for screen color, grayscale and line gradient display. 1. Please set your operating system. Press the i key to optimize and adjust the screen settings automatically for you use one of the supported modes as the desktop of this endeavour, BenQ has provided a screen test image...
... your monitor to use auto.exe. 1711How to set the picture optimization The easiest way to obtain an optimal display is on the monitor panel. Refer to How to adjust your monitor for screen color, grayscale and line gradient display. 1. Please set your operating system. Press the i key to optimize and adjust the screen settings automatically for you use one of the supported modes as the desktop of this endeavour, BenQ has provided a screen test image...
User Manual
Page 20
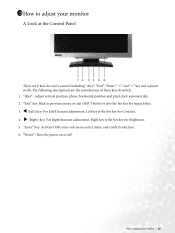
"iKey" : Adjust vertical position, phase, horizontal position and pixel clock automatically. 2. Left key is also the hot key for user's control including "iKey", "Exit", "Enter", "" key and a power swith. How to previous menu or exit OSD. The following descriptions are 6 keys for Input Select. 3. "Exit" key: Back to adjust your monitor A Look at the Control Panel There are the introduction of these keys & switch. 1. This key is the...
"iKey" : Adjust vertical position, phase, horizontal position and pixel clock automatically. 2. Left key is also the hot key for user's control including "iKey", "Exit", "Enter", "" key and a power swith. How to previous menu or exit OSD. The following descriptions are 6 keys for Input Select. 3. "Exit" key: Back to adjust your monitor A Look at the Control Panel There are the introduction of these keys & switch. 1. This key is the...
User Manual
Page 24
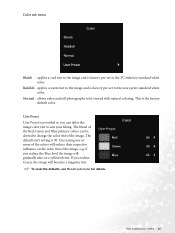
This is 50. The default start setting is the factory default color. applies a cool tint to the image and is factory pre-set to adjust your liking. Normal - allows video and still photographs to the PC industry standard white color. The blend of the Red, Green and Blue primary colors can tailor the image color tint to change the color tint of the image. if you reduce Green, the image will become a magenta tint. If...
This is 50. The default start setting is the factory default color. applies a cool tint to the image and is factory pre-set to adjust your liking. Normal - allows video and still photographs to the PC industry standard white color. The blend of the Red, Green and Blue primary colors can tailor the image color tint to change the color tint of the image. if you reduce Green, the image will become a magenta tint. If...
User Manual
Page 28
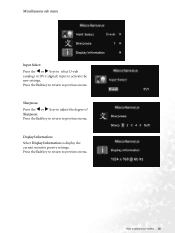
Press the Exit key to return to display the current monitor proerty settings. Display Information: Select Display Information to previous menu. Press the Exit key to return to adjust the degree of Sharpness. Sharpness: Press the W or X keys to previous menu. Press the Exit key to return to adjust your monitor 28 How to previous menu. Miscellaneous sub menu Input Select: Press the W or X keys to select D-sub (analog) or DVI (digital) input to activate the new settings.
Press the Exit key to return to display the current monitor proerty settings. Display Information: Select Display Information to previous menu. Press the Exit key to return to adjust the degree of Sharpness. Sharpness: Press the W or X keys to previous menu. Press the Exit key to return to adjust your monitor 28 How to previous menu. Miscellaneous sub menu Input Select: Press the W or X keys to select D-sub (analog) or DVI (digital) input to activate the new settings.

User Manual
Page 29
... cable? Is the prompt on the display illuminated in the signal input. Check the power supply mains socket, the external power supply and the mains switch. 29 Troubleshooting Read the How to get necessary support. If the image is still not correct and the OSD also has faulty coloration, this means one or more pixels are permanently white, one of Range" on the screen, this monitor does not support, please change the setting...
... cable? Is the prompt on the display illuminated in the signal input. Check the power supply mains socket, the external power supply and the mains switch. 29 Troubleshooting Read the How to get necessary support. If the image is still not correct and the OSD also has faulty coloration, this means one or more pixels are permanently white, one of Range" on the screen, this monitor does not support, please change the setting...

User Manual
Page 30
The image is displaced in one direction: Read the How to adjust the screen resolution section and then select the correct resolution, refresh rate and make adjustments based on these instructions.. The image is distorted, flashes or flickers: Read the How to adjust the screen resolution section and then select the correct resolution, refresh rate and make adjustments based on these instructions. If your problems remain after checking this manual, please contact your place of purchase or e-mail us at: Support@BenQ.com Troubleshooting 30 Need More Help?
The image is displaced in one direction: Read the How to adjust the screen resolution section and then select the correct resolution, refresh rate and make adjustments based on these instructions.. The image is distorted, flashes or flickers: Read the How to adjust the screen resolution section and then select the correct resolution, refresh rate and make adjustments based on these instructions. If your problems remain after checking this manual, please contact your place of purchase or e-mail us at: Support@BenQ.com Troubleshooting 30 Need More Help?
User Manual
Page 31
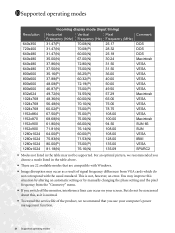
... manually changing the phase setting and the pixel frequency from VGA cards which do not correspond with Windows. • Image disruption may not be concerned about this, as a result of the product, we recommended you switch off the monitor, interference lines can occur on your computer's power management function. 31 Supported operating modes For an optimal picture, we recommend that are 22 available modes that you use your screen...
... manually changing the phase setting and the pixel frequency from VGA cards which do not correspond with Windows. • Image disruption may not be concerned about this, as a result of the product, we recommended you switch off the monitor, interference lines can occur on your computer's power management function. 31 Supported operating modes For an optimal picture, we recommend that are 22 available modes that you use your screen...


