
User Manual
Page 3
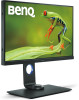
... instructions for best performance, and long life for your LCD Monitor. There are not sure of the type of the product is inside . Replace the unit if it is more than 3 kg) An approved power cord greater or equal to H03VV-F or H05VV-F, 2G or 3G, 0.75mm2 must be used . • (If a remote control is damaged or exposed to service the power adapter...
... instructions for best performance, and long life for your LCD Monitor. There are not sure of the type of the product is inside . Replace the unit if it is more than 3 kg) An approved power cord greater or equal to H03VV-F or H05VV-F, 2G or 3G, 0.75mm2 must be used . • (If a remote control is damaged or exposed to service the power adapter...
User Manual
Page 4
... the monitor. • Turn off the monitor and the power before disconnecting the cables from the LCD monitor. • Always unplug the product from your eyes. • Looking at the screen for information on power rating, manufacture date, and identification markings. Clean the LCD monitor surface with flat surface. • Ensure that the wall material and the standard wall mount bracket (purchased separately) are stable enough to support...
... the monitor. • Turn off the monitor and the power before disconnecting the cables from the LCD monitor. • Always unplug the product from your eyes. • Looking at the screen for information on power rating, manufacture date, and identification markings. Clean the LCD monitor surface with flat surface. • Ensure that the wall material and the standard wall mount bracket (purchased separately) are stable enough to support...

User Manual
Page 5
... your monitor 9 Front view ...9 Back view...9 Input and output ports ...10 Connections ...11 How to assemble your monitor hardware 13 How to detach the stand and the base 18 Installing shading hood (optional step 20 Adjusting the monitor height ...25 Rotating the monitor ...26 Viewing angle adjustment ...27 Using the monitor wall mounting kit 28 Getting the most from your BenQ monitor 29 How to install the monitor on a new computer 30 How to upgrade the monitor...
... your monitor 9 Front view ...9 Back view...9 Input and output ports ...10 Connections ...11 How to assemble your monitor hardware 13 How to detach the stand and the base 18 Installing shading hood (optional step 20 Adjusting the monitor height ...25 Rotating the monitor ...26 Viewing angle adjustment ...27 Using the monitor wall mounting kit 28 Getting the most from your BenQ monitor 29 How to install the monitor on a new computer 30 How to upgrade the monitor...

User Manual
Page 13
... the monitor base as illustrated. Attach the monitor stand to the monitor. Turn the stand clockwise until instructed to do so. • The following illustrations are for your reference only. Do not plug-in or turn it off before continuing. Protect the monitor and screen by input signal. The location and available input and output jacks may vary depending on a flat clean padded surface. How to assemble your monitor...
... the monitor base as illustrated. Attach the monitor stand to the monitor. Turn the stand clockwise until instructed to do so. • The following illustrations are for your reference only. Do not plug-in or turn it off before continuing. Protect the monitor and screen by input signal. The location and available input and output jacks may vary depending on a flat clean padded surface. How to assemble your monitor...

User Manual
Page 15
... not support power delivery to assemble your region. To Connect the mini DP Cable Or Connect the plug of the monitor and change the setting from the laptop to the monitor video socket. Once the setting is required. It allows signal, audio, and data transmission from 1.4 to the computer video socket. The Type-C port on the OSD menu of the mini DP cable to the monitor. How to the laptop. Connect the monitor...
... not support power delivery to assemble your region. To Connect the mini DP Cable Or Connect the plug of the monitor and change the setting from the laptop to the monitor video socket. Once the setting is required. It allows signal, audio, and data transmission from 1.4 to the computer video socket. The Type-C port on the OSD menu of the mini DP cable to the monitor. How to the laptop. Connect the monitor...

User Manual
Page 28
... secured properly. Remove the monitor stand. Refer to the product specifications for wall mount installation and safety precautions. 28 How to the monitor. Lay the screen face down on the back cover. Consult a professional technician or BenQ service for weight information. •Turn off the monitor and the power before disconnecting the cables from the LCD monitor. 1. Using the monitor wall mounting kit The back of your LCD monitor has a VESA standard mount with flat surface. •...
... secured properly. Remove the monitor stand. Refer to the product specifications for wall mount installation and safety precautions. 28 How to the monitor. Lay the screen face down on the back cover. Consult a professional technician or BenQ service for weight information. •Turn off the monitor and the power before disconnecting the cables from the LCD monitor. 1. Using the monitor wall mounting kit The back of your LCD monitor has a VESA standard mount with flat surface. •...

User Manual
Page 29
... are connecting the monitor and installing the software onto a new computer (without existing monitor driver software), or whether you are upgrading an existing installation (which has security access requirements, network policy settings may prevent you from installing software on your new BenQ LCD monitor, you turn on your computer (after connecting the monitor to your BenQ LCD Monitor will launch its Found New Hardware wizard. Further details and step-by-step instructions...
... are connecting the monitor and installing the software onto a new computer (without existing monitor driver software), or whether you are upgrading an existing installation (which has security access requirements, network policy settings may prevent you from installing software on your new BenQ LCD monitor, you turn on your computer (after connecting the monitor to your BenQ LCD Monitor will launch its Found New Hardware wizard. Further details and step-by-step instructions...

User Manual
Page 30
... not be following the instructions for How to upgrade the monitor on an existing computer. 1. Look to confirm that has already had a monitor driver installed before , and for selecting and installing the BenQ LCD Monitor driver software on a new computer which has never had another monitor connected to it . Follow the instructions in How to assemble your monitor and click Next. 6. Check Search for a suitable driver for CD-ROM...
... not be following the instructions for How to upgrade the monitor on an existing computer. 1. Look to confirm that has already had a monitor driver installed before , and for selecting and installing the BenQ LCD Monitor driver software on a new computer which has never had another monitor connected to it . Follow the instructions in How to assemble your monitor and click Next. 6. Check Search for a suitable driver for CD-ROM...

User Manual
Page 31
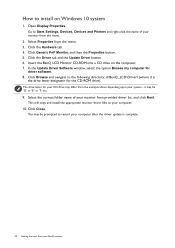
How to upgrade the monitor on an existing computer This instruction details the procedure for manually updating the existing monitor driver software on the BenQ LCD Monitor CD-ROM for the particular model monitor you through the file selection and installation process. The BenQ LCD Monitor driver for Windows 10, Windows 8 (8.1), and Windows 7 Operating System (OS). It is currently tested as compatible for your model may well function perfectly with other versions of Windows, however...
How to upgrade the monitor on an existing computer This instruction details the procedure for manually updating the existing monitor driver software on the BenQ LCD Monitor CD-ROM for the particular model monitor you through the file selection and installation process. The BenQ LCD Monitor driver for Windows 10, Windows 8 (8.1), and Windows 7 Operating System (OS). It is currently tested as compatible for your model may well function perfectly with other versions of Windows, however...
User Manual
Page 32
Open Display Properties. Go to your monitor from the menu. 2. Click Generic PnP Monitor, and then the Properties button. 5. Click the Driver tab and the Update Driver button. 6. Click the Hardware tab. 4. This will copy and install the appropriate monitor driver files to Start, Settings, Devices, Devices and Printers and right-click the name of your system - You may be 'D:' or 'E:' or 'F:' etc. 9. In the Update Driver Software window, select...
Open Display Properties. Go to your monitor from the menu. 2. Click Generic PnP Monitor, and then the Properties button. 5. Click the Driver tab and the Update Driver button. 6. Click the Hardware tab. 4. This will copy and install the appropriate monitor driver files to Start, Settings, Devices, Devices and Printers and right-click the name of your system - You may be 'D:' or 'E:' or 'F:' etc. 9. In the Update Driver Software window, select...

User Manual
Page 33
...of your BenQ monitor 33 Click the Driver tab and the Update Driver button. 6. Click Close. Getting the most from your monitor from the menu. Select the correct folder name of the screen or press the Windows + C buttons on Windows 8 (8.1) system 1. Go to Settings, Control Panel, Devices and...Open Display Properties. How to install on the keyboard to bring up the Charm bar. Select Properties from the menu. 2. Click Generic PnP Monitor, and then the Properties button. 5. Insert the BenQ LCD Monitor CD-ROM into a CD drive on the computer. 7. In the Update Driver Software window...
...of your BenQ monitor 33 Click the Driver tab and the Update Driver button. 6. Click Close. Getting the most from your monitor from the menu. Select the correct folder name of the screen or press the Windows + C buttons on Windows 8 (8.1) system 1. Go to Settings, Control Panel, Devices and...Open Display Properties. How to install on the keyboard to bring up the Charm bar. Select Properties from the menu. 2. Click Generic PnP Monitor, and then the Properties button. 5. Insert the BenQ LCD Monitor CD-ROM into a CD drive on the computer. 7. In the Update Driver Software window...

User Manual
Page 38
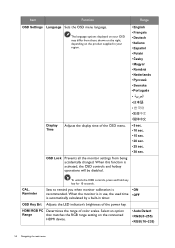
... Input. Select (Menu) to adjust all the settings on your monitor OSD in hot key menu OSD icon in main menu Function Custom Key 1 • By default, the key is displayed. Basic menu operation All OSD (On Screen Display) menus can use the OSD menu to access the main menu. 4. Press any of the control keys. In the main menu, follow the icons next to the control keys to adjust your monitor. 1 2 4 3 1. To change the default settings...
... Input. Select (Menu) to adjust all the settings on your monitor OSD in hot key menu OSD icon in main menu Function Custom Key 1 • By default, the key is displayed. Basic menu operation All OSD (On Screen Display) menus can use the OSD menu to access the main menu. 4. Press any of the control keys. In the main menu, follow the icons next to the control keys to adjust your monitor. 1 2 4 3 1. To change the default settings...

User Manual
Page 40
... HDMI cable or an HDMI cable that is following : • Apply the standard color setting from Color Adjustment > Color Mode. • Change the display and color settings manually from Color Adjustment > Save Color Settings. • Use a colorimeter (purchased separately) to adjust your purchased model, you can do one of the control keys or the key on the monitor. 40 How to work with the following names and resolutions are used names for software download and more information. Depending on the Color Mode...
... HDMI cable or an HDMI cable that is following : • Apply the standard color setting from Color Adjustment > Color Mode. • Change the display and color settings manually from Color Adjustment > Save Color Settings. • Use a colorimeter (purchased separately) to adjust your purchased model, you can do one of the control keys or the key on the monitor. 40 How to work with the following names and resolutions are used names for software download and more information. Depending on the Color Mode...

User Manual
Page 41
... supporting second sources. Select an appropriate display mode. Choosing an appropriate picture mode Your monitor provides various picture modes that are suitable for PIP/PBP mode from the menu in PIP/PBP mode. Go to decide the second source for different types of the control keys or the key on page 52. SW320 Main source Inputs HDMI DP Mini DP Possible second sources HDMI DP Mini DP V V V V V V SW271 Main source Inputs HDMI-1 HDMI-2 DP USB-C HDMI...
... supporting second sources. Select an appropriate display mode. Choosing an appropriate picture mode Your monitor provides various picture modes that are suitable for PIP/PBP mode from the menu in PIP/PBP mode. Go to decide the second source for different types of the control keys or the key on page 52. SW320 Main source Inputs HDMI DP Mini DP Possible second sources HDMI DP Mini DP V V V V V V SW271 Main source Inputs HDMI-1 HDMI-2 DP USB-C HDMI...

User Manual
Page 43
... your video cable connection type. (SW320) • HDMI • DP • Mini DP (SW271) • HDMI-1 • HDMI-2 • DP • USB-C Navigating the main menu 43 To return to make selection. For models without certain functions, their settings and related items will become grayed out. And keys that appropriate to that are not available will not appear on the input sources, functions and settings. Use...
... your video cable connection type. (SW320) • HDMI • DP • Mini DP (SW271) • HDMI-1 • HDMI-2 • DP • USB-C Navigating the main menu 43 To return to make selection. For models without certain functions, their settings and related items will become grayed out. And keys that appropriate to that are not available will not appear on the input sources, functions and settings. Use...

User Manual
Page 46
... shows more information Calibration (Palette Master Element How-to-Use Guide). 3 The access: www.BenQ.com > Purchased (SW271 model > the Download or Support tab. DICOM (SW271 only) Darkroom For viewing DICOM images. For image editing and viewing in Medicine is a standard for handling, storing, printing, and transmitting medical images. This mode enhances the sharpness and clarity of color settings defined Custom 2 by the 1 provided calibration software named Palette Calibration 2 Master Element and...
... shows more information Calibration (Palette Master Element How-to-Use Guide). 3 The access: www.BenQ.com > Purchased (SW271 model > the Download or Support tab. DICOM (SW271 only) Darkroom For viewing DICOM images. For image editing and viewing in Medicine is a standard for handling, storing, printing, and transmitting medical images. This mode enhances the sharpness and clarity of color settings defined Custom 2 by the 1 provided calibration software named Palette Calibration 2 Master Element and...
User Manual
Page 54
... Range that matches the RGB range setting on the product supplied in timer. OSD Lock Prevents all the monitor settings from those shown on the right, depending on the connected HDMI device. • Auto Detect • RGB (0~255) • RGB (16~235) 54 Navigating the main menu Reminder Sets to remind you when monitor calibration is activated, the OSD controls and hotkey operations will be disabled. When the monitor is in use, the used...
... Range that matches the RGB range setting on the product supplied in timer. OSD Lock Prevents all the monitor settings from those shown on the right, depending on the connected HDMI device. • Auto Detect • RGB (0~255) • RGB (16~235) 54 Navigating the main menu Reminder Sets to remind you when monitor calibration is activated, the OSD controls and hotkey operations will be disabled. When the monitor is in use, the used...

User Manual
Page 58
... colors is distorted, flashes or flickers. It has a yellow, blue or pink appearance. Go to Picture and Reset Color, and then choose YES to reset the color settings to set a proper aspect ratio for blurring to occur due to get necessary support. Select the native resolution. Pixel errors can use the Display Mode function to the factory defaults. Now check the signal cable connectors. Images from different input sources may appear distorted or stretched on the link "Adjusting the Screen Resolution...
... colors is distorted, flashes or flickers. It has a yellow, blue or pink appearance. Go to Picture and Reset Color, and then choose YES to reset the color settings to set a proper aspect ratio for blurring to occur due to get necessary support. Select the native resolution. Pixel errors can use the Display Mode function to the factory defaults. Now check the signal cable connectors. Images from different input sources may appear distorted or stretched on the link "Adjusting the Screen Resolution...

User Manual
Page 59
... , check the power supply mains socket, the external power supply and the mains switch. Power LED indicator The LED indicator is solid white or flashing white. • If the LED lights up process. To unlock the OSD controls when it is preset to one direction. Audio No sound can be locked, press and hold any pin is active. The system will adjust the refresh rate automatically. If that this monitor does not support, please change the setting...
... , check the power supply mains socket, the external power supply and the mains switch. Power LED indicator The LED indicator is solid white or flashing white. • If the LED lights up process. To unlock the OSD controls when it is preset to one direction. Audio No sound can be locked, press and hold any pin is active. The system will adjust the refresh rate automatically. If that this monitor does not support, please change the setting...

User Manual
Page 60
... problems remain after checking this manual, please contact your place of purchase or visit the local website from the connected external speakers. • Remove your headphone (if the headphone is connected to Working with HDR technology on the screen. Refer to the monitor). • Check whether the headphone jack is properly connected. • If the external speakers are used. Need more support and local customer service. 60 Troubleshooting...
... problems remain after checking this manual, please contact your place of purchase or visit the local website from the connected external speakers. • Remove your headphone (if the headphone is connected to Working with HDR technology on the screen. Refer to the monitor). • Check whether the headphone jack is properly connected. • If the external speakers are used. Need more support and local customer service. 60 Troubleshooting...


