
Safety Warning and Notice
Page 2
... (e.g. power cable) only with the device to check whether the monitor is the sole responsibility of the user if problems (such as alcohol to be void if any of its intended sales area. Note that appears to clean your nearest BenQ service center for warranty services have the pay the repairing costs. It is compatible with a (multi-outlet) extension cord. Always turn...
... (e.g. power cable) only with the device to check whether the monitor is the sole responsibility of the user if problems (such as alcohol to be void if any of its intended sales area. Note that appears to clean your nearest BenQ service center for warranty services have the pay the repairing costs. It is compatible with a (multi-outlet) extension cord. Always turn...

Resolution file
Page 1
... purchased model, please check the Specification on a full screen through an interpolation circuit. Close the Display Properties window. Image blurring across pixel boundaries can open Display Properties by right-clicking on your PC, different procedures should select the native resolution setting of your input source does not provide an image which supports this resolution value. If yours doesn't, check with the video card manufacturer's website for an updated driver for new hardware video resolutions. Open Display Properties...
... purchased model, please check the Specification on a full screen through an interpolation circuit. Close the Display Properties window. Image blurring across pixel boundaries can open Display Properties by right-clicking on your PC, different procedures should select the native resolution setting of your input source does not provide an image which supports this resolution value. If yours doesn't, check with the video card manufacturer's website for an updated driver for new hardware video resolutions. Open Display Properties...
Resolution file
Page 2
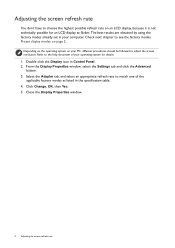
... Display Properties window. 2 Adjusting the screen refresh rate Click Change, OK, then Yes. 5. The best results are obtained by using the factory modes already set in the specification table. 4. Refer to flicker. Select the Adapter tab, and select an appropriate refresh rate to match one of your operating system for details. 1. Adjusting the screen refresh rate You don't have to choose the highest possible refresh rate on page 3. Double click the Display icon in Control Panel. 2. Check...
... Display Properties window. 2 Adjusting the screen refresh rate Click Change, OK, then Yes. 5. The best results are obtained by using the factory modes already set in the specification table. 4. Refer to flicker. Select the Adapter tab, and select an appropriate refresh rate to match one of your operating system for details. 1. Adjusting the screen refresh rate You don't have to choose the highest possible refresh rate on page 3. Double click the Display icon in Control Panel. 2. Check...
Resolution file
Page 4
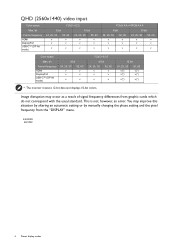
..., 60 v v v v *: The monitor receives 12-bit data and displays 10-bit colors. 12 bit 24, 25, 30 v(*) v(*) 50, 60 v(*) v(*) v(*) v(*) Image disruption may improve this situation by altering an automatic setting or by manually changing the phase setting and the pixel frequency from graphic cards which do not correspond with the usual standard. bit Frame frequency HDMI DisplayPort USB-C™ (DP Alt mode) YCbCr 4:2:2 8 bit 10...
..., 60 v v v v *: The monitor receives 12-bit data and displays 10-bit colors. 12 bit 24, 25, 30 v(*) v(*) 50, 60 v(*) v(*) v(*) v(*) Image disruption may improve this situation by altering an automatic setting or by manually changing the phase setting and the pixel frequency from graphic cards which do not correspond with the usual standard. bit Frame frequency HDMI DisplayPort USB-C™ (DP Alt mode) YCbCr 4:2:2 8 bit 10...
User Manual
Page 7
... ...2 Product support ...3 Getting started ...9 Getting to know your monitor 12 Front view ...12 Back view...12 Input and output ports ...13 Connections ...14 How to assemble your monitor hardware 17 How to detach the stand and the base 23 Installing shading hood (optional step 25 Adjusting the monitor height ...30 Rotating the monitor ...31 Viewing angle adjustment ...32 Using the monitor wall mounting kit 33 Getting the most from your BenQ monitor 34 Downloading the LCD Monitor driver files...
... ...2 Product support ...3 Getting started ...9 Getting to know your monitor 12 Front view ...12 Back view...12 Input and output ports ...13 Connections ...14 How to assemble your monitor hardware 17 How to detach the stand and the base 23 Installing shading hood (optional step 25 Adjusting the monitor height ...30 Rotating the monitor ...31 Viewing angle adjustment ...32 Using the monitor wall mounting kit 33 Getting the most from your BenQ monitor 34 Downloading the LCD Monitor driver files...
User Manual
Page 33
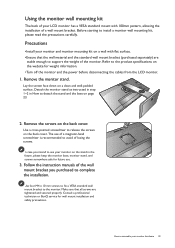
..., allowing the installation of the monitor. Detach the monitor stand as instructed in step 1~2 in the future, please keep the monitor base, monitor stand, and screws somewhere safe for wall mount installation and safety precautions. Use four M4 x 10 mm screws to fix a VESA standard wall mount bracket to assemble your monitor on the back cover. Follow the instruction manuals of losing the screws. How to the monitor. Refer to the product specifications on page 23. 2. Make sure that...
..., allowing the installation of the monitor. Detach the monitor stand as instructed in step 1~2 in the future, please keep the monitor base, monitor stand, and screws somewhere safe for wall mount installation and safety precautions. Use four M4 x 10 mm screws to fix a VESA standard wall mount bracket to assemble your monitor on the back cover. Follow the instruction manuals of losing the screws. How to the monitor. Refer to the product specifications on page 23. 2. Make sure that...
User Manual
Page 34
... connect and install your BenQ LCD Monitor will launch its Found New Hardware wizard. Downloading the LCD Monitor driver files from www.BenQ.com > Support > Download & FAQ > model name > Software. 2. Download the correct driver files from the Internet 1. Remember the file location the files are upgrading an existing installation (which process you turn on as an Administrator or as provided on the local website. See Downloading the LCD Monitor driver files from installing software on...
... connect and install your BenQ LCD Monitor will launch its Found New Hardware wizard. Downloading the LCD Monitor driver files from www.BenQ.com > Support > Download & FAQ > model name > Software. 2. Download the correct driver files from the Internet 1. Remember the file location the files are upgrading an existing installation (which process you turn on as an Administrator or as provided on the local website. See Downloading the LCD Monitor driver files from installing software on...
User Manual
Page 35
... BenQ LCD Monitor driver software on a new computer which has never had another monitor connected to it will automatically detect the new monitor and launch the Found New Hardware Wizard. When Windows starts, it . You should instead be connected to it (and has monitor driver software installed), you should not be following the instructions for How to upgrade the monitor on page 17. Follow the prompts until it displays...
... BenQ LCD Monitor driver software on a new computer which has never had another monitor connected to it will automatically detect the new monitor and launch the Found New Hardware Wizard. When Windows starts, it . You should instead be connected to it (and has monitor driver software installed), you should not be following the instructions for How to upgrade the monitor on page 17. Follow the prompts until it displays...
User Manual
Page 36
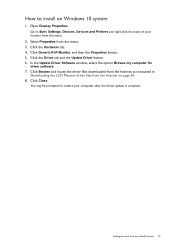
Windows has an Upgrade Device Driver Wizard to automate the task and guide you have connected, and letting Windows install the corresponding driver files. The BenQ LCD Monitor driver for your model may well function perfectly with other versions of Windows, however, as compatible for manually updating the existing monitor driver software on your BenQ monitor You need only steer it in the right direction. See: • How to install on Windows 10 system on page...
Windows has an Upgrade Device Driver Wizard to automate the task and guide you have connected, and letting Windows install the corresponding driver files. The BenQ LCD Monitor driver for your model may well function perfectly with other versions of Windows, however, as compatible for manually updating the existing monitor driver software on your BenQ monitor You need only steer it in the right direction. See: • How to install on Windows 10 system on page...
User Manual
Page 37
... driver update is complete. Select Properties from the Internet on Windows 10 system 1. Open Display Properties. Click the Hardware tab. 4. In the Update Driver Software window, select the option Browse my computer for driver software. 7. You may be prompted to install on page 34. 8. Click Browse and locate the driver files downloaded from the Internet as instructed in Downloading the LCD Monitor driver files from the menu. 3. Click Generic PnP Monitor...
... driver update is complete. Select Properties from the Internet on Windows 10 system 1. Open Display Properties. Click the Hardware tab. 4. In the Update Driver Software window, select the option Browse my computer for driver software. 7. You may be prompted to install on page 34. 8. Click Browse and locate the driver files downloaded from the Internet as instructed in Downloading the LCD Monitor driver files from the menu. 3. Click Generic PnP Monitor...
User Manual
Page 38
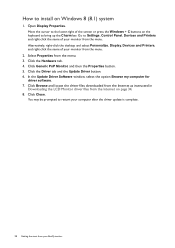
... the name of the screen or press the Windows + C buttons on the keyboard to install on page 34. 8. Click Close. Click the Hardware tab. 4. Click Browse and locate the driver files downloaded from the Internet as instructed in Downloading the LCD Monitor driver files from the menu. 3. Move the cursor to the lower-right of your monitor from your BenQ monitor Open Display Properties. How to bring...
... the name of the screen or press the Windows + C buttons on the keyboard to install on page 34. 8. Click Close. Click the Hardware tab. 4. Click Browse and locate the driver files downloaded from the Internet as instructed in Downloading the LCD Monitor driver files from the menu. 3. Move the cursor to the lower-right of your monitor from your BenQ monitor Open Display Properties. How to bring...
User Manual
Page 45
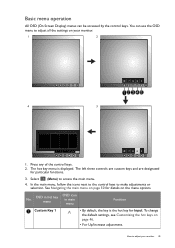
... on page 50 for particular functions. 3. Basic menu operation All OSD (On Screen Display) menus can use the OSD menu to access the main menu. 4. You can be accessed by the control keys. Press any of the control keys. 2. Select (Menu) to adjust all the settings on page 46. • For Up/Increase adjustment. To change the default settings, see Customizing the hot keys on your monitor 45
... on page 50 for particular functions. 3. Basic menu operation All OSD (On Screen Display) menus can use the OSD menu to access the main menu. 4. You can be accessed by the control keys. Press any of the control keys. 2. Select (Menu) to adjust all the settings on page 46. • For Up/Increase adjustment. To change the default settings, see Customizing the hot keys on your monitor 45
User Manual
Page 47
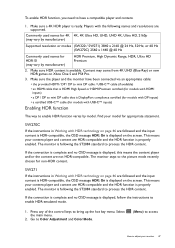
... resolutions are not HDR-compatible. The monitor is DisplayPort compliance certified (for models with DP inputs) • a certified USB-C™ cable (for models with HDMI inputs) • a DP / DP to mini DP cable that is following the ST2084 standard to process the HDR content. Select the main menu. 2. Make sure a 4K HDR player is displayed on Xbox One S and PS4 Pro. 3. SW270C If the instructions in Working...
... resolutions are not HDR-compatible. The monitor is DisplayPort compliance certified (for models with DP inputs) • a certified USB-C™ cable (for models with HDMI inputs) • a DP / DP to mini DP cable that is following the ST2084 standard to process the HDR content. Select the main menu. 2. Make sure a 4K HDR player is displayed on Xbox One S and PS4 Pro. 3. SW270C If the instructions in Working...
User Manual
Page 48
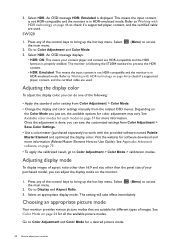
... appropriate picture mode Your monitor provides various picture modes that are used . 3. See Appendix: Advanced software on page 46 to check if a supported player, content, and the certified cable are suitable for a desired picture mode. 48 How to Working with the provided software named Palette Master Element and optimized the display color. Go to Color Adjustment and Color Mode for different types of the following the ST2084 standard to Color Adjustment > Color Mode > calibration modes. Select HDR. An OSD...
... appropriate picture mode Your monitor provides various picture modes that are used . 3. See Appendix: Advanced software on page 46 to check if a supported player, content, and the certified cable are suitable for a desired picture mode. 48 How to Working with the provided software named Palette Master Element and optimized the display color. Go to Color Adjustment and Color Mode for different types of the following the ST2084 standard to Color Adjustment > Color Mode > calibration modes. Select HDR. An OSD...
User Manual
Page 51
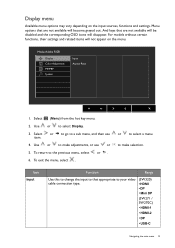
... to your video cable connection type. (SW320) • HDMI • DP • Mini DP (SW271 / SW270C) • HDMI-1 • HDMI-2 • DP • USB-C Navigating the main menu 51 Item Input Function Range Use this to change the input to that appropriate to select Display. 3. Mode: Adobe RGB Display Color Adjustment PIP/PBP System Input Aspect Ratio 1. Menu options that are not available will not appear on the input sources, functions and settings. or to...
... to your video cable connection type. (SW320) • HDMI • DP • Mini DP (SW271 / SW270C) • HDMI-1 • HDMI-2 • DP • USB-C Navigating the main menu 51 Item Input Function Range Use this to change the input to that appropriate to select Display. 3. Mode: Adobe RGB Display Color Adjustment PIP/PBP System Input Aspect Ratio 1. Menu options that are not available will not appear on the input sources, functions and settings. or to...
User Manual
Page 55
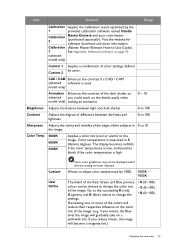
... website for software download and more of the image. Item Function Range Calibration Applies the calibration result optimized by users. Color temperature is measured in 0 to change the settings. Go to the succeeding R (red), G (green), and B (blue) menus to change the color tint of the colors will become a magenta tint.) • R (0~100) • G (0~100) • B (0~100) Navigating the main menu 55 Decreasing one or more information Calibration (Palette Master Element...
... website for software download and more of the image. Item Function Range Calibration Applies the calibration result optimized by users. Color temperature is measured in 0 to change the settings. Go to the succeeding R (red), G (green), and B (blue) menus to change the color tint of the colors will become a magenta tint.) • R (0~100) • G (0~100) • B (0~100) Navigating the main menu 55 Decreasing one or more information Calibration (Palette Master Element...
User Manual
Page 56
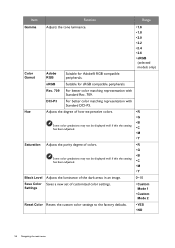
... color settings to the factory defaults. • Custom Mode 1 • Custom Mode 2 • YES • NO 56 Navigating the main menu Hue Adjusts the degree of how we perceive colors. • R • G • B Some color gradations may not be displayed well if this the setting has been adjusted. Adjusts the luminance of the dark areas in an image. • R • G • B • C • M • Y 0~10 Save Color Saves...
... color settings to the factory defaults. • Custom Mode 1 • Custom Mode 2 • YES • NO 56 Navigating the main menu Hue Adjusts the degree of how we perceive colors. • R • G • B Some color gradations may not be displayed well if this the setting has been adjusted. Adjusts the luminance of the dark areas in an image. • R • G • B • C • M • Y 0~10 Save Color Saves...
User Manual
Page 70
... or more pixels are permanently red, green, blue or another color. • Clean the LCD screen. • Cycle power on or off . • These are pixels that occurs in the signal input. And then select the correct resolution, refresh rate and make adjustments based on the monitor running the monitor at its native resolution. Download Resolution file from different input sources may appear distorted or stretched on these instructions. • If a VGA extension cable is blurred. • Download Resolution file from...
... or more pixels are permanently red, green, blue or another color. • Clean the LCD screen. • Cycle power on or off . • These are pixels that occurs in the signal input. And then select the correct resolution, refresh rate and make adjustments based on the monitor running the monitor at its native resolution. Download Resolution file from different input sources may appear distorted or stretched on these instructions. • If a VGA extension cable is blurred. • Download Resolution file from...
User Manual
Page 71
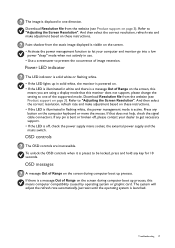
... of Range on these instructions. The image is displaced in flashing white, the power management mode is active. Press any key for 10 seconds. And then select the correct resolution, refresh rate and make adjustment based on the screen during computer boot up process. Just wait until the operating system is launched. The system will adjust the refresh rate automatically. Troubleshooting 71 OSD controls The OSD controls are using a display mode that does not help, check the signal cable connectors.
... of Range on these instructions. The image is displaced in flashing white, the power management mode is active. Press any key for 10 seconds. And then select the correct resolution, refresh rate and make adjustment based on the screen during computer boot up process. Just wait until the operating system is launched. The system will adjust the refresh rate automatically. Troubleshooting 71 OSD controls The OSD controls are using a display mode that does not help, check the signal cable connectors.

User Manual
Page 72
... the appropriate audio output setting on Display > Input. Need more support and local customer service. 72 Troubleshooting Check the cable connections and menu settings in HDR-emulated mode. Refer to Working with USB-C™ connection. See Connect the PC video cable on page 19 for more information. • Check if the input source has been selected to USB-C on your laptop has been selected. Audio No sound can be heard from the connected external speakers. • Remove your headphone...
... the appropriate audio output setting on Display > Input. Need more support and local customer service. 72 Troubleshooting Check the cable connections and menu settings in HDR-emulated mode. Refer to Working with USB-C™ connection. See Connect the PC video cable on page 19 for more information. • Check if the input source has been selected to USB-C on your laptop has been selected. Audio No sound can be heard from the connected external speakers. • Remove your headphone...


