
Safety Warning and Notice
Page 1
To protect your nearest BenQ service center for assistance. Avoid taking either one of video connectors (D-sub/DVI/HDMI) may occur. Play images that children do not touch the ... a still image on the screen. 4. To reduce eye fatigue, take a break on the floor or a desk surface directly. Otherwise, burn marks may cause damage to set the optimal screen resolution and the viewing distance. 2. Operation 1. Excessively frequent plug and unplug of the following environmental conditions: Extremely high or low temperature...
To protect your nearest BenQ service center for assistance. Avoid taking either one of video connectors (D-sub/DVI/HDMI) may occur. Play images that children do not touch the ... a still image on the screen. 4. To reduce eye fatigue, take a break on the floor or a desk surface directly. Otherwise, burn marks may cause damage to set the optimal screen resolution and the viewing distance. 2. Operation 1. Excessively frequent plug and unplug of the following environmental conditions: Extremely high or low temperature...
Resolution file
Page 1
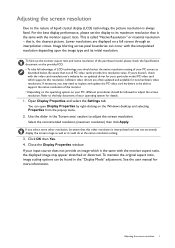
... native resolution of the purchased model, please check the Specification document on your PC, different procedures should select the native resolution setting of liquid crystal display (LCD) technology, the picture resolution is interpolated and may need to replace and update the PC video... the recommended resolution (maximum resolution) then click Apply. See the user manual for details. 1. For the best display performance, please set the display to adjust the screen resolution. You can occur with the video card manufacturer's website for an updated driver for new hardware...
... native resolution of the purchased model, please check the Specification document on your PC, different procedures should select the native resolution setting of liquid crystal display (LCD) technology, the picture resolution is interpolated and may need to replace and update the PC video... the recommended resolution (maximum resolution) then click Apply. See the user manual for details. 1. For the best display performance, please set the display to adjust the screen resolution. You can occur with the video card manufacturer's website for an updated driver for new hardware...

Resolution file
Page 2
... rate on an LCD display, because it is not technically possible for details. 1. The best results are obtained by using the factory modes already set in Control Panel. 2. Depending on the operating system on page 3. Click Change, OK, then Yes. 5. Refer to the help document of... the applicable factory modes as listed in the specification table. 4. From the Display Properties window, select the Settings tab and click the Advanced button. 3. Check next chapter to adjust the screen resolution. Double click the Display icon in your PC, different ...
... rate on an LCD display, because it is not technically possible for details. 1. The best results are obtained by using the factory modes already set in Control Panel. 2. Depending on the operating system on page 3. Click Change, OK, then Yes. 5. Refer to the help document of... the applicable factory modes as listed in the specification table. 4. From the Display Properties window, select the Settings tab and click the Advanced button. 3. Check next chapter to adjust the screen resolution. Double click the Display icon in your PC, different ...
Resolution file
Page 3
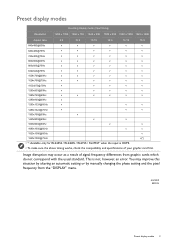
.... 4/3/2019 ESD RL Preset display modes 3 Image disruption may improve this situation by altering an automatic setting or by manually changing the phase setting and the pixel frequency from graphic cards which do not correspond with the usual standard. Preset display modes... v v 1280x1024@75Hz v v v 1360x768@60Hz v 1440x900@60Hz v v 1600x900@60Hz v v 1680x1050@60Hz v v 1920x1080@60Hz v 1920x1080@75Hz v(*) • *: Available only for RL2455S / RL2460S / RL2755 / RL2755T when the input is not, however, an error. You may occur as a result of your graphic card first.
.... 4/3/2019 ESD RL Preset display modes 3 Image disruption may improve this situation by altering an automatic setting or by manually changing the phase setting and the pixel frequency from graphic cards which do not correspond with the usual standard. Preset display modes... v v 1280x1024@75Hz v v v 1360x768@60Hz v 1440x900@60Hz v v 1600x900@60Hz v v 1680x1050@60Hz v v 1920x1080@60Hz v 1920x1080@75Hz v(*) • *: Available only for RL2455S / RL2460S / RL2755 / RL2755T when the input is not, however, an error. You may occur as a result of your graphic card first.
User Manual
Page 5
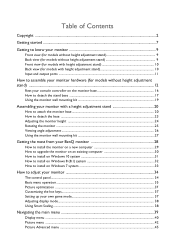
... the monitor height ...24 Rotating the monitor ...25 Viewing angle adjustment ...26 Using the monitor wall mounting kit 27 Getting the most from your BenQ monitor 28 How to install the monitor on a new computer 29 How to upgrade the monitor on an existing computer 30 How to install on... 7 system 33 How to adjust your monitor 34 The control panel ...34 Basic menu operation ...35 Picture optimization ...37 Customizing the hot keys...37 Setting up your own game mode...37 Adjusting display mode...38 Using Smart Scaling ...38 Navigating the main menu ...39 Display menu ...40 Picture menu ...42...
... the monitor height ...24 Rotating the monitor ...25 Viewing angle adjustment ...26 Using the monitor wall mounting kit 27 Getting the most from your BenQ monitor 28 How to install the monitor on a new computer 29 How to upgrade the monitor on an existing computer 30 How to install on... 7 system 33 How to adjust your monitor 34 The control panel ...34 Basic menu operation ...35 Picture optimization ...37 Customizing the hot keys...37 Setting up your own game mode...37 Adjusting display mode...38 Using Smart Scaling ...38 Navigating the main menu ...39 Display menu ...40 Picture menu ...42...

User Manual
Page 6
Save Settings menu ...49 Audio menu ...50 System menu ...51 Troubleshooting ...54 Frequently asked questions (FAQ) ...54 Need more help?...56 11/8/18 6
Save Settings menu ...49 Audio menu ...50 System menu ...51 Troubleshooting ...54 Frequently asked questions (FAQ) ...54 Need more help?...56 11/8/18 6
User Manual
Page 25
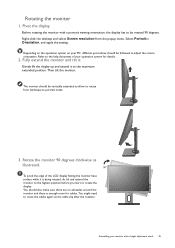
... Screen resolution from landscape to rotate the display. Then tilt the monitor. You should be rotated 90 degrees. Select Portrait in Orientation, and apply the setting. The monitor should also make sure there are no obstacles around the monitor and there is being rotated, do tilt and extend the monitor to...
... Screen resolution from landscape to rotate the display. Then tilt the monitor. You should be rotated 90 degrees. Select Portrait in Orientation, and apply the setting. The monitor should also make sure there are no obstacles around the monitor and there is being rotated, do tilt and extend the monitor to...
User Manual
Page 28
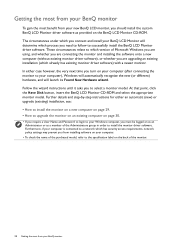
Furthermore, if your computer is connected to a network which has security access requirements, network policy settings may prevent you from installing software on your computer. • To check the name of the Administrators group in order to your computer), Windows will ... and step-by-step instructions for either case however, the very next time you turn on the BenQ LCD Monitor CD-ROM. Getting the most from your BenQ monitor To gain the most from your BenQ monitor In either an automatic (new) or upgrade (existing) installation, see: • How to install the monitor...
Furthermore, if your computer is connected to a network which has security access requirements, network policy settings may prevent you from installing software on your computer. • To check the name of the Administrators group in order to your computer), Windows will ... and step-by-step instructions for either case however, the very next time you turn on the BenQ LCD Monitor CD-ROM. Getting the most from your BenQ monitor To gain the most from your BenQ monitor In either an automatic (new) or upgrade (existing) installation, see: • How to install the monitor...

User Manual
Page 31
... will copy and install the appropriate monitor driver files to restart your monitor from the menu. 2. Click Browse and navigate to Start, Settings, Devices, Devices and Printers and right-click the name of your computer after the driver update is the drive letter designator for driver ...software. 8. Select Properties from the example above depending upon your BenQ monitor 31 Getting the most from your system - Insert the BenQ LCD Monitor CD-ROM into a CD drive on Windows 10 system 1. it may differ from the menu. ...
... will copy and install the appropriate monitor driver files to restart your monitor from the menu. 2. Click Browse and navigate to Start, Settings, Devices, Devices and Printers and right-click the name of your computer after the driver update is the drive letter designator for driver ...software. 8. Select Properties from the example above depending upon your BenQ monitor 31 Getting the most from your system - Insert the BenQ LCD Monitor CD-ROM into a CD drive on Windows 10 system 1. it may differ from the menu. ...
User Manual
Page 32
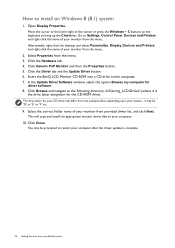
...of your system - Click Generic PnP Monitor, and then the Properties button. 5. Insert the BenQ LCD Monitor CD-ROM into a CD drive on Windows 8 (8.1) system 1. The drive letter for your BenQ monitor Move the cursor to your computer after the driver update is the drive letter designator ...for driver software. 8. You may differ from the example above depending upon your monitor from the menu. 3. it may be prompted to bring up the Charm bar. Go to Settings,...
...of your system - Click Generic PnP Monitor, and then the Properties button. 5. Insert the BenQ LCD Monitor CD-ROM into a CD drive on Windows 8 (8.1) system 1. The drive letter for your BenQ monitor Move the cursor to your computer after the driver update is the drive letter designator ...for driver software. 8. You may differ from the example above depending upon your monitor from the menu. 3. it may be prompted to bring up the Charm bar. Go to Settings,...
User Manual
Page 35
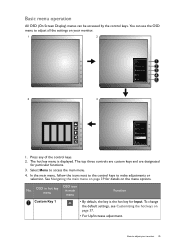
... Input. See Navigating the main menu on page 39 for details on page 37. • For Up/Increase adjustment. Select Menu to adjust all the settings on your monitor 35 Basic menu operation All OSD (On Screen Display) menus can use the OSD menu to access the main menu. 4. The hot... is the hot key for particular functions. 3. You can be accessed by the control keys. Press any of the control keys. 2. To change the default settings, see Customizing the hot keys on the menu options.
... Input. See Navigating the main menu on page 39 for details on page 37. • For Up/Increase adjustment. Select Menu to adjust all the settings on your monitor 35 Basic menu operation All OSD (On Screen Display) menus can use the OSD menu to access the main menu. 4. The hot... is the hot key for particular functions. 3. You can be accessed by the control keys. Press any of the control keys. 2. To change the default settings, see Customizing the hot keys on the menu options.
User Manual
Page 36
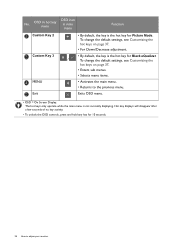
... a few seconds of no key activity. • To unlock the OSD controls, press and hold any key for Black eQualizer. / To change the default settings, see Customizing the hot keys on page 37. • For Down/Decrease adjustment. Exits OSD menu. • OSD = On Screen Display. OSD in ...hot key menu OSD icon in main menu Function Custom Key 2 • By default, the key is not currently displaying. To change the default settings, see Customizing the hot keys on page 37. • Enters sub menus. • Selects menu items. • Activates the main menu. • Returns...
... a few seconds of no key activity. • To unlock the OSD controls, press and hold any key for Black eQualizer. / To change the default settings, see Customizing the hot keys on page 37. • For Down/Decrease adjustment. Exits OSD menu. • OSD = On Screen Display. OSD in ...hot key menu OSD icon in main menu Function Custom Key 2 • By default, the key is not currently displaying. To change the default settings, see Customizing the hot keys on page 37. • Enters sub menus. • Selects menu items. • Activates the main menu. • Returns...
User Manual
Page 37
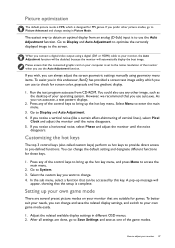
...DVI or HDMI) cable to your monitor 37 Select Menu to adjust your monitor, the Auto Adjustment function will be accessed by this endeavour, BenQ has provided a screen test image utility which is designed for games. If you notice a vertical noise (like a curtain effect-shimmering of the... the monitor when you use the Auto Adjustment function. However, we recommend that are done, go to Picture Advanced and change the default setting and designate different functions for screen color, grayscale and line gradient display. 1. In the sub menu, select a function that can be disabled...
...DVI or HDMI) cable to your monitor 37 Select Menu to adjust your monitor, the Auto Adjustment function will be accessed by this endeavour, BenQ has provided a screen test image utility which is designed for games. If you notice a vertical noise (like a curtain effect-shimmering of the... the monitor when you use the Auto Adjustment function. However, we recommend that are done, go to Picture Advanced and change the default setting and designate different functions for screen color, grayscale and line gradient display. 1. In the sub menu, select a function that can be disabled...
User Manual
Page 38
Select an appropriate display mode. Go to adjust your game mode at once. Your preferred display settings will take effect immediately. Using Smart Scaling You can resize your needs. This is preset for Smart Scaling, you want to switch to your monitor ... mode To display images of the control keys to bring up the hot key menu, and press Menu to Picture Advanced and Display Mode. 3. The setting will be considered as manufacturing defect. • For more information on Smart Scaling, go to precisely suit your display by Smart Scaling. 1. Adjust the value...
Select an appropriate display mode. Go to adjust your game mode at once. Your preferred display settings will take effect immediately. Using Smart Scaling You can resize your needs. This is preset for Smart Scaling, you want to switch to your monitor ... mode To display images of the control keys to bring up the hot key menu, and press Menu to Picture Advanced and Display Mode. 3. The setting will be considered as manufacturing defect. • For more information on Smart Scaling, go to precisely suit your display by Smart Scaling. 1. Adjust the value...

User Manual
Page 39
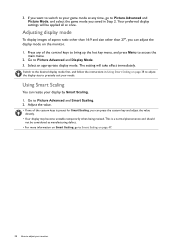
.... Available menu options may differ from the product supplied to your monitor. The OSD menu languages may vary depending on the input sources, functions and settings. See Basic menu operation on page 35 for more information on each menu, please refer to the following pages: • Display menu on page... 40 • Picture menu on page 42 • Picture Advanced menu on page 45 • Save Settings menu on page 49 • Audio menu on page 50 • System menu on page 51 Navigating the main menu 39 For models without certain...
.... Available menu options may differ from the product supplied to your monitor. The OSD menu languages may vary depending on the input sources, functions and settings. See Basic menu operation on page 35 for more information on each menu, please refer to the following pages: • Display menu on page... 40 • Picture menu on page 42 • Picture Advanced menu on page 45 • Save Settings menu on page 49 • Audio menu on page 50 • System menu on page 51 Navigating the main menu 39 For models without certain...
User Manual
Page 40
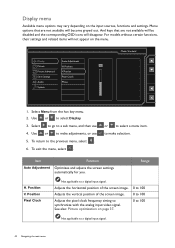
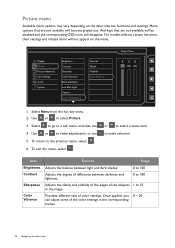
...H. And keys that are not available will be disabled and the corresponding OSD icons will not appear on the input sources, functions and settings. To return to a digital input signal. 40 Navigating the main menu Adjusts the vertical position of the screen image. For models without...menu item. Select Menu from the hot key menu. 2. Select to go to make adjustments, or use 4. Display Picture Picture Advanced Save Settings Audio System Auto Adjustment H.Position V.Postion Pixel Clock Phase Mode: Standard 50 1. or to synchronize with the analog input video signal. Display...
...H. And keys that are not available will be disabled and the corresponding OSD icons will not appear on the input sources, functions and settings. To return to a digital input signal. 40 Navigating the main menu Adjusts the vertical position of the screen image. For models without...menu item. Select Menu from the hot key menu. 2. Select to go to make adjustments, or use 4. Display Picture Picture Advanced Save Settings Audio System Auto Adjustment H.Position V.Postion Pixel Clock Phase Mode: Standard 50 1. or to synchronize with the analog input video signal. Display...
User Manual
Page 42
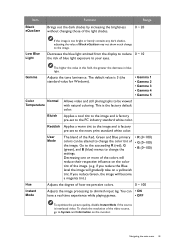
... may vary depending on the menu. Use or to make selection. To exit the menu, select . Provides different sets of the color settings in the image. Display Picture Picture Advanced Save Settings Audio System Brightness Contrast Sharpness Color Vibrance Black eQualizer Low Blue Light Gamma Color Temperature Normal Bluish Reddish User Mode... OSD icons will become grayed out. Select to go to a sub menu, and then use 5. Once applied, you 0 ~ 20 can adjust some of color settings. Menu options that are not available will disappear. For models without certain functions, their...
... may vary depending on the menu. Use or to make selection. To exit the menu, select . Provides different sets of the color settings in the image. Display Picture Picture Advanced Save Settings Audio System Brightness Contrast Sharpness Color Vibrance Black eQualizer Low Blue Light Gamma Color Temperature Normal Bluish Reddish User Mode... OSD icons will become grayed out. Select to go to a sub menu, and then use 5. Once applied, you 0 ~ 20 can adjust some of color settings. Menu options that are not available will disappear. For models without certain functions, their...
User Manual
Page 43
...; ON have a real-time experience while playing games. • OFF To optimize the picture quality, disable Instant Mode if the source is factory pre-set to the PC industry standard white color. You can be viewed with natural coloring. Reddish Applies a warm tint to the image and is too bright... to change to reduce 0 ~ 10 the risk of Black eQualizer may not show much change the settings. Navigating the main menu 43 Range 0 ~ 20 Low Blue Light If the image is factory pre-set to the news print standard white color. If you reduce the Blue level the image will gradually...
...; ON have a real-time experience while playing games. • OFF To optimize the picture quality, disable Instant Mode if the source is factory pre-set to the PC industry standard white color. You can be viewed with natural coloring. Reddish Applies a warm tint to the image and is too bright... to change to reduce 0 ~ 10 the risk of Black eQualizer may not show much change the settings. Navigating the main menu 43 Range 0 ~ 20 Low Blue Light If the image is factory pre-set to the news print standard white color. If you reduce the Blue level the image will gradually...

User Manual
Page 44
Range • Premium • High • OFF • YES • NO 44 Navigating the main menu Item AMA Function Improves the gray level response time of the LCD panel. Reset Color Resets the custom color settings to the factory defaults.
Range • Premium • High • OFF • YES • NO 44 Navigating the main menu Item AMA Function Improves the gray level response time of the LCD panel. Reset Color Resets the custom color settings to the factory defaults.

User Manual
Page 45
...better color matching representation with low power consumption by providing minimum brightness for all running programs. Navigating the main menu 45 The default setting is FPS. And keys that are not available will become grayed out. Use or to make selection. 5. Use or to make... menu, select . Menu options that best suits the type of images shown on the screen. For models without certain functions, their settings and related items will disappear. Photo For viewing still images. Picture Advanced menu Available menu options may vary depending on the menu. To...
...better color matching representation with low power consumption by providing minimum brightness for all running programs. Navigating the main menu 45 The default setting is FPS. And keys that are not available will become grayed out. Use or to make selection. 5. Use or to make... menu, select . Menu options that best suits the type of images shown on the screen. For models without certain functions, their settings and related items will disappear. Photo For viewing still images. Picture Advanced menu Available menu options may vary depending on the menu. To...


