

Safety Warning and Notice
Page 2
... responsibility of the user if problems (such as electric shock and fire. power cable) only with a (multi-outlet) extension cord. Always turn off the monitor before cleaning your monitor Use a monitor cleaner and a soft cloth to clean your monitor. Do not use the original accessories (e.g. Full 3/29/2019 If a bad smell or an abnormal sound appears to non-factory provided software, parts, and/or non...
... responsibility of the user if problems (such as electric shock and fire. power cable) only with a (multi-outlet) extension cord. Always turn off the monitor before cleaning your monitor Use a monitor cleaner and a soft cloth to clean your monitor. Do not use the original accessories (e.g. Full 3/29/2019 If a bad smell or an abnormal sound appears to non-factory provided software, parts, and/or non...
Resolution file
Page 1
... with the monitor aspect ratio, the displayed image may need to replace and update the PC video card hardware to be able to support the native resolution of your particular model PC video card which is interpolated and may not accurately display the screen image as well as described below. This is always fixed. Software video drivers are displayed on the provided CD. • To take full advantage of your input source does not...
... with the monitor aspect ratio, the displayed image may need to replace and update the PC video card hardware to be able to support the native resolution of your particular model PC video card which is interpolated and may not accurately display the screen image as well as described below. This is always fixed. Software video drivers are displayed on the provided CD. • To take full advantage of your input source does not...

Resolution file
Page 2
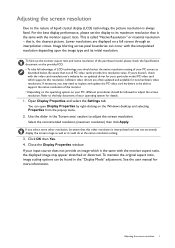
... to adjust the screen resolution. Depending on the operating system on your operating system for an LCD display to flicker. Double click the Display icon in the specification table. 4. Click Change, OK, then Yes. 5. From the Display Properties window, select the Settings tab and click the Advanced button. 3. Close the Display Properties window. 2 Adjusting the screen refresh rate Refer to the help document of the applicable factory modes as listed in Control Panel. 2. Adjusting the screen refresh rate...
... to adjust the screen resolution. Depending on the operating system on your operating system for an LCD display to flicker. Double click the Display icon in the specification table. 4. Click Change, OK, then Yes. 5. From the Display Properties window, select the Settings tab and click the Advanced button. 3. Close the Display Properties window. 2 Adjusting the screen refresh rate Refer to the help document of the applicable factory modes as listed in Control Panel. 2. Adjusting the screen refresh rate...
Resolution file
Page 3
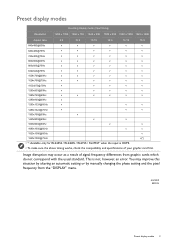
...of your graphic card first. This is HDMI. • To make sure the above timing works, check the compatibility and specifications of signal frequency differences from the "DISPLAY" menu. 4/3/2019 ESD RL Preset display modes 3 Preset display modes Incoming display mode (Input timing) Resolution 1280 x 1024... RL2455S / RL2460S / RL2755 / RL2755T when the input is not, however, an error. Image disruption may improve this situation by altering an automatic setting or by manually changing the phase setting and the pixel frequency from graphic cards which do not correspond with the ...
...of your graphic card first. This is HDMI. • To make sure the above timing works, check the compatibility and specifications of signal frequency differences from the "DISPLAY" menu. 4/3/2019 ESD RL Preset display modes 3 Preset display modes Incoming display mode (Input timing) Resolution 1280 x 1024... RL2455S / RL2460S / RL2755 / RL2755T when the input is not, however, an error. Image disruption may improve this situation by altering an automatic setting or by manually changing the phase setting and the pixel frequency from graphic cards which do not correspond with the ...
User Manual
Page 4
... structure before cleaning. Clean the LCD monitor surface with flat surface. • Ensure that support wall or ceiling mounting) • Install your monitor and monitor mounting kit on a wall with a lint-free, non-abrasive cloth. Avoid using any of the monitor. • Turn off the monitor and the power before disconnecting the cables from the LCD monitor. • Always unplug the product from the power outlet before operation. • (For models that the wall material...
... structure before cleaning. Clean the LCD monitor surface with flat surface. • Ensure that support wall or ceiling mounting) • Install your monitor and monitor mounting kit on a wall with a lint-free, non-abrasive cloth. Avoid using any of the monitor. • Turn off the monitor and the power before disconnecting the cables from the LCD monitor. • Always unplug the product from the power outlet before operation. • (For models that the wall material...
User Manual
Page 9
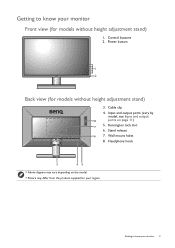
Getting to know your monitor Front view (for models without height adjustment stand) 3. Kensington lock slot 6. Getting to know your region. Cable clip 4. Wall mount holes 8. Headphone hook 3 45 • Above diagram may vary depending on page 11) 7 5. Power button 1 2 Back view (for your monitor 9 Input and output ports (vary by model, see Input and output 8 ports on the model. • Picture may differ from the product supplied for models without height adjustment stand) 1. Stand release 6 7. Control buttons 2.
Getting to know your monitor Front view (for models without height adjustment stand) 3. Kensington lock slot 6. Getting to know your region. Cable clip 4. Wall mount holes 8. Headphone hook 3 45 • Above diagram may vary depending on page 11) 7 5. Power button 1 2 Back view (for your monitor 9 Input and output ports (vary by model, see Input and output 8 ports on the model. • Picture may differ from the product supplied for models without height adjustment stand) 1. Stand release 6 7. Control buttons 2.
User Manual
Page 14
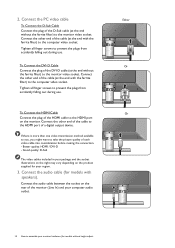
... height adjust- Better quality: HDMI / DVI-D - Connect the audio cable between the socket on the monitor. Connect the audio cable (for your package and the socket illustrations on the right may vary depending on the product supplied for models with speakers). To Connect the HDMI Cable Connect the plug of the HDMI cable to the monitor video socket. 2. Connect the PC video cable To Connect the D-Sub Cable Connect the plug of each video cable into consideration before making the connection. - Tighten all finger screws...
... height adjust- Better quality: HDMI / DVI-D - Connect the audio cable between the socket on the monitor. Connect the audio cable (for your package and the socket illustrations on the right may vary depending on the product supplied for models with speakers). To Connect the HDMI Cable Connect the plug of the HDMI cable to the monitor video socket. 2. Connect the PC video cable To Connect the D-Sub Cable Connect the plug of each video cable into consideration before making the connection. - Tighten all finger screws...
User Manual
Page 19
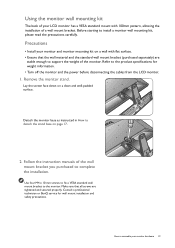
Before starting to the monitor. Remove the monitor stand. Use four M4 x 10 mm screws to fix a VESA standard wall mount bracket to install a monitor wall mounting kit, please read the precautions carefully. Refer to detach the stand base on a clean and well-padded surface. Detach the monitor base as instructed in How to the product specifications for wall mount installation and safety precautions. Make sure that the wall material and the standard wall mount bracket (purchased separately) are tightened...
Before starting to the monitor. Remove the monitor stand. Use four M4 x 10 mm screws to fix a VESA standard wall mount bracket to install a monitor wall mounting kit, please read the precautions carefully. Refer to detach the stand base on a clean and well-padded surface. Detach the monitor base as instructed in How to the product specifications for wall mount installation and safety precautions. Make sure that the wall material and the standard wall mount bracket (purchased separately) are tightened...
User Manual
Page 27
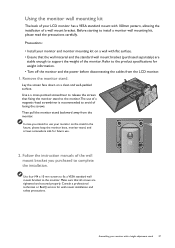
... BenQ service for weight information. • Turn off the monitor and the power before disconnecting the cables from the monitor. Follow the instruction manuals of the wall mount bracket you intend to support the weight of the monitor. Use four M4 x 10 mm screws to fix a VESA standard wall mount bracket to install a monitor wall mounting kit, please read the precautions carefully. Assembling your monitor and monitor mounting kit on a clean and well-padded surface. Remove the monitor stand. Precautions: • Install...
... BenQ service for weight information. • Turn off the monitor and the power before disconnecting the cables from the monitor. Follow the instruction manuals of the wall mount bracket you intend to support the weight of the monitor. Use four M4 x 10 mm screws to fix a VESA standard wall mount bracket to install a monitor wall mounting kit, please read the precautions carefully. Assembling your monitor and monitor mounting kit on a clean and well-padded surface. Remove the monitor stand. Precautions: • Install...
User Manual
Page 28
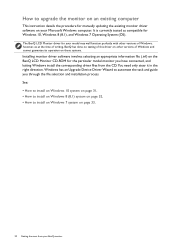
... are upgrading an existing installation (which you connect and install your new BenQ LCD monitor, you require a User Name and Password to login to install the monitor driver software. Furthermore, if your computer is connected to a network which process you to successfully install the BenQ LCD Monitor driver software. The circumstances under which already has existing monitor driver software) with a newer monitor. Follow the wizard instructions until it asks you need to follow to select a monitor model. Getting...
... are upgrading an existing installation (which you connect and install your new BenQ LCD monitor, you require a User Name and Password to login to install the monitor driver software. Furthermore, if your computer is connected to a network which process you to successfully install the BenQ LCD Monitor driver software. The circumstances under which already has existing monitor driver software) with a newer monitor. Follow the wizard instructions until it asks you need to follow to select a monitor model. Getting...
User Manual
Page 29
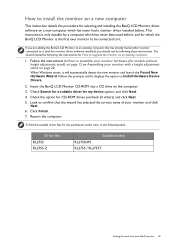
... install the monitor on a new computer This instruction details the procedure for models without height adjustment stand) on page 12 or Assembling your monitor with a height adjustment stand on page 20 When Windows starts, it will automatically detect the new monitor and launch the Found New Hardware Wizard. Follow the prompts until it displays the option to assemble your BenQ monitor 29 Follow the instructions in How to Install Hardware Device Drivers...
... install the monitor on a new computer This instruction details the procedure for models without height adjustment stand) on page 12 or Assembling your monitor with a height adjustment stand on page 20 When Windows starts, it will automatically detect the new monitor and launch the Found New Hardware Wizard. Follow the prompts until it displays the option to assemble your BenQ monitor 29 Follow the instructions in How to Install Hardware Device Drivers...
User Manual
Page 30
... This instruction details the procedure for manually updating the existing monitor driver software on your BenQ monitor The BenQ LCD Monitor driver for your model may well function perfectly with other versions of Windows and cannot guarantee its operation on those systems. Installing monitor driver software involves selecting an appropriate information file (.inf) on the BenQ LCD Monitor CD-ROM for the particular model monitor you through the file selection and installation process. You need...
... This instruction details the procedure for manually updating the existing monitor driver software on your BenQ monitor The BenQ LCD Monitor driver for your model may well function perfectly with other versions of Windows and cannot guarantee its operation on those systems. Installing monitor driver software involves selecting an appropriate information file (.inf) on the BenQ LCD Monitor CD-ROM for the particular model monitor you through the file selection and installation process. You need...

User Manual
Page 31
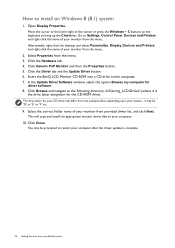
... install on the computer. 7. This will copy and install the appropriate monitor driver files to your monitor from the menu. 3. Insert the BenQ LCD Monitor CD-ROM into a CD drive on Windows 10 system 1. Click Generic PnP Monitor, and then the Properties button. 5. The drive letter for the CD-ROM drive). Click Close. In the Update Driver Software window, select the option Browse my computer for driver software. 8. Open Display...
... install on the computer. 7. This will copy and install the appropriate monitor driver files to your monitor from the menu. 3. Insert the BenQ LCD Monitor CD-ROM into a CD drive on Windows 10 system 1. Click Generic PnP Monitor, and then the Properties button. 5. The drive letter for the CD-ROM drive). Click Close. In the Update Driver Software window, select the option Browse my computer for driver software. 8. Open Display...
User Manual
Page 32
... to Settings, Control Panel, Devices and Printers and right-click the name of your monitor from your computer after the driver update is the drive letter designator for driver software. 8. Select the correct folder name of the screen or press the Windows + C buttons on the keyboard to install on the computer. 7. Select Properties from provided driver list, and click Next. In the Update Driver Software window, select...
... to Settings, Control Panel, Devices and Printers and right-click the name of your monitor from your computer after the driver update is the drive letter designator for driver software. 8. Select the correct folder name of the screen or press the Windows + C buttons on the keyboard to install on the computer. 7. Select Properties from provided driver list, and click Next. In the Update Driver Software window, select...
User Manual
Page 35
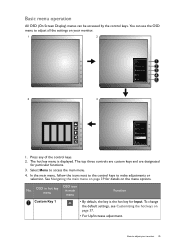
... change the default settings, see Customizing the hot keys on the menu options. Press any of the control keys. 2. The hot key menu is the hot key for Input. See Navigating the main menu on page 39 for particular functions. 3. How to adjust all the settings on your monitor 35 Basic menu operation All OSD (On Screen Display) menus can use the OSD menu to adjust your monitor. 1 2 Input Picture Mode Black eQualizer Menu Exit 4 3 Input Picture Mode Black...
... change the default settings, see Customizing the hot keys on the menu options. Press any of the control keys. 2. The hot key menu is the hot key for Input. See Navigating the main menu on page 39 for particular functions. 3. How to adjust all the settings on your monitor 35 Basic menu operation All OSD (On Screen Display) menus can use the OSD menu to adjust your monitor. 1 2 Input Picture Mode Black eQualizer Menu Exit 4 3 Input Picture Mode Black...
User Manual
Page 37
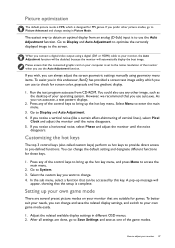
... card on your monitor that can always adjust the screen geometric settings manually using a digital (DVI or HDMI) cable to Picture Advanced and change . 4. If you use the Auto Adjustment function. Setting up the hot key menu, and press Menu to your computer is set to the native resolution of the monitor when you notice a vertical noise (like a curtain effect-shimmering of vertical lines), select Pixel Clock and adjust the monitor until the noise disappears. Adjust the related available display settings...
... card on your monitor that can always adjust the screen geometric settings manually using a digital (DVI or HDMI) cable to Picture Advanced and change . 4. If you use the Auto Adjustment function. Setting up the hot key menu, and press Menu to your computer is set to the native resolution of the monitor when you notice a vertical noise (like a curtain effect-shimmering of vertical lines), select Pixel Clock and adjust the monitor until the noise disappears. Adjust the related available display settings...
User Manual
Page 43
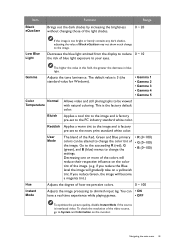
... the brightness without changing those of blue light exposure to your eyes. The default value is the factory default color. User Mode The blend of the image. Go to the succeeding R (red), G (green), and B (blue) menus to change the color tint of the Red, Green and Blue primary colors can • ON have a real-time experience while playing games. • OFF To optimize the picture quality, disable Instant Mode if the source is factory pre-set to...
... the brightness without changing those of blue light exposure to your eyes. The default value is the factory default color. User Mode The blend of the image. Go to the succeeding R (red), G (green), and B (blue) menus to change the color tint of the Red, Green and Blue primary colors can • ON have a real-time experience while playing games. • OFF To optimize the picture quality, disable Instant Mode if the source is factory pre-set to...
User Manual
Page 53
... key 3. 3 • Picture mode • Display Mode • Smart Scaling • Brightness • Contrast • Smart Focus • Volume • Mute • Input • Black eQualizer • Low Blue Light • Color Vibrance Auto Power Sets the time to power off the monitor automatically in the input auto select loop. DDC/CI Allows the monitor settings to be set through the software • ON on the PC. • OFF HDMI Auto Switch Resolution Notice Information Reset All DDC...
... key 3. 3 • Picture mode • Display Mode • Smart Scaling • Brightness • Contrast • Smart Focus • Volume • Mute • Input • Black eQualizer • Low Blue Light • Color Vibrance Auto Power Sets the time to power off the monitor automatically in the input auto select loop. DDC/CI Allows the monitor settings to be set through the software • ON on the PC. • OFF HDMI Auto Switch Resolution Notice Information Reset All DDC...
User Manual
Page 54
... instructions on the link "Adjusting the Screen Resolution" on the CD, and then select the correct resolution, refresh rate and make adjustments based on the link "Adjusting the Screen Resolution". If you prefer other picture modes, go to Picture and change setting in LCD technology. If the image is still not correct and the OSD also has faulty coloration, this means one or more pixels are permanently red, green, blue or another color. • Clean the LCD screen. • Cycle power...
... instructions on the link "Adjusting the Screen Resolution" on the CD, and then select the correct resolution, refresh rate and make adjustments based on the link "Adjusting the Screen Resolution". If you prefer other picture modes, go to Picture and change setting in LCD technology. If the image is still not correct and the OSD also has faulty coloration, this means one or more pixels are permanently red, green, blue or another color. • Clean the LCD screen. • Cycle power...
User Manual
Page 55
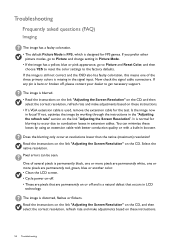
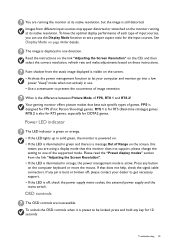
.... OSD controls The OSD controls are using a display mode that this means you can use the Display Mode function to get necessary support. • If the LED is off , please contact your computer and monitor go into a low power "sleep" mode when not actively in orange, the power management mode is active. You are running at its native resolution. If that best suit specific types of image retention. Troubleshooting 55 See Display Mode on these instructions. Please...
.... OSD controls The OSD controls are using a display mode that this means you can use the Display Mode function to get necessary support. • If the LED is off , please contact your computer and monitor go into a low power "sleep" mode when not actively in orange, the power management mode is active. You are running at its native resolution. If that best suit specific types of image retention. Troubleshooting 55 See Display Mode on these instructions. Please...


