
US 3 Year LCD Monitor Warranty
Page 1
... United States, Hawaii, and Alaska. END USER LIMITED WARRANTY LCD MONITORS Subject to the terms and conditions set forth below , BenQ America Corp. ("BenQ") warrants the BenQ LCD Monitor ("Product") you are entitled to depot repair service during the warranty period in materials or workmanship... components or parts to the Customer during the warranty period BenQ will replace the DOA unit with a new or reconditioned Product of purchase. BENQ AMERICA CORP. BenQ LCD Monitor Standard Limited Warranty: Subject to the exclusions set forth below : Three (3) years from the ...
... United States, Hawaii, and Alaska. END USER LIMITED WARRANTY LCD MONITORS Subject to the terms and conditions set forth below , BenQ America Corp. ("BenQ") warrants the BenQ LCD Monitor ("Product") you are entitled to depot repair service during the warranty period in materials or workmanship... components or parts to the Customer during the warranty period BenQ will replace the DOA unit with a new or reconditioned Product of purchase. BENQ AMERICA CORP. BenQ LCD Monitor Standard Limited Warranty: Subject to the exclusions set forth below : Three (3) years from the ...
US 3 Year LCD Monitor Warranty
Page 3
... THE WARRANTY SERVICES DESCRIBED HEREIN IS YOUR SOLE AND EXCLUSIVE REMEDY WITH RESPECT TO ANY BREACH OF THE BenQ LIMITED WARRANTY SET FORTH HEREIN. All prices, products, terms and conditions are subject to BenQ or BenQ Authorized Service Provider without notice. This limited warranty gives you . or fluctuation of electrical power, lightning, static electricity...
... THE WARRANTY SERVICES DESCRIBED HEREIN IS YOUR SOLE AND EXCLUSIVE REMEDY WITH RESPECT TO ANY BREACH OF THE BenQ LIMITED WARRANTY SET FORTH HEREIN. All prices, products, terms and conditions are subject to BenQ or BenQ Authorized Service Provider without notice. This limited warranty gives you . or fluctuation of electrical power, lightning, static electricity...
Rl2755HM User Manual
Page 4
... controller on the monitor base 13 How to detach the stand base ...14 Using the monitor wall mounting kit 16 Getting the most from your BenQ monitor 17 How to install the monitor on a new computer 18 How to upgrade the monitor on an existing computer 19 How to install on... Windows 7 system 21 How to adjust your monitor 22 The control panel...22 Basic menu operation...23 Picture optimization ...25 Customizing the hot keys...25 Setting up your own game mode ...25 Adjusting display mode ...26 Using Smart Scaling...26 Navigating the main menu ...27 Display menu ...28 Picture menu ...30...
... controller on the monitor base 13 How to detach the stand base ...14 Using the monitor wall mounting kit 16 Getting the most from your BenQ monitor 17 How to install the monitor on a new computer 18 How to upgrade the monitor on an existing computer 19 How to install on... Windows 7 system 21 How to adjust your monitor 22 The control panel...22 Basic menu operation...23 Picture optimization ...25 Customizing the hot keys...25 Setting up your own game mode ...25 Adjusting display mode ...26 Using Smart Scaling...26 Navigating the main menu ...27 Display menu ...28 Picture menu ...30...
Rl2755HM User Manual
Page 17
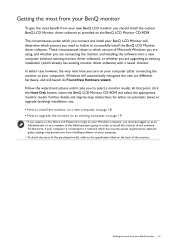
...BenQ LCD Monitor driver software. These circumstances relate to which version of Microsoft Windows you are using, and whether you are connecting the monitor and installing the software onto a new computer (without existing monitor driver software), or whether you are upgrading an existing installation (which has security access requirements, network policy settings...label on the back of the purchased model, refer to your Windows computer, you from installing software on the BenQ LCD Monitor CD-ROM. Furthermore, if your computer is connected to select a monitor model. At that point, click...
...BenQ LCD Monitor driver software. These circumstances relate to which version of Microsoft Windows you are using, and whether you are connecting the monitor and installing the software onto a new computer (without existing monitor driver software), or whether you are upgrading an existing installation (which has security access requirements, network policy settings...label on the back of the purchased model, refer to your Windows computer, you from installing software on the BenQ LCD Monitor CD-ROM. Furthermore, if your computer is connected to select a monitor model. At that point, click...
Rl2755HM User Manual
Page 20
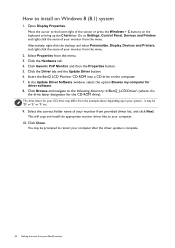
...the correct folder name of your system - This will copy and install the appropriate monitor driver files to your monitor from the menu. 2. Go to Settings, Control Panel, Devices and Printers and right-click the name of the screen or press the Windows + C buttons on Windows 8 (8.1) system 1. ... it may be 'D:' or 'E:' or 'F:' etc. 9. How to install on the keyboard to bring up the Charm bar. Open Display Properties. Insert the BenQ LCD Monitor CD-ROM into a CD drive on the computer. 7. Click Browse and navigate to the following directory: d:\BenQ_LCD\Driver\ (where d is complete...
...the correct folder name of your system - This will copy and install the appropriate monitor driver files to your monitor from the menu. 2. Go to Settings, Control Panel, Devices and Printers and right-click the name of the screen or press the Windows + C buttons on Windows 8 (8.1) system 1. ... it may be 'D:' or 'E:' or 'F:' etc. 9. How to install on the keyboard to bring up the Charm bar. Open Display Properties. Insert the BenQ LCD Monitor CD-ROM into a CD drive on the computer. 7. Click Browse and navigate to the following directory: d:\BenQ_LCD\Driver\ (where d is complete...
Rl2755HM User Manual
Page 23
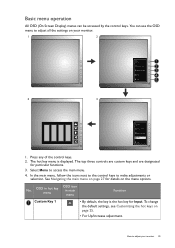
...menu is the hot key for Input. Basic menu operation All OSD (On Screen Display) menus can use the OSD menu to adjust all the settings on your monitor 23 In the main menu, follow the icons next to the control keys to adjust your monitor. 1 2 Input Picture Mode... Black eQualizer Menu Exit 4 3 Input Picture Mode Black eQualizer Menu Exit 1. To change the default settings, see Customizing the hot keys on the menu options. See Navigating the main menu on page 27 for particular functions. 3. How to make adjustments or...
...menu is the hot key for Input. Basic menu operation All OSD (On Screen Display) menus can use the OSD menu to adjust all the settings on your monitor 23 In the main menu, follow the icons next to the control keys to adjust your monitor. 1 2 Input Picture Mode... Black eQualizer Menu Exit 4 3 Input Picture Mode Black eQualizer Menu Exit 1. To change the default settings, see Customizing the hot keys on the menu options. See Navigating the main menu on page 27 for particular functions. 3. How to make adjustments or...

Rl2755HM User Manual
Page 24
... How to the previous menu. The hot keys only operate while the main menu is the hot key for Black eQualizer. / To change the default settings, see Customizing the hot keys on page 25. • For Down/Decrease adjustment. Custom Key 3 MENU Exit • By default, the key ...is the hot key for Picture Mode. To change the default settings, see Customizing the hot keys on page 25. • Enters sub menus. • Selects menu items. • Activates the main menu. • Returns ...
... How to the previous menu. The hot keys only operate while the main menu is the hot key for Black eQualizer. / To change the default settings, see Customizing the hot keys on page 25. • For Down/Decrease adjustment. Custom Key 3 MENU Exit • By default, the key ...is the hot key for Picture Mode. To change the default settings, see Customizing the hot keys on page 25. • Enters sub menus. • Selects menu items. • Activates the main menu. • Returns ...
Rl2755HM User Manual
Page 25
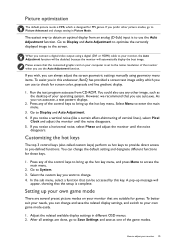
...game mode easily. 1. Run the test program auto.exe from an analog (D-Sub) input is set to the native resolution of your monitor, the Auto Adjustment function will be accessed by this endeavour, BenQ has provided a screen test image utility which is complete. As you want to your monitor ...25 Press any of the game modes. Press any of vertical lines), select Pixel Clock and adjust the monitor until the noise disappears. After all settings are suitable for these...
...game mode easily. 1. Run the test program auto.exe from an analog (D-Sub) input is set to the native resolution of your monitor, the Auto Adjustment function will be accessed by this endeavour, BenQ has provided a screen test image utility which is complete. As you want to your monitor ...25 Press any of the game modes. Press any of vertical lines), select Pixel Clock and adjust the monitor until the noise disappears. After all settings are suitable for these...
Rl2755HM User Manual
Page 26
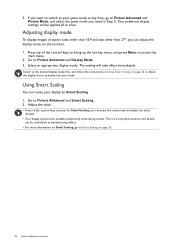
... to Picture Advanced and Picture Mode, and select the game mode you want to switch to precisely suit your monitor Your preferred display settings will take effect immediately. The setting will be considered as manufacturing defect. • For more information on page 26 to adjust the display size to your display by...
... to Picture Advanced and Picture Mode, and select the game mode you want to switch to precisely suit your monitor Your preferred display settings will take effect immediately. The setting will be considered as manufacturing defect. • For more information on page 26 to adjust the display size to your display by...

Rl2755HM User Manual
Page 27
... disabled and the corresponding OSD icons will become grayed out. Menu options that are not available will disappear. For models without certain functions, their settings and related items will not appear on page 23 for more information on each menu, please refer to access the main menu. For more details... the following pages: • Display menu on page 28 • Picture menu on page 30 • Picture Advanced menu on page 33 • Save Settings menu on page 37 • Audio menu on page 38 • System menu on page 39 Navigating the main menu 27 Navigating the main menu...
... disabled and the corresponding OSD icons will become grayed out. Menu options that are not available will disappear. For models without certain functions, their settings and related items will not appear on page 23 for more information on each menu, please refer to access the main menu. For more details... the following pages: • Display menu on page 28 • Picture menu on page 30 • Picture Advanced menu on page 33 • Save Settings menu on page 37 • Audio menu on page 38 • System menu on page 39 Navigating the main menu 27 Navigating the main menu...
Rl2755HM User Manual
Page 28
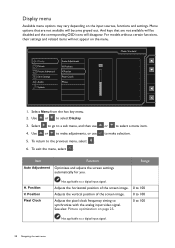
And keys that are not available will be disabled and the corresponding OSD icons will disappear. Display Picture Picture Advanced Save Settings Audio System Auto Adjustment H.Position V.Postion Pixel Clock Phase Mode: Standard 50 1. Use or to make adjustments, or use 4. to select Display... Select to go to a digital input signal. 28 Navigating the main menu To exit the menu, select . For models without certain functions, their settings and related items will become grayed out. Select Menu from the hot key menu. 2. To return to a digital input signal. Item Auto Adjustment ...
And keys that are not available will be disabled and the corresponding OSD icons will disappear. Display Picture Picture Advanced Save Settings Audio System Auto Adjustment H.Position V.Postion Pixel Clock Phase Mode: Standard 50 1. Use or to make adjustments, or use 4. to select Display... Select to go to a digital input signal. 28 Navigating the main menu To exit the menu, select . For models without certain functions, their settings and related items will become grayed out. Select Menu from the hot key menu. 2. To return to a digital input signal. Item Auto Adjustment ...
Rl2755HM User Manual
Page 30
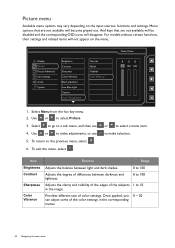
...to the previous menu, select . 6. To return to select Picture. 3. Provides different sets of the subjects 1 to 100 Adjusts the clarity and visibility of the edges of color settings. Select Menu from the hot key menu. 2. Item Brightness Contrast Sharpness Color Vibrance Function... to make adjustments, or use 4. Once applied, you 0 ~ 20 can adjust some of the color settings in the image. Display Picture Picture Advanced Save Settings Audio System Brightness Contrast Sharpness Color Vibrance Black eQualizer Low Blue Light Gamma Color Temperature Normal Bluish Reddish User...
...to the previous menu, select . 6. To return to select Picture. 3. Provides different sets of the subjects 1 to 100 Adjusts the clarity and visibility of the edges of color settings. Select Menu from the hot key menu. 2. Item Brightness Contrast Sharpness Color Vibrance Function... to make adjustments, or use 4. Once applied, you 0 ~ 20 can adjust some of the color settings in the image. Display Picture Picture Advanced Save Settings Audio System Brightness Contrast Sharpness Color Vibrance Black eQualizer Low Blue Light Gamma Color Temperature Normal Bluish Reddish User...
Rl2755HM User Manual
Page 31
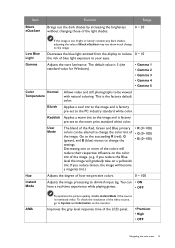
... a real-time experience while playing games. • OFF AMA To optimize the picture quality, disable Instant Mode if the source is factory pre-set to the image. if you reduce Green, the image will reduce their respective influence on the color tint of how we perceive colors. 0 ~...check the resolution of the image. Bluish Applies a cool tint to the image and is interlaced video. The default value is factory pre-set to change to the news print standard white color. Item Black eQualizer Function Brings out the dark shades by increasing the brightness without changing...
... a real-time experience while playing games. • OFF AMA To optimize the picture quality, disable Instant Mode if the source is factory pre-set to the image. if you reduce Green, the image will reduce their respective influence on the color tint of how we perceive colors. 0 ~...check the resolution of the image. Bluish Applies a cool tint to the image and is interlaced video. The default value is factory pre-set to change to the news print standard white color. Item Black eQualizer Function Brings out the dark shades by increasing the brightness without changing...

Rl2755HM User Manual
Page 32
Range • YES • NO 32 Navigating the main menu Item Function Reset Color Resets the custom color settings to the factory defaults.
Range • YES • NO 32 Navigating the main menu Item Function Reset Color Resets the custom color settings to the factory defaults.

Rl2755HM User Manual
Page 33
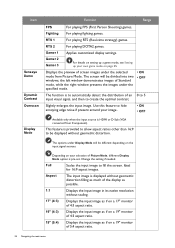
And keys that are not available will be disabled and the corresponding OSD icons will disappear. Display Picture Picture Advanced Save Settings Audio System Picture Mode Senseye Demo Dynamic Contrast Overscan Display Mode Smart Scaling Color Format HDMI RGB PC Range Standard Movie...to make selection. 5. Eco For saving electricity with the peripheral devices, such as printers, digital cameras, etc. For models without certain functions, their settings and related items will become grayed out. Select Menu from the hot key menu. 2. Select to go to a sub menu, and then use to...
And keys that are not available will be disabled and the corresponding OSD icons will disappear. Display Picture Picture Advanced Save Settings Audio System Picture Mode Senseye Demo Dynamic Contrast Overscan Display Mode Smart Scaling Color Format HDMI RGB PC Range Standard Movie...to make selection. 5. Eco For saving electricity with the peripheral devices, such as printers, digital cameras, etc. For models without certain functions, their settings and related items will become grayed out. Select Menu from the hot key menu. 2. Select to go to a sub menu, and then use to...
Rl2755HM User Manual
Page 34
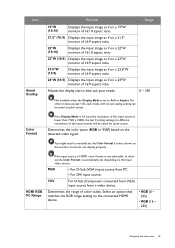
... image is to hide annoying edge noise if present around your image. • ON • OFF Available only when the input source is pre-set. the left window demonstrates images of an 0 to 5 input visual signal, and then to fill the screen. Change the... different Display Mode option is HDMI or D-Sub (VGA converted from Picture Mode. Ideal for 16:9 aspect images. Gamer 2 Gamer 3 For details on setting up a game mode, see Setting up your selection of 5:4 aspect ratio. 34 Navigating the main menu Slightly enlarges the input image. The options under Display Mode will be...
... image is to hide annoying edge noise if present around your image. • ON • OFF Available only when the input source is pre-set. the left window demonstrates images of an 0 to 5 input visual signal, and then to fill the screen. Change the... different Display Mode option is HDMI or D-Sub (VGA converted from Picture Mode. Ideal for 16:9 aspect images. Gamer 2 Gamer 3 For details on setting up a game mode, see Setting up your selection of 5:4 aspect ratio. 34 Navigating the main menu Slightly enlarges the input image. The options under Display Mode will be...
Rl2755HM User Manual
Page 35
... input source. Color Format If the Display Mode is 1:1 (and the resolution of the input source is not selectable. Adjusts the display size to manually set to Full or Aspect. HDMI RGB PC Range If the input source is HDMI, color format is lower than 1920 x 1080), the last 3 scaling... different resolutions of the input source) will be saved as if on a 24"W monitor of 16:9 aspect ratio. For other words, Color Format is set the Color Format if colors shown on the monitor screen do not display properly. You might need to best suit your needs. Item Smart Scaling ...
... input source. Color Format If the Display Mode is 1:1 (and the resolution of the input source is not selectable. Adjusts the display size to manually set to Full or Aspect. HDMI RGB PC Range If the input source is HDMI, color format is lower than 1920 x 1080), the last 3 scaling... different resolutions of the input source) will be saved as if on a 24"W monitor of 16:9 aspect ratio. For other words, Color Format is set the Color Format if colors shown on the monitor screen do not display properly. You might need to best suit your needs. Item Smart Scaling ...
Rl2755HM User Manual
Page 37
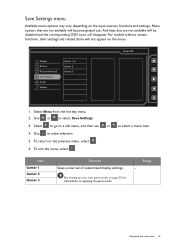
...appear on applying the game mode. For models without certain functions, their settings and related items will become grayed out. Use or to select a menu item. 4. Navigating the main menu 37 See... Setting up your own game mode on page 25 for information on the menu. Select Menu from ... return to make selection. 5. Item Gamer 1 Gamer 2 Gamer 3 Function Saves a new set of customized display settings. And keys that are not available will be disabled and the corresponding OSD icons will disappear. Save...
...appear on applying the game mode. For models without certain functions, their settings and related items will become grayed out. Use or to select a menu item. 4. Navigating the main menu 37 See... Setting up your own game mode on page 25 for information on the menu. Select Menu from ... return to make selection. 5. Item Gamer 1 Gamer 2 Gamer 3 Function Saves a new set of customized display settings. And keys that are not available will be disabled and the corresponding OSD icons will disappear. Save...
Rl2755HM User Manual
Page 38
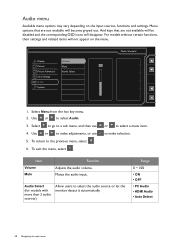
...HDMI Audio • Auto Detect 38 Navigating the main menu Menu options that are not available will not appear on the input sources, functions and settings. Select Menu from the hot key menu. 2. or to select Audio. 3. Item Volume Mute Function Adjusts the audio volume. Audio Select (for ...To exit the menu, select . To return to select the audio source or let the monitor detect it automatically. For models without certain functions, their settings and related items will become grayed out. Select to go to a sub menu, and then use 5. Use or to make adjustments, or use ...
...HDMI Audio • Auto Detect 38 Navigating the main menu Menu options that are not available will not appear on the input sources, functions and settings. Select Menu from the hot key menu. 2. or to select Audio. 3. Item Volume Mute Function Adjusts the audio volume. Audio Select (for ...To exit the menu, select . To return to select the audio source or let the monitor detect it automatically. For models without certain functions, their settings and related items will become grayed out. Select to go to a sub menu, and then use 5. Use or to make adjustments, or use ...
Rl2755HM User Manual
Page 39
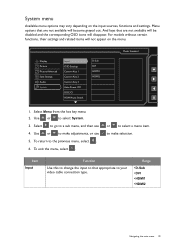
.... 2. Select to go to that are not available will be disabled and the corresponding OSD icons will not appear on the input sources, functions and settings. To return to select System. 3. Item Input Function Use this to change the input to a sub menu, and then use 5. Range •...or to make selection. Use or to select a menu item. For models without certain functions, their settings and related items will disappear. Display Picture Picture Advanced Save Settings Audio System Input OSD Settings Custom Key 1 Custom Key 2 Custom Key 3 Auto Power Off DDC/CI HDMI Auto Switch D-Sub ...
.... 2. Select to go to that are not available will be disabled and the corresponding OSD icons will not appear on the input sources, functions and settings. To return to select System. 3. Item Input Function Use this to change the input to a sub menu, and then use 5. Range •...or to make selection. Use or to select a menu item. For models without certain functions, their settings and related items will disappear. Display Picture Picture Advanced Save Settings Audio System Input OSD Settings Custom Key 1 Custom Key 2 Custom Key 3 Auto Power Off DDC/CI HDMI Auto Switch D-Sub ...


