User Manual
Page 3
..., as opening or removing covers may expose you should always adjust the monitor brightness according to extend the display's lifetime. BenQ ecoFACTS label lists key eco-friendly design highlights of the "Bringing Enjoyment 'N Quality to Life" corporate vision with the device to avoid possible dangers such as data loss and system failure) occurred due to non-factory provided software, parts, and...
..., as opening or removing covers may expose you should always adjust the monitor brightness according to extend the display's lifetime. BenQ ecoFACTS label lists key eco-friendly design highlights of the "Bringing Enjoyment 'N Quality to Life" corporate vision with the device to avoid possible dangers such as data loss and system failure) occurred due to non-factory provided software, parts, and...

User Manual
Page 4
... easily accessible. • This product should be used . • (If a remote control is more than 3 kg) An approved power cord greater or equal to H05VV-F or H05RR-F, 3G, 0.75mm2 must be used . Do not use the power adapter while it is damaged or exposed to service the power adapter. For models with adapter: • Use only the power adapter supplied with paper or other objects that will result...
... easily accessible. • This product should be used . • (If a remote control is more than 3 kg) An approved power cord greater or equal to H05VV-F or H05RR-F, 3G, 0.75mm2 must be used . Do not use the power adapter while it is damaged or exposed to service the power adapter. For models with adapter: • Use only the power adapter supplied with paper or other objects that will result...
User Manual
Page 5
... the monitor. • Turn off the monitor and the power before disconnecting the cables from the LCD monitor. • Always unplug the product from www.BenQ.com for ventilation. Rest your eyes for 5 ~ 10 minutes for information on a wall with a lint-free, non-abrasive cloth. Clean the LCD monitor surface with flat surface. • Ensure that support wall or ceiling mounting) • Install your monitor and monitor mounting kit on power rating, manufacture...
... the monitor. • Turn off the monitor and the power before disconnecting the cables from the LCD monitor. • Always unplug the product from www.BenQ.com for ventilation. Rest your eyes for 5 ~ 10 minutes for information on a wall with a lint-free, non-abrasive cloth. Clean the LCD monitor surface with flat surface. • Ensure that support wall or ceiling mounting) • Install your monitor and monitor mounting kit on power rating, manufacture...

User Manual
Page 9
Power switch 6. Service port (Service only. Kensington lock slot Getting to the PC) 13. Power button 2 34 Back view 56 7 8 9 11 13 10 12 5. Do not remove the seal or the warranty is void.) 12. connecting to know your monitor 9 Getting to know your monitor Front view 1 1. Color temperature sensor (see Adjusting color temperature automatically on page 35) 2. Cable management hole 8. DisplayPort socket 10. Control buttons 4. HDMI socket 9. Mini DisplayPort socket 11. AC power input jack 7. USB port (upstream; Light sensor / ECO sensor 3.
Power switch 6. Service port (Service only. Kensington lock slot Getting to the PC) 13. Power button 2 34 Back view 56 7 8 9 11 13 10 12 5. Do not remove the seal or the warranty is void.) 12. connecting to know your monitor 9 Getting to know your monitor Front view 1 1. Color temperature sensor (see Adjusting color temperature automatically on page 35) 2. Cable management hole 8. DisplayPort socket 10. Control buttons 4. HDMI socket 9. Mini DisplayPort socket 11. AC power input jack 7. USB port (upstream; Light sensor / ECO sensor 3.
User Manual
Page 25
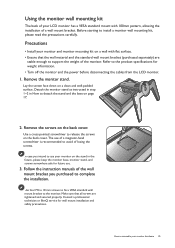
... installation. Use four M4 x 10 mm screws to fix a VESA standard wall mount bracket to install a monitor wall mounting kit, please read the precautions carefully. In case you purchased to release the screws on a clean and well-padded surface. Consult a professional technician or BenQ service for weight information. • Turn off the monitor and the power before disconnecting the cables from the LCD monitor. 1. Before starting to the monitor. Refer to assemble your monitor on a wall...
... installation. Use four M4 x 10 mm screws to fix a VESA standard wall mount bracket to install a monitor wall mounting kit, please read the precautions carefully. In case you purchased to release the screws on a clean and well-padded surface. Consult a professional technician or BenQ service for weight information. • Turn off the monitor and the power before disconnecting the cables from the LCD monitor. 1. Before starting to the monitor. Refer to assemble your monitor on a wall...
User Manual
Page 26
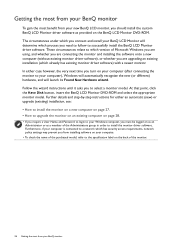
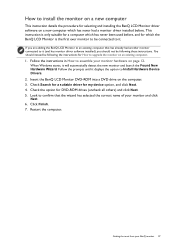
... has existing monitor driver software) with a newer monitor. Getting the most from your BenQ monitor To gain the most from your BenQ monitor At that point, click the Have Disk button, insert the BenQ LCD Monitor DVD-ROM and select the appropriate monitor model. Follow the wizard instructions until it asks you need to follow to the specification label on your computer (after connecting the monitor to select a monitor model. Further...
... has existing monitor driver software) with a newer monitor. Getting the most from your BenQ monitor To gain the most from your BenQ monitor At that point, click the Have Disk button, insert the BenQ LCD Monitor DVD-ROM and select the appropriate monitor model. Follow the wizard instructions until it asks you need to follow to the specification label on your computer (after connecting the monitor to select a monitor model. Further...
User Manual
Page 27
... the prompts until it (and has monitor driver software installed), you should instead be following these instructions. Check the option for selecting and installing the BenQ LCD Monitor driver software on an existing computer. 1. Getting the most from your monitor and click Next. 6. Follow the instructions in How to it displays the option to confirm that has already had a monitor driver installed before , and for which has never...
... the prompts until it (and has monitor driver software installed), you should instead be following these instructions. Check the option for selecting and installing the BenQ LCD Monitor driver software on an existing computer. 1. Getting the most from your monitor and click Next. 6. Follow the instructions in How to it displays the option to confirm that has already had a monitor driver installed before , and for which has never...
User Manual
Page 28
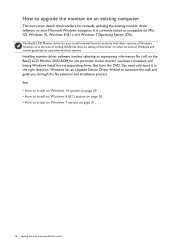
... for manually updating the existing monitor driver software on the BenQ LCD Monitor DVD-ROM for Mac OS, Windows 10, Windows 8 (8.1), and Windows 7 Operating System (OS). It is currently tested as at the time of writing, BenQ has done no testing of this driver on other versions of Windows, however, as compatible for the particular model monitor you through the file selection and installation process. The BenQ LCD Monitor driver for your model may...
... for manually updating the existing monitor driver software on the BenQ LCD Monitor DVD-ROM for Mac OS, Windows 10, Windows 8 (8.1), and Windows 7 Operating System (OS). It is currently tested as at the time of writing, BenQ has done no testing of this driver on other versions of Windows, however, as compatible for the particular model monitor you through the file selection and installation process. The BenQ LCD Monitor driver for your model may...
User Manual
Page 29
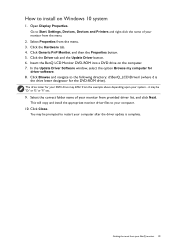
... be 'D:' or 'E:' or 'F:' etc. 9. This will copy and install the appropriate monitor driver files to Start, Settings, Devices, Devices and Printers and right-click the name of your monitor from the example above depending upon your BenQ monitor 29 Go to your monitor from the menu. 2. Click the Hardware tab. 4. You may differ from provided driver list, and click Next. Open Display Properties.
... be 'D:' or 'E:' or 'F:' etc. 9. This will copy and install the appropriate monitor driver files to Start, Settings, Devices, Devices and Printers and right-click the name of your monitor from the example above depending upon your BenQ monitor 29 Go to your monitor from the menu. 2. Click the Hardware tab. 4. You may differ from provided driver list, and click Next. Open Display Properties.

User Manual
Page 30
... Close. Move the cursor to restart your monitor from the menu. Alternatively, right-click the desktop and select Personalize, Display, Devices and Printers, and right-click the name of your BenQ monitor it may differ from the menu. 3. Click the Driver tab and the Update Driver button. 6. Click Browse and navigate to Settings, Control Panel, Devices and Printers and right-click the name...
... Close. Move the cursor to restart your monitor from the menu. Alternatively, right-click the desktop and select Personalize, Display, Devices and Printers, and right-click the name of your BenQ monitor it may differ from the menu. 3. Click the Driver tab and the Update Driver button. 6. Click Browse and navigate to Settings, Control Panel, Devices and Printers and right-click the name...

User Manual
Page 31
... the example above depending upon your BenQ monitor 31 How to install on the computer. 7. Click Generic PnP Monitor, and then the Properties button. 5. it may be 'D:' or 'E:' or 'F:' etc. 9. The drive letter for your DVD drive may differ from the menu. Getting the most from the menu. 2. Open Display Properties. In the Update Driver Software window, select the option Browse my computer...
... the example above depending upon your BenQ monitor 31 How to install on the computer. 7. Click Generic PnP Monitor, and then the Properties button. 5. it may be 'D:' or 'E:' or 'F:' etc. 9. The drive letter for your DVD drive may differ from the menu. Getting the most from the menu. 2. Open Display Properties. In the Update Driver Software window, select the option Browse my computer...

User Manual
Page 33
... for Input. OSD in hot key menu OSD icon in main menu Function 1 Custom Key 1 • By default, the key is displayed. Select (Menu) to make adjustments or selection. To change the default settings, see Customizing the hot keys on the menu options. In the main menu, follow the icons next to the control keys to access the main menu. 4. See Navigating the main menu on your monitor 33...
... for Input. OSD in hot key menu OSD icon in main menu Function 1 Custom Key 1 • By default, the key is displayed. Select (Menu) to make adjustments or selection. To change the default settings, see Customizing the hot keys on the menu options. In the main menu, follow the icons next to the control keys to access the main menu. 4. See Navigating the main menu on your monitor 33...
User Manual
Page 35
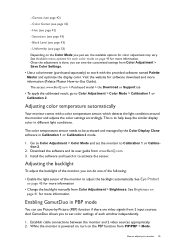
... model > the Download or Support tab • To apply the calibrated result, go to adjust your monitor 35 The color temperature sensor needs to be activated and managed by -Picture (PBP) function if there are video signals from 2 input sources. Establish cable connections between the monitor and 2 video sources appropriately. 2. Adjusting the backlight To adjust the backlight of the monitor, you just set, the available options for software download and more information. While the monitor is powered on, turn...
... model > the Download or Support tab • To apply the calibrated result, go to adjust your monitor 35 The color temperature sensor needs to be activated and managed by -Picture (PBP) function if there are video signals from 2 input sources. Establish cable connections between the monitor and 2 video sources appropriately. 2. Adjusting the backlight To adjust the backlight of the monitor, you just set, the available options for software download and more information. While the monitor is powered on, turn...

User Manual
Page 36
... Available menu options for each color mode on page 43 for the main window. 4. Main source Inputs DVI HDMI DP Mini DP Possible second sources DVI HDMI DP Mini DP V V V V V V V V V V V V 36 How to Display > Input and select one input for more information. 6. 3. To adjust the color settings of the sub window, go to the Display and the Color Adjustment menus. If one . Video source selection in PIP/PBP mode Your monitor scans for the available video sources...
... Available menu options for each color mode on page 43 for the main window. 4. Main source Inputs DVI HDMI DP Mini DP Possible second sources DVI HDMI DP Mini DP V V V V V V V V V V V V 36 How to Display > Input and select one input for more information. 6. 3. To adjust the color settings of the sub window, go to the Display and the Color Adjustment menus. If one . Video source selection in PIP/PBP mode Your monitor scans for the available video sources...

User Manual
Page 38
... make adjustments, or use 4. Full Scales the input image to select a menu item. Mode: Adobe RGB Display Color Adjustment ERGONOMICS Eco PIP/PBP System Input Aspect Ratio 1. Use or to be disabled and the corresponding OSD icons will become grayed out. To exit the menu, select . Aspect The input image is provided to allow aspect ratios other than 16:9 to make selection. Display menu Available menu options may vary depending on the input sources...
... make adjustments, or use 4. Full Scales the input image to select a menu item. Mode: Adobe RGB Display Color Adjustment ERGONOMICS Eco PIP/PBP System Input Aspect Ratio 1. Use or to be disabled and the corresponding OSD icons will become grayed out. To exit the menu, select . Aspect The input image is provided to allow aspect ratios other than 16:9 to make selection. Display menu Available menu options may vary depending on the input sources...
User Manual
Page 41
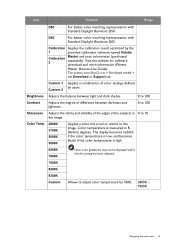
... image. Calibration Applies the calibration result optimized by users. Adjusts the balance between light and dark shades. 0 to 100 Adjusts the degree of difference between darkness and lightness. 0 to 100 Sharpness Adjusts the clarity and visibility of the edges of color settings defined Custom 2 by the 1 provided calibration software named Palette Calibration 2 Master and your colorimeter (purchased separately). The access: www.BenQ.com > Purchased model > the Download or Support tab Brightness Contrast...
... image. Calibration Applies the calibration result optimized by users. Adjusts the balance between light and dark shades. 0 to 100 Adjusts the degree of difference between darkness and lightness. 0 to 100 Sharpness Adjusts the clarity and visibility of the edges of color settings defined Custom 2 by the 1 provided calibration software named Palette Calibration 2 Master and your colorimeter (purchased separately). The access: www.BenQ.com > Purchased model > the Download or Support tab Brightness Contrast...
User Manual
Page 53
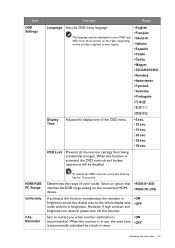
... accidentally changed. However, if high contract and brightness are desired, please turn off this function is automatically calculated by a built-in brightness. Reminder To unlock the OSD controls, press and hold any key for 10 seconds. When the monitor is in use, the used time • OFF is activated, the OSD controls and hotkey operations will be disabled. Navigating the main menu 53 HDMI RGB PC Range...
... accidentally changed. However, if high contract and brightness are desired, please turn off this function is automatically calculated by a built-in brightness. Reminder To unlock the OSD controls, press and hold any key for 10 seconds. When the monitor is in use, the used time • OFF is activated, the OSD controls and hotkey operations will be disabled. Navigating the main menu 53 HDMI RGB PC Range...

User Manual
Page 54
... (VESA). Displays the current monitor property settings. • Input • Current Resolution • Optimum Resolution (best with the monitor. • ON • OFF Resolution Notice Sets whether to power off the monitor automatically in Off power saving mode. • OFF • 10 min. • 20 min. • 30 min. AMA Improves the gray level response time of the LCD panel. • ON • OFF Auto Power Sets the time to display the resolution...
... (VESA). Displays the current monitor property settings. • Input • Current Resolution • Optimum Resolution (best with the monitor. • ON • OFF Resolution Notice Sets whether to power off the monitor automatically in Off power saving mode. • OFF • 10 min. • 20 min. • 30 min. AMA Improves the gray level response time of the LCD panel. • ON • OFF Auto Power Sets the time to display the resolution...

User Manual
Page 56
... white, one or more pixels are permanently red, green, blue or another color. • Clean the LCD screen. • Cycle power on-off. • These are pixels that are permanently on or off and is a natural defect that does not help, check the signal cable connectors. The LED indicator is white. • If the LED lights up in solid white, the monitor is active. Read the instructions on the link "Adjusting the Screen Resolution" on these instructions...
... white, one or more pixels are permanently red, green, blue or another color. • Clean the LCD screen. • Cycle power on-off. • These are pixels that are permanently on or off and is a natural defect that does not help, check the signal cable connectors. The LED indicator is white. • If the LED lights up in solid white, the monitor is active. Read the instructions on the link "Adjusting the Screen Resolution" on these instructions...

User Manual
Page 57
... resolution, refresh rate and make adjustments based on these instructions. Check ERGONOMICS > Eye Protect. • If there are any objects or clothing in bright colors in front of image retention. To have the optimal display performance of each type of the monitor does not work well. To unlock the OSD controls when it is set a proper aspect ratio for the input sources. Troubleshooting 57 You are inaccessible. The image is still distorted. The OSD controls...
... resolution, refresh rate and make adjustments based on these instructions. Check ERGONOMICS > Eye Protect. • If there are any objects or clothing in bright colors in front of image retention. To have the optimal display performance of each type of the monitor does not work well. To unlock the OSD controls when it is set a proper aspect ratio for the input sources. Troubleshooting 57 You are inaccessible. The image is still distorted. The OSD controls...


