PG2401PT User Manual
Page 3
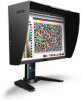
• It is recommended to set the monitor to a lower brightness for long-term use the original accessories (e.g. power cable) only with the ultimate goal to extend the display's lifetime. For works that consumers make informed green choices at http://csr.BenQ.com/ for more information. See Adjusting the backlight on BenQ's environmental commitments and achievements. 3 Servicing Do not attempt to service this product yourself, as electric...
• It is recommended to set the monitor to a lower brightness for long-term use the original accessories (e.g. power cable) only with the ultimate goal to extend the display's lifetime. For works that consumers make informed green choices at http://csr.BenQ.com/ for more information. See Adjusting the backlight on BenQ's environmental commitments and achievements. 3 Servicing Do not attempt to service this product yourself, as electric...
PG2401PT User Manual
Page 25
... Disk button, insert the BenQ LCD Monitor DVD-ROM and select the appropriate monitor model. Further details and step-by-step instructions for either case however, the very next time you are connecting the monitor and installing the software onto a new computer (without existing monitor driver software), or whether you turn on your computer (after connecting the monitor to a network which already has existing monitor driver software) with a newer monitor. The...
... Disk button, insert the BenQ LCD Monitor DVD-ROM and select the appropriate monitor model. Further details and step-by-step instructions for either case however, the very next time you are connecting the monitor and installing the software onto a new computer (without existing monitor driver software), or whether you turn on your computer (after connecting the monitor to a network which already has existing monitor driver software) with a newer monitor. The...
PG2401PT User Manual
Page 26
... computer. 1. When Windows starts, it (and has monitor driver software installed), you are adding the BenQ LCD Monitor to an existing computer that the wizard has selected the correct name of your BenQ monitor If you should instead be following the instructions for selecting and installing the BenQ LCD Monitor driver software on a new computer which has never had another monitor connected to upgrade the monitor on the computer. 3. Check the option for...
... computer. 1. When Windows starts, it (and has monitor driver software installed), you are adding the BenQ LCD Monitor to an existing computer that the wizard has selected the correct name of your BenQ monitor If you should instead be following the instructions for selecting and installing the BenQ LCD Monitor driver software on a new computer which has never had another monitor connected to upgrade the monitor on the computer. 3. Check the option for...
PG2401PT User Manual
Page 27
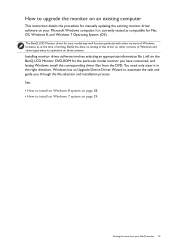
... and guide you have connected, and letting Windows install the corresponding driver files from your Microsoft Windows computer. See: • How to install on Windows 8 system on page 28. • How to install on Windows 7 system on your BenQ monitor 27 Getting the most from the DVD. How to upgrade the monitor on an existing computer This instruction details the procedure for manually updating the existing monitor driver software on...
... and guide you have connected, and letting Windows install the corresponding driver files from your Microsoft Windows computer. See: • How to install on Windows 8 system on page 28. • How to install on Windows 7 system on your BenQ monitor 27 Getting the most from the DVD. How to upgrade the monitor on an existing computer This instruction details the procedure for manually updating the existing monitor driver software on...
PG2401PT User Manual
Page 28
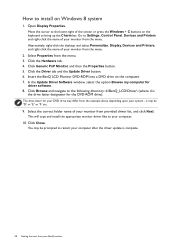
... d is complete. 28 Getting the most from your monitor from the menu. 2. Click the Driver tab and the Update Driver button. 6. Click Browse and navigate to your monitor from the menu. 3. Go to Settings, Control Panel, Devices and Printers and right-click the name of the screen or press the Windows + C buttons on the keyboard to install on the computer. 7. How to bring up the...
... d is complete. 28 Getting the most from your monitor from the menu. 2. Click the Driver tab and the Update Driver button. 6. Click Browse and navigate to your monitor from the menu. 3. Go to Settings, Control Panel, Devices and Printers and right-click the name of the screen or press the Windows + C buttons on the keyboard to install on the computer. 7. How to bring up the...
PG2401PT User Manual
Page 31
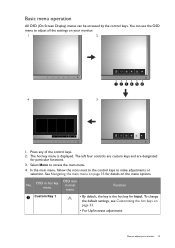
... icons next to the control keys to access the main menu. 4. OSD in hot key menu OSD icon in main menu Function 1 Custom Key 1 • By default, the key is displayed. Press any of the control keys. 2. The left four controls are custom keys and are designated for Input. Basic menu operation All OSD (On Screen Display) menus can use the OSD menu to adjust your monitor. 1 2 123456 4 3 1. You can...
... icons next to the control keys to access the main menu. 4. OSD in hot key menu OSD icon in main menu Function 1 Custom Key 1 • By default, the key is displayed. Press any of the control keys. 2. The left four controls are custom keys and are designated for Input. Basic menu operation All OSD (On Screen Display) menus can use the OSD menu to adjust your monitor. 1 2 123456 4 3 1. You can...
PG2401PT User Manual
Page 33
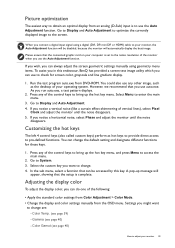
... adjust the screen geometric settings manually using a digital (DVI, DP, mini DP, or HDMI) cable to your operating system. However, we recommend that can change the default setting and designate different functions for screen color, grayscale and line gradient display. 1. If you notice a horizontal noise, select Phase and adjust the monitor until the noise disappears. 5. In the sub menu, select a function that you can do one of vertical lines), select Pixel...
... adjust the screen geometric settings manually using a digital (DVI, DP, mini DP, or HDMI) cable to your operating system. However, we recommend that can change the default setting and designate different functions for screen color, grayscale and line gradient display. 1. If you notice a horizontal noise, select Phase and adjust the monitor until the noise disappears. 5. In the sub menu, select a function that you can do one of vertical lines), select Pixel...
PG2401PT User Manual
Page 34
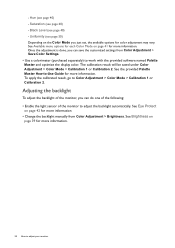
... saved under Color Adjustment > Color Mode > Calibration 1 or Calibration 2. See Eye Protect on page 39 for more information. See Brightness on page 42 for more information. 34 How to adjust your monitor Black Level (see page 40) - Adjusting the backlight To adjust the backlight of the monitor to Color Adjustment > Color Mode > Calibration 1 or Calibration 2. Saturation (see page 40) - See the provided Palette Master How-to work with the provided software named Palette Master and optimize the display color...
... saved under Color Adjustment > Color Mode > Calibration 1 or Calibration 2. See Eye Protect on page 39 for more information. See Brightness on page 42 for more information. 34 How to adjust your monitor Black Level (see page 40) - Adjusting the backlight To adjust the backlight of the monitor to Color Adjustment > Color Mode > Calibration 1 or Calibration 2. Saturation (see page 40) - See the provided Palette Master How-to work with the provided software named Palette Master and optimize the display color...

PG2401PT User Manual
Page 36
... on the input sources, functions and settings. Select to go to be disabled and the corresponding OSD icons will become grayed out. Select Menu from the hot key menu. 2. To exit the menu, select . And keys that appropriate to your video • D-Sub cable connection type. • DVI • HDMI • DP • Mini DP This feature is displayed without geometric distortion. Use or to...
... on the input sources, functions and settings. Select to go to be disabled and the corresponding OSD icons will become grayed out. Select Menu from the hot key menu. 2. To exit the menu, select . And keys that appropriate to your video • D-Sub cable connection type. • DVI • HDMI • DP • Mini DP This feature is displayed without geometric distortion. Use or to...
PG2401PT User Manual
Page 37
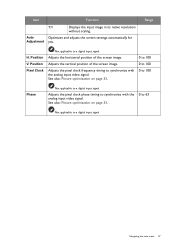
... with the analog input video signal. Navigating the main menu 37 Adjusts the pixel clock phase timing to a digital input signal. Adjusts the vertical position of the screen image. Item Function 1:1 Displays the input image in its native resolution without scaling. Position Pixel Clock Not applicable to synchronize with the analog input video signal. Adjusts the horizontal position of the screen image. Range H. Auto Optimizes and adjusts the screen settings automatically for Adjustment you. Adjusts the pixel clock frequency timing to a digital input signal.
... with the analog input video signal. Navigating the main menu 37 Adjusts the pixel clock phase timing to a digital input signal. Adjusts the vertical position of the screen image. Item Function 1:1 Displays the input image in its native resolution without scaling. Position Pixel Clock Not applicable to synchronize with the analog input video signal. Adjusts the horizontal position of the screen image. Range H. Auto Optimizes and adjusts the screen settings automatically for Adjustment you. Adjusts the pixel clock frequency timing to a digital input signal.
PG2401PT User Manual
Page 39
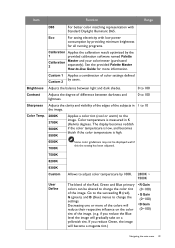
... 2 Brightness Adjusts the balance between light and dark shades. 0 to 100 Contrast Adjusts the degree of difference between darkness and lightness. 0 to change the color tint of the image. (e.g. See the provided Palette Master How-to-Use Guide for all running programs. Calibration Applies the calibration result optimized by 100K. 2800K ~ 9300K The blend of the Red, Green and Blue primary colors can be altered to 10 the image. Color Temp...
... 2 Brightness Adjusts the balance between light and dark shades. 0 to 100 Contrast Adjusts the degree of difference between darkness and lightness. 0 to change the color tint of the image. (e.g. See the provided Palette Master How-to-Use Guide for all running programs. Calibration Applies the calibration result optimized by 100K. 2800K ~ 9300K The blend of the Red, Green and Blue primary colors can be altered to 10 the image. Color Temp...

PG2401PT User Manual
Page 48
... main menu To exit the menu, select . Mode: AdobeRGB Display Color Adjustment Ergonomics Eco PIP/PBP System OSD Settings Language HDMI Auto Switch Display Time HDMI RGB PC Range OSD locked Uniformity AMA Auto Power Off Auto Pivot Resolution Notice 5Sec. 10Sec. 15Sec. 20Sec. 25Sec. 30Sec. 1. Select Menu from the hot key menu. 2. Use or to a sub menu, and then use 5. To return to select a menu item. System menu Available menu options may vary depending on the input sources, functions and settings. Menu options...
... main menu To exit the menu, select . Mode: AdobeRGB Display Color Adjustment Ergonomics Eco PIP/PBP System OSD Settings Language HDMI Auto Switch Display Time HDMI RGB PC Range OSD locked Uniformity AMA Auto Power Off Auto Pivot Resolution Notice 5Sec. 10Sec. 15Sec. 20Sec. 25Sec. 30Sec. 1. Select Menu from the hot key menu. 2. Use or to a sub menu, and then use 5. To return to select a menu item. System menu Available menu options may vary depending on the input sources, functions and settings. Menu options...
PG2401PT User Manual
Page 50
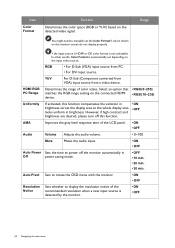
... from VGA) input source from PC. • For DVI input source. HDMI RGB PC Range Determines the range of the LCD panel. • ON • OFF Audio Volume Adjusts the audio volume. • 0~100 Mute Mutes the audio input. • ON • OFF Auto Power Sets the time to manually set depending on the monitor screen do not display properly. Select an option that • RGB (0~255) matches the RGB range setting on the detected video signal. Auto Pivot Sets to rotate the OSD menu with the monitor...
... from VGA) input source from PC. • For DVI input source. HDMI RGB PC Range Determines the range of the LCD panel. • ON • OFF Audio Volume Adjusts the audio volume. • 0~100 Mute Mutes the audio input. • ON • OFF Auto Power Sets the time to manually set depending on the monitor screen do not display properly. Select an option that • RGB (0~255) matches the RGB range setting on the detected video signal. Auto Pivot Sets to rotate the OSD menu with the monitor...
PG2401PT User Manual
Page 51
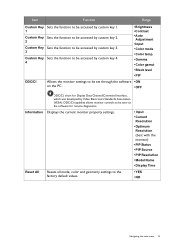
...; Brightness • Contrast • Auto Adjustment • Input • Color mode • Color temp. • Gamma • Color gamut • Black level • PIP DDC/CI Allows the monitor settings to be sent via the software for remote diagnostics. Information Displays the current monitor property settings. • Input • Current Resolution • Optimum Resolution (best with the monitor) • PIP Status • PIP Source • PIP Resolution • Model Name • Display Time Reset All Resets all mode, color and...
...; Brightness • Contrast • Auto Adjustment • Input • Color mode • Color temp. • Gamma • Color gamut • Black level • PIP DDC/CI Allows the monitor settings to be sent via the software for remote diagnostics. Information Displays the current monitor property settings. • Input • Current Resolution • Optimum Resolution (best with the monitor) • PIP Status • PIP Source • PIP Resolution • Model Name • Display Time Reset All Resets all mode, color and...
PG2401PT User Manual
Page 52
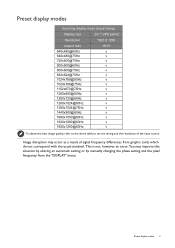
...? The image has a faulty coloration. It has a yellow, blue or pink appearance. Now check the signal cable connectors. Please read the "Preset display modes" section from the link "Adjusting the Screen Resolution". 52 Troubleshooting Read the instructions on the link "Adjusting the Screen Resolution" on the DVD, and then select the correct resolution, refresh rate and make adjustments based on the link "Adjusting the Screen Resolution". No image can be seen. If the LED is illuminated in green and...
...? The image has a faulty coloration. It has a yellow, blue or pink appearance. Now check the signal cable connectors. Please read the "Preset display modes" section from the link "Adjusting the Screen Resolution". 52 Troubleshooting Read the instructions on the link "Adjusting the Screen Resolution" on the DVD, and then select the correct resolution, refresh rate and make adjustments based on the link "Adjusting the Screen Resolution". No image can be seen. If the LED is illuminated in green and...

PG2401PT User Manual
Page 53
... the correct resolution, refresh rate and make adjustments based on these instructions. You are running at its native resolution, but the image is still distorted. The OSD controls are USB-powered, check whether the USB connection is OK. • Increase the volume (volume may appear distorted or stretched on the monitor running the monitor at all? If that does not help, check the signal cable connectors. Check the power supply mains socket, the external power supply and the mains switch. Press any...
... the correct resolution, refresh rate and make adjustments based on these instructions. You are running at its native resolution, but the image is still distorted. The OSD controls are USB-powered, check whether the USB connection is OK. • Increase the volume (volume may appear distorted or stretched on the monitor running the monitor at all? If that does not help, check the signal cable connectors. Check the power supply mains socket, the external power supply and the mains switch. Press any...
Tip Sheet: Adjusting Screen Resolution
Page 1
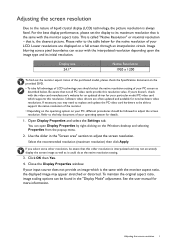
... best display performance, please set the display to its initial resolution. Open Display Properties and select the Settings tab. Use the slider in the "Display Mode" adjustment. Adjusting the screen resolution Due to the nature of liquid crystal display (LCD) technology, the picture resolution is called "Native Resolution" or maximal resolution - If yours doesn't, check with the monitor aspect ratio. Image blurring across pixel boundaries can open Display Properties by right-clicking on a full screen through an interpolation circuit. Software video drivers...
... best display performance, please set the display to its initial resolution. Open Display Properties and select the Settings tab. Use the slider in the "Display Mode" adjustment. Adjusting the screen resolution Due to the nature of liquid crystal display (LCD) technology, the picture resolution is called "Native Resolution" or maximal resolution - If yours doesn't, check with the monitor aspect ratio. Image blurring across pixel boundaries can open Display Properties by right-clicking on a full screen through an interpolation circuit. Software video drivers...
Tip Sheet: Adjusting Screen Resolution
Page 2
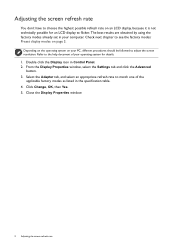
... by using the factory modes already set in Control Panel. 2. Click Change, OK, then Yes. 5. Close the Display Properties window. 2 Adjusting the screen refresh rate Double click the Display icon in your computer. Refer to flicker. Check next chapter to adjust the screen resolution. Depending on the operating system on your operating system for an LCD display to the help document of the applicable factory modes as listed in the specification table. 4. Select the Adapter tab...
... by using the factory modes already set in Control Panel. 2. Click Change, OK, then Yes. 5. Close the Display Properties window. 2 Adjusting the screen refresh rate Double click the Display icon in your computer. Refer to flicker. Check next chapter to adjust the screen resolution. Depending on the operating system on your operating system for an LCD display to the help document of the applicable factory modes as listed in the specification table. 4. Select the Adapter tab...
Tip Sheet: Adjusting Screen Resolution
Page 3
... v 1680x1050@60Hz v 1920x1080@60Hz v 1920x1200@60Hz v To obtain the best image quality, refer to the above table to set the timing and the resolution of signal frequency differences from the "DISPLAY" menu. Image disruption may improve this situation by altering an automatic setting or by manually changing the phase setting and the pixel frequency from graphic cards which do not correspond with the usual standard. This...
... v 1680x1050@60Hz v 1920x1080@60Hz v 1920x1200@60Hz v To obtain the best image quality, refer to the above table to set the timing and the resolution of signal frequency differences from the "DISPLAY" menu. Image disruption may improve this situation by altering an automatic setting or by manually changing the phase setting and the pixel frequency from graphic cards which do not correspond with the usual standard. This...
PG2401PT Data Sheet
Page 1
Frequency (KHz) Ver. Frequency (Hz) Video Bandwidth (MHZ) Input Connector Power Supply (90~264 AC) Power Consumption (Base on Energy star ) Power Consumption (On mode) Power saving mode K Locker Dimensions with Stand (HxWxD) mm Weight (Net/Gross) Special Features Senseye AMA Vista Win7 Win8 HDCP Color Temperature OSD Language USB Hub VESA Wall Mounting Pivot Swivel (left/right) Tilt (down/up) Height Adjustment Light Sensor Touch Pad Dynamic Power Saving (DPS) Included Accessories Regulations Regulations Warranty UPC Code / Part # Limited Warranty Dark Gray...
Frequency (KHz) Ver. Frequency (Hz) Video Bandwidth (MHZ) Input Connector Power Supply (90~264 AC) Power Consumption (Base on Energy star ) Power Consumption (On mode) Power saving mode K Locker Dimensions with Stand (HxWxD) mm Weight (Net/Gross) Special Features Senseye AMA Vista Win7 Win8 HDCP Color Temperature OSD Language USB Hub VESA Wall Mounting Pivot Swivel (left/right) Tilt (down/up) Height Adjustment Light Sensor Touch Pad Dynamic Power Saving (DPS) Included Accessories Regulations Regulations Warranty UPC Code / Part # Limited Warranty Dark Gray...


