
User Manual
Page 3
The serial number is on the back of Purchase: Dealer Information Dealer: Telephone: Number: Address: iii For the convenience of service, write following related information of your monitor in here!! Monitor Information Product Name: Serial Number: Date of the product. Reference Fill in the space below.
The serial number is on the back of Purchase: Dealer Information Dealer: Telephone: Number: Address: iii For the convenience of service, write following related information of your monitor in here!! Monitor Information Product Name: Serial Number: Date of the product. Reference Fill in the space below.

User Manual
Page 9
...there is connected. 4 Consult the dealer or an experienced radio/television technician for help. Caution: 1 If you find some parts of the monitor display discolored due to comply with the emission limits of the following measures: 1 Reorient or relocate the receiving antenna. 2 Increase the separation ... against harmful interference in a residential installation. The degaussing circuit of FCC Rules. These limits are designed to Part 15 of the monitor will not occur in order to magnetic fields generated by one or more of FCC Class B digital device. ix If this ...
...there is connected. 4 Consult the dealer or an experienced radio/television technician for help. Caution: 1 If you find some parts of the monitor display discolored due to comply with the emission limits of the following measures: 1 Reorient or relocate the receiving antenna. 2 Increase the separation ... against harmful interference in a residential installation. The degaussing circuit of FCC Rules. These limits are designed to Part 15 of the monitor will not occur in order to magnetic fields generated by one or more of FCC Class B digital device. ix If this ...

User Manual
Page 10
These directives refer to EMC. Canadian Department of Communications Regulatory Statement This digital apparatus does not exceed Class B limits for radio noise emissions from digital apparatus set out in the Radio Interference Regulations of the Canadian Department of Communications. x CE Declaration CE Declaration This monitor complies with 72/23/EEC and 89/336/EEC modified by 92/31/ECC.
These directives refer to EMC. Canadian Department of Communications Regulatory Statement This digital apparatus does not exceed Class B limits for radio noise emissions from digital apparatus set out in the Radio Interference Regulations of the Canadian Department of Communications. x CE Declaration CE Declaration This monitor complies with 72/23/EEC and 89/336/EEC modified by 92/31/ECC.
User Manual
Page 11
...; ○ ○ ○ ○ ○ ○ ○ ○ ○ ○ ○ ○ ○ ○ ○ ○ ○ ○ ○ ○ ○ ○ Chapter 2 Installing the Monitor 4 ○ ○ ○ ○ ○ ○ ○ ○ ○ ○ ○ ○ ○ ○ ○ ○ ○ ○ ○ ○ ○ ○ Connecting the Signal...
...; ○ ○ ○ ○ ○ ○ ○ ○ ○ ○ ○ ○ ○ ○ ○ ○ ○ ○ ○ ○ ○ ○ Chapter 2 Installing the Monitor 4 ○ ○ ○ ○ ○ ○ ○ ○ ○ ○ ○ ○ ○ ○ ○ ○ ○ ○ ○ ○ ○ ○ Connecting the Signal...
User Manual
Page 12
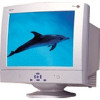
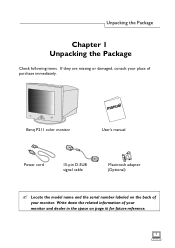
Unpacking the Package Chapter 1 Unpacking the Package Check following items. If they are missing or damaged, consult your monitor. Benq P211 color monitor User's manual Power cord 15-pin D-SUB signal cable Macintosh adapter (Optional) Locate the model name and the serial number labeled on page iii for future reference. 1 Write down the related information of your monitor and dealer in the space on the back of your place of purchase immediately.
Unpacking the Package Chapter 1 Unpacking the Package Check following items. If they are missing or damaged, consult your monitor. Benq P211 color monitor User's manual Power cord 15-pin D-SUB signal cable Macintosh adapter (Optional) Locate the model name and the serial number labeled on page iii for future reference. 1 Write down the related information of your monitor and dealer in the space on the back of your place of purchase immediately.
User Manual
Page 13
... calibrating) Low radiation Users and Environment Pressing the i key, the monitor will automatically adjust display's size and position to 1920 x 1440. Plug'n Play Compatibility Supporting VESA DDC 2B™ standards, Benq P211 is produced by the ISO 14001 certified manufacturer, and in compliance with... and "TCO'99". Flicker-Free design for vertical frequency of up to the optimum. Benq P211 is compatible with MPRII, but also ergonomic qualities, and ecological concerns. Benq P211 is needed when a user changes display mode. Wide Range AutoScan Horizontal frequency ranges from 30KHz...
... calibrating) Low radiation Users and Environment Pressing the i key, the monitor will automatically adjust display's size and position to 1920 x 1440. Plug'n Play Compatibility Supporting VESA DDC 2B™ standards, Benq P211 is produced by the ISO 14001 certified manufacturer, and in compliance with... and "TCO'99". Flicker-Free design for vertical frequency of up to the optimum. Benq P211 is compatible with MPRII, but also ergonomic qualities, and ecological concerns. Benq P211 is needed when a user changes display mode. Wide Range AutoScan Horizontal frequency ranges from 30KHz...

User Manual
Page 14
... 91.15 93.75 106.00 112.50 ** All above timings are non-Interlace timings. 3 Unpacking the Package Power Management The Power management of this monitor complies with these VESA power saving modes: Mode Power Consumption On < 150W Max.
... 91.15 93.75 106.00 112.50 ** All above timings are non-Interlace timings. 3 Unpacking the Package Power Management The Power management of this monitor complies with these VESA power saving modes: Mode Power Consumption On < 150W Max.

User Manual
Page 15
Please confirm the line voltage designation at the rear panel of the monitor before connecting the machine. 1) Make sure that the system power is equipped with an autosensing universal compatible power supply for voltage ranges 100-120/200-240V AC, 50~60Hz.. Chapter 2 Chapter 2 Installing the Monitor This monitor is turned off. 2) Please refer to the instructions below to connect the signal cable through D-SUB or BNC. 3) Connect the power cord to the monitor and attach it to power source. 4) Turn on the computer and the monitor. 4
Please confirm the line voltage designation at the rear panel of the monitor before connecting the machine. 1) Make sure that the system power is equipped with an autosensing universal compatible power supply for voltage ranges 100-120/200-240V AC, 50~60Hz.. Chapter 2 Chapter 2 Installing the Monitor This monitor is turned off. 2) Please refer to the instructions below to connect the signal cable through D-SUB or BNC. 3) Connect the power cord to the monitor and attach it to power source. 4) Turn on the computer and the monitor. 4
User Manual
Page 16
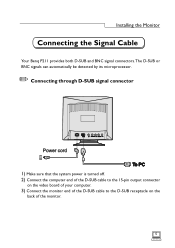
Installing the Monitor Connecting the Signal Cable Your Benq P211 provides both D-SUB and BNC signal connectors.The D-SUB or BNC signals can automatically be detected by its microprocessor. ✏ Connecting through D-SUB signal connector 1) Make sure that the system power is turned off. 2) Connect the computer end of the D-SUB cable to the 15-pin output connector on the video board of your computer. 3) Connect the monitor end of the D-SUB cable to the D-SUB receptacle on the back of the monitor. 5
Installing the Monitor Connecting the Signal Cable Your Benq P211 provides both D-SUB and BNC signal connectors.The D-SUB or BNC signals can automatically be detected by its microprocessor. ✏ Connecting through D-SUB signal connector 1) Make sure that the system power is turned off. 2) Connect the computer end of the D-SUB cable to the 15-pin output connector on the video board of your computer. 3) Connect the monitor end of the D-SUB cable to the D-SUB receptacle on the back of the monitor. 5
User Manual
Page 17
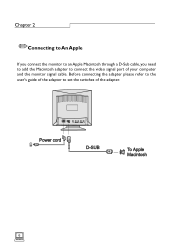
Chapter 2 ✏Connecting to An Apple If you connect the monitor to an Apple Macintosh through a D-Sub cable, you need to add the Macintosh adapter to set the switches of your computer and the monitor signal cable. Before connecting the adapter please refer to the user's guide of the adapter to connect the video signal port of the adapter. 6
Chapter 2 ✏Connecting to An Apple If you connect the monitor to an Apple Macintosh through a D-Sub cable, you need to add the Macintosh adapter to set the switches of your computer and the monitor signal cable. Before connecting the adapter please refer to the user's guide of the adapter to connect the video signal port of the adapter. 6

User Manual
Page 18
Installing the Monitor ✏Connecting through BNC Signal Connector 1) Make sure that the system power is turned off. 2) Connect the computer end of the BNC cable to the output connector on the video board of your computer. 3) Connect the monitor end of the BNC cable to the BNC receptacle on the back of the monitor. 7
Installing the Monitor ✏Connecting through BNC Signal Connector 1) Make sure that the system power is turned off. 2) Connect the computer end of the BNC cable to the output connector on the video board of your computer. 3) Connect the monitor end of the BNC cable to the BNC receptacle on the back of the monitor. 7
User Manual
Page 20
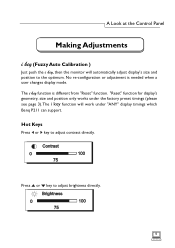
"Reset" function for display's geometry, size and position only works under "ANY" display timings which Benq P211 can support. The i key function will automatically adjust display's size and position to the optimum. Press or key to adjust contrast directly. Hot Keys Press ...configuration or adjustment is different from "Reset" function. A Look at the Control Panel Making Adjustments i key (Fuzzy Auto Calibration ) Just push the i key, then the monitor will work under the factory preset timings (please see page 3). The i key function is needed when a user changes display mode.
"Reset" function for display's geometry, size and position only works under "ANY" display timings which Benq P211 can support. The i key function will automatically adjust display's size and position to the optimum. Press or key to adjust contrast directly. Hot Keys Press ...configuration or adjustment is different from "Reset" function. A Look at the Control Panel Making Adjustments i key (Fuzzy Auto Calibration ) Just push the i key, then the monitor will work under the factory preset timings (please see page 3). The i key function is needed when a user changes display mode.
User Manual
Page 24
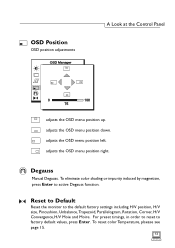
..., press Enter to the default factory settings including H/V position, H/V size, Pincushion, Unbalance,Trapezoid, Parallelogram, Rotation, Corner, H/V Convergence, H/V Moie and Moire. Reset to Default Reset the monitor to active Degauss function. adjusts the OSD menu position right. Degauss Manual Degauss. adjusts the OSD menu position left. OSD Position OSD position adjustments A Look...
..., press Enter to the default factory settings including H/V position, H/V size, Pincushion, Unbalance,Trapezoid, Parallelogram, Rotation, Corner, H/V Convergence, H/V Moie and Moire. Reset to Default Reset the monitor to active Degauss function. adjusts the OSD menu position right. Degauss Manual Degauss. adjusts the OSD menu position left. OSD Position OSD position adjustments A Look...

User Manual
Page 27
.... When adjusting convergence, look at the top and bottom edges of horizontal lines or characters.The monitor is best to have tinges of red , green, or blue if the electron beams do not converge correctly. Benq P211 offers a convergence adjustment feature.To properly adjust convergence, it easy to specific screen areas. Chapter 3 Convergence...
.... When adjusting convergence, look at the top and bottom edges of horizontal lines or characters.The monitor is best to have tinges of red , green, or blue if the electron beams do not converge correctly. Benq P211 offers a convergence adjustment feature.To properly adjust convergence, it easy to specific screen areas. Chapter 3 Convergence...
User Manual
Page 31
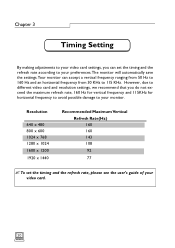
... recommend that you can accept a vertical frequency ranging from 50 Hz to 160 Hz and an horizontal frequency from 30 KHz to your preferences.The monitor will automatically save the settings.Your monitor can set the timing and the refresh rate, please see the user's guide of your...
... recommend that you can accept a vertical frequency ranging from 50 Hz to 160 Hz and an horizontal frequency from 30 KHz to your preferences.The monitor will automatically save the settings.Your monitor can set the timing and the refresh rate, please see the user's guide of your...
User Manual
Page 34
...this chapter for Benq P211.You can download the update file from the Benq Corporation web site (http://www.benq.com) § If there is no picture on the screen, check: Power outlet type. If you cannot find Benq P211on the Windows ® XP/ ME/ 2000 / 98 / 95 monitor list, you.... Change the settings of your dealer. § If the picture is properly installed. If the problems persist, check this product, for the monitor. Replace with a functional one if inoperative. See if the settings are bent or missing, consult your graphics card to deactivate the mode. See...
...this chapter for Benq P211.You can download the update file from the Benq Corporation web site (http://www.benq.com) § If there is no picture on the screen, check: Power outlet type. If you cannot find Benq P211on the Windows ® XP/ ME/ 2000 / 98 / 95 monitor list, you.... Change the settings of your dealer. § If the picture is properly installed. If the problems persist, check this product, for the monitor. Replace with a functional one if inoperative. See if the settings are bent or missing, consult your graphics card to deactivate the mode. See...
User Manual
Page 35
...167; If colors are bent or missing, consult your dealer Adjust the Purity setting. See Chapter 3, A Look at : DPLservice@benq.com 24 Maintenance ✗ Do not expose the monitor to direct sunlight or heat. ✗ Do not spill liquid on your dealer. ✗ Do not use harsh chemicals or strong... cleaning solvents to open the monitor. Need More Help? For service, call your monitor. ing nearby. ✗ Do not use your place of purchase or e-mail us at the Control Panel. Bad ventilation may...
...167; If colors are bent or missing, consult your dealer Adjust the Purity setting. See Chapter 3, A Look at : DPLservice@benq.com 24 Maintenance ✗ Do not expose the monitor to direct sunlight or heat. ✗ Do not spill liquid on your dealer. ✗ Do not use harsh chemicals or strong... cleaning solvents to open the monitor. Need More Help? For service, call your monitor. ing nearby. ✗ Do not use your place of purchase or e-mail us at the Control Panel. Bad ventilation may...

