GP1 User Manual
Page 8
...be suitable for your place of the items shown below. Please contact your dealer for purchase. 8 Introduction Projector Power cord Multi-input cable AC adapter Safety manual Quick start guide User manual CD Warranty card* Pull the tab before using the remote control. ...Please consult your sales dealer for detailed information. iPod Dock with battery Optional accessories 1. Projector carrying Remote control bag with cable Optional accessories may differ from those illustrated. *The warranty card is only supplied in some specific regions. Shipping contents Carefully ...
...be suitable for your place of the items shown below. Please contact your dealer for purchase. 8 Introduction Projector Power cord Multi-input cable AC adapter Safety manual Quick start guide User manual CD Warranty card* Pull the tab before using the remote control. ...Please consult your sales dealer for detailed information. iPod Dock with battery Optional accessories 1. Projector carrying Remote control bag with cable Optional accessories may differ from those illustrated. *The warranty card is only supplied in some specific regions. Shipping contents Carefully ...
GP1 User Manual
Page 15
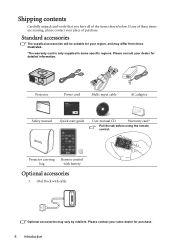
... all equipment off . Take the supplied multi-input cable and connect one end of the cable to the audio output socket of the computer, and the other end of the multi-input cable to the D-Sub output socket of the multi-input cable. Use the correct signal cables for each source. 3. If you wish... to make use of the projector speaker, take a suitable audio cable and connect one end to the multi-input socket on the notebook. To...
... all equipment off . Take the supplied multi-input cable and connect one end of the cable to the audio output socket of the computer, and the other end of the multi-input cable to the D-Sub output socket of the multi-input cable. Use the correct signal cables for each source. 3. If you wish... to make use of the projector speaker, take a suitable audio cable and connect one end to the multi-input socket on the notebook. To...
GP1 User Manual
Page 17
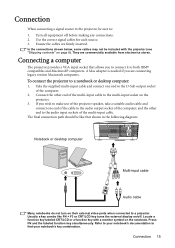
... correctly. • When AUDIO OUT is turned on the projector. 4. green to green, blue to blue, and red to a Component Video source device: 1. Connect the multi-input cable to the color of the multi-input cable. The final connection path should be adjusted either. Connection 17 Match the color of the plugs to the...
... correctly. • When AUDIO OUT is turned on the projector. 4. green to green, blue to blue, and red to a Component Video source device: 1. Connect the multi-input cable to the color of the multi-input cable. The final connection path should be adjusted either. Connection 17 Match the color of the plugs to the...
GP1 User Manual
Page 18
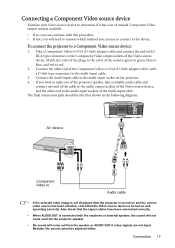
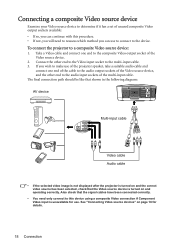
..." on and operating correctly. Connect the other end to the audio input sockets of the multi-input cable. The final connection path should be like that shown in the following diagram: AV device Multi-input cable Video cable Audio cable • If the selected video image is not displayed after the ...projector is turned on and the correct video source has been selected, check that the signal cables have been connected correctly. • You...
..." on and operating correctly. Connect the other end to the audio input sockets of the multi-input cable. The final connection path should be like that shown in the following diagram: AV device Multi-input cable Video cable Audio cable • If the selected video image is not displayed after the ...projector is turned on and the correct video source has been selected, check that the signal cables have been connected correctly. • You...
GP1 User Manual
Page 20
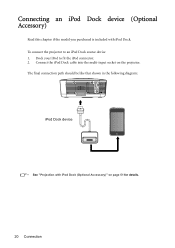
Connecting an iPod Dock device (Optional Accessory) Read this chapter if the model you purchased is included with iPod Dock (Optional Accessory)" on the projector. The final connection path should be like that shown in the following diagram: iPod Dock device • See "Projection with iPod Dock. Dock your iPod to an iPod Dock source device 1. To connect the projector to fit the iPod connector. 2. Connect the iPod Dock cable into the multi-input socket on page 51 for details. 20 Connection
Connecting an iPod Dock device (Optional Accessory) Read this chapter if the model you purchased is included with iPod Dock (Optional Accessory)" on the projector. The final connection path should be like that shown in the following diagram: iPod Dock device • See "Projection with iPod Dock. Dock your iPod to an iPod Dock source device 1. To connect the projector to fit the iPod connector. 2. Connect the iPod Dock cable into the multi-input socket on page 51 for details. 20 Connection
GP1 User Manual
Page 51
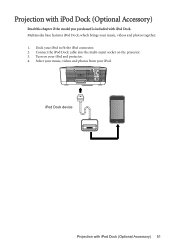
iPod Dock device Projection with iPod Dock. Projection with iPod Dock (Optional Accessory) Read this chapter if the model you purchased is included with iPod Dock (Optional Accessory) 51 Turn on the projector. 3. Dock your iPod and projector. 4. Select your music, videos and photos from your music, videos and photos together. 1. Connect the iPod Dock cable into the multi-input socket on your iPod to fit the iPod connector. 2. Multimedia base features iPod Dock, which brings your iPod.
iPod Dock device Projection with iPod Dock. Projection with iPod Dock (Optional Accessory) Read this chapter if the model you purchased is included with iPod Dock (Optional Accessory) 51 Turn on the projector. 3. Dock your iPod and projector. 4. Select your music, videos and photos from your music, videos and photos together. 1. Connect the iPod Dock cable into the multi-input socket on your iPod to fit the iPod connector. 2. Multimedia base features iPod Dock, which brings your iPod.
GP1 User Manual
Page 55
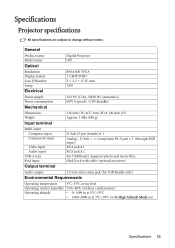
General Product name Model name Digital Projector GP1 Optical Resolution Display system Lens F/Number Lamp 858 x 600 SVGA 1-CHIP DMD F = 2, f = 17.67 mm LED Electrical Power supply Power consumption AC19V, 4.74A, 50/60 Hz (Automatic) 60W (typical); Specifications Projector specifications All specifications are subject to change without notice.
General Product name Model name Digital Projector GP1 Optical Resolution Display system Lens F/Number Lamp 858 x 600 SVGA 1-CHIP DMD F = 2, f = 17.67 mm LED Electrical Power supply Power consumption AC19V, 4.74A, 50/60 Hz (Automatic) 60W (typical); Specifications Projector specifications All specifications are subject to change without notice.


