
Quick Start Guide
Page 5
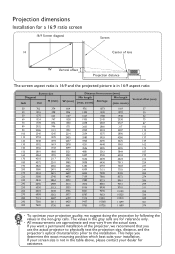
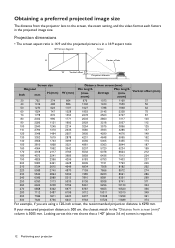
... the exact mounting position which best suits your projection quality, we recommend that you use the actual projector to physically test the projection size, distance, and the projector's optical characteristics prior to the installation. If your dealer for assistance. zoom) 664 976 1073 1169...349 361 374 To optimize your installation. Projection dimensions Installation for a 16:9 ratio screen 16:9 Screen diagonal H Screen Center of the projector, we suggest doing the projection by following the values in 16:9 aspect ratio Screen size Diagonal Inch mm H (mm) 30 762 ...
... the exact mounting position which best suits your projection quality, we recommend that you use the actual projector to physically test the projection size, distance, and the projector's optical characteristics prior to the installation. If your dealer for assistance. zoom) 664 976 1073 1169...349 361 374 To optimize your installation. Projection dimensions Installation for a 16:9 ratio screen 16:9 Screen diagonal H Screen Center of the projector, we suggest doing the projection by following the values in 16:9 aspect ratio Screen size Diagonal Inch mm H (mm) 30 762 ...

User Manual
Page 1
W1700/W1700S/HT2550 Digital Projector User Manual V 1.01
W1700/W1700S/HT2550 Digital Projector User Manual V 1.01

User Manual
Page 2
... the contents hereof and specifically disclaims any warranties, merchantability or fitness for the details on BenQ projector patent coverage. 2 Warranty and Copyright information For other rights which you may be required with any particular purpose. Further...computer language, in a dusty environment. Patents Please go to operate the projector in any form or by BenQ Corporation. Disclaimer BenQ Corporation makes no representations or warranties, either expressed or implied, with BenQ's written instructions, especially the ambient humidity must be replacement of any ...
... the contents hereof and specifically disclaims any warranties, merchantability or fitness for the details on BenQ projector patent coverage. 2 Warranty and Copyright information For other rights which you may be required with any particular purpose. Further...computer language, in a dusty environment. Patents Please go to operate the projector in any form or by BenQ Corporation. Disclaimer BenQ Corporation makes no representations or warranties, either expressed or implied, with BenQ's written instructions, especially the ambient humidity must be replacement of any ...
User Manual
Page 3
... Choosing a location ...11 Obtaining a preferred projected image size 12 Mounting the projector ...13 Adjusting the projected image...14 Connection ...16 Operation ...18 Starting up the projector ...18 Using the menus ...20 Securing the projector ...21 Switching input signal ...22 Shutting down the projector ...23 Direct power off ...23 Menu operation ...24 PICTURE menu ...24...
... Choosing a location ...11 Obtaining a preferred projected image size 12 Mounting the projector ...13 Adjusting the projected image...14 Connection ...16 Operation ...18 Starting up the projector ...18 Using the menus ...20 Securing the projector ...21 Switching input signal ...22 Shutting down the projector ...23 Direct power off ...23 Menu operation ...24 PICTURE menu ...24...

User Manual
Page 4
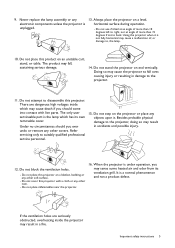
...on rare occasions. 4 Important safety instructions Save it is recommended that you follow the instructions mentioned in this manual before you connect your projector through a power stabilizer, surge protector or uninterruptible power supply (UPS). 3. The intense light beam may fluctuate or cut out, it for...reference. 2. Refer servicing to removing the lamp assembly for replacement. 8. Do not block the projection lens with any ) when the projector lamp is NOT stable. The lamp becomes extremely hot during operation. Excessive operation of this could fail if power cuts or surges of...
...on rare occasions. 4 Important safety instructions Save it is recommended that you follow the instructions mentioned in this manual before you connect your projector through a power stabilizer, surge protector or uninterruptible power supply (UPS). 3. The intense light beam may fluctuate or cut out, it for...reference. 2. Refer servicing to removing the lamp assembly for replacement. 8. Do not block the projection lens with any ) when the projector lamp is NOT stable. The lamp becomes extremely hot during operation. Excessive operation of this could fail if power cuts or surges of...
User Manual
Page 5
... or table. The product may result in accidents and possible injury. 12. Do not stand the projector on the projector or place any other soft surface. - Refer servicing only to disassemble this projector with live parts. Do not step on end vertically. If the ventilation holes are dangerous high voltages ... seriously obstructed, overheating inside which has its ventilation grill. 9. Never replace the lamp assembly or any other item. - Do not cover this projector. Do not use if tilted at an angle of more than 10 degrees left to right, nor at angle of , or damage to the...
... or table. The product may result in accidents and possible injury. 12. Do not stand the projector on the projector or place any other soft surface. - Refer servicing only to disassemble this projector with live parts. Do not step on end vertically. If the ventilation holes are dangerous high voltages ... seriously obstructed, overheating inside which has its ventilation grill. 9. Never replace the lamp assembly or any other item. - Do not cover this projector. Do not use if tilted at an angle of more than 10 degrees left to right, nor at angle of , or damage to the...
User Manual
Page 6
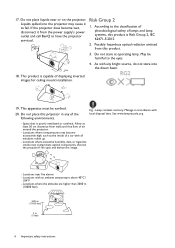
... fail. Hg - Possibly hazardous optical radiation emitted from the power supply's power outlet and call BenQ to the eyes. 4. May be earthed. 20. Locations where excessive humidity, dust, or cigarette smoke may cause it from this projector in accordance with all windows rolled up. - Do not place liquids near fire alarms - This...
... fail. Hg - Possibly hazardous optical radiation emitted from the power supply's power outlet and call BenQ to the eyes. 4. May be earthed. 20. Locations where excessive humidity, dust, or cigarette smoke may cause it from this projector in accordance with all windows rolled up. - Do not place liquids near fire alarms - This...
User Manual
Page 7
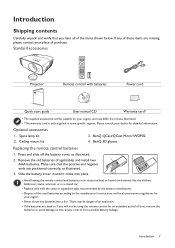
... danger of an explosion. • If the batteries are dead or if you have all of purchase. Introduction 7 Standard accessories Projector QDuigiictkalSPtraortjeGctuoidr e Remote control with the same or equivalent type recommended by the battery manufacturer. • Dispose of time, remove the ...The warranty card is only supplied in some specific regions. Press and slide off the battery cover, as illustrated. 3. Optional accessories 1. BenQ QCast/QCast Mirror/WDP02 2. Slide the battery cover in a closed car. • Replace only with batteries Power cord Quick start ...
... danger of an explosion. • If the batteries are dead or if you have all of purchase. Introduction 7 Standard accessories Projector QDuigiictkalSPtraortjeGctuoidr e Remote control with the same or equivalent type recommended by the battery manufacturer. • Dispose of time, remove the ...The warranty card is only supplied in some specific regions. Press and slide off the battery cover, as illustrated. 3. Optional accessories 1. BenQ QCast/QCast Mirror/WDP02 2. Slide the battery cover in a closed car. • Replace only with batteries Power cord Quick start ...
User Manual
Page 8
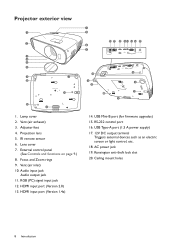
...) 15. Ceiling mount holes 8 Introduction Lamp cover 2. RGB (PC) signal input jack 12. HDMI input port (Version 2.0) 13. Projection lens 5. RS-232 control port 16. Projector exterior view 1 2 3 4 5 6 3 3 20 20 20 3 1. External control panel (See Controls and functions on page 9.) 8. IR remote sensor 6. Vent (air exhaust) 3. Adjuster feet 4. Vent (air inlet...
...) 15. Ceiling mount holes 8 Introduction Lamp cover 2. RGB (PC) signal input jack 12. HDMI input port (Version 2.0) 13. Projection lens 5. RS-232 control port 16. Projector exterior view 1 2 3 4 5 6 3 3 20 20 20 3 1. External control panel (See Controls and functions on page 9.) 8. IR remote sensor 6. Vent (air exhaust) 3. Adjuster feet 4. Vent (air inlet...
User Manual
Page 9
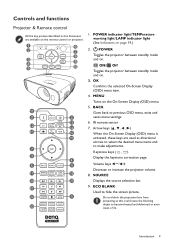
... to previous OSD menu, exits and saves menu settings. 6. OK Confirms the selected On-Screen Display (OSD) menu item. 4. Controls and functions Projector & Remote control All the key presses described in this could cause the blocking object to become heated and deformed or even cause a fire. POWER ...Toggles the projector between standby mode and on . Do not block the projection lens from projecting as this document are used as directional arrows to select ...
... to previous OSD menu, exits and saves menu settings. 6. OK Confirms the selected On-Screen Display (OSD) menu item. 4. Controls and functions Projector & Remote control All the key presses described in this could cause the blocking object to become heated and deformed or even cause a fire. POWER ...Toggles the projector between standby mode and on . Do not block the projection lens from projecting as this document are used as directional arrows to select ...
User Manual
Page 10
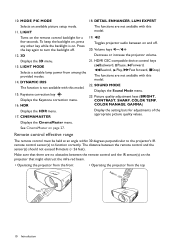
...remote control must be held at an angle within 30 degrees perpendicular to the projector's IR remote control sensor(s) to turn the backlight off . 20. Volume keys / 12. 3D Decrease or increase the projector volume. DYNAMIC IRIS 22. SOUND MODE The function is on page 27. ...Selects an available picture setup mode. 11. Make sure that might obstruct the infra-red beam. • Operating the projector from the front • Operating the projector from among the provided modes. To keep the backlight on, press any other key while the backlight is not available...
...remote control must be held at an angle within 30 degrees perpendicular to the projector's IR remote control sensor(s) to turn the backlight off . 20. Volume keys / 12. 3D Decrease or increase the projector volume. DYNAMIC IRIS 22. SOUND MODE The function is on page 27. ...Selects an available picture setup mode. 11. Make sure that might obstruct the infra-red beam. • Operating the projector from the front • Operating the projector from among the provided modes. To keep the backlight on, press any other key while the backlight is not available...
User Manual
Page 11
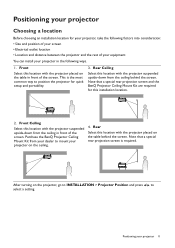
... of the screen. Note that a special rear projection screen and the BenQ Projector Ceiling Mount Kit are required for this location with the projector placed on the table behind the screen. Rear Select this installation location. 2. Positioning your projector on the projector, go to INSTALLATION > Projector Position and press / to select a setting. After turning on the...
... of the screen. Note that a special rear projection screen and the BenQ Projector Ceiling Mount Kit are required for this location with the projector placed on the table behind the screen. Rear Select this installation location. 2. Positioning your projector on the projector, go to INSTALLATION > Projector Position and press / to select a setting. After turning on the...
User Manual
Page 12
... 3736 6641 9763 10726 11689 374 For example, if you are using a 120-inch screen, the recommended projection distance is 5005 mm. If your projector Looking across this row shows that a 140'' (about 3.6 m) screen is in a 16:9 aspect ratio 16:9 Screen diagonal Screen H Center of... lens W Vertical offset Projection distance Screen size Distance from the projector lens to the screen, the zoom setting, and the video format each factors in the "Distance from screen (mm)" column is 4290 mm. zoom)...
... 3736 6641 9763 10726 11689 374 For example, if you are using a 120-inch screen, the recommended projection distance is 5005 mm. If your projector Looking across this row shows that a 140'' (about 3.6 m) screen is in a 16:9 aspect ratio 16:9 Screen diagonal Screen H Center of... lens W Vertical offset Projection distance Screen size Distance from the projector lens to the screen, the zoom setting, and the video format each factors in the "Distance from screen (mm)" column is 4290 mm. zoom)...
User Manual
Page 13
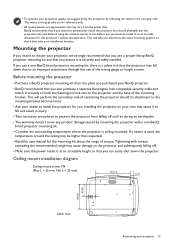
... temperature around the ceiling may vary from the place you purchased your BenQ projector. • BenQ recommends that you determine the exact mounting position so that if you intend to permanently install the projector, you should its attachment to fall down the projector. BenQ recommends that it to the mounting bracket become loose. • Ask your...
... temperature around the ceiling may vary from the place you purchased your BenQ projector. • BenQ recommends that you determine the exact mounting position so that if you intend to permanently install the projector, you should its attachment to fall down the projector. BenQ recommends that it to the mounting bracket become loose. • Ask your...
User Manual
Page 14
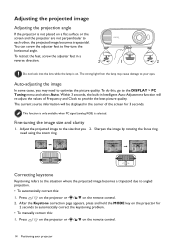
...damage to the DISPLAY > PC Tuning menu and select Auto. After the Keystone correction page appears, press and hold the MODE key on the projector for 3 seconds. To retract the feet, screw the adjuster feet in the corner of Frequency and Clock to angled projection. • To ...automatically correct this : 1. Press / on the projector or / / on the remote control. 2. Auto-adjusting the image In some cases, you 2. Press / on the projector or / / on the remote control. 14 Positioning your eyes. To do this, go to your...
...damage to the DISPLAY > PC Tuning menu and select Auto. After the Keystone correction page appears, press and hold the MODE key on the projector for 3 seconds. To retract the feet, screw the adjuster feet in the corner of Frequency and Clock to angled projection. • To ...automatically correct this : 1. Press / on the projector or / / on the remote control. 2. Auto-adjusting the image In some cases, you 2. Press / on the projector or / / on the remote control. 14 Positioning your eyes. To do this, go to your...
User Manual
Page 15
After the Keystone correction page appears, press / to correct keystoning at the top of the image. Press / . Press / . 2. Press / to correct keystoning at the bottom of the image. Positioning your projector 15
After the Keystone correction page appears, press / to correct keystoning at the top of the image. Press / . Press / . 2. Press / to correct keystoning at the bottom of the image. Positioning your projector 15
User Manual
Page 16
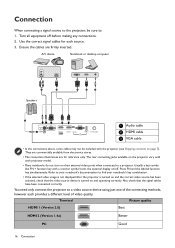
...cables for reference only. Refer to your notebook's key combination. • If the selected video image is not displayed after the projector is turned on and the correct video source has been selected, check that the signal cables have been connected correctly. Also check...8226; Many notebooks do not turn on /off before making any connections. 2. You need only connect the projector to : 1. Connection When connecting a signal source to the projector, be included with the projector (see Shipping contents on and operating correctly. Usually a key combo like FN + function key with each...
...cables for reference only. Refer to your notebook's key combination. • If the selected video image is not displayed after the projector is turned on and the correct video source has been selected, check that the signal cables have been connected correctly. Also check...8226; Many notebooks do not turn on /off before making any connections. 2. You need only connect the projector to : 1. Connection When connecting a signal source to the projector, be included with the projector (see Shipping contents on and operating correctly. Usually a key combo like FN + function key with each...

User Manual
Page 17
...and the correct video source has been selected, check that the signal cables have been connected correctly. Connection 17 Connecting audio The projector has built-in home theater or home cinema applications. They are designed to provide basic audio functionality accompanying data presentations for stereo ...audio reproduction use as might be muted when the AUDIO OUT jack is connected. • The projector is only capable of playing mixed mono audio, even if a stereo audio input is connected. • If the selected video image...
...and the correct video source has been selected, check that the signal cables have been connected correctly. Connection 17 Connecting audio The projector has built-in home theater or home cinema applications. They are designed to provide basic audio functionality accompanying data presentations for stereo ...audio reproduction use as might be muted when the AUDIO OUT jack is connected. • The projector is only capable of playing mixed mono audio, even if a stereo audio input is connected. • If the selected video image...
User Manual
Page 18
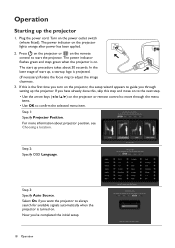
... location. Step 3: Specify Auto Source. In the later stage of start the projector. The power indicator on the remote control to adjust the image clearness. 3. Press on the projector or on the projector lights orange after power has been applied. 2. Select On if you 've ...completed the initial setup. 18 Operation Now you want the projector to always search for available signals automatically when the projector is projected. (If necessary) Rotate the focus ring to start up the projector 1. For more information about 30 seconds. Operation Starting up , a startup...
... location. Step 3: Specify Auto Source. In the later stage of start the projector. The power indicator on the remote control to adjust the image clearness. 3. Press on the projector or on the projector lights orange after power has been applied. 2. Select On if you 've ...completed the initial setup. 18 Operation Now you want the projector to always search for available signals automatically when the projector is projected. (If necessary) Rotate the focus ring to start up the projector 1. For more information about 30 seconds. Operation Starting up , a startup...
User Manual
Page 19
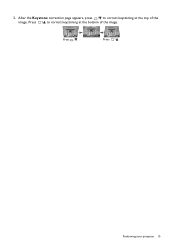
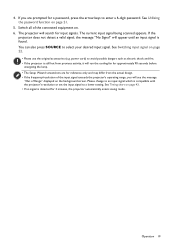
...Please change to avoid possible dangers such as electric shock and fire. • If the projector is detected for 3 minutes, the projector automatically enters saving mode. Switch all of Range" displayed on . 6. If the projector does not detect a valid signal, the message "No Signal" will search for a ...screenshots are for reference only and may differ from the actual design. • If the frequency/resolution of the input signal exceeds the projector's operating range, you are prompted for input signals. You can also press SOURCE to enter a 6-digit password. See Utilizing the ...
...Please change to avoid possible dangers such as electric shock and fire. • If the projector is detected for 3 minutes, the projector automatically enters saving mode. Switch all of Range" displayed on . 6. If the projector does not detect a valid signal, the message "No Signal" will search for a ...screenshots are for reference only and may differ from the actual design. • If the frequency/resolution of the input signal exceeds the projector's operating range, you are prompted for input signals. You can also press SOURCE to enter a 6-digit password. See Utilizing the ...


