Quick Start Guide
Page 5
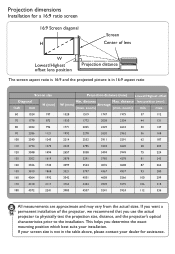
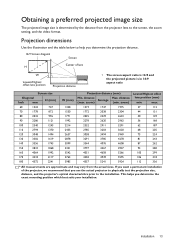
... physically test the projection size, distance, and the projector's optical characteristics prior to the installation. zoom) (min. If your screen size is in the table above, please contact your installation. This helps you ...determine the exact mounting position which best suits your dealer for a 16:9 ratio screen 16:9 Screen diagonal H Screen Center of the projector, we recommend that you want a permanent installation of lens W Lowest/Highest offset lens position Projection distance The screen aspect ratio is 16:9 and the projected...
... physically test the projection size, distance, and the projector's optical characteristics prior to the installation. zoom) (min. If your screen size is in the table above, please contact your installation. This helps you ...determine the exact mounting position which best suits your dealer for a 16:9 ratio screen 16:9 Screen diagonal H Screen Center of the projector, we recommend that you want a permanent installation of lens W Lowest/Highest offset lens position Projection distance The screen aspect ratio is 16:9 and the projected...

User Manual
Page 2
...Connecting component video devices.... 16 Connecting video devices 16 Connecting a computer 17 Operation 18 Starting up the projector 18 Shutting down the projector 20 Securing the projector 20 Using a security cable lock 20 Utilizing the password function 20 Selecting an input source 23 Renaming...the OSD Menus 26 2 Table of replacing the lamp 49 Replacing the lamp 50 Indicators 52 Troubleshooting 54 Specifications 55 Projector specifications 55 Dimensions 56 Ceiling mount installation 56 Timing chart 57 Warranty and Copyright information 63 Warranty 63 Copyright 63 ...
...Connecting component video devices.... 16 Connecting video devices 16 Connecting a computer 17 Operation 18 Starting up the projector 18 Shutting down the projector 20 Securing the projector 20 Using a security cable lock 20 Utilizing the password function 20 Selecting an input source 23 Renaming...the OSD Menus 26 2 Table of replacing the lamp 49 Replacing the lamp 50 Indicators 52 Troubleshooting 54 Specifications 55 Projector specifications 55 Dimensions 56 Ceiling mount installation 56 Timing chart 57 Warranty and Copyright information 63 Warranty 63 Copyright 63 ...
User Manual
Page 3
...to ensure safe use if tilted at an angle of information technology equipment. Please read this manual in any of air around the projector. - Locations near the projector. - Allow at angle of more than 10 degrees left to right, nor at least 50 cm clearance from walls and free ...flow of the following environments: - Always place the projector on end vertically. Locations where temperatures may fall over, causing injury or resulting in damage. - Keep this user manual before you follow the ...
...to ensure safe use if tilted at an angle of information technology equipment. Please read this manual in any of air around the projector. - Locations near the projector. - Allow at angle of more than 10 degrees left to right, nor at least 50 cm clearance from walls and free ...flow of the following environments: - Always place the projector on end vertically. Locations where temperatures may fall over, causing injury or resulting in damage. - Keep this user manual before you follow the ...
User Manual
Page 4
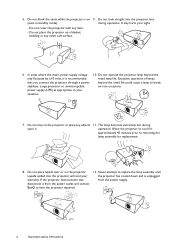
... the mains power supply voltage may harm your warranty. 5. The lamp becomes extremely hot during operation. Liquids spilled into the projector lens during upon it from the power outlet and contact BenQ to replace the lamp assembly until the projector has cooled down and is on a blanket, bedding or any other soft surface. 9.
... the mains power supply voltage may harm your warranty. 5. The lamp becomes extremely hot during operation. Liquids spilled into the projector lens during upon it from the power outlet and contact BenQ to replace the lamp assembly until the projector has cooled down and is on a blanket, bedding or any other soft surface. 9.
User Manual
Page 5
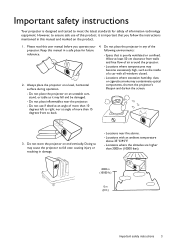
... use , adjust the projection lens to an appropriate position, put the lens cushion around the lens, and fit the lens cushion and projector cushion together to environment. for mounting. 15. 13. Use only BenQ's Ceiling Mount Kit for at least 2 hours when there is a safety risk that you intend to mount your...
... use , adjust the projection lens to an appropriate position, put the lens cushion around the lens, and fit the lens cushion and projector cushion together to environment. for mounting. 15. 13. Use only BenQ's Ceiling Mount Kit for at least 2 hours when there is a safety risk that you intend to mount your...
User Manual
Page 6
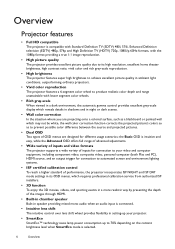
...(HDTV) 720p, 1080i/p 60Hz formats, with the 1080p format providing a true 1:1 image reproduction. • High picture quality The projector provides excellent picture quality due to its high resolution, excellent home theater brightness, high contrast ratio, vivid color and rich gray-scale ...to automated screen and environment lighting systems. • ISF certified calibration control To reach a higher standard of performance, the projector incorporates ISF NIGHT and ISF DAY mode settings in its OSD menus, which requires professional calibration service from authorized ISF installers...
...(HDTV) 720p, 1080i/p 60Hz formats, with the 1080p format providing a true 1:1 image reproduction. • High picture quality The projector provides excellent picture quality due to its high resolution, excellent home theater brightness, high contrast ratio, vivid color and rich gray-scale ...to automated screen and environment lighting systems. • ISF certified calibration control To reach a higher standard of performance, the projector incorporates ISF NIGHT and ISF DAY mode settings in its OSD menus, which requires professional calibration service from authorized ISF installers...
User Manual
Page 7
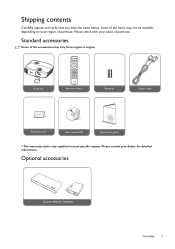
Please check with your place of the accessories may not be available depending on your dealer for detailed information. Optional accessories Wireless FHD Kit (WDP02) Overview 7 Standard accessories Some of purchase. Please consult your region of purchase. Projector Remote control Batteries Power cable Warranty card* User manual CD Quick start guide * The warranty card is only supplied in some specific regions. Shipping contents Carefully unpack and verify that you have the items below. Some of the items may vary from region to region.
Please check with your place of the accessories may not be available depending on your dealer for detailed information. Optional accessories Wireless FHD Kit (WDP02) Overview 7 Standard accessories Some of purchase. Please consult your region of purchase. Projector Remote control Batteries Power cable Warranty card* User manual CD Quick start guide * The warranty card is only supplied in some specific regions. Shipping contents Carefully unpack and verify that you have the items below. Some of the items may vary from region to region.
User Manual
Page 8
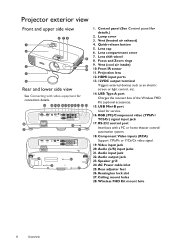
... 1. Video input jack 20. AC Power cable inlet 25. Wireless FHD Kit mount hole 8 Overview Audio input jack 22. USB Mini-B port Used for details.) 2. Projector exterior view Front and upper side view 6 78 1 2 9 3 10 11 4 5 Rear and lower side view See Connecting with a PC or home theater control/ automation system...
... 1. Video input jack 20. AC Power cable inlet 25. Wireless FHD Kit mount hole 8 Overview Audio input jack 22. USB Mini-B port Used for details.) 2. Projector exterior view Front and upper side view 6 78 1 2 9 3 10 11 4 5 Rear and lower side view See Connecting with a PC or home theater control/ automation system...
User Manual
Page 9
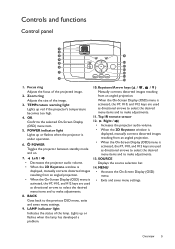
... warning light Lights up or flashes when the lamp has developed a problem. POWER indicator light Lights up or flashes when the projector is 14. Lights up red if the projector's temperature becomes too high. 4. Overview 9 Top IR remote sensor 12. activated, the #7, #10, and #12 keys ... ring 10. Zoom ring from an angled projection. OK Confirms the selected On-Screen Display (OSD) menu item. 5. POWER Toggles the projector between standby mode and on. Displays the source selection bar. • When the 2D Keystone window is under operation. 6. Right / • ...
... warning light Lights up or flashes when the lamp has developed a problem. POWER indicator light Lights up or flashes when the projector is 14. Lights up red if the projector's temperature becomes too high. 4. Overview 9 Top IR remote sensor 12. activated, the #7, #10, and #12 keys ... ring 10. Zoom ring from an angled projection. OK Confirms the selected On-Screen Display (OSD) menu item. 5. POWER Toggles the projector between standby mode and on. Displays the source selection bar. • When the 2D Keystone window is under operation. 6. Right / • ...
User Manual
Page 10
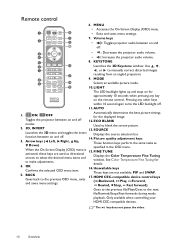
Remote control 6. Toggles the projector between on and off . 14. Used to manually correct distorted images 17 resulting from an angled projection. 8 9. function between on the remote control. These keys ... and to make adjustments. 15. OK 16. HDMI CEC-compatible device control keys ( Backward, Play, Forward, and saves menu settings. Volume keys 2 12 • : Toggles projector audio between on for approximately 10 seconds when pressing any other keys within 10 second again turns the LED backlight off . 3 • : Decreases the...
Remote control 6. Toggles the projector between on and off . 14. Used to manually correct distorted images 17 resulting from an angled projection. 8 9. function between on the remote control. These keys ... and to make adjustments. 15. OK 16. HDMI CEC-compatible device control keys ( Backward, Play, Forward, and saves menu settings. Volume keys 2 12 • : Toggles projector audio between on for approximately 10 seconds when pressing any other keys within 10 second again turns the LED backlight off . 3 • : Decreases the...
User Manual
Page 11
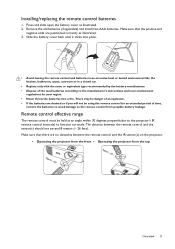
...explosion. • If the batteries are drained or if you will not be held at an angle within 30 degrees perpendicular to the projector's IR remote control sensor(s) to the remote control from the top Approx. +30º Approx. +30º Overview 11 Installing/...replacing the remote control batteries 1. The distance between the remote control and the IR sensor(s) on the projector. • Operating the projector from the front • Operating the projector from possible battery leakage. Press and slide open the battery cover as illustrated. 3. Remove the old batteries ...
...explosion. • If the batteries are drained or if you will not be held at an angle within 30 degrees perpendicular to the projector's IR remote control sensor(s) to the remote control from the top Approx. +30º Approx. +30º Overview 11 Installing/...replacing the remote control batteries 1. The distance between the remote control and the IR sensor(s) on the projector. • Operating the projector from the front • Operating the projector from possible battery leakage. Press and slide open the battery cover as illustrated. 3. Remove the old batteries ...
User Manual
Page 12
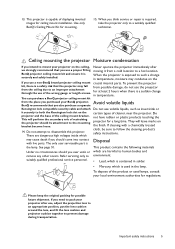
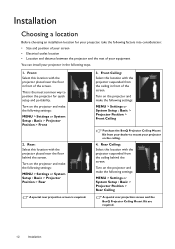
... near the floor in front of the screen. Turn on the projector and make the following ways. 1. Turn on the projector and make the following settings: MENU > Settings or System Setup : Basic > Projector Position > Front Ceiling Purchase the BenQ Projector Ceiling Mount Kit from the ceiling behind the screen. Turn on the ceiling. 4. Rear Ceiling...
... near the floor in front of the screen. Turn on the projector and make the following ways. 1. Turn on the projector and make the following settings: MENU > Settings or System Setup : Basic > Projector Position > Front Ceiling Purchase the BenQ Projector Ceiling Mount Kit from the ceiling behind the screen. Turn on the ceiling. 4. Rear Ceiling...
User Manual
Page 13
...68 205 75 224 81 243 87 262 93 280 100 299 106 318 112 336 All measurements are approximate and may vary from the projector lens to the screen, the zoom setting, and the video format. zoom) (min. This helps you determine the projection distance. 16...Projection distance (mm) Min. distance Max. If you want a permanent installation of the projector, we recommend that you use the actual projector to physically test the projection size, distance, and the projector's optical characteristics prior to help you determine the exact mounting position which best suits your ...
...68 205 75 224 81 243 87 262 93 280 100 299 106 318 112 336 All measurements are approximate and may vary from the projector lens to the screen, the zoom setting, and the video format. zoom) (min. This helps you determine the projection distance. 16...Projection distance (mm) Min. distance Max. If you want a permanent installation of the projector, we recommend that you use the actual projector to physically test the projection size, distance, and the projector's optical characteristics prior to help you determine the exact mounting position which best suits your ...
User Manual
Page 14
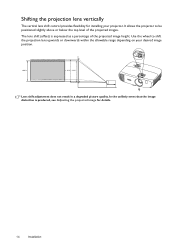
... unlikely event that the image distortion is expressed as a percentage of the projected images. It allows the projector to shift the projection lens upwards or downwards within the allowable range depending on your projector. Shifting the projection lens vertically The vertical lens shift control provides flexibility for details. 14 Installation Use the...
... unlikely event that the image distortion is expressed as a percentage of the projected images. It allows the projector to shift the projection lens upwards or downwards within the allowable range depending on your projector. Shifting the projection lens vertically The vertical lens shift control provides flexibility for details. 14 Installation Use the...
User Manual
Page 15
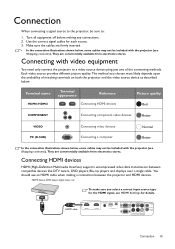
...shown below , some cables may not be sure to a video source device using just one of matching terminals on both the projector and the video source device as described below: Terminal name HDMI1/HDMI2 Terminal appearance Reference Connecting HDMI devices Picture quality Best COMPONENT ... In the connection illustrations shown below , some cables may not be included with video equipment You need only connect the projector to : 1. Connecting with the projector (see HDMI Settings for each source. 3. To make sure you choose most likely depends upon the availability of the ...
...shown below , some cables may not be sure to a video source device using just one of matching terminals on both the projector and the video source device as described below: Terminal name HDMI1/HDMI2 Terminal appearance Reference Connecting HDMI devices Picture quality Best COMPONENT ... In the connection illustrations shown below , some cables may not be included with video equipment You need only connect the projector to : 1. Connecting with the projector (see HDMI Settings for each source. 3. To make sure you choose most likely depends upon the availability of the ...
User Manual
Page 16
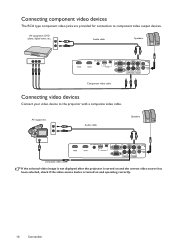
... video device to component video output devices. AV equipment Audio cable Speakers composite video cable If the selected video image is not displayed after the projector is turned on and the correct video source has been selected, check if the video source device is turned on and operating correctly. 16 Connection...
... video device to component video output devices. AV equipment Audio cable Speakers composite video cable If the selected video image is not displayed after the projector is turned on and the correct video source has been selected, check if the video source device is turned on and operating correctly. 16 Connection...
User Manual
Page 17
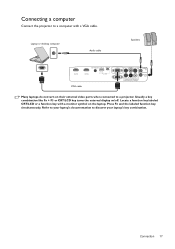
Locate a function key labeled CRT/LCD or a function key with a VGA cable. Connecting a computer Connect the projector to a computer with a monitor symbol on the laptop. Refer to your laptop's documentation to a projector. Connection 17 Press Fn and the labeled function key simultaneously. Laptop or desktop computer Audio cable Speakers VGA cable Many laptops do not turn on /off. Usually a key combination like Fn + F3 or CRT/LCD key turns the external display on their external video ports when connected to discover your laptop's key combination.
Locate a function key labeled CRT/LCD or a function key with a VGA cable. Connecting a computer Connect the projector to a computer with a monitor symbol on the laptop. Refer to your laptop's documentation to a projector. Connection 17 Press Fn and the labeled function key simultaneously. Laptop or desktop computer Audio cable Speakers VGA cable Many laptops do not turn on /off. Usually a key combination like Fn + F3 or CRT/LCD key turns the external display on their external video ports when connected to discover your laptop's key combination.
User Manual
Page 18
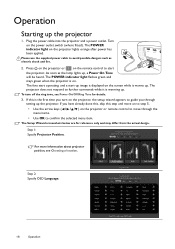
... is displayed on the remote control to avoid possible dangers such as the lamp lights up, a Power On Tone will be heard. Press on the projector or on the screen while it is the first time you turn off the ring tone, see Choosing a location. The fans start operating, and a start... to step 5. • Use the arrow keys ( / / / ) on . If this step and move through setting up . Step 2: Specify OSD Language. 18 Operation Turn on the projector lights orange after power has been applied. As soon as electric shock and fire. 2. If you through the menu items. • Use OK to further...
... is displayed on the remote control to avoid possible dangers such as the lamp lights up, a Power On Tone will be heard. Press on the projector or on the screen while it is the first time you turn off the ring tone, see Choosing a location. The fans start operating, and a start... to step 5. • Use the arrow keys ( / / / ) on . If this step and move through setting up . Step 2: Specify OSD Language. 18 Operation Turn on the projector lights orange after power has been applied. As soon as electric shock and fire. 2. If you through the menu items. • Use OK to further...
User Manual
Page 19
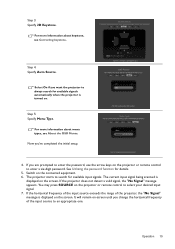
...control to select your desired input signal. 7. Operation 19 The current input signal being scanned is displayed on the screen. If the projector does not detect a valid signal, the "No Signal" message appears. It will remain on-screen until you are prompted to ... control to enter a six-digit password. Step 4: Specify Auto Source. Now you want the projector to search for details. 5. The projector starts to always search for available signals automatically when the projector is turned on the connected equipment. 6. Step 3: Specify 2D Keystone. For more information about ...
...control to select your desired input signal. 7. Operation 19 The current input signal being scanned is displayed on the screen. If the projector does not detect a valid signal, the "No Signal" message appears. It will remain on-screen until you are prompted to ... control to enter a six-digit password. Step 4: Specify Auto Source. Now you want the projector to search for details. 5. The projector starts to always search for available signals automatically when the projector is turned on the connected equipment. 6. Step 3: Specify 2D Keystone. For more information about ...
User Manual
Page 20
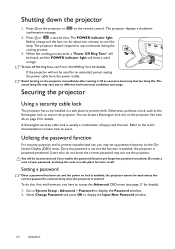
...a combination of your password, and keep the note in a safe place to secure the projector. Setting a password Once a password has been set and the power on the projector immediately after turning it . The projector doesn't respond to different environmental conditions and usage. When the cooling process ends, a "... safe place for later recall. To turn off as the Kensington lock, to prevent theft. Avoid turning on lock is enabled, the projector cannot be inconvenienced if you may vary due to any commands during the cooling process. 3. Refer to the lock's documentation to learn ...
...a combination of your password, and keep the note in a safe place to secure the projector. Setting a password Once a password has been set and the power on the projector immediately after turning it . The projector doesn't respond to different environmental conditions and usage. When the cooling process ends, a "... safe place for later recall. To turn off as the Kensington lock, to prevent theft. Avoid turning on lock is enabled, the projector cannot be inconvenienced if you may vary due to any commands during the cooling process. 3. Refer to the lock's documentation to learn ...


