
User Manual
Page 2
... Extending lamp life 48 Timing of replacing the lamp 49 Replacing the lamp 50 Indicators 52 Troubleshooting 54 Specifications 55 Projector specifications 55 Dimensions 56 Ceiling mount installation 56 Timing chart 57 Warranty and Copyright information 63 Warranty 63 Copyright 63 Disclaimer 63 with video equipment .....15 Connecting HDMI devices 15 Connecting...
... Extending lamp life 48 Timing of replacing the lamp 49 Replacing the lamp 50 Indicators 52 Troubleshooting 54 Specifications 55 Projector specifications 55 Dimensions 56 Ceiling mount installation 56 Timing chart 57 Warranty and Copyright information 63 Warranty 63 Copyright 63 Disclaimer 63 with video equipment .....15 Connecting HDMI devices 15 Connecting...
User Manual
Page 5
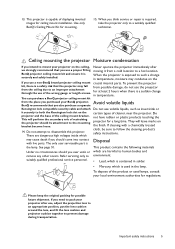
... remove any other covers. Please keep the original packing for a long time. BenQ projector ceiling mount kit and ensure it securely to a hot location. You can purchase a BenQ projector ceiling mount kit from the place you also purchase a separate Kensington lock compatible security cable.... Refer servicing only to disassemble this projector. Avoid volatile liquids BenQ recommends that the projector may condense on the ceiling, Never operate the projector immediately after use a non-BenQ brand projector ceiling mount crucial internal parts. If you use , adjust the projection lens...
... remove any other covers. Please keep the original packing for a long time. BenQ projector ceiling mount kit and ensure it securely to a hot location. You can purchase a BenQ projector ceiling mount kit from the place you also purchase a separate Kensington lock compatible security cable.... Refer servicing only to disassemble this projector. Avoid volatile liquids BenQ recommends that the projector may condense on the ceiling, Never operate the projector immediately after use a non-BenQ brand projector ceiling mount crucial internal parts. If you use , adjust the projection lens...
User Manual
Page 8
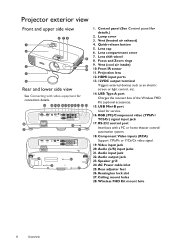
... intake) 10. Audio (L/R) input jacks 21. Speaker grill 24. Lamp cover 3. USB Mini-B port Used for details.) 2. Ceiling mount holes 28. Quick-release button 5. Audio output jack 23. Rear adjuster feet 26. Wireless FHD Kit mount hole 8 Overview Projector exterior view Front and upper side view 6 78 1 2 9 3 10 11 4 5 Rear and lower side...
... intake) 10. Audio (L/R) input jacks 21. Speaker grill 24. Lamp cover 3. USB Mini-B port Used for details.) 2. Ceiling mount holes 28. Quick-release button 5. Audio output jack 23. Rear adjuster feet 26. Wireless FHD Kit mount hole 8 Overview Projector exterior view Front and upper side view 6 78 1 2 9 3 10 11 4 5 Rear and lower side...
User Manual
Page 12
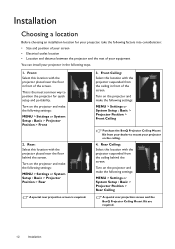
...and make the following settings: MENU > Settings or System Setup : Basic > Projector Position > Rear Ceiling A special rear projection screen and the BenQ Projector Ceiling Mount Kit are required. 12 Installation Front: Select this location with the projector placed near the floor behind...and make the following settings: MENU > Settings or System Setup : Basic > Projector Position > Front Ceiling Purchase the BenQ Projector Ceiling Mount Kit from the ceiling behind the screen. Installation Choosing a location Before choosing an installation location for quick setup and portability. ...
...and make the following settings: MENU > Settings or System Setup : Basic > Projector Position > Rear Ceiling A special rear projection screen and the BenQ Projector Ceiling Mount Kit are required. 12 Installation Front: Select this location with the projector placed near the floor behind...and make the following settings: MENU > Settings or System Setup : Basic > Projector Position > Front Ceiling Purchase the BenQ Projector Ceiling Mount Kit from the ceiling behind the screen. Installation Choosing a location Before choosing an installation location for quick setup and portability. ...


