
User Manual
Page 2
... of BenQ Corporation. Power Safety • The AC plug isolates this publication and to make changes from the AC supply. • The power supply cord serves as a power disconnect device for ventilation. Avoid using any liquid, aerosol or glass cleaners. • Slots and openings on the marked label. Please follow these safety instructions for best performance, and long life for any particular purpose. Clean the LCD monitor...
... of BenQ Corporation. Power Safety • The AC plug isolates this publication and to make changes from the AC supply. • The power supply cord serves as a power disconnect device for ventilation. Avoid using any liquid, aerosol or glass cleaners. • Slots and openings on the marked label. Please follow these safety instructions for best performance, and long life for any particular purpose. Clean the LCD monitor...

User Manual
Page 3
... monitor hardware 6 How to detach the stand base 8 Getting the most from your BenQ monitor 10 How to install the monitor on a new computer 11 How to upgrade the monitor on an existing computer 12 How to install on Windows Vista systems 13 How to install on Windows XP system 14 Picture optimization ...15 How to adjust your monitor 16 The control panel ...16 Hot key mode ...17 Main menu mode ...18 Troubleshooting...
... monitor hardware 6 How to detach the stand base 8 Getting the most from your BenQ monitor 10 How to install the monitor on a new computer 11 How to upgrade the monitor on an existing computer 12 How to install on Windows Vista systems 13 How to install on Windows XP system 14 Picture optimization ...15 How to adjust your monitor 16 The control panel ...16 Hot key mode ...17 Main menu mode ...18 Troubleshooting...

User Manual
Page 4
BenQ LCD Monitor Monitor Base Quick Start Guide CD-ROM Power Cord (Picture may differ from product supplied for your region) Signal Cable: D-Sub Consider keeping the box and packaging in storage for use in the future when you have the following items. If any are missing or damaged, please contact the place of purchase for protecting the monitor during transport. 4 Getting started When unpacking please check you may need to transport the monitor. The fitted foam packing is ideal for a replacement. Getting started 1.
BenQ LCD Monitor Monitor Base Quick Start Guide CD-ROM Power Cord (Picture may differ from product supplied for your region) Signal Cable: D-Sub Consider keeping the box and packaging in storage for use in the future when you have the following items. If any are missing or damaged, please contact the place of purchase for protecting the monitor during transport. 4 Getting started When unpacking please check you may need to transport the monitor. The fitted foam packing is ideal for a replacement. Getting started 1.

User Manual
Page 6
... on your warranty. Attach the monitor base. Orient and align the stand base socket with the end of the monitor. Sliding or scraping the monitor around on the desk for padding. Gently lay the screen face down on the power to assemble your monitor hardware If the computer is turned on a flat even surface. Carefully lift the monitor, turn -on a flat clean padded surface. Gently attempt...
... on your warranty. Attach the monitor base. Orient and align the stand base socket with the end of the monitor. Sliding or scraping the monitor around on the desk for padding. Gently lay the screen face down on the power to assemble your monitor hardware If the computer is turned on a flat even surface. Carefully lift the monitor, turn -on a flat clean padded surface. Gently attempt...

User Manual
Page 8
... screen by pressing the power key. Turn off the computer before unplugging the power cable. Placing the screen surface on an object like a towel on the power. Prepare the monitor and area. 5. Turn on . Please be careful to prevent damage to detach the stand base 1. Plug the other end of the power cord into a power outlet and turn -on the desk for your warranty. Connect-to install the monitor software...
... screen by pressing the power key. Turn off the computer before unplugging the power cable. Placing the screen surface on an object like a towel on the power. Prepare the monitor and area. 5. Turn on . Please be careful to prevent damage to detach the stand base 1. Plug the other end of the power cord into a power outlet and turn -on the desk for your warranty. Connect-to install the monitor software...

User Manual
Page 10
... you from your computer is connected to a network which process you should install the custom BenQ LCD Monitor driver software as provided on your computer. 10 Getting the most benefit from your new BenQ color LCD flat screen monitor, you need to follow . Further details and step-by-step instructions for both an automatic (new) or upgrade (existing) installation follow to install the monitor driver software. These circumstances relate to select a monitor model. 4.
... you from your computer is connected to a network which process you should install the custom BenQ LCD Monitor driver software as provided on your computer. 10 Getting the most benefit from your new BenQ color LCD flat screen monitor, you need to follow . Further details and step-by-step instructions for both an automatic (new) or upgrade (existing) installation follow to install the monitor driver software. These circumstances relate to select a monitor model. 4.

User Manual
Page 11
... your monitor and click Next. 6. Look to Install Hardware Device drivers. 2. Follow the instructions in How to install the monitor on a new computer This instruction details the procedure for which the BenQ LCD Monitor is only suitable for a computer which has never had another monitor connected to upgrade the monitor on an existing computer. 1. How to assemble your monitor hardware on page 6. Check Search for a suitable driver for...
... your monitor and click Next. 6. Look to Install Hardware Device drivers. 2. Follow the instructions in How to install the monitor on a new computer This instruction details the procedure for which the BenQ LCD Monitor is only suitable for a computer which has never had another monitor connected to upgrade the monitor on an existing computer. 1. How to assemble your monitor hardware on page 6. Check Search for a suitable driver for...
User Manual
Page 12
... need only steer it in the right direction. Windows has an Upgrade Device Driver Wizard to automate the task and guide you have connected, and letting Windows install the corresponding driver files from your model may well function perfectly with other versions of Windows and cannot guarantee its operation on those systems. Installing monitor driver software involves selecting an appropriate information file (.inf) on the BenQ LCD Monitor...
... need only steer it in the right direction. Windows has an Upgrade Device Driver Wizard to automate the task and guide you have connected, and letting Windows install the corresponding driver files from your model may well function perfectly with other versions of Windows and cannot guarantee its operation on those systems. Installing monitor driver software involves selecting an appropriate information file (.inf) on the BenQ LCD Monitor...
User Manual
Page 13
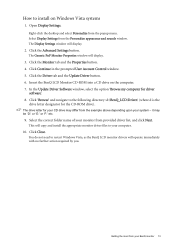
... the drive letter designator for driver software'. 8. The drive letter for your computer. 10. Getting the most from the popup menu. The Display Settings window will display. 3. Click Close. Open Display Settings. The Generic PnP Monitor Properties window will display. 2. Click the Driver tab and the Update Driver button. 6. You do not need to restart Windows Vista, as the BenQ LCD monitor drivers will copy and install the appropriate monitor driver files to your CD drive...
... the drive letter designator for driver software'. 8. The drive letter for your computer. 10. Getting the most from the popup menu. The Display Settings window will display. 3. Click Close. Open Display Settings. The Generic PnP Monitor Properties window will display. 2. Click the Driver tab and the Update Driver button. 6. You do not need to restart Windows Vista, as the BenQ LCD monitor drivers will copy and install the appropriate monitor driver files to your CD drive...
User Manual
Page 14
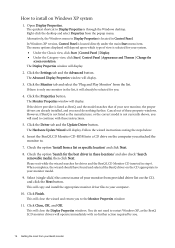
... menu. Click the Properties button. However, if BenQ is not listed as the BenQ LCD monitor drivers will display. Follow the wizard instructions noting the steps below: 6. Insert the BenQ LCD Monitor CD-ROM into a CD drive on Windows XP system 1. Check the option 'Search for your system. • Under the Classic view, click Start | Control Panel | Display. • Under the Category view, click Start | Control Panel | Appearance and Themes | Change the screen resolution. This will need...
... menu. Click the Properties button. However, if BenQ is not listed as the BenQ LCD monitor drivers will display. Follow the wizard instructions noting the steps below: 6. Insert the BenQ LCD Monitor CD-ROM into a CD drive on Windows XP system 1. Check the option 'Search for your system. • Under the Classic view, click Start | Control Panel | Display. • Under the Category view, click Start | Control Panel | Appearance and Themes | Change the screen resolution. This will need...

User Manual
Page 15
... is to the native resolution of the monitor when you notice a vertical noise (like a curtain effect-shimmering of your operating system. Picture optimization 15 Picture optimization The easiest way to obtain an optimal display from CD-ROM. Press the AUTO key to optimize the currently displayed image to adjust the monitor until the noise disappears. Please ensure that you can always adjust the screen geometric settings manually using geometry menu items. To...
... is to the native resolution of the monitor when you notice a vertical noise (like a curtain effect-shimmering of your operating system. Picture optimization 15 Picture optimization The easiest way to obtain an optimal display from CD-ROM. Press the AUTO key to optimize the currently displayed image to adjust the monitor until the noise disappears. Please ensure that you can always adjust the screen geometric settings manually using geometry menu items. To...
User Manual
Page 16
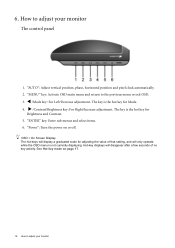
... hot key for Brightness and Contrast. 5. X /Contrast/Brightness key: For Right/Increase adjustment. "ENTER" key: Enter sub menus and select items. 6. Hot-key displays will only operate while the OSD menu is the hot key for Mode. 4. How to adjust your monitor W /Mode key: For Left/Decrease adjustment. "Power": Turn the power on page 17. 16 How to the previous menu or exit OSD. 3. "AUTO": Adjust vertical position, phase, horizontal position and pixel clock automatically...
... hot key for Brightness and Contrast. 5. X /Contrast/Brightness key: For Right/Increase adjustment. "ENTER" key: Enter sub menus and select items. 6. Hot-key displays will only operate while the OSD menu is the hot key for Mode. 4. How to adjust your monitor W /Mode key: For Left/Decrease adjustment. "Power": Turn the power on page 17. 16 How to the previous menu or exit OSD. 3. "AUTO": Adjust vertical position, phase, horizontal position and pixel clock automatically...

User Manual
Page 18
... to adjust your monitor. The OSD menu languages may differ from the product supplied to display the following pages: • Display menu on page 19 • Picture menu on page 20 • Picture Advanced menu on page 22 • System menu on each menu, please refer to the following main OSD menu. 1 2 3 4 There are four main OSD menus: 1. System Use the W (left) or X (right) keys to enter the Menu item settings. light a menu...
... to adjust your monitor. The OSD menu languages may differ from the product supplied to display the following pages: • Display menu on page 19 • Picture menu on page 20 • Picture Advanced menu on page 22 • System menu on each menu, please refer to the following main OSD menu. 1 2 3 4 There are four main OSD menus: 1. System Use the W (left) or X (right) keys to enter the Menu item settings. light a menu...

User Manual
Page 19
... Function Optimizes and adjusts the screen settings automatically for this option and make adjustments or selections. 5. Adjusts the pixel clock phase timing to display the main menu. 2. Operation Press the ENTER key to select this function. Press the MENU key to synchronize with the analog input video signal. Adjusts the horizontal position of the screen image. Adjusts the vertical position of the screen image. Range 0 to 100 0 to 100 0 to 100 0 to adjust your monitor 19 Display menu 1. See also: Picture optimization...
... Function Optimizes and adjusts the screen settings automatically for this option and make adjustments or selections. 5. Adjusts the pixel clock phase timing to display the main menu. 2. Operation Press the ENTER key to select this function. Press the MENU key to synchronize with the analog input video signal. Adjusts the horizontal position of the screen image. Adjusts the vertical position of the screen image. Range 0 to 100 0 to 100 0 to 100 0 to adjust your monitor 19 Display menu 1. See also: Picture optimization...

User Manual
Page 21
.... How to leave the Color menu. e.g. if you reduce Green, the image will gradually take on the color tint of the image. Reset Color Resets the User Mode custom color settings to select Red, Green, or Blue. Press the W or X keys and the ENTER key to the factory defaults. Press the W or X keys to make the color adjustments. Then use the W or X keys to change the settings. Normal Allows video and still photographs to be...
.... How to leave the Color menu. e.g. if you reduce Green, the image will gradually take on the color tint of the image. Reset Color Resets the User Mode custom color settings to select Red, Green, or Blue. Press the W or X keys and the ENTER key to the factory defaults. Press the W or X keys to make the color adjustments. Then use the W or X keys to change the settings. Normal Allows video and still photographs to be...

User Manual
Page 22
... a picture mode that item. 4. for better color matching representation with the peripheral devices, such as printers, DSCs, etc. for viewing landscape-specific videos and playing games. • Photo - Picture Advanced menu 1. for viewing videos. • Dynamics - Press the MENU key to make adjustments or selections. 5. Press the W or X keys to display the main menu. 2. for basic PC application. • Movie - for viewing still images. • sRGB - Range •...
... a picture mode that item. 4. for better color matching representation with the peripheral devices, such as printers, DSCs, etc. for viewing landscape-specific videos and playing games. • Photo - Picture Advanced menu 1. for viewing videos. • Dynamics - Press the MENU key to make adjustments or selections. 5. Press the W or X keys to display the main menu. 2. for basic PC application. • Movie - for viewing still images. • sRGB - Range •...

User Manual
Page 23
... the right window presents the images under the selected mode from Picture Mode. the left window demonstrates images of screen images under the specified mode. Press the W or X keys to change the settings. Ideal for 16:9 aspect images. • Aspect - How to change the settings. • ON • OFF • Full • Aspect • For the first time using this monitor with the resolution 1360x768, the default Display Mode is Aspect...
... the right window presents the images under the selected mode from Picture Mode. the left window demonstrates images of screen images under the specified mode. Press the W or X keys to change the settings. Ideal for 16:9 aspect images. • Aspect - How to change the settings. • ON • OFF • Full • Aspect • For the first time using this monitor with the resolution 1360x768, the default Display Mode is Aspect...

User Manual
Page 25
... by Video Electronics Standards Association (VESA). Position Display Time Adjusts the horizontal position of the OSD menu. Press the the software on the PC. W or X keys to change the settings. 0 to 100 0 to be sent via the software for 15 seconds to adjust your monitor 25 Press the W or X keys to be accessible. DDC/CI* Allows the monitor Press the ENTER key to settings to change the settings. Adjusts the vertical position...
... by Video Electronics Standards Association (VESA). Position Display Time Adjusts the horizontal position of the OSD menu. Press the the software on the PC. W or X keys to change the settings. 0 to 100 0 to be sent via the software for 15 seconds to adjust your monitor 25 Press the W or X keys to be accessible. DDC/CI* Allows the monitor Press the ENTER key to settings to change the settings. Adjusts the vertical position...
User Manual
Page 26
... the link "Adjusting the Screen Resolution". If not, optimize the image by using a display mode that are permanently white, one of image retention. 26 Troubleshooting Pixel errors can be seen: One of several pixels is permanently black, one or more pixels are permanently red, green, blue or another color. • Clean the LCD screen. • Cycle power on-off. • These are pixels that this monitor does not support, please change the setting to get necessary support. No image can be...
... the link "Adjusting the Screen Resolution". If not, optimize the image by using a display mode that are permanently white, one of image retention. 26 Troubleshooting Pixel errors can be seen: One of several pixels is permanently black, one or more pixels are permanently red, green, blue or another color. • Clean the LCD screen. • Cycle power on-off. • These are pixels that this monitor does not support, please change the setting to get necessary support. No image can be...

User Manual
Page 27
... "Adjusting the Screen Resolution" on the CD, and then select the correct resolution, refresh rate and make adjustments based on these instructions. See Display Mode on the display illuminated in the "OSD Lock" submenu from different input sources may use the "Display Mode" function to set a proper aspect ratio for details. If the LED is still distorted. Need more help , check the signal cable connectors. Is the prompt on page 23 for the input sources. Check the power supply mains socket, the external power supply...
... "Adjusting the Screen Resolution" on the CD, and then select the correct resolution, refresh rate and make adjustments based on these instructions. See Display Mode on the display illuminated in the "OSD Lock" submenu from different input sources may use the "Display Mode" function to set a proper aspect ratio for details. If the LED is still distorted. Need more help , check the signal cable connectors. Is the prompt on page 23 for the input sources. Check the power supply mains socket, the external power supply...


