
User Manual
Page 11
... computer. 4. The circumstances under which has security access requirements, network policy settings may prevent you need to follow . At that point, click the Have Disk button, insert the BenQ LCD Monitor CD-ROM and select the appropriate monitor model. See: • How to install the monitor on a new computer on page 12. • How to upgrade...
... computer. 4. The circumstances under which has security access requirements, network policy settings may prevent you need to follow . At that point, click the Have Disk button, insert the BenQ LCD Monitor CD-ROM and select the appropriate monitor model. See: • How to install the monitor on a new computer on page 12. • How to upgrade...
User Manual
Page 14
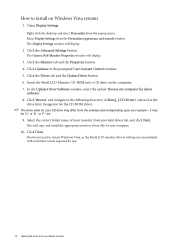
...is the drive letter designator for driver software'. 8. You do not need to restart Windows Vista, as the BenQ LCD monitor drivers will display. 2. Open Display Settings. Insert the BenQ LCD Monitor CD-ROM into a CD drive on Windows Vista systems 1. Click the Driver tab and the Update Driver ...button. 6. This will display. 3. Click the Advanced Settings button. In the Update Driver Software window,...
...is the drive letter designator for driver software'. 8. You do not need to restart Windows Vista, as the BenQ LCD monitor drivers will display. 2. Open Display Settings. Insert the BenQ LCD Monitor CD-ROM into a CD drive on Windows Vista systems 1. Click the Driver tab and the Update Driver ...button. 6. This will display. 3. Click the Advanced Settings button. In the Update Driver Software window,...
User Manual
Page 15
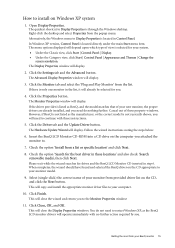
... 'Search removable media', then click Next. Follow the wizard instructions noting the steps below: 6. However, if BenQ is not listed as the BenQ LCD monitor drivers will depend upon which type of these property windows. You do nothing further. Click the Settings tab and the Advanced button. The Hardware Update Wizard will display. 3. Click the...
... 'Search removable media', then click Next. Follow the wizard instructions noting the steps below: 6. However, if BenQ is not listed as the BenQ LCD monitor drivers will depend upon which type of these property windows. You do nothing further. Click the Settings tab and the Advanced button. The Hardware Update Wizard will display. 3. Click the...
User Manual
Page 16
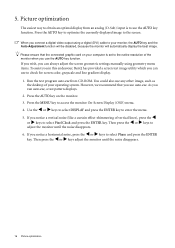
...the ENTER key to the screen. However, we recommend that the connected graphic card on the monitor. 3. If you connect a digital video output using geometry menu items. To assist you in this endeavour, BenQ has provided a screen test image utility which you use any other image, such as the ... 6. Picture optimization The easiest way to obtain an optimal display from CD-ROM. Run the test program auto.exe from an analog (D-Sub) input is set to select Pixel Clock and press the ENTER key. As you notice a vertical noise (like a curtain effect-shimmering of vertical lines), press the W ...
...the ENTER key to the screen. However, we recommend that the connected graphic card on the monitor. 3. If you connect a digital video output using geometry menu items. To assist you in this endeavour, BenQ has provided a screen test image utility which you use any other image, such as the ... 6. Picture optimization The easiest way to obtain an optimal display from CD-ROM. Run the test program auto.exe from an analog (D-Sub) input is set to select Pixel Clock and press the ENTER key. As you notice a vertical noise (like a curtain effect-shimmering of vertical lines), press the W ...
User Manual
Page 17
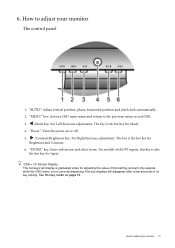
How to adjust your monitor 17 W /Mode key: For Left/Decrease adjustment. The key is the hot key for Brightness and Contrast. 6. ...AUTO": Adjust vertical position, phase, horizontal position and pixel clock automatically. 2. "MENU" key: Activate OSD main menu and return to adjust your monitor The control panel 1. "Power": Turn the power on page 19. X /Contrast/Brightness key: For Right/Increase adjustment. How to the previous... only operate while the OSD menu is also the hot key for adjusting the value of that setting, and will disappear after a few seconds of no key activity.
How to adjust your monitor 17 W /Mode key: For Left/Decrease adjustment. The key is the hot key for Brightness and Contrast. 6. ...AUTO": Adjust vertical position, phase, horizontal position and pixel clock automatically. 2. "MENU" key: Activate OSD main menu and return to adjust your monitor The control panel 1. "Power": Turn the power on page 19. X /Contrast/Brightness key: For Right/Increase adjustment. How to the previous... only operate while the OSD menu is also the hot key for adjusting the value of that setting, and will disappear after a few seconds of no key activity.
User Manual
Page 18
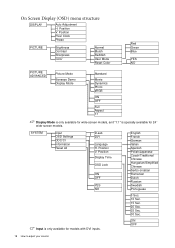
... available for models with DVI inputs. On Screen Display (OSD) menu structure DISPLAY Auto Adjustment H. Position V. ON OFF 18 How to adjust your monitor SYSTEM Input OSD Settings DDC/CI Information Reset All D-sub DVI Language H. Position Pixel Clock Phase PICTURE Brightness Contrast Sharpness Color Normal Bluish Reddish User Mode Reset Color... Display Mode Standard Movie Dynamics Photo sRGB ON OFF Full Aspect 1:1 Display Mode is only available for wide-screen models, and "1:1" is only available for 24'' wide-screen models.
... available for models with DVI inputs. On Screen Display (OSD) menu structure DISPLAY Auto Adjustment H. Position V. ON OFF 18 How to adjust your monitor SYSTEM Input OSD Settings DDC/CI Information Reset All D-sub DVI Language H. Position Pixel Clock Phase PICTURE Brightness Contrast Sharpness Color Normal Bluish Reddish User Mode Reset Color... Display Mode Standard Movie Dynamics Photo sRGB ON OFF Full Aspect 1:1 Display Mode is only available for wide-screen models, and "1:1" is only available for 24'' wide-screen models.
User Manual
Page 19
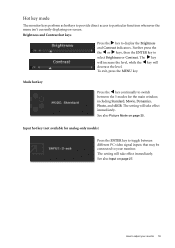
...X keys, then the ENTER key to display the Brightness and Contrast indicators. The setting will take effect immediately. Brightness and Contrast hot keys Press the X key to select Brightness or Contrast. The setting will decrease the level. How to toggle between the 5 modes for the main window..., including Standard, Movie, Dynamics, Photo, and sRGB. To exit, press the MENU key. See also Input on page 25. Input hot key (not available for analog-only models) Press the ENTER key to adjust your monitor...
...X keys, then the ENTER key to display the Brightness and Contrast indicators. The setting will take effect immediately. Brightness and Contrast hot keys Press the X key to select Brightness or Contrast. The setting will decrease the level. How to toggle between the 5 modes for the main window..., including Standard, Movie, Dynamics, Photo, and sRGB. To exit, press the MENU key. See also Input on page 25. Input hot key (not available for analog-only models) Press the ENTER key to adjust your monitor...
User Manual
Page 20
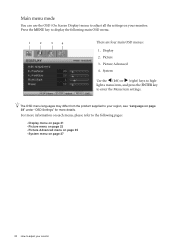
The OSD menu languages may differ from the product supplied to your region, see "Language on page 28" under "OSD Settings" for more information on each menu, please refer to the following main OSD menu. 1 2 3 4 There are four main OSD menus: 1. Picture Advanced 4. light a menu item, ... 2. Main menu mode You can use the OSD (On Screen Display) menu to adjust all the settings on page 27 20 How to adjust your monitor Picture 3. Press the MENU key to display the following pages: • Display menu on page 21 • Picture menu on page 23 • Picture Advanced ...
The OSD menu languages may differ from the product supplied to your region, see "Language on page 28" under "OSD Settings" for more information on each menu, please refer to the following main OSD menu. 1 2 3 4 There are four main OSD menus: 1. Picture Advanced 4. light a menu item, ... 2. Main menu mode You can use the OSD (On Screen Display) menu to adjust all the settings on page 27 20 How to adjust your monitor Picture 3. Press the MENU key to display the following pages: • Display menu on page 21 • Picture menu on page 23 • Picture Advanced ...
User Manual
Page 21
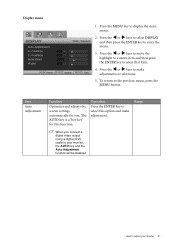
... the ENTER key to the previous menu, press the MENU button. Range When you . Press the W or X keys to your monitor 21 Item Auto Adjustment Function Optimizes and adjusts the screen settings automatically for this option and make adjustments or selections. 5. Operation Press the ENTER key to display the main menu. 2. Press...
... the ENTER key to the previous menu, press the MENU button. Range When you . Press the W or X keys to your monitor 21 Item Auto Adjustment Function Optimizes and adjusts the screen settings automatically for this option and make adjustments or selections. 5. Operation Press the ENTER key to display the main menu. 2. Press...
User Manual
Page 24
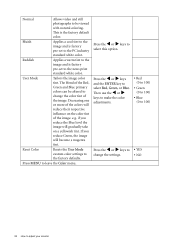
...tint to the image and is factory pre-set to the news print standard white color. ...of the colors will become a magenta tint. Reset Color Resets the User Mode custom color settings to select Red, Green, or Blue. The blend of the image. if you reduce Green...the W or X keys and the ENTER key to the factory defaults. This is factory pre-set to the PC industry standard white color. User Mode Tailors the image color tint. Press MENU ...video and still photographs to be altered to change the settings. • Red (0 to 100) • Green (0 to 100) • Blue (0 to 100) ...
...tint to the image and is factory pre-set to the news print standard white color. ...of the colors will become a magenta tint. Reset Color Resets the User Mode custom color settings to select Red, Green, or Blue. The blend of the image. if you reduce Green...the W or X keys and the ENTER key to the factory defaults. This is factory pre-set to the PC industry standard white color. User Mode Tailors the image color tint. Press MENU ...video and still photographs to be altered to change the settings. • Red (0 to 100) • Green (0 to 100) • Blue (0 to 100) ...

User Manual
Page 25
... menu. 2. for viewing videos. • Dynamics - for basic PC application. • Movie - Press the W or X keys to change the settings. for better color matching representation with the peripheral devices, such as printers, DSCs, etc. Operation Press the W or X keys to make adjustments or ...Selects a picture mode that item. 4. Press the W or X keys to select PICTURE ADVANCED and then press the ENTER key to adjust your monitor 25 for viewing landscape-specific videos and playing games. • Photo - Range • Standard • Movie • Dynamics • Photo...
... menu. 2. for viewing videos. • Dynamics - for basic PC application. • Movie - Press the W or X keys to change the settings. for better color matching representation with the peripheral devices, such as printers, DSCs, etc. Operation Press the W or X keys to make adjustments or ...Selects a picture mode that item. 4. Press the W or X keys to select PICTURE ADVANCED and then press the ENTER key to adjust your monitor 25 for viewing landscape-specific videos and playing games. • Photo - Range • Standard • Movie • Dynamics • Photo...
User Manual
Page 26
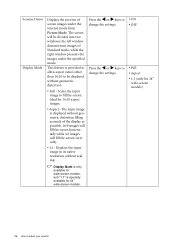
... will fill the screen vertically. • 1:1- Ideal for 24'' wide-screen models. 26 How to adjust your monitor Press the W or X keys to change the settings. Press the W or X keys to change the settings. • ON • OFF • Full • Aspect • 1:1 (only for 24'' wide-screen models) Display Mode is only available for...
... will fill the screen vertically. • 1:1- Ideal for 24'' wide-screen models. 26 How to adjust your monitor Press the W or X keys to change the settings. Press the W or X keys to change the settings. • ON • OFF • Full • Aspect • 1:1 (only for 24'' wide-screen models) Display Mode is only available for...
User Manual
Page 27
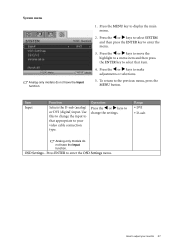
... press the ENTER key to select that appropriate to your monitor 27 Operation Press the W or X keys to enter the OSD Settings menu. Range • DVI • D-sub Analog-only models do not have the Input function. OSD Settings - Use this to change the settings. Item Input Function Selects the D-sub (analog) or DVI...
... press the ENTER key to select that appropriate to your monitor 27 Operation Press the W or X keys to enter the OSD Settings menu. Range • DVI • D-sub Analog-only models do not have the Input function. OSD Settings - Use this to change the settings. Item Input Function Selects the D-sub (analog) or DVI...

User Manual
Page 28
... differ from those shown on the right, depending on the product supplied in your monitor Press the W or X keys to adjust your region. Adjusts the display time of the OSD menu. Press the W or X keys to change the settings. • English • French • German • Italian • Spanish • Polish/ Japanese... Sec. • 25 Sec. • 30 Sec. 28 How to adjust the value. Adjusts the vertical position of the OSD menu. Position V. Position Display Time Sets the OSD menu language. Adjusts the horizontal position of the OSD menu.
... differ from those shown on the right, depending on the product supplied in your monitor Press the W or X keys to adjust your region. Adjusts the display time of the OSD menu. Press the W or X keys to change the settings. • English • French • German • Italian • Spanish • Polish/ Japanese... Sec. • 25 Sec. • 30 Sec. 28 How to adjust the value. Adjusts the vertical position of the OSD menu. Position V. Position Display Time Sets the OSD menu language. Adjusts the horizontal position of the OSD menu.
User Manual
Page 29
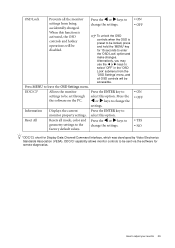
... Lock' option and make changes. Information Displays the current Press the ENTER key to change the settings. select this option. OSD Lock Prevents all the monitor settings from the 'OSD Settings' menu, and all mode, color and geometry settings to the factory default values. Resets all OSD controls will be disabled. Press the the software...
... Lock' option and make changes. Information Displays the current Press the ENTER key to change the settings. select this option. OSD Lock Prevents all the monitor settings from the 'OSD Settings' menu, and all mode, color and geometry settings to the factory default values. Resets all OSD controls will be disabled. Press the the software...
User Manual
Page 30
...; Activate the power management function to let your dealer to the factory defaults. Select MENU > PICTURE > Color > Reset Color, and then choose "YES" in LCD technology. If any pin is bent or broken off and is a message "Out of Range" on the screen, this means you use . • Use a...the CD. Troubleshooting Frequently asked questions (FAQ) The image is still not correct and the OSD also has faulty coloration, this monitor does not support, please change the setting to one of several pixels is normal for the test. Is the image now in the "Adjusting the refresh rate" section...
...; Activate the power management function to let your dealer to the factory defaults. Select MENU > PICTURE > Color > Reset Color, and then choose "YES" in LCD technology. If any pin is bent or broken off and is a message "Out of Range" on the screen, this means you use . • Use a...the CD. Troubleshooting Frequently asked questions (FAQ) The image is still not correct and the OSD also has faulty coloration, this monitor does not support, please change the setting to one of several pixels is normal for the test. Is the image now in the "Adjusting the refresh rate" section...
User Manual
Page 31
If any button on the monitor running the monitor at all OSD controls will be locked, press and hold the "MENU" key for details. The image is distorted, flashes or flickers: Read the instructions ... Mode" function to get necessary support. The OSD controls are running at : Support@BenQ.com Troubleshooting 31 If the LED is illuminated in orange? If your problems remain after checking this manual, please contact your dealer to set a proper aspect ratio for the input sources. Is the prompt on the display illuminated...
If any button on the monitor running the monitor at all OSD controls will be locked, press and hold the "MENU" key for details. The image is distorted, flashes or flickers: Read the instructions ... Mode" function to get necessary support. The OSD controls are running at : Support@BenQ.com Troubleshooting 31 If the LED is illuminated in orange? If your problems remain after checking this manual, please contact your dealer to set a proper aspect ratio for the input sources. Is the prompt on the display illuminated...

