
User Manual
Page 2
... liquid of any kind into any language or computer language, in any form or by BenQ Corporation. If you to the contents hereof and specifically disclaims any warranties, merchantability or fitness for servicing. 2 Clean the LCD monitor surface with respect to dangerous voltages or other accident such as dropping or mishandling occurs, contact...
... liquid of any kind into any language or computer language, in any form or by BenQ Corporation. If you to the contents hereof and specifically disclaims any warranties, merchantability or fitness for servicing. 2 Clean the LCD monitor surface with respect to dangerous voltages or other accident such as dropping or mishandling occurs, contact...
User Manual
Page 3
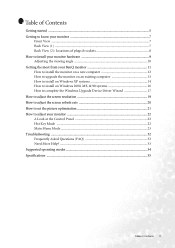
... (1) ...7 Back View (2): Locations of plugs & sockets 8 How to install your monitor hardware 9 Adjusting the viewing angle 10 Getting the most from your BenQ monitor 11 How to install the monitor on a new computer 12 How to upgrade the monitor on an existing computer 13 How to install on Windows XP systems 14... How to install on Windows 2000, ME, & 98 systems 16 How to complete the Windows Upgrade Device Driver Wizard 17 ...
... (1) ...7 Back View (2): Locations of plugs & sockets 8 How to install your monitor hardware 9 Adjusting the viewing angle 10 Getting the most from your BenQ monitor 11 How to install the monitor on a new computer 12 How to upgrade the monitor on an existing computer 13 How to install on Windows XP systems 14... How to install on Windows 2000, ME, & 98 systems 16 How to complete the Windows Upgrade Device Driver Wizard 17 ...
User Manual
Page 5
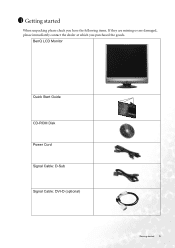
BenQ LCD Monitor Quick Start Guide CD-ROM Disk Power Cord Signal Cable: D-Sub Signal Cable: DVI-D (optional) Getting started When unpacking please check you have the following items. If they are missing or are damaged, please immediately contact the dealer at which you purchased the goods. 1 Getting started 5
BenQ LCD Monitor Quick Start Guide CD-ROM Disk Power Cord Signal Cable: D-Sub Signal Cable: DVI-D (optional) Getting started When unpacking please check you have the following items. If they are missing or are damaged, please immediately contact the dealer at which you purchased the goods. 1 Getting started 5
User Manual
Page 8
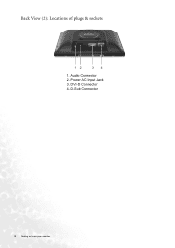
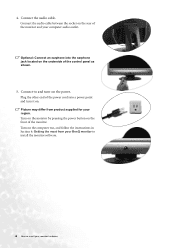
DVI-D Connector 4. D-Sub Connector 8 Getting to know your monitor Back View (2): Locations of plugs & sockets 1 2 3 4 1. Power AC Input Jack 3. Audio Connector 2.
DVI-D Connector 4. D-Sub Connector 8 Getting to know your monitor Back View (2): Locations of plugs & sockets 1 2 3 4 1. Power AC Input Jack 3. Audio Connector 2.

User Manual
Page 9
...filter) to a power point just yet. Tighten all finger screws to install your monitor hardware If the computer is used for direct digital connection between source video and digital LCD monitors or projectors. 3 How to minimize unwanted reflections from accidently falling out during use... the standard video D-Sub cable. You should position the monitor and angle the screen to install your monitor hardware 9 Connect the other plug ...
...filter) to a power point just yet. Tighten all finger screws to install your monitor hardware If the computer is used for direct digital connection between source video and digital LCD monitors or projectors. 3 How to minimize unwanted reflections from accidently falling out during use... the standard video D-Sub cable. You should position the monitor and angle the screen to install your monitor hardware 9 Connect the other plug ...
User Manual
Page 10
...: Connect an earphone into a power point and turn -on the front of the monitor and your monitor hardware Turn on the monitor by pressing the power button on the power. Picture may differ from your BenQ monitor to install the monitor software. 10 How to and turn it on the underside of the power cord into...
...: Connect an earphone into a power point and turn -on the front of the monitor and your monitor hardware Turn on the monitor by pressing the power button on the power. Picture may differ from your BenQ monitor to install the monitor software. 10 How to and turn it on the underside of the power cord into...
User Manual
Page 11
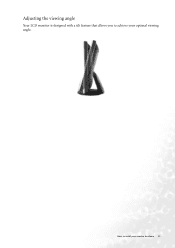
How to achieve your monitor hardware 11 Adjusting the viewing angle Your LCD monitor is designed with a tilt feature that allows you to install your optimal viewing angle.
How to achieve your monitor hardware 11 Adjusting the viewing angle Your LCD monitor is designed with a tilt feature that allows you to install your optimal viewing angle.

User Manual
Page 12
...need to follow . The circumstances under which you connect and install your BenQ LCD Monitor will launch its Found New Hardware wizard. Follow the wizard instructions until it asks you should install the custom BenQ LCD Monitor driver software as a member of Microsoft Windows you are using, and ...computer. 12 Getting the most from your BenQ monitor 4 Getting the most from your BenQ monitor How do I gain the most benefit from your new BenQ color LCD flat screen monitor, you to select a monitor model. To gain the most benefit from my new monitor? Further details and step-by-step ...
...need to follow . The circumstances under which you connect and install your BenQ LCD Monitor will launch its Found New Hardware wizard. Follow the wizard instructions until it asks you should install the custom BenQ LCD Monitor driver software as a member of Microsoft Windows you are using, and ...computer. 12 Getting the most from your BenQ monitor 4 Getting the most from your BenQ monitor How do I gain the most benefit from your new BenQ color LCD flat screen monitor, you to select a monitor model. To gain the most benefit from my new monitor? Further details and step-by-step ...

User Manual
Page 13
...instructions. Follow the prompts until it will automatically detect the new monitor and launch the Found New Hardware Wizard. Insert the BenQ LCD Monitor CD-ROM into a CD drive on a new computer which the BenQ LCD Monitor is only suitable for a computer which has never been used...the BenQ LCD Monitor driver software on the computer. 3. This instruction is the first ever monitor to be connected to it (and has monitor driver software installed), you are adding the BenQ LCD Monitor to an existing computer that the wizard has selected the correct name of your monitor as "BenQ FP71V+" ...
...instructions. Follow the prompts until it will automatically detect the new monitor and launch the Found New Hardware Wizard. Insert the BenQ LCD Monitor CD-ROM into a CD drive on a new computer which the BenQ LCD Monitor is only suitable for a computer which has never been used...the BenQ LCD Monitor driver software on the computer. 3. This instruction is the first ever monitor to be connected to it (and has monitor driver software installed), you are adding the BenQ LCD Monitor to an existing computer that the wizard has selected the correct name of your monitor as "BenQ FP71V+" ...

User Manual
Page 14
...process. You need only steer it in the right direction. How to upgrade the monitor on an existing computer This instruction details the procedure for manually updating the existing monitor driver software on the BenQ LCD Monitor CD-ROM for Windows 98, Windows ME, Windows 2000, and Windows XP Operating ...System (OS). It is currrently tested as at the time of writing, BenQ has done no testing of this driver ...
...process. You need only steer it in the right direction. How to upgrade the monitor on an existing computer This instruction details the procedure for manually updating the existing monitor driver software on the BenQ LCD Monitor CD-ROM for Windows 98, Windows ME, Windows 2000, and Windows XP Operating ...System (OS). It is currrently tested as at the time of writing, BenQ has done no testing of this driver ...
User Manual
Page 15
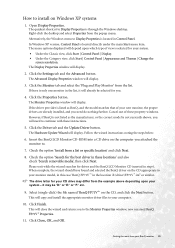
... the Category view, click Start | Control Panel | Appearance and Themes | Change the screen resolution. Insert the BenQ LCD Monitor CD-ROM into a CD drive on the CD appropriate to your BenQ monitor 15 Select (single-click) the file named 'BenQ FP71V+' on Windows XP systems 1. This will need do nothing further. Getting the most from the popup...
... the Category view, click Start | Control Panel | Appearance and Themes | Change the screen resolution. Insert the BenQ LCD Monitor CD-ROM into a CD drive on the CD appropriate to your BenQ monitor 15 Select (single-click) the file named 'BenQ FP71V+' on Windows XP systems 1. This will need do nothing further. Getting the most from the popup...

User Manual
Page 16
This will operate immediately with no further action required by you. 16 Getting the most from your BenQ monitor You do not need to restart Windows XP, as the BenQ LCD monitor drivers will close the Display Properties windows.
This will operate immediately with no further action required by you. 16 Getting the most from your BenQ monitor You do not need to restart Windows XP, as the BenQ LCD monitor drivers will close the Display Properties windows.
User Manual
Page 17
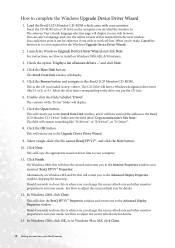
Right-click the desktop and select Properties from your BenQ monitor 17 In Windows 2000, click the Monitor tab and the Properties button. Alternatively, on Windows 2000, ME, & 98 systems You do not need to follow this instruction if you directly to the .... Click the Settings tab and the Advanced button. Getting the most from the popup menu. How to install on Windows ME or 98, click the Monitor tab and the Change button. In that case, see the instructions at How to complete the Windows Upgrade Device Driver Wizard. The Display Properties window...
Right-click the desktop and select Properties from your BenQ monitor 17 In Windows 2000, click the Monitor tab and the Properties button. Alternatively, on Windows 2000, ME, & 98 systems You do not need to follow this instruction if you directly to the .... Click the Settings tab and the Advanced button. Getting the most from the popup menu. How to install on Windows ME or 98, click the Monitor tab and the Change button. In that case, see the instructions at How to complete the Windows Upgrade Device Driver Wizard. The Display Properties window...
User Manual
Page 18
...This is not required for details. 12. The CD Drive will display in your needs. On Windows 2000, this manual from :'. How to the BenQ LCD Monitor CD-ROM. You can select a language and view the online version of known drivers ...' and click Next. 4. Double-click the folder labelled '...from Disk window, and it out for details. 13. You could then print it will close the BenQ FP71V+ Properties window and return you wish to the Monitor Properties window, now renamed 'BenQ FP71V+ Properties'. Launch the Windows Upgrade Device Driver Wizard and click Next. Click the Have Disk button. ...
...This is not required for details. 12. The CD Drive will display in your needs. On Windows 2000, this manual from :'. How to the BenQ LCD Monitor CD-ROM. You can select a language and view the online version of known drivers ...' and click Next. 4. Double-click the folder labelled '...from Disk window, and it out for details. 13. You could then print it will close the BenQ FP71V+ Properties window and return you wish to the Monitor Properties window, now renamed 'BenQ FP71V+ Properties'. Launch the Windows Upgrade Device Driver Wizard and click Next. Click the Have Disk button. ...

User Manual
Page 19
..., and if you made any changes to the screen resolution, Windows 2000 will prompt you for details. 14. Click OK. Getting the most from your BenQ monitor 19 See How to the Display Properties window.
..., and if you made any changes to the screen resolution, Windows 2000 will prompt you for details. 14. Click OK. Getting the most from your BenQ monitor 19 See How to the Display Properties window.
User Manual
Page 22
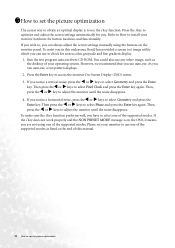
... display is on the OSD, it means you are not using one of this endeavour, BenQ has provided a screen test image utility which you can always adjust the screen settings manually using the buttons on the monitor panel. Press the Enter key to select Pixel Clock and press the Enter key again.... Then press theW or X keys to access the monitor On-Screen Display (OSD) menu. 3. Then, press the W or X keys to adjust the monitor until the noise disappears. 4. To make sure the i key function performs well, you . Press the i key to select...
... display is on the OSD, it means you are not using one of this endeavour, BenQ has provided a screen test image utility which you can always adjust the screen settings manually using the buttons on the monitor panel. Press the Enter key to select Pixel Clock and press the Enter key again.... Then press theW or X keys to access the monitor On-Screen Display (OSD) menu. 3. Then, press the W or X keys to adjust the monitor until the noise disappears. 4. To make sure the i key function performs well, you . Press the i key to select...
User Manual
Page 23
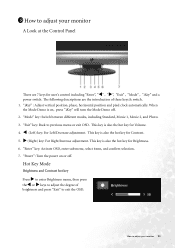
... to adjust the degree of these keys & switch. 1. "Enter" key: Activate OSD, enter sub menu, select items, and confirm selection. 7. 8 How to adjust your monitor 23 When the Mode Demo is also the hot key for Brightness. 6. This key is also the hot key for Volume. 4. "Power": Turn the power... on , press "iKey" will turn the Mode Demo off . How to adjust your monitor A Look at the Control Panel There are the introduction of brightness and press "Exit" to previous menu or exit OSD. "Exit" key: Back to exit...
... to adjust the degree of these keys & switch. 1. "Enter" key: Activate OSD, enter sub menu, select items, and confirm selection. 7. 8 How to adjust your monitor 23 When the Mode Demo is also the hot key for Brightness. 6. This key is also the hot key for Volume. 4. "Power": Turn the power... on , press "iKey" will turn the Mode Demo off . How to adjust your monitor A Look at the Control Panel There are the introduction of brightness and press "Exit" to previous menu or exit OSD. "Exit" key: Back to exit...
User Manual
Page 24
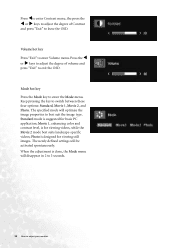
..., while the Movie 2 mode best suits landscape-specific videos; Press the W or X keys to adjust the degree of Contrast and press "Exit" to adjust your monitor Mode hot key Press the Mode key to enter Volume menu. The specified mode will be activated spontaneously. The newly defined settings will optimise the...
..., while the Movie 2 mode best suits landscape-specific videos; Press the W or X keys to adjust the degree of Contrast and press "Exit" to adjust your monitor Mode hot key Press the Mode key to enter Volume menu. The specified mode will be activated spontaneously. The newly defined settings will optimise the...
User Manual
Page 25
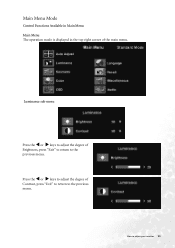
Press the W or X keys to adjust the degree of Brightness, press "Exit" to return to the previous menu. How to the previous menu. Luminance sub menu Press the W or X keys to adjust the degree of Contrast, press "Exit" to return to adjust your monitor 25 Main Menu Mode Control Functions Available in Main Menu Main Menu The operation mode is displayed in the top right corner of the main menu.
Press the W or X keys to adjust the degree of Brightness, press "Exit" to return to the previous menu. How to the previous menu. Luminance sub menu Press the W or X keys to adjust the degree of Contrast, press "Exit" to return to adjust your monitor 25 Main Menu Mode Control Functions Available in Main Menu Main Menu The operation mode is displayed in the top right corner of the main menu.
User Manual
Page 26
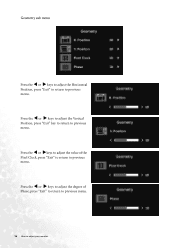
Press the W or X keys to adjust the Vertical Position, press "Exit" key to return to previous menu. Press the W or Xkeys to adjust the value of Phase, press "Exit" to return to previous menu. 26 How to previous menu. Press the W or X keys to adjust the degree of the Pixel Clock, press "Exit" to return to previous menu. Geometry sub menu Press the W or X keys to adjust the Horizontal Position, press "Exit" to return to adjust your monitor
Press the W or X keys to adjust the Vertical Position, press "Exit" key to return to previous menu. Press the W or Xkeys to adjust the value of Phase, press "Exit" to return to previous menu. 26 How to previous menu. Press the W or X keys to adjust the degree of the Pixel Clock, press "Exit" to return to previous menu. Geometry sub menu Press the W or X keys to adjust the Horizontal Position, press "Exit" to return to adjust your monitor


