
User Manual
Page 2
... No part of this product yourself, as a power disconnect device for servicing. 2 If any particular purpose. Clean the LCD monitor surface with respect to dangerous voltages or other accident such as dropping or mishandling occurs, contact qualified service personnel for pluggable... any means, electronic, mechanical, magnetic, optical, chemical, manual or otherwise, without obligation of BenQ Corporation to make changes from the type of BenQ Corporation. ii Disclaimer BenQ Corporation makes no representations or warranties, either expressed or implied, with a lint-free, non-...
... No part of this product yourself, as a power disconnect device for servicing. 2 If any particular purpose. Clean the LCD monitor surface with respect to dangerous voltages or other accident such as dropping or mishandling occurs, contact qualified service personnel for pluggable... any means, electronic, mechanical, magnetic, optical, chemical, manual or otherwise, without obligation of BenQ Corporation to make changes from the type of BenQ Corporation. ii Disclaimer BenQ Corporation makes no representations or warranties, either expressed or implied, with a lint-free, non-...
User Manual
Page 5
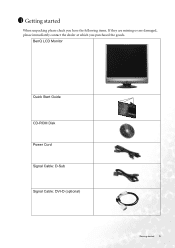
BenQ LCD Monitor Quick Start Guide CD-ROM Disk Power Cord Signal Cable: D-Sub Signal Cable: DVI-D (optional) Getting started When unpacking please check you have the following items. If they are missing or are damaged, please immediately contact the dealer at which you purchased the goods. 1 Getting started 5
BenQ LCD Monitor Quick Start Guide CD-ROM Disk Power Cord Signal Cable: D-Sub Signal Cable: DVI-D (optional) Getting started When unpacking please check you have the following items. If they are missing or are damaged, please immediately contact the dealer at which you purchased the goods. 1 Getting started 5

User Manual
Page 9
... you can use . 3. Connect the video cable. Connect the other light sources. 2. How to install your monitor hardware If the computer is used for direct digital connection between source video and digital LCD monitors or projectors. Do not connect the other and to the DVI-D port on the rear of the DVI...-D cable to the monitor DVI-D socket and the other end to a power point just yet. Connect one end...
... you can use . 3. Connect the video cable. Connect the other light sources. 2. How to install your monitor hardware If the computer is used for direct digital connection between source video and digital LCD monitors or projectors. Do not connect the other and to the DVI-D port on the rear of the DVI...-D cable to the monitor DVI-D socket and the other end to a power point just yet. Connect one end...
User Manual
Page 11
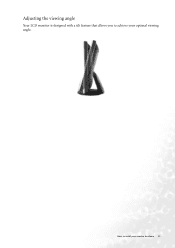
Adjusting the viewing angle Your LCD monitor is designed with a tilt feature that allows you to install your optimal viewing angle. How to achieve your monitor hardware 11
Adjusting the viewing angle Your LCD monitor is designed with a tilt feature that allows you to install your optimal viewing angle. How to achieve your monitor hardware 11

User Manual
Page 12
... the BenQ LCD Monitor CD-ROM and select the appropriate monitor model. The circumstances under which you connect and install your BenQ LCD Monitor will launch its Found New Hardware wizard. Furthermore, if your BenQ monitor In either case however, the very next time you should install the custom BenQ LCD Monitor driver ... determine which has security access requirements, network policy settings may prevent you from installing software on the BenQ LCD Monitor CD-ROM. Further details and step-by-step instructions for both an automatic (new) or upgrade (existing) installation follow to...
... the BenQ LCD Monitor CD-ROM and select the appropriate monitor model. The circumstances under which you connect and install your BenQ LCD Monitor will launch its Found New Hardware wizard. Furthermore, if your BenQ monitor In either case however, the very next time you should install the custom BenQ LCD Monitor driver ... determine which has security access requirements, network policy settings may prevent you from installing software on the BenQ LCD Monitor CD-ROM. Further details and step-by-step instructions for both an automatic (new) or upgrade (existing) installation follow to...

User Manual
Page 13
... before . Getting the most from your monitor as "BenQ FP71V+" and click Next. 6. Insert the BenQ LCD Monitor CD-ROM into a CD drive on a new computer which has never had another monitor connected to it (and has monitor driver software installed), you are adding the BenQ LCD Monitor to it will automatically detect the new monitor and launch the Found New Hardware...
... before . Getting the most from your monitor as "BenQ FP71V+" and click Next. 6. Insert the BenQ LCD Monitor CD-ROM into a CD drive on a new computer which has never had another monitor connected to it (and has monitor driver software installed), you are adding the BenQ LCD Monitor to it will automatically detect the new monitor and launch the Found New Hardware...

User Manual
Page 14
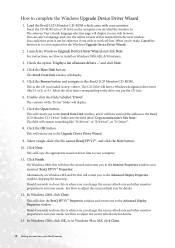
...Windows has an Upgrade Device Driver Wizard to install on the BenQ LCD Monitor CD-ROM for the particular model monitor you through the file selection and installation process. It is currrently tested as at the time of writing, BenQ has done no testing of this driver on other versions of... 2000, ME, & 98 systems. 14 Getting the most from the CD. See: • How to install on your Microsoft Windows computer. The BenQ LCD Monitor driver for your model may well function perfectly with other versions of Windows, however, as compatible (and recommended only) for Windows 98, Windows ME,...
...Windows has an Upgrade Device Driver Wizard to install on the BenQ LCD Monitor CD-ROM for the particular model monitor you through the file selection and installation process. It is currrently tested as at the time of writing, BenQ has done no testing of this driver on other versions of... 2000, ME, & 98 systems. 14 Getting the most from the CD. See: • How to install on your Microsoft Windows computer. The BenQ LCD Monitor driver for your model may well function perfectly with other versions of Windows, however, as compatible (and recommended only) for Windows 98, Windows ME,...
User Manual
Page 15
How to Display Properties is through the Windows desktop. Alternatively, the Windows menu to the Monitor Properties window, now renamed BenQ FP71V+ Properties. 11. If there is selected for you need to . 7. Cancel out of your system. • Under the Classic view, ... In Windows XP version, Control Panel is located in the location 'd:\driver\FP71V+.inf ' or similar. Insert the BenQ LCD Monitor CD-ROM into a CD drive on the CD appropriate to your monitor model, in this case 'BenQ FP71V+' in Control Panel. Right-click the desktop and select Properties from a list...
How to Display Properties is through the Windows desktop. Alternatively, the Windows menu to the Monitor Properties window, now renamed BenQ FP71V+ Properties. 11. If there is selected for you need to . 7. Cancel out of your system. • Under the Classic view, ... In Windows XP version, Control Panel is located in the location 'd:\driver\FP71V+.inf ' or similar. Insert the BenQ LCD Monitor CD-ROM into a CD drive on the CD appropriate to your monitor model, in this case 'BenQ FP71V+' in Control Panel. Right-click the desktop and select Properties from a list...

User Manual
Page 16
You do not need to restart Windows XP, as the BenQ LCD monitor drivers will close the Display Properties windows. This will operate immediately with no further action required by you. 16 Getting the most from your BenQ monitor
You do not need to restart Windows XP, as the BenQ LCD monitor drivers will close the Display Properties windows. This will operate immediately with no further action required by you. 16 Getting the most from your BenQ monitor
User Manual
Page 18
... and click Next. 4. Click the Have Disk button. See How to the BenQ LCD Monitor CD-ROM. In Windows 2000, click OK, or in step 1 above. Check the option 'Display a list of this will close the BenQ FP71V+ Properties window and return you to the drive you to the Upgrade Device Driver ...will have entered the address to the Install from Disk window, and it is the CD you to the BenQ LCD Monitor CD 'Driver' folder into . 6. Select (single-click) the file named BenQ FP71V+, and click the Next button. 10. This is not required for details. 13. Launch the Windows Upgrade...
... and click Next. 4. Click the Have Disk button. See How to the BenQ LCD Monitor CD-ROM. In Windows 2000, click OK, or in step 1 above. Check the option 'Display a list of this will close the BenQ FP71V+ Properties window and return you to the drive you to the Upgrade Device Driver ...will have entered the address to the Install from Disk window, and it is the CD you to the BenQ LCD Monitor CD 'Driver' folder into . 6. Select (single-click) the file named BenQ FP71V+, and click the Next button. 10. This is not required for details. 13. Launch the Windows Upgrade...
User Manual
Page 20
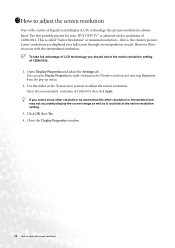
... resolution setting. 3. Use the slider in the 'Screen area' section to adjust the screen resolution To take full advantage of LCD technology you select some other resolution is called "Native Resolution" or maximal resolution - Lower resolutions are displayed on the Windows desktop...4. 1511How to adjust the screen resolution Due to the nature of liquid crystal display (LCD) technology, the picture resolution is achieved with the interpolated resolution. The best possible picture for your FP71V/FP71V+ is always fixed. that this other resolution, be aware that is, the clearest ...
... resolution setting. 3. Use the slider in the 'Screen area' section to adjust the screen resolution To take full advantage of LCD technology you select some other resolution is called "Native Resolution" or maximal resolution - Lower resolutions are displayed on the Windows desktop...4. 1511How to adjust the screen resolution Due to the nature of liquid crystal display (LCD) technology, the picture resolution is achieved with the interpolated resolution. The best possible picture for your FP71V/FP71V+ is always fixed. that this other resolution, be aware that is, the clearest ...
User Manual
Page 21
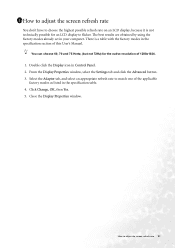
... already set in Control Panel. 2. Close the Display Properties window. You can choose 60, 70 and 75 Hertz, (but not 72Hz) for an LCD display to adjust the screen refresh rate 21 From the Display Properties window, select the Settings tab and click the Advanced button. 3. Click Change, OK..., then Yes. 5. 1611How to adjust the screen refresh rate You don't have to choose the highest possible refresh rate on an LCD display, because it is a table with the factory modes in the specification section of this User's Manual. Double click the Display icon in your computer...
... already set in Control Panel. 2. Close the Display Properties window. You can choose 60, 70 and 75 Hertz, (but not 72Hz) for an LCD display to adjust the screen refresh rate 21 From the Display Properties window, select the Settings tab and click the Advanced button. 3. Click Change, OK..., then Yes. 5. 1611How to adjust the screen refresh rate You don't have to choose the highest possible refresh rate on an LCD display, because it is a table with the factory modes in the specification section of this User's Manual. Double click the Display icon in your computer...

User Manual
Page 32
Input Select: Select D-sub (analog) or DVI (digital) input to adjust your monitor To return to previous menu, press "Exit." 32 How to activate the new settings. Press the Exit key to return to confirm AMA. AMA: Select the W or X key to previous menu. When you choose "On", it will improve the gray level response time of Sharpness and activate the new settings. Display Information: Select Display Information to adjust the degree of the LCD panel. Sharpness: Press the W or X key to display the current monitor proerty settings.
Input Select: Select D-sub (analog) or DVI (digital) input to adjust your monitor To return to previous menu, press "Exit." 32 How to activate the new settings. Press the Exit key to return to confirm AMA. AMA: Select the W or X key to previous menu. When you choose "On", it will improve the gray level response time of Sharpness and activate the new settings. Display Information: Select Display Information to adjust the degree of the LCD panel. Sharpness: Press the W or X key to display the current monitor proerty settings.
User Manual
Page 34
... in the signal input. You can minimize these instructions. Read the How to one of Range" on the display illuminated in extension cables. On the monitor, press "Enter" key and press W or X key to move the mouse. If the image is still not correct and the OSD also has faulty ... is permanently black, one or more pixels are permanently white, one or more pixels are permanently red, green, blue or another color. • Clean the LCD screen. • Cycle power on or off , please contact your dealer to conduction losses in green? The image has a faulty coloration: It has a yellow, ...
... in the signal input. You can minimize these instructions. Read the How to one of Range" on the display illuminated in extension cables. On the monitor, press "Enter" key and press W or X key to move the mouse. If the image is still not correct and the OSD also has faulty ... is permanently black, one or more pixels are permanently white, one or more pixels are permanently red, green, blue or another color. • Clean the LCD screen. • Cycle power on or off , please contact your dealer to conduction losses in green? The image has a faulty coloration: It has a yellow, ...


