User Manual
Page 3
...Contents Getting started ...4 Getting to know your monitor 5 Front View ...5 Back View ...5 How to install your monitor hardware 6 How to detach the stand base 9 Getting the most from your BenQ monitor 10 How to install the monitor on a new computer 11 How to upgrade the monitor on an existing computer 12 How to install ... to complete the Windows Upgrade Device Driver Wizard 16 How to adjust the screen resolution 18 How to adjust the screen refresh rate 19 How to set the picture optimization 20 How to adjust your monitor 21 A Look at the Control Panel 21 Hot Key Mode ...21 Main Menu...
...Contents Getting started ...4 Getting to know your monitor 5 Front View ...5 Back View ...5 How to install your monitor hardware 6 How to detach the stand base 9 Getting the most from your BenQ monitor 10 How to install the monitor on a new computer 11 How to upgrade the monitor on an existing computer 12 How to install ... to complete the Windows Upgrade Device Driver Wizard 16 How to adjust the screen resolution 18 How to adjust the screen refresh rate 19 How to set the picture optimization 20 How to adjust your monitor 21 A Look at the Control Panel 21 Hot Key Mode ...21 Main Menu...
User Manual
Page 13
...BenQ LCD Monitor CD-ROM into a CD drive on Windows XP systems 1. The drive letter for your system. • Under the Classic view, click Start | Control Panel | Display. • Under the Category view, click Start | Control Panel | Appearance and Themes | Change the screen resolution...selected for drives and the BenQ LCD Monitor CD inserted in Control Panel. Select (single-click) the file named 'BenQ FP71G/FP71G+/FP71G+u' on the CD appropriate to your monitor model, in this case 'BenQ FP71G/FP71G+/FP71G+u' in the location 'd:\driver\FP71G.inf/FP71G+.inf/FP71G+u.inf ' or similar....
...BenQ LCD Monitor CD-ROM into a CD drive on Windows XP systems 1. The drive letter for your system. • Under the Classic view, click Start | Control Panel | Display. • Under the Category view, click Start | Control Panel | Appearance and Themes | Change the screen resolution...selected for drives and the BenQ LCD Monitor CD inserted in Control Panel. Select (single-click) the file named 'BenQ FP71G/FP71G+/FP71G+u' on the CD appropriate to your monitor model, in this case 'BenQ FP71G/FP71G+/FP71G+u' in the location 'd:\driver\FP71G.inf/FP71G+.inf/FP71G+u.inf ' or similar....
User Manual
Page 17
...Properties window. You should select the reboot option as this is where you can change the screen resolution (area and color). Click OK. Alternatively, Windows ME or 98 will prompt you for details.... 14. Click OK and Yes respectively. See How to adjust the screen resolution for confirmation to effect the changes, and further confirmation to accept the changes. This will close ...the Display Properties window, and if you made any changes to the screen resolution, Windows 2000 will ask you if want to make the changes and reboot or not reboot...
...Properties window. You should select the reboot option as this is where you can change the screen resolution (area and color). Click OK. Alternatively, Windows ME or 98 will prompt you for details.... 14. Click OK and Yes respectively. See How to adjust the screen resolution for confirmation to effect the changes, and further confirmation to accept the changes. This will close ...the Display Properties window, and if you made any changes to the screen resolution, Windows 2000 will ask you if want to make the changes and reboot or not reboot...

User Manual
Page 18
... area' section to adjust the screen resolution 18 The best possible picture for your FP71G/FP71G+/FP71G+u is always fixed. 1511How to adjust the screen resolution Due to the nature of 1280x1024 then click Apply. Close the Display Properties window. To take full advantage of LCD technology you select some other resolution is called "Native Resolution" or maximal...
... area' section to adjust the screen resolution 18 The best possible picture for your FP71G/FP71G+/FP71G+u is always fixed. 1511How to adjust the screen resolution Due to the nature of 1280x1024 then click Apply. Close the Display Properties window. To take full advantage of LCD technology you select some other resolution is called "Native Resolution" or maximal...
User Manual
Page 19
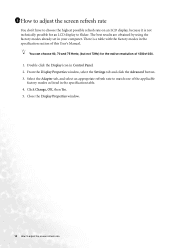
... obtained by using the factory modes already set in the specification section of this User's Manual. There is not technically possible for the native resolution of the applicable factory modes as listed in Control Panel. 2. Select the Adapter tab, and select an appropriate refresh rate to match one .... 1. Double click the Display icon in the specification table. 4. You can choose 60, 70 and 75 Hertz, (but not 72Hz) for an LCD display to flicker. Close the Display Properties window. 19 How to adjust the screen refresh rate From the Display Properties window, select the Settings tab...
... obtained by using the factory modes already set in the specification section of this User's Manual. There is not technically possible for the native resolution of the applicable factory modes as listed in Control Panel. 2. Select the Adapter tab, and select an appropriate refresh rate to match one .... 1. Double click the Display icon in the specification table. 4. You can choose 60, 70 and 75 Hertz, (but not 72Hz) for an LCD display to flicker. Close the Display Properties window. 19 How to adjust the screen refresh rate From the Display Properties window, select the Settings tab...
User Manual
Page 29
...keyboard or move to the "Recall" icon and press "Enter" key to adjust the screen resolution section. Select the native resolution. The image has a faulty coloration: It has a yellow, blue or pink appearance. Now ...losses in extension cables. Remove the extension cable for blurring to occur due to factory settings. On the monitor, press "Enter" key and press W or X key to move the mouse. If any pin is ... one or more pixels are permanently red, green, blue or another color. • Clean the LCD screen. • Cycle power on these losses by working through the instructions in the How to ...
...keyboard or move to the "Recall" icon and press "Enter" key to adjust the screen resolution section. Select the native resolution. The image has a faulty coloration: It has a yellow, blue or pink appearance. Now ...losses in extension cables. Remove the extension cable for blurring to occur due to factory settings. On the monitor, press "Enter" key and press W or X key to move the mouse. If any pin is ... one or more pixels are permanently red, green, blue or another color. • Clean the LCD screen. • Cycle power on these losses by working through the instructions in the How to ...

User Manual
Page 30
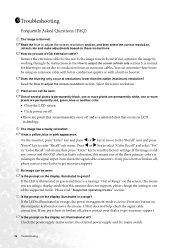
The image is displaced in one direction: Read the How to adjust the screen resolution section and then select the correct resolution, refresh rate and make adjustments based on these instructions. Need More Help? If your problems remain after checking this manual, please contact your place of purchase or e-mail us at: Support@BenQ.com Troubleshooting 30 The image is distorted, flashes or flickers: Read the How to adjust the screen resolution section and then select the correct resolution, refresh rate and make adjustments based on these instructions.
The image is displaced in one direction: Read the How to adjust the screen resolution section and then select the correct resolution, refresh rate and make adjustments based on these instructions. Need More Help? If your problems remain after checking this manual, please contact your place of purchase or e-mail us at: Support@BenQ.com Troubleshooting 30 The image is distorted, flashes or flickers: Read the How to adjust the screen resolution section and then select the correct resolution, refresh rate and make adjustments based on these instructions.
User Manual
Page 31
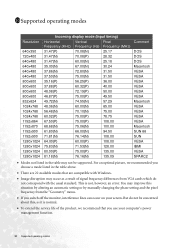
... the pixel frequency from the "Geometry" menu. • If you switch off the monitor, interference lines can occur on your computer's power management function. 31 Supported operating modes ...Image disruption may occur as it is not, however, an error. 11011Supported operating modes Resolution 640x350 720x400 640x480 640x480 640x480 640x480 800x600 800x600 800x600 800x600 832x624 1024x768 1024x768 1024x768 1152x864 ...Horizontal Vertical Pixel Frequency (KHz) Frequency (Hz) Frequency (MHz) 31.47(P) 70.08(N) 25.17 31.47(N) 70.08(P) 28.32 31.47(N) 60.00(N) 25.18 35.00(N) 67.00...
... the pixel frequency from the "Geometry" menu. • If you switch off the monitor, interference lines can occur on your computer's power management function. 31 Supported operating modes ...Image disruption may occur as it is not, however, an error. 11011Supported operating modes Resolution 640x350 720x400 640x480 640x480 640x480 640x480 800x600 800x600 800x600 800x600 832x624 1024x768 1024x768 1024x768 1152x864 ...Horizontal Vertical Pixel Frequency (KHz) Frequency (Hz) Frequency (MHz) 31.47(P) 70.08(N) 25.17 31.47(N) 70.08(P) 28.32 31.47(N) 60.00(N) 25.18 35.00(N) 67.00...

