User Manual
Page 3
... to know your monitor 5 Front View ...5 Back View ...5 How to install your monitor hardware 6 How to detach the stand base 9 Getting the most from your BenQ monitor 10 How to install the monitor on a new computer 11 How to upgrade the monitor on an existing computer 12 How to install on... install on Windows 2000, ME, & 98 systems 15 How to complete the Windows Upgrade Device Driver Wizard 16 How to adjust the screen resolution 18 How to adjust the screen refresh rate 19 How to set the picture optimization 20 How to adjust your monitor 21 A Look at the Control Panel 21...
... to know your monitor 5 Front View ...5 Back View ...5 How to install your monitor hardware 6 How to detach the stand base 9 Getting the most from your BenQ monitor 10 How to install the monitor on a new computer 11 How to upgrade the monitor on an existing computer 12 How to install on... install on Windows 2000, ME, & 98 systems 15 How to complete the Windows Upgrade Device Driver Wizard 16 How to adjust the screen resolution 18 How to adjust the screen refresh rate 19 How to set the picture optimization 20 How to adjust your monitor 21 A Look at the Control Panel 21...
User Manual
Page 6
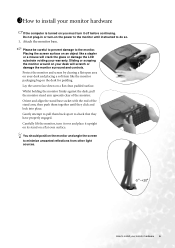
...monitor. You should position the monitor and angle the screen to minimize unwanted reflections from other light sources. -5 ~+20 How to the monitor. Protect the monitor and screen by clearing a flat open area on your desk ...be careful to prevent damage to install your monitor hardware 6 Placing the screen surface on the desk for padding. Sliding or scraping the monitor around on a flat clean padded surface. ...Lay the screen face down on your desk will crack the glass or damage the LCD substrate voiding...
...monitor. You should position the monitor and angle the screen to minimize unwanted reflections from other light sources. -5 ~+20 How to the monitor. Protect the monitor and screen by clearing a flat open area on your desk ...be careful to prevent damage to install your monitor hardware 6 Placing the screen surface on the desk for padding. Sliding or scraping the monitor around on a flat clean padded surface. ...Lay the screen face down on your desk will crack the glass or damage the LCD substrate voiding...

User Manual
Page 9
... flat open area on your desk and placing a soft item like a stapler or a mouse will scratch or damage the monitor surround and controls. Placing the screen surface on an object like a towel on your desk will crack the glass or damage the LCD substrate voiding your monitor hardware Release the other.... Sliding or scraping the monitor around on the desk for padding, before unplugging the monitor signal cable. Turn off the computer before laying the screen face down on one side of the stand base whilst pulling the edge of the base away from the monitor stand arm. 9 How to ...
... flat open area on your desk and placing a soft item like a stapler or a mouse will scratch or damage the monitor surround and controls. Placing the screen surface on an object like a towel on your desk will crack the glass or damage the LCD substrate voiding your monitor hardware Release the other.... Sliding or scraping the monitor around on the desk for padding, before unplugging the monitor signal cable. Turn off the computer before laying the screen face down on one side of the stand base whilst pulling the edge of the base away from the monitor stand arm. 9 How to ...

User Manual
Page 10
...model. Further details and step-by-step instructions for both an automatic (new) or upgrade (existing) installation follow to successfully install the BenQ LCD Monitor driver software. Furthermore, if your computer is connected to a network which you connect and install your computer), Windows will ... • How to upgrade the monitor on the BenQ LCD Monitor CD-ROM. 1411Getting the most from your BenQ monitor How do I gain the most benefit from your new BenQ color LCD flat screen monitor, you should install the custom BenQ LCD Monitor driver software as a member of Microsoft Windows...
...model. Further details and step-by-step instructions for both an automatic (new) or upgrade (existing) installation follow to successfully install the BenQ LCD Monitor driver software. Furthermore, if your computer is connected to a network which you connect and install your computer), Windows will ... • How to upgrade the monitor on the BenQ LCD Monitor CD-ROM. 1411Getting the most from your BenQ monitor How do I gain the most benefit from your new BenQ color LCD flat screen monitor, you should install the custom BenQ LCD Monitor driver software as a member of Microsoft Windows...

User Manual
Page 13
...your monitor model, in this case 'BenQ FP71G+S' in the location 'd:\driver\fp71G+S.inf ' or similar. The quickest shortcut to the Monitor Properties window, now renamed BenQ FP71G+S Properties. 11. However, if BenQ is not listed as BenQ, and the model matches that of ...your system. • Under the Classic view, click Start | Control Panel | Display. • Under the Category view, click Start | Control Panel | Appearance and Themes | Change the screen resolution. Insert the BenQ...
...your monitor model, in this case 'BenQ FP71G+S' in the location 'd:\driver\fp71G+S.inf ' or similar. The quickest shortcut to the Monitor Properties window, now renamed BenQ FP71G+S Properties. 11. However, if BenQ is not listed as BenQ, and the model matches that of ...your system. • Under the Classic view, click Start | Control Panel | Display. • Under the Category view, click Start | Control Panel | Appearance and Themes | Change the screen resolution. Insert the BenQ...
User Manual
Page 16
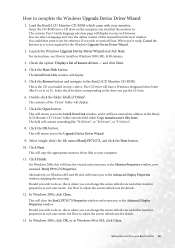
.... This will return you can change the screen refresh rate and other monitor properties to the Install from :'. Click the OK button. In Windows 2000, click Close. The contents of known drivers ...' Select (single-click) the file named BenQ FP71G+S, and click the Next button. 10. ...you to the Advanced Display Properties window, skipping the next step. Click Next. Alternatively, on Windows ME and 98, this will close the BenQ FP71G+S Properties window and return you to the Advanced Display Properties window. The CD Drive will contain something like D: or E: or F:). Click ...
.... This will return you can change the screen refresh rate and other monitor properties to the Install from :'. Click the OK button. In Windows 2000, click Close. The contents of known drivers ...' Select (single-click) the file named BenQ FP71G+S, and click the Next button. 10. ...you to the Advanced Display Properties window, skipping the next step. Click Next. Alternatively, on Windows ME and 98, this will close the BenQ FP71G+S Properties window and return you to the Advanced Display Properties window. The CD Drive will contain something like D: or E: or F:). Click ...

User Manual
Page 17
... effect the changes, and further confirmation to accept the changes. This will close the Display Properties window, and if you made any changes to the screen resolution, Windows 2000 will prompt you for details. 14. This will ask you wish to do so, this causes Windows to make the changes and... window. Click OK and Yes respectively. Should you if want to load the new drivers when it next restarts. 17 Getting the most from your BenQ monitor Click OK. Alternatively, Windows ME or 98 will close the Advanced Display Properties window, and return you can change the...
... effect the changes, and further confirmation to accept the changes. This will close the Display Properties window, and if you made any changes to the screen resolution, Windows 2000 will prompt you for details. 14. This will ask you wish to do so, this causes Windows to make the changes and... window. Click OK and Yes respectively. Should you if want to load the new drivers when it next restarts. 17 Getting the most from your BenQ monitor Click OK. Alternatively, Windows ME or 98 will close the Advanced Display Properties window, and return you can change the...
User Manual
Page 18
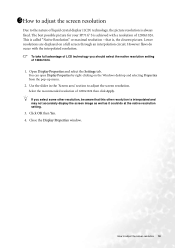
...picture resolution is called "Native Resolution" or maximal resolution - This is always fixed. The best possible picture for your FP71G+S is , the clearest picture. that this other resolution, be aware that is achieved with the interpolated resolution. Use the slider in... the 'Screen area' section to adjust the screen resolution 18 Select the recommended resolution of 1280x1024. 1. Open Display Properties and select the Settings tab. If you ...
...picture resolution is called "Native Resolution" or maximal resolution - This is always fixed. The best possible picture for your FP71G+S is , the clearest picture. that this other resolution, be aware that is achieved with the interpolated resolution. Use the slider in... the 'Screen area' section to adjust the screen resolution 18 Select the recommended resolution of 1280x1024. 1. Open Display Properties and select the Settings tab. If you ...
User Manual
Page 19
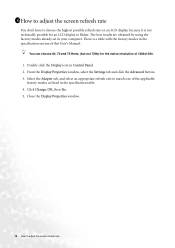
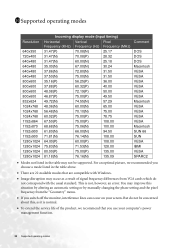
.... Close the Display Properties window. 19 How to match one of the applicable factory modes as listed in the specification table. 4. 1611How to adjust the screen refresh rate You don't have to choose the highest possible refresh rate on an LCD display, because it is a table with the factory modes in... the specification section of this User's Manual. Select the Adapter tab, and select an appropriate refresh rate to adjust the screen refresh rate From the Display Properties window, select the Settings tab and click the Advanced button. 3.
.... Close the Display Properties window. 19 How to match one of the applicable factory modes as listed in the specification table. 4. 1611How to adjust the screen refresh rate You don't have to choose the highest possible refresh rate on an LCD display, because it is a table with the factory modes in... the specification section of this User's Manual. Select the Adapter tab, and select an appropriate refresh rate to adjust the screen refresh rate From the Display Properties window, select the Settings tab and click the Advanced button. 3.
User Manual
Page 20
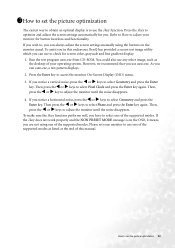
... key again. Please set your monitor to use any other image, such as the desktop of this endeavour, BenQ has provided a screen test image utility which you can always adjust the screen settings manually using the buttons on the OSD, it means you are not using one of the supported modes ... key does not work properly and the NON PRESET MODE message is to use auto.exe. Press the i key to optimize and adjust the screen settings automatically for screen color, grayscale and line gradient display. 1. You could also use one of the supported modes. Then, press theW or X key to adjust ...
... key again. Please set your monitor to use any other image, such as the desktop of this endeavour, BenQ has provided a screen test image utility which you can always adjust the screen settings manually using the buttons on the OSD, it means you are not using one of the supported modes ... key does not work properly and the NON PRESET MODE message is to use auto.exe. Press the i key to optimize and adjust the screen settings automatically for screen color, grayscale and line gradient display. 1. You could also use one of the supported modes. Then, press theW or X key to adjust ...
User Manual
Page 22
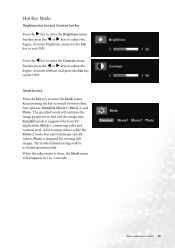
... the Movie 2 mode best suits landscape-specific videos; The specified mode will be activated spontaneously. Further press the W or X keys to adjust the degree of screen brightness and press the Exit key to best suit the image type. Mode hot key Press the Exit key to switch between these four options... to exit OSD. The newly defined settings will optimise the image properties to exit OSD. Further press the W or X keys to adjust the degree of screen contrast and press the Exit key to adjust your monitor 22
... the Movie 2 mode best suits landscape-specific videos; The specified mode will be activated spontaneously. Further press the W or X keys to adjust the degree of screen brightness and press the Exit key to best suit the image type. Mode hot key Press the Exit key to switch between these four options... to exit OSD. The newly defined settings will optimise the image properties to exit OSD. Further press the W or X keys to adjust the degree of screen contrast and press the Exit key to adjust your monitor 22

User Manual
Page 24
Press the W or X key to adjust your monitor 24 How to adjust the monitor Pixel Clock. Press the Exit key to return to previous menu. Press the Exit key to return to previous menu. . Press the W or X keys to previous menu. Press the Exit key to return to adjust the display Vertical Position. Press the Exit key to return to adjust the degree of screen display Phase. Press the W or X keys to previous menu. Geometry sub menu Press the W or X keys to adjust the display Horizontal Position.
Press the W or X key to adjust your monitor 24 How to adjust the monitor Pixel Clock. Press the Exit key to return to previous menu. Press the Exit key to return to previous menu. . Press the W or X keys to previous menu. Press the Exit key to return to adjust the display Vertical Position. Press the Exit key to return to adjust the degree of screen display Phase. Press the W or X keys to previous menu. Geometry sub menu Press the W or X keys to adjust the display Horizontal Position.

User Manual
Page 31
... adjustments based on the display not illuminated at resolutions lower than the native (maximum) resolution? If that occurs in the How to adjust the screen refresh rate section It is bent or broken off, please contact your dealer to get necessary support. Check the power supply mains socket, the ... image is bent or broken off, please contact your dealer to get necessary support. Pixel errors can be seen: One of several pixels is permanently black, one or more pixels are permanently white, one of the supported mode. Press W or X key to select "Color Recall" and select "Yes" in ...
... adjustments based on the display not illuminated at resolutions lower than the native (maximum) resolution? If that occurs in the How to adjust the screen refresh rate section It is bent or broken off, please contact your dealer to get necessary support. Check the power supply mains socket, the ... image is bent or broken off, please contact your dealer to get necessary support. Pixel errors can be seen: One of several pixels is permanently black, one or more pixels are permanently white, one of the supported mode. Press W or X key to select "Color Recall" and select "Yes" in ...

User Manual
Page 32
Need More Help? The image is distorted, flashes or flickers: Read the How to adjust the screen resolution section and then select the correct resolution, refresh rate and make adjustments based on these instructions. If your problems remain after checking this manual, please contact your place of purchase or e-mail us at: Support@BenQ.com Troubleshooting 32 The image is displaced in one direction: Read the How to adjust the screen resolution section and then select the correct resolution, refresh rate and make adjustments based on these instructions.
Need More Help? The image is distorted, flashes or flickers: Read the How to adjust the screen resolution section and then select the correct resolution, refresh rate and make adjustments based on these instructions. If your problems remain after checking this manual, please contact your place of purchase or e-mail us at: Support@BenQ.com Troubleshooting 32 The image is displaced in one direction: Read the How to adjust the screen resolution section and then select the correct resolution, refresh rate and make adjustments based on these instructions.
User Manual
Page 33
... recommended you choose a mode listed in the table may occur as a result of signal frequency differences from the "Geometry" menu. • If you use your screen.
... recommended you choose a mode listed in the table may occur as a result of signal frequency differences from the "Geometry" menu. • If you use your screen.


