User Manual
Page 8
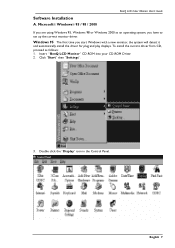
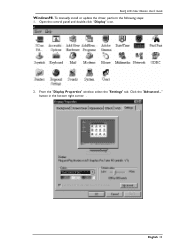
... proceed as an operating system, you start Windows with a new monitor, the system will detect it and automatically install the driver for plug and play displays. English 7 Click "Start" then "Settings". 3. Insert "BenQ LCD Monitor" CD-ROM into your CD-ROM Driver. 2. Microsoft® Windows...® 95 / 98 / 2000 BenQ LCD Color Monitor User's Guide If you are using Windows 95, Windows...
... proceed as an operating system, you start Windows with a new monitor, the system will detect it and automatically install the driver for plug and play displays. English 7 Click "Start" then "Settings". 3. Insert "BenQ LCD Monitor" CD-ROM into your CD-ROM Driver. 2. Microsoft® Windows...® 95 / 98 / 2000 BenQ LCD Color Monitor User's Guide If you are using Windows 95, Windows...
User Manual
Page 9
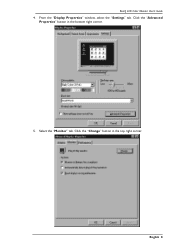
Click the "Advanced Properties" button in the top right corner. English 8 Select the "Monitor" tab. Click the "Change" button in the bottom right corner. 5. From the "Display Properties" window, select the "Settings" tab. BenQ LCD Color Monitor User's Guide 4.
Click the "Advanced Properties" button in the top right corner. English 8 Select the "Monitor" tab. Click the "Change" button in the bottom right corner. 5. From the "Display Properties" window, select the "Settings" tab. BenQ LCD Color Monitor User's Guide 4.
User Manual
Page 11
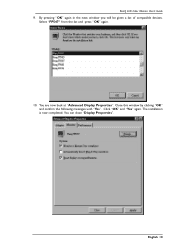
You are now back at "Advanced Display Properties". By pressing "OK" again in the next window you will be given a list of compatible devices. You can close "Display Properties". English 10 Select "FP547" from the list and press "OK" again. 10. The installation is now completed. Close this window by clicking "OK" and confirm the following messages with "Yes". BenQ LCD Color Monitor User's Guide 9. Click "OK" and "Yes" again.
You are now back at "Advanced Display Properties". By pressing "OK" again in the next window you will be given a list of compatible devices. You can close "Display Properties". English 10 Select "FP547" from the list and press "OK" again. 10. The installation is now completed. Close this window by clicking "OK" and confirm the following messages with "Yes". BenQ LCD Color Monitor User's Guide 9. Click "OK" and "Yes" again.
User Manual
Page 12
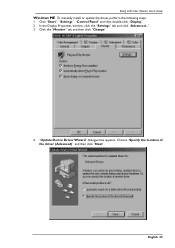
BenQ LCD Color Monitor User's Guide Windows98. Open the control panel and double-click "Display" icon. 2. button in the bottom right corner. . English 11 From the "Display Properties" window, select the "Settings" tab. To manually install or update the driver, perform the following steps: 1. Click the "Advanced..."
BenQ LCD Color Monitor User's Guide Windows98. Open the control panel and double-click "Display" icon. 2. button in the bottom right corner. . English 11 From the "Display Properties" window, select the "Settings" tab. To manually install or update the driver, perform the following steps: 1. Click the "Advanced..."

User Manual
Page 14
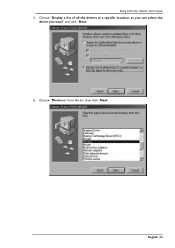
English 13 Another window appears, select the "Browse" button. Now click the "Have Disk" button in a specific location, so you can select the driver you want." BenQ LCD Color Monitor User's Guide 5. and press "Next". 6. Select "Display a list of all drivers in the bottom right corner.
English 13 Another window appears, select the "Browse" button. Now click the "Have Disk" button in a specific location, so you can select the driver you want." BenQ LCD Color Monitor User's Guide 5. and press "Next". 6. Select "Display a list of all drivers in the bottom right corner.

User Manual
Page 17
Open the Control Panel and double click on the "Display" icon. Click "Start" then "Settings". 3. English 16 BenQ LCD Color Monitor User's Guide Windows 2000 The first time you start Windows with a new monitor, the system will detect it and automatically start the "Add New Hardware Wizard". Insert "BenQ LCD Monitor" CD-ROM into your CD-ROM Driver. 2. Carry out the instructions beginning at step 4. 1.
Open the Control Panel and double click on the "Display" icon. Click "Start" then "Settings". 3. English 16 BenQ LCD Color Monitor User's Guide Windows 2000 The first time you start Windows with a new monitor, the system will detect it and automatically start the "Add New Hardware Wizard". Insert "BenQ LCD Monitor" CD-ROM into your CD-ROM Driver. 2. Carry out the instructions beginning at step 4. 1.

User Manual
Page 18
Click the "Advanced..." button in the bottom right corner. 5. English 17 BenQ LCD Color Monitor User's Guide 4. Select "Monitor" tab, then click "Properties". From the "Display Properties" window, select the "Settings" tab.
Click the "Advanced..." button in the bottom right corner. 5. English 17 BenQ LCD Color Monitor User's Guide 4. Select "Monitor" tab, then click "Properties". From the "Display Properties" window, select the "Settings" tab.

User Manual
Page 20
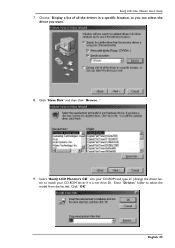
cific driver" then click "Next". 9. In the next window, click "Have Disk", then "Install From Disk" window will pop up, click "Browse", the "Located File" will pop up. BenQ LCD Color Monitor User's Guide 8. English 19 Select "Display a list of the known drivers for this device so that I can choose a spe-
cific driver" then click "Next". 9. In the next window, click "Have Disk", then "Install From Disk" window will pop up, click "Browse", the "Located File" will pop up. BenQ LCD Color Monitor User's Guide 8. English 19 Select "Display a list of the known drivers for this device so that I can choose a spe-
User Manual
Page 24
BenQ LCD Color Monitor User's Guide Windows ME To manually install or update the driver, perform the following steps: 1. Choose "Specify the location of the driver (Advanced)" and then click "Next". Click the "Monitor" tab and then click "Change". 4. Click "Start", "Settings", "Control Panel" and then double-click "Display." 2. "Update Device Driver Wizard" dialogue box appears. In the Display Properties window, click the "Settings" tab and click "Advanced...". 3. English 23
BenQ LCD Color Monitor User's Guide Windows ME To manually install or update the driver, perform the following steps: 1. Choose "Specify the location of the driver (Advanced)" and then click "Next". Click the "Monitor" tab and then click "Change". 4. Click "Start", "Settings", "Control Panel" and then double-click "Display." 2. "Update Device Driver Wizard" dialogue box appears. In the Display Properties window, click the "Settings" tab and click "Advanced...". 3. English 23
User Manual
Page 25
Choose "Monitors" from the list, then click "Next". English 24 BenQ LCD Color Monitor User's Guide 5. Choose "Display a list of all the drivers in a specific location, so you can select the driver you want" and click "Next". 6.
Choose "Monitors" from the list, then click "Next". English 24 BenQ LCD Color Monitor User's Guide 5. Choose "Display a list of all the drivers in a specific location, so you can select the driver you want" and click "Next". 6.
User Manual
Page 26
Choose "Display a list of all the drivers in a specific location, so you can select the driver you want.". 8. Enter "Drivers" folder to match your CD-ROM driver if it is not drive D). Insert "BenQ LCD Monitor's CD" into your CD-ROM and type d:\ (change the driver letter to select the model from the list left. Click "Have Disk" and then click "Browse...". 9. English 25 BenQ LCD Color Monitor User's Guide 7. Click "OK".
Choose "Display a list of all the drivers in a specific location, so you can select the driver you want.". 8. Enter "Drivers" folder to match your CD-ROM driver if it is not drive D). Insert "BenQ LCD Monitor's CD" into your CD-ROM and type d:\ (change the driver letter to select the model from the list left. Click "Have Disk" and then click "Browse...". 9. English 25 BenQ LCD Color Monitor User's Guide 7. Click "OK".
User Manual
Page 29
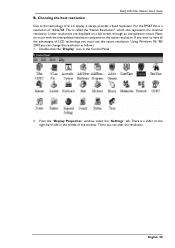
... is a resolution of the window. Double-click the "Display" icon in the middle of 1024x768. From the "Display Properties" window, select the "Settings" tab. Choosing the best resolution BenQ LCD Color Monitor User's Guide Due to the technology of LCD technology you can alter the resolution. For the FP547 this is a slider on a full screen through an...
... is a resolution of the window. Double-click the "Display" icon in the middle of 1024x768. From the "Display Properties" window, select the "Settings" tab. Choosing the best resolution BenQ LCD Color Monitor User's Guide Due to the technology of LCD technology you can alter the resolution. For the FP547 this is a slider on a full screen through an...

User Manual
Page 30
BenQ LCD Color Monitor User's Guide 4. In the subsequent windows, press "OK" and "Yes." 5. You can now close "Display Properties". Then click "Apply.". English 29 Select a resolution of 1024x768. 3.
BenQ LCD Color Monitor User's Guide 4. In the subsequent windows, press "OK" and "Yes." 5. You can now close "Display Properties". Then click "Apply.". English 29 Select a resolution of 1024x768. 3.
User Manual
Page 31
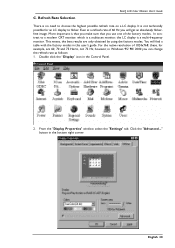
..." tab. Click the "Advanced..." For the native resolution of the factory modes. English 30 Double click the "Display" icon in the bottom right corner. It is a multi-frequency monitor. This means, the best results are 60, 70 and 75 Hertz, not 72 Hz; C. button in the...of 1024x768, these, for an LC display to a modern CRT monitor, which is a multiscan monitor, the LC display is not technically possible for example, are only obtained by using the factory modes. In contrast to flicker. Refresh Rate Selection BenQ LCD Color Monitor User's Guide There is that you make...
..." tab. Click the "Advanced..." For the native resolution of the factory modes. English 30 Double click the "Display" icon in the bottom right corner. It is a multi-frequency monitor. This means, the best results are 60, 70 and 75 Hertz, not 72 Hz; C. button in the...of 1024x768, these, for an LC display to a modern CRT monitor, which is a multiscan monitor, the LC display is not technically possible for example, are only obtained by using the factory modes. In contrast to flicker. Refresh Rate Selection BenQ LCD Color Monitor User's Guide There is that you make...

User Manual
Page 32
tom of the window. . 4. English 31 BenQ LCD Color Monitor User's Guide 3. The refresh rate selection field is located in the settings field. 5. In the subsequent windows press "Change", "OK" and "Yes". 6. Choose a refresh rate from the table with the factory modes, which can now close "Display Properties". You can be found in the user's guide, and select this in the center at the bot- Select the "Adapter" tab.
tom of the window. . 4. English 31 BenQ LCD Color Monitor User's Guide 3. The refresh rate selection field is located in the settings field. 5. In the subsequent windows press "Change", "OK" and "Yes". 6. Choose a refresh rate from the table with the factory modes, which can now close "Display Properties". You can be found in the user's guide, and select this in the center at the bot- Select the "Adapter" tab.
User Manual
Page 35
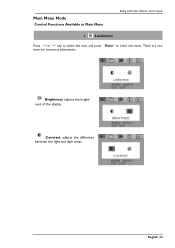
English 34 Contrast: adjusts the difference between the light and dark areas. Luminance Press "" key to select this item and press "Enter" to enter sub-menu. Main Menu Mode Control Functions Available in Main Menu BenQ LCD Color Monitor User's Guide 1. Brightness: adjusts the brightness of the display. There are two items for luminance adjustments.
English 34 Contrast: adjusts the difference between the light and dark areas. Luminance Press "" key to select this item and press "Enter" to enter sub-menu. Main Menu Mode Control Functions Available in Main Menu BenQ LCD Color Monitor User's Guide 1. Brightness: adjusts the brightness of the display. There are two items for luminance adjustments.
User Manual
Page 36
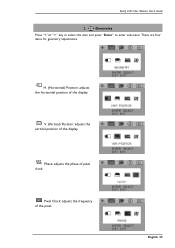
Geometry Press "" key to select this item and press "Enter" to enter sub-menu. Pixel Clock: adjusts the frequency of the display. H. (Horizontal) Position: adjusts the horizontal position of the pixel. English 35 BenQ LCD Color Monitor User's Guide 2. There are four items for geometry adjustments. Phase: adjusts the phase of the display. V. (Vertical) Position: adjusts the vertical position of pixel clock.
Geometry Press "" key to select this item and press "Enter" to enter sub-menu. Pixel Clock: adjusts the frequency of the display. H. (Horizontal) Position: adjusts the horizontal position of the pixel. English 35 BenQ LCD Color Monitor User's Guide 2. There are four items for geometry adjustments. Phase: adjusts the phase of the display. V. (Vertical) Position: adjusts the vertical position of pixel clock.
User Manual
Page 38
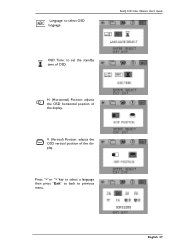
V. (Vertical) Position: adjusts the OSD vertical position of the display. Press ""key to select a language then press "Exit" to back to select OSD language. English 37 Language: to previous menu. H. (Horizontal) Position: adjusts the OSD horizontal position of the display. BenQ LCD Color Monitor User's Guide OSD Time: to set the standby time of OSD.
V. (Vertical) Position: adjusts the OSD vertical position of the display. Press ""key to select a language then press "Exit" to back to select OSD language. English 37 Language: to previous menu. H. (Horizontal) Position: adjusts the OSD horizontal position of the display. BenQ LCD Color Monitor User's Guide OSD Time: to set the standby time of OSD.

User Manual
Page 39
Press "Enter" to recall to factory setings. BenQ LCD Color Monitor User's Guide 5. English 38 Information "Information" sub menu the OSD display the resolution, horizontal and vertical refresh rate.
Press "Enter" to recall to factory setings. BenQ LCD Color Monitor User's Guide 5. English 38 Information "Information" sub menu the OSD display the resolution, horizontal and vertical refresh rate.
User Manual
Page 40
... Do you use the ""keys to conduction losses in extension cables. Troubleshooting Frequently Asked Questions (FAQ) ✓ The image is blurred: BenQ LCD Color Monitor User's Guide ☞ Read the chapter, "Installation/Adjustment" and select the correct resolution, refresh rate and make adjustments based on the ... broken off , then contact your dealer or read the chapter, Additional Help, Repairs & Service. ☞ Is the prompt on the display illuminated in the signal input. Check the power supply mains socket, the external power supply and the mains switch. You can be seen:...
... Do you use the ""keys to conduction losses in extension cables. Troubleshooting Frequently Asked Questions (FAQ) ✓ The image is blurred: BenQ LCD Color Monitor User's Guide ☞ Read the chapter, "Installation/Adjustment" and select the correct resolution, refresh rate and make adjustments based on the ... broken off , then contact your dealer or read the chapter, Additional Help, Repairs & Service. ☞ Is the prompt on the display illuminated in the signal input. Check the power supply mains socket, the external power supply and the mains switch. You can be seen:...
