

User Manual
Page 3
... sockets 8 How to assemble your monitor hardware 9 Adjusting the monitor angle 11 Detaching the top-mount monitor shelf 12 Using the monitor wall mounting kit 12 Getting the most from your BenQ monitor 14 How to install the monitor on a new computer 16 How to upgrade the monitor on an existing computer 17 How ... install on Windows XP system 19 How to adjust the screen resolution 20 How to adjust the screen refresh rate 21 Picture optimization ...22 How to adjust your monitor 23 The control panel ...23 On Screen Display (OSD) menu structure 24 Hot key mode ...26 Main menu mode ...30...
... sockets 8 How to assemble your monitor hardware 9 Adjusting the monitor angle 11 Detaching the top-mount monitor shelf 12 Using the monitor wall mounting kit 12 Getting the most from your BenQ monitor 14 How to install the monitor on a new computer 16 How to upgrade the monitor on an existing computer 17 How ... install on Windows XP system 19 How to adjust the screen resolution 20 How to adjust the screen refresh rate 21 Picture optimization ...22 How to adjust your monitor 23 The control panel ...23 On Screen Display (OSD) menu structure 24 Hot key mode ...26 Main menu mode ...30...

User Manual
Page 11
Turn on page 14 to the nearby electric outlet. Turn on the computer too, and follow the instructions in Section 4: Getting the most from product supplied for your region. Adjusting the monitor angle For comfortable viewing of power cable to install the monitor software. 6. Turn on the screen, you may differ from your monitor hardware 11 Connect the other end of images on the monitor by pressing the power key. Picture may tilt the monitor upward to 12 degrees and downward to assemble your BenQ monitor on the power. How to -5 degrees.
Turn on page 14 to the nearby electric outlet. Turn on the computer too, and follow the instructions in Section 4: Getting the most from product supplied for your region. Adjusting the monitor angle For comfortable viewing of power cable to install the monitor software. 6. Turn on the screen, you may differ from your monitor hardware 11 Connect the other end of images on the monitor by pressing the power key. Picture may tilt the monitor upward to 12 degrees and downward to assemble your BenQ monitor on the power. How to -5 degrees.
User Manual
Page 20
... You can occur with a resolution of the monitor. 1. To take full advantage of 1920 x 1200 then click Apply. Select the recommended resolution of LCD technology you may not accurately display the screen... image as well as described below. The best possible picture for your FP241VW is achieved with the interpolated ...menu. 2. Use the slider in the 'Screen area' section to adjust the screen resolution If you select some other resolution is , the clearest picture. Close the Display...
... You can occur with a resolution of the monitor. 1. To take full advantage of 1920 x 1200 then click Apply. Select the recommended resolution of LCD technology you may not accurately display the screen... image as well as described below. The best possible picture for your FP241VW is achieved with the interpolated ...menu. 2. Use the slider in the 'Screen area' section to adjust the screen resolution If you select some other resolution is , the clearest picture. Close the Display...

User Manual
Page 21
Close the Display Properties window. How to adjust the screen refresh rate You don't have to choose the highest possible refresh rate on page 45 You can choose 60, 70 and 75 Hertz, (but not 72Hz) for an LCD display to flicker. Double click the Display icon in your computer. Click Change...2. Select the Adapter tab, and select an appropriate refresh rate to adjust the screen refresh rate 21 How to match one of the applicable factory modes as listed in the specification section of this User Manual: Supported PC Timings on an LCD display, because it is a table with the factory modes in...
Close the Display Properties window. How to adjust the screen refresh rate You don't have to choose the highest possible refresh rate on page 45 You can choose 60, 70 and 75 Hertz, (but not 72Hz) for an LCD display to flicker. Double click the Display icon in your computer. Click Change...2. Select the Adapter tab, and select an appropriate refresh rate to adjust the screen refresh rate 21 How to match one of the applicable factory modes as listed in the specification section of this User Manual: Supported PC Timings on an LCD display, because it is a table with the factory modes in...

User Manual
Page 22
... (like a curtain effect-shimmering of your computer is to the native resolution of the monitor (1920 x 1200) when you connect a digital video output using geometry menu items. To assist you in this endeavour, BenQ has provided a screen test image utility which you notice a horizontal noise, press the ...is set to use to select Phase and press the ENTER key. However, we recommend that the connected graphic card on the monitor. 3. If you can always adjust the screen geometric settings manually using a digital (DVI) cable to enter the menu. 5. Press the i key on your ...
... (like a curtain effect-shimmering of your computer is to the native resolution of the monitor (1920 x 1200) when you connect a digital video output using geometry menu items. To assist you in this endeavour, BenQ has provided a screen test image utility which you notice a horizontal noise, press the ...is set to use to select Phase and press the ENTER key. However, we recommend that the connected graphic card on the monitor. 3. If you can always adjust the screen geometric settings manually using a digital (DVI) cable to enter the menu. 5. Press the i key on your ...

User Manual
Page 23
.... The key is also the hot key for the PIP window. 3. "MENU/EXIT" key: Activate OSD main menu and return to adjust your monitor The control panel 1. OSD = On Screen Display. "Power": Turn the power on page 26. The key is also the hot key... horizontal position and pixel clock automatically. See Hot key mode on or off. 2. u (Down) key: For Down/Decrease adjustment. 8. How to your monitor for Contrast. 5. t (Up) key: For Up/Increase adjustment. "Game Mode" key: Switch between different modes, including Standard, Movie, Dynamics, Photo, Action Game, and Racing Game....
.... The key is also the hot key for the PIP window. 3. "MENU/EXIT" key: Activate OSD main menu and return to adjust your monitor The control panel 1. OSD = On Screen Display. "Power": Turn the power on page 26. The key is also the hot key... horizontal position and pixel clock automatically. See Hot key mode on or off. 2. u (Down) key: For Down/Decrease adjustment. 8. How to your monitor for Contrast. 5. t (Up) key: For Up/Increase adjustment. "Game Mode" key: Switch between different modes, including Standard, Movie, Dynamics, Photo, Action Game, and Racing Game....

User Manual
Page 24
... NO Hue and Saturation are not available for use when the input source is set to be the input signal for the main window. 24 How to the monitor and HDMI is D-Sub or DVI-D. Position Contrast Sharpness Standard Movie Dynamics Photo Action Game Racing Game ON OFF D-sub/Composite DVI/S-Video... HDMI Component OFF Small Medium Large AUDIO Volume Mute ON OFF The Audio menu is only available when the HDMI cable is connected to adjust your monitor On Screen Display (OSD) menu structure DISPLAY Auto...
... NO Hue and Saturation are not available for use when the input source is set to be the input signal for the main window. 24 How to the monitor and HDMI is D-Sub or DVI-D. Position Contrast Sharpness Standard Movie Dynamics Photo Action Game Racing Game ON OFF D-sub/Composite DVI/S-Video... HDMI Component OFF Small Medium Large AUDIO Volume Mute ON OFF The Audio menu is only available when the HDMI cable is connected to adjust your monitor On Screen Display (OSD) menu structure DISPLAY Auto...

User Manual
Page 26
...the messages of the desired input source displays, release the key to set -top boxes, DVD players, and DVD recorders, etc. 26 How to adjust your monitor Thus you to perform PIP. *HDMI, short for the highest image quality. The setting will last around 3 seconds. Being different from 1 computer ... function will not allow for 2 computer graphic/PC video sources or 2 video sources to switch between audio/video sources and audio and/or video monitors. Pressing this key continually allows you can bring up a window from a second image source. Further press the t key to increase or the ...
...the messages of the desired input source displays, release the key to set -top boxes, DVD players, and DVD recorders, etc. 26 How to adjust your monitor Thus you to perform PIP. *HDMI, short for the highest image quality. The setting will last around 3 seconds. Being different from 1 computer ... function will not allow for 2 computer graphic/PC video sources or 2 video sources to switch between audio/video sources and audio and/or video monitors. Pressing this key continually allows you can bring up a window from a second image source. Further press the t key to increase or the ...

User Manual
Page 27
... through the following messages indicating the video input sources for the PIP window. PIP off and Exit Mode hot key Press the key continually to adjust your monitor 27 PIP off and Exit • If the input source of the main window is from the computer graphic/PC video signals (D-sub, DVI...
... through the following messages indicating the video input sources for the PIP window. PIP off and Exit Mode hot key Press the key continually to adjust your monitor 27 PIP off and Exit • If the input source of the main window is from the computer graphic/PC video signals (D-sub, DVI...

User Manual
Page 28
...: The Computer Graphic/PC Video input sources include D-sub, DVI, HDMI, and Component, while the Video input sources include Composite and S-video. 28 How to adjust your monitor The setting will take effect immediately. • When the PIP function is activated.
...: The Computer Graphic/PC Video input sources include D-sub, DVI, HDMI, and Component, while the Video input sources include Composite and S-video. 28 How to adjust your monitor The setting will take effect immediately. • When the PIP function is activated.

User Manual
Page 29
... Enter to exit. Keeping pressing the key will swap the current main window's signal source with the current PIP window's signal source. How to adjust your monitor 29 See also PerfectMotion on page 26. • When the PIP function is ON, select between various input sources of PerfectMotion to the desired value...
... Enter to exit. Keeping pressing the key will swap the current main window's signal source with the current PIP window's signal source. How to adjust your monitor 29 See also PerfectMotion on page 26. • When the PIP function is ON, select between various input sources of PerfectMotion to the desired value...

User Manual
Page 30
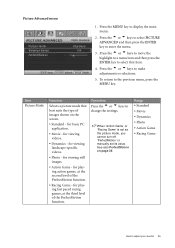
... The Audio menu is only available when the HDMI cable is connected to the monitor and HDMI is set to adjust all the settings on page 41" under "OSD Settings" for the main window. 30 How to adjust your monitor. Display 2. Picture Advanced 4. System Use the t (Up) or u (Down) keys to highlight a menu item... signal for more information on each menu, please refer to the following main OSD menu. 1 2 3 4 5 6 There are 14 different menu languages, see "Language on your monitor For more details.
... The Audio menu is only available when the HDMI cable is connected to the monitor and HDMI is set to adjust all the settings on page 41" under "OSD Settings" for the main window. 30 How to adjust your monitor. Display 2. Picture Advanced 4. System Use the t (Up) or u (Down) keys to highlight a menu item... signal for more information on each menu, please refer to the following main OSD menu. 1 2 3 4 5 6 There are 14 different menu languages, see "Language on your monitor For more details.

User Manual
Page 31
... The current picture mode is a 'hot-key' for you connect a digital video output using a digital (DVI) cable to adjust your monitor, the i key and the Auto Adjustment function will be disabled. See Picture Mode on page 35 to select that item. 4. Operation Press the ENTER key to enter ...learn more information. Press the MENU key to the previous menu, press the MENU key. Item Auto Adjustment Function Optimizes and adjusts the screen settings automatically for this option and make adjustments or selections. 5. The i key is displayed in the top right corner of the main menu. ...
... The current picture mode is a 'hot-key' for you connect a digital video output using a digital (DVI) cable to adjust your monitor, the i key and the Auto Adjustment function will be disabled. See Picture Mode on page 35 to select that item. 4. Operation Press the ENTER key to enter ...learn more information. Press the MENU key to the previous menu, press the MENU key. Item Auto Adjustment Function Optimizes and adjusts the screen settings automatically for this option and make adjustments or selections. 5. The i key is displayed in the top right corner of the main menu. ...

User Manual
Page 32
... position of the screen image. Not applicable to a digital input signal. H. Position Pixel Clock Phase Adjusts the horizontal position of the screen image. Adjusts the pixel clock frequency timing to adjust your monitor Position V. Press the t or u keys to adjust the value. 0 to 100 0 to 100 0 to 100 0 to 63 See also: Picture optimization on...
... position of the screen image. Not applicable to a digital input signal. H. Position Pixel Clock Phase Adjusts the horizontal position of the screen image. Adjusts the pixel clock frequency timing to adjust your monitor Position V. Press the t or u keys to adjust the value. 0 to 100 0 to 100 0 to 100 0 to 63 See also: Picture optimization on...

User Manual
Page 33
...select this option. Operation Press the t key to increase the brightness and press the u key to display the main menu. 2. Press ENTER to adjust your monitor 33 This is factory pre-set to select that item. 4. contrast. Range 0 to 100 0 to 100 1 to 5 How to enter the ...Color menu. Reddish Applies a warm tint to the image and is the factory default color. Item Brightness Function Adjusts the balance between darkness and lightness. ...
...select this option. Operation Press the t key to increase the brightness and press the u key to display the main menu. 2. Press ENTER to adjust your monitor 33 This is factory pre-set to select that item. 4. contrast. Range 0 to 100 0 to 100 1 to 5 How to enter the ...Color menu. Reddish Applies a warm tint to the image and is the factory default color. Item Brightness Function Adjusts the balance between darkness and lightness. ...

User Manual
Page 34
...on a yellowish tint. Then use when the input source is D-Sub or DVI-D. 34 How to adjust your monitor Press Menu to change the color tint of the image. Press the t or u keys to move... the highlight to a menu item and then press the t or u keys to adjust the value. • 0 to 100... (0 to 100) • Blue (0 to 100) • YES • NO • 0 to make the color adjustments. Press the t or u keys to leave the menu. if you reduce Green, the image will gradually take on the color...
...on a yellowish tint. Then use when the input source is D-Sub or DVI-D. 34 How to adjust your monitor Press Menu to change the color tint of the image. Press the t or u keys to move... the highlight to a menu item and then press the t or u keys to adjust the value. • 0 to 100... (0 to 100) • Blue (0 to 100) • YES • NO • 0 to make the color adjustments. Press the t or u keys to leave the menu. if you reduce Green, the image will gradually take on the color...
User Manual
Page 35
Press the t or u keys to the previous menu, press the MENU key. To return to make adjustments or selections. 5. for playing action games, at the third level of the PerfectMotion function. for viewing videos. • Dynamics - When 'Action Game' or 'Racing...ENTER key to display the main menu. 2. Range • Standard • Movie • Dynamics • Photo • Action Game • Racing Game How to adjust your monitor 35 Picture Advanced menu 1. Item Picture Mode Function Selects a picture mode that item. 4. for viewing still images. • Action Game -
Press the t or u keys to the previous menu, press the MENU key. To return to make adjustments or selections. 5. for playing action games, at the third level of the PerfectMotion function. for viewing videos. • Dynamics - When 'Action Game' or 'Racing...ENTER key to display the main menu. 2. Range • Standard • Movie • Dynamics • Photo • Action Game • Racing Game How to adjust your monitor 35 Picture Advanced menu 1. Item Picture Mode Function Selects a picture mode that item. 4. for viewing still images. • Action Game -
User Manual
Page 36
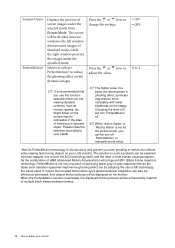
... 'Action Game' or 'Racing Game' is set its value. *BenQ's PerfectMotion technology is introduced to 3 It is from ghosting or motion blur effects while viewing fast moving objects on your LCD monitor. Press the t or u keys to adjust the value. • ON • OFF 0 to well prevent...recommended that you use of BFI technology, the visual effect of motion blur resulted from Picture Mode. Please make the selection according to adjust your needs. The solution to change the settings. As the combination of AMA (Advanced Motion Acceleration) technology and BFI (Black Frame...
... 'Action Game' or 'Racing Game' is set its value. *BenQ's PerfectMotion technology is introduced to 3 It is from ghosting or motion blur effects while viewing fast moving objects on your LCD monitor. Press the t or u keys to adjust the value. • ON • OFF 0 to well prevent...recommended that you use of BFI technology, the visual effect of motion blur resulted from Picture Mode. Please make the selection according to adjust your needs. The solution to change the settings. As the combination of AMA (Advanced Motion Acceleration) technology and BFI (Black Frame...

User Manual
Page 37
... window. This command can watch images from a second image source. Press the t or u keys to perform PIP. See also PIP hot key on page 26 Adjusts the size of the PIP window. Press the MENU key to enter the menu. 3. Press the t or u keys to select PIP and then press the.... 2. Press the t or u keys to move the highlight to a menu item and then press the ENTER key to your monitor 37 Item Input Size H. Adjusts the horizontal position of the PIP window. Adjusts the vertical position of the PIP window. Thus you can bring up a window from 1 computer graphic/PC video source (D-sub...
... window. This command can watch images from a second image source. Press the t or u keys to perform PIP. See also PIP hot key on page 26 Adjusts the size of the PIP window. Press the MENU key to enter the menu. 3. Press the t or u keys to select PIP and then press the.... 2. Press the t or u keys to move the highlight to a menu item and then press the ENTER key to your monitor 37 Item Input Size H. Adjusts the horizontal position of the PIP window. Adjusts the vertical position of the PIP window. Thus you can bring up a window from 1 computer graphic/PC video source (D-sub...

User Manual
Page 38
Press the t key to increase the contrast and press the u key to decrease the contrast. 0 to 100 Press the t key to improve the crispness of the subjects in the images displayed in the PIP window. Adjusts the clarity and visibility of the edges of the display and press the u key to have softness effect on the display. 1 to 5 38 How to adjust your monitor Contrast Sharpness Adjusts the degree of difference between darkness and lightness of the images in the PIP window.
Press the t key to increase the contrast and press the u key to decrease the contrast. 0 to 100 Press the t key to improve the crispness of the subjects in the images displayed in the PIP window. Adjusts the clarity and visibility of the edges of the display and press the u key to have softness effect on the display. 1 to 5 38 How to adjust your monitor Contrast Sharpness Adjusts the degree of difference between darkness and lightness of the images in the PIP window.