User Manual
Page 7
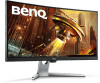
... use in the future when you may subject to transport the monitor. Video Cable: HDMI USB Cable: USB-C™ Audio Cable (Optional accessory) Back Cover VESA Wall Mount Transfer Kit (Optional accessory) • Available accessories and the pictures shown here may differ from the actual contents and the product supplied for...
... use in the future when you may subject to transport the monitor. Video Cable: HDMI USB Cable: USB-C™ Audio Cable (Optional accessory) Back Cover VESA Wall Mount Transfer Kit (Optional accessory) • Available accessories and the pictures shown here may differ from the actual contents and the product supplied for...
User Manual
Page 17
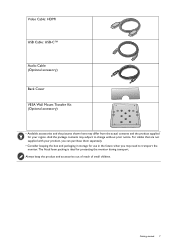
... off the monitor and the power before disconnecting the cables from the monitor. Using the monitor wall mount set (purchased separately) 17 A VESA standard mount bracket with flat surface. • Ensure that the wall material and the standard wall mount set (purchased separately) are stable enough... to remove it from the LCD monitor. 1. Should you need the VESA wall mount transfer kit, please contact BenQ service. Precautions • Install your monitor has screw holes to install the monitor wall mount set, please read the ...
... off the monitor and the power before disconnecting the cables from the monitor. Using the monitor wall mount set (purchased separately) 17 A VESA standard mount bracket with flat surface. • Ensure that the wall material and the standard wall mount set (purchased separately) are stable enough... to remove it from the LCD monitor. 1. Should you need the VESA wall mount transfer kit, please contact BenQ service. Precautions • Install your monitor has screw holes to install the monitor wall mount set, please read the ...

User Manual
Page 18
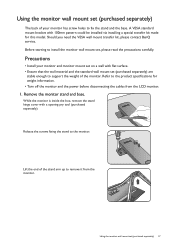
Use a magnetic tip screwdriver to fix the VESA wall mount transfer kit to complete the installation. Follow the instruction manuals of the wall mount bracket you purchased to the monitor with 6 screws from step 1. 3. Use four M4 x 10 mm screws to fix a VESA standard wall mount bracket to the monitor. Consult a professional technician or BenQ service for wall mount installation and safety precautions. 18 Using the monitor wall mount set (purchased separately) Install the VESA wall mount transfer kit as illustrated. Make sure that all screws are tightened and secured properly. 2.
Use a magnetic tip screwdriver to fix the VESA wall mount transfer kit to complete the installation. Follow the instruction manuals of the wall mount bracket you purchased to the monitor with 6 screws from step 1. 3. Use four M4 x 10 mm screws to fix a VESA standard wall mount bracket to the monitor. Consult a professional technician or BenQ service for wall mount installation and safety precautions. 18 Using the monitor wall mount set (purchased separately) Install the VESA wall mount transfer kit as illustrated. Make sure that all screws are tightened and secured properly. 2.
User Manual
Page 41
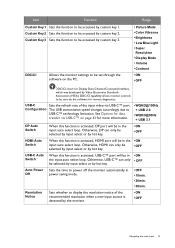
... selected by input select or by hot key. • ON • OFF HDMI Auto Switch When this function is detected by Video Electronics Standards Association (VESA). Custom Key 3 Sets the function to display the resolution notice of the input video via USB-C™ on the PC. Resolution Notice Sets whether to...
... selected by input select or by hot key. • ON • OFF HDMI Auto Switch When this function is detected by Video Electronics Standards Association (VESA). Custom Key 3 Sets the function to display the resolution notice of the input video via USB-C™ on the PC. Resolution Notice Sets whether to...
