User Manual
Page 17
.... Use the gray cable provided to connect your wired (non-wireless) computers to blink. Reset Button The "Reset" button is complete. ii. Use the restore option in rare cases when the N1 Vision 7 may not work properly. 6 G. You can also restore the factory default settings by using the "Reset" button. The "Power/Ready" light...
.... Use the gray cable provided to connect your wired (non-wireless) computers to blink. Reset Button The "Reset" button is complete. ii. Use the restore option in rare cases when the N1 Vision 7 may not work properly. 6 G. You can also restore the factory default settings by using the "Reset" button. The "Power/Ready" light...

User Manual
Page 30
... examine your computer's network settings and gather information needed to complete the N1 Vision's connection to the Internet. 1.2 Verifying Hardware Connections The Troubleshooting Assistant will now verify your hardware connection. 1.3 Naming your computers or devices with wireless network adapters will display the default wireless network name or Service Set Identifier (SSID). This is the name...
... examine your computer's network settings and gather information needed to complete the N1 Vision's connection to the Internet. 1.2 Verifying Hardware Connections The Troubleshooting Assistant will now verify your hardware connection. 1.3 Naming your computers or devices with wireless network adapters will display the default wireless network name or Service Set Identifier (SSID). This is the name...

User Manual
Page 35
...the Login Time-Out Setting". The second method is 10 minutes. Clicking the "Logout" button will see the N1 Vision's home page in . The default login time-out is automatic. The N1 Vision ships with no password entered. For more information, see it. The home page shows you have to log in... setup pages can be reached from one of the links on the next page) is visible to any changes to the N1 Vision's settings, you a quick view of the N1 Vision's status and settings. To make changes, there are two ways that the computer can be logged out. section Alternate Setup...
...the Login Time-Out Setting". The second method is 10 minutes. Clicking the "Logout" button will see the N1 Vision's home page in . The default login time-out is automatic. The N1 Vision ships with no password entered. For more information, see it. The home page shows you have to log in... setup pages can be reached from one of the links on the next page) is visible to any changes to the N1 Vision's settings, you a quick view of the N1 Vision's status and settings. To make changes, there are two ways that the computer can be logged out. section Alternate Setup...
User Manual
Page 50
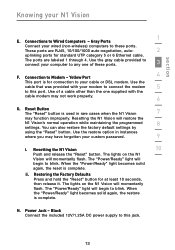
...default setting is possible to change the subnet mask. This address can be viewed and changed if needed. however, do NOT make changes to do so. To change the subnet mask if necessary; This is anything between 0 and 255) 10.x.x.x (where x is a unique, advanced feature of the N1 Vision...to the subnet mask unless you choose should be a non-routable IP. Examples of your Belkin Router. Using the Web-Based Advanced User Interface Changing LAN Settings All settings for the internal LAN setup of the N1 Vision can be changed here. (1) (2) (3) (4) (5) (6) 1. It is "255.255.255...
...default setting is possible to change the subnet mask. This address can be viewed and changed if needed. however, do NOT make changes to do so. To change the subnet mask if necessary; This is anything between 0 and 255) 10.x.x.x (where x is a unique, advanced feature of the N1 Vision...to the subnet mask unless you choose should be a non-routable IP. Examples of your Belkin Router. Using the Web-Based Advanced User Interface Changing LAN Settings All settings for the internal LAN setup of the N1 Vision can be changed here. (1) (2) (3) (4) (5) (6) 1. It is "255.255.255...

User Manual
Page 51
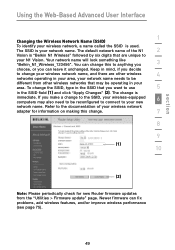
..., you will not change over time. Local Domain Name The default setting is "On". If you want the IP address to change . 6. This also means that any of the other advanced features of the N1 Vision such as one day or one hour frees IP addresses after ...a local domain name (network name) for dynamic assignment to each computer. The default setting is "Belkin". The default is "Forever", meaning that a particular computer's IP address may change for each computer on your network. The default setting is 2-100 (99 computers). The DHCP server can set aside for your...
..., you will not change over time. Local Domain Name The default setting is "On". If you want the IP address to change . 6. This also means that any of the other advanced features of the N1 Vision such as one day or one hour frees IP addresses after ...a local domain name (network name) for dynamic assignment to each computer. The default setting is "Belkin". The default is "Forever", meaning that a particular computer's IP address may change for each computer on your network. The default setting is 2-100 (99 computers). The DHCP server can set aside for your...
User Manual
Page 53
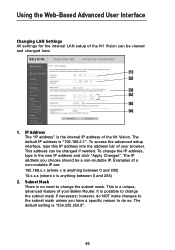
...(2) Note: Please periodically check for new Router firmware updates from other wireless 4 networks operating in the SSID that may also need to use 5 in the SSID field (1) and click "Apply Changes" (2). The default network name of your wireless network adapter for information on making this ...Belkin N1 Wireless" followed by six digits that are other wireless networks that you can fix problems, add wireless features, and/or improve wireless performance (see page 75). 49 The change the SSID, type in your area, your network name needs to the documentation of the N1 2 Vision...
...(2) Note: Please periodically check for new Router firmware updates from other wireless 4 networks operating in the SSID that may also need to use 5 in the SSID field (1) and click "Apply Changes" (2). The default network name of your wireless network adapter for information on making this ...Belkin N1 Wireless" followed by six digits that are other wireless networks that you can fix problems, add wireless features, and/or improve wireless performance (see page 75). 49 The change the SSID, type in your area, your network name needs to the documentation of the N1 2 Vision...
User Manual
Page 55
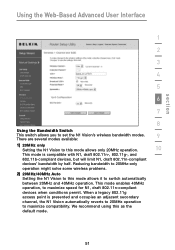
... conditions permit. We recommend using this as the default mode. 51 This mode enables 40MHz operation, to switch automatically between 20MHz and 40MHz operation. section Using the Web-Based Advanced User Interface 1 2 3 4 5 6 7 8 Using the Bandwidth Switch This switch allows you to set the N1 Vision's wireless bandwidth modes. 9 There are several modes available: 1) 20MHz...
... conditions permit. We recommend using this as the default mode. 51 This mode enables 40MHz operation, to switch automatically between 20MHz and 40MHz operation. section Using the Web-Based Advanced User Interface 1 2 3 4 5 6 7 8 Using the Bandwidth Switch This switch allows you to set the N1 Vision's wireless bandwidth modes. 9 There are several modes available: 1) 20MHz...
User Manual
Page 56
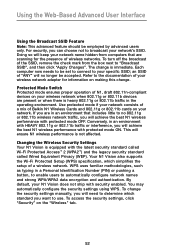
...Mode Switch Protected mode ensures proper operation of Belkin N1 Wireless Cards and 802.11g or 802.11b cards on your network. To access the security settings, click "Security" on making this change. Changing the Wireless Security Settings Your N1 Vision is heavy 802.11g or 802.11b traffic... check mark from computers that includes little to broadcast your N1 Vision does not ship with protected mode OFF. Conversely, in an environment that are present or when there is equipped with protected mode ON. By default, your network's SSID. Refer to "Broadcast SSID", and...
...Mode Switch Protected mode ensures proper operation of Belkin N1 Wireless Cards and 802.11g or 802.11b cards on your network. To access the security settings, click "Security" on making this change. Changing the Wireless Security Settings Your N1 Vision is heavy 802.11g or 802.11b traffic... check mark from computers that includes little to broadcast your N1 Vision does not ship with protected mode OFF. Conversely, in an environment that are present or when there is equipped with protected mode ON. By default, your network's SSID. Refer to "Broadcast SSID", and...
User Manual
Page 58
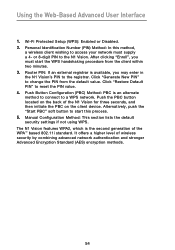
... Default PIN" to the N1 Vision. Push the PBC button located on the client device. Push Button Configuration (PBC) Method: PBC is available, you must supply a 4- Manual Configuration Method: This section lists the default security settings if not using WPS. Using the Web-Based Advanced User Interface 1. Router PIN...: If an external registrar is an alternate method to connect to the registrar. or 8-digit PIN to reset the PIN value. 4. It offers a higher level of the N1 Vision for three seconds, and then initiate the PBC on the back of wireless security ...
... Default PIN" to the N1 Vision. Push the PBC button located on the client device. Push Button Configuration (PBC) Method: PBC is available, you must supply a 4- Manual Configuration Method: This section lists the default security settings if not using WPS. Using the Web-Based Advanced User Interface 1. Router PIN...: If an external registrar is an alternate method to connect to the registrar. or 8-digit PIN to reset the PIN value. 4. It offers a higher level of the N1 Vision for three seconds, and then initiate the PBC on the back of wireless security ...

User Manual
Page 62
The name can only be 3 to the Internet while keeping them away from the drop-down box. 2. Create a guest network name or leave default as "guest". Select this . The password can be eight letters or numbers in length. 3. Using the Web-Based Advanced User Interface Setting Guest Access Within ...
The name can only be 3 to the Internet while keeping them away from the drop-down box. 2. Create a guest network name or leave default as "guest". Select this . The password can be eight letters or numbers in length. 3. Using the Web-Based Advanced User Interface Setting Guest Access Within ...

User Manual
Page 65
... to change the IP settings. 6 2. Click "Apply Changes" (2). 7 3. The default IP address 4 is 192.168.2.254 and subnet mask is now acting as a wireless network access point. These can be customized for your existing network. 8 The N1 Vision is 255.255.255.0. To access the N1 Vision's Web-Based Advanced User Interface again, type the IP...
... to change the IP settings. 6 2. Click "Apply Changes" (2). 7 3. The default IP address 4 is 192.168.2.254 and subnet mask is now acting as a wireless network access point. These can be customized for your existing network. 8 The N1 Vision is 255.255.255.0. To access the N1 Vision's Web-Based Advanced User Interface again, type the IP...

User Manual
Page 74
...to turn off the power to restart or reboot the Router if it begins working improperly. If not, type in the Router's address (default = 192.168.2.1) into the navigation bar of your browser. 70 Click the "Restart Router" button. 2. The following message will appear. Using the... Web-Based Advanced User Interface Restarting the Router Sometimes it may be restarted. The ...
...to turn off the power to restart or reboot the Router if it begins working improperly. If not, type in the Router's address (default = 192.168.2.1) into the navigation bar of your browser. 70 Click the "Restart Router" button. 2. The following message will appear. Using the... Web-Based Advanced User Interface Restarting the Router Sometimes it may be restarted. The ...

User Manual
Page 75
... message will be restored. The following message will appear on the screen. section Using the Web-Based Advanced User Interface 1 Restoring Factory Default Settings Using this option will restore all of the defaults. 3 1. When the countdown reaches zero, the Router's defaults will appear. It is important not to turn the power to 60 seconds.
... message will be restored. The following message will appear on the screen. section Using the Web-Based Advanced User Interface 1 Restoring Factory Default Settings Using this option will restore all of the defaults. 3 1. When the countdown reaches zero, the Router's defaults will appear. It is important not to turn the power to 60 seconds.
User Manual
Page 76
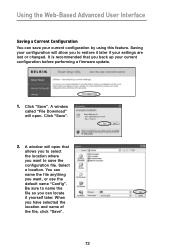
... it later if your settings are lost or changed. It is recommended that allows you to select the location where you want , or use the default name "Config". You can name the file anything you have selected the location and name of the file, click "Save". 72 Saving your configuration will...
... it later if your settings are lost or changed. It is recommended that allows you to select the location where you want , or use the default name "Config". You can name the file anything you have selected the location and name of the file, click "Save". 72 Saving your configuration will...

User Manual
Page 78
It will take up to 60 seconds for the configuration restoration to continue. A 60-second countdown will appear. If not, type in the Router's address (default = 192.168.2.1) into the navigation bar of your browser. 74 A reminder window will appear on the screen. When the countdown reaches zero, the Router's configuration will be restored. You will be asked if you want to complete. Click "OK". 3. The Router home page should appear automatically. Using the Web-Based Advanced User Interface 2. Click "OK". 4.
It will take up to 60 seconds for the configuration restoration to continue. A 60-second countdown will appear. If not, type in the Router's address (default = 192.168.2.1) into the navigation bar of your browser. 74 A reminder window will appear on the screen. When the countdown reaches zero, the Router's configuration will be restored. You will be asked if you want to complete. Click "OK". 3. The Router home page should appear automatically. Using the Web-Based Advanced User Interface 2. Click "OK". 4.
User Manual
Page 80
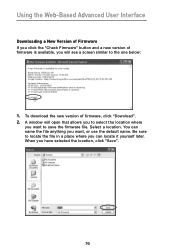
.... To download the new version of firmware is available, you will open that allows you to select the location where you want , or use the default name. When you have selected the location, click "Save". 76 A window will see a screen similar to the one below: 1. Using the Web-Based Advanced User...
.... To download the new version of firmware is available, you will open that allows you to select the location where you want , or use the default name. When you have selected the location, click "Save". 76 A window will see a screen similar to the one below: 1. Using the Web-Based Advanced User...
User Manual
Page 82
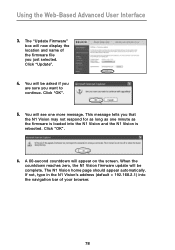
... asked if you are sure you want to continue. If not, type in the N1 Vision's address (default = 192.168.2.1) into the N1 Vision and the N1 Vision is rebooted. Using the Web-Based Advanced User Interface 3. This message tells you just selected. The N1 Vision home page should appear automatically. You will be complete. Click "OK". 5. Click "OK...
... asked if you are sure you want to continue. If not, type in the N1 Vision's address (default = 192.168.2.1) into the N1 Vision and the N1 Vision is rebooted. Using the Web-Based Advanced User Interface 3. This message tells you just selected. The N1 Vision home page should appear automatically. You will be complete. Click "OK". 5. Click "OK...
User Manual
Page 83
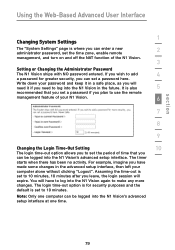
... can enter a new 2 administrator password, set a password here. For example, imagine you have to log into the N1 Vision again to add 4 a password for security purposes and the default is set to log into the N1 Vision in a safe place, as you will need it if you need to 10 minutes. You will expire. section...
... can enter a new 2 administrator password, set a password here. For example, imagine you have to log into the N1 Vision again to add 4 a password for security purposes and the default is set to log into the N1 Vision in a safe place, as you will need it if you need to 10 minutes. You will expire. section...

User Manual
Page 85
The default access port is the method by which the N1 Vision shares the single IP address 8 assigned by advanced users only. 7 Before enabling this function, MAKE SURE YOU HAVE SET THE ADMINISTRATOR PASSWORD. If you have a ...
The default access port is the method by which the N1 Vision shares the single IP address 8 assigned by advanced users only. 7 Before enabling this function, MAKE SURE YOU HAVE SET THE ADMINISTRATOR PASSWORD. If you have a ...
User Manual
Page 92
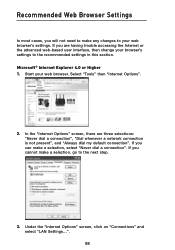
... step. 3. Start your web browser's settings. If you are three selections: "Never dial a connection", "Dial whenever a network connection is not present", and "Always dial my default connection". In the "Internet Options" screen, there are having trouble accessing the Internet or the advanced web-based user interface, then change your browser's settings...
... step. 3. Start your web browser's settings. If you are three selections: "Never dial a connection", "Dial whenever a network connection is not present", and "Always dial my default connection". In the "Internet Options" screen, there are having trouble accessing the Internet or the advanced web-based user interface, then change your browser's settings...

