User Guide
Page 3
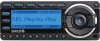
... Antenna Cable 29 Step 5: Connect the Magnetic Mount Antenna and PowerConnect Power Adapter 41 Step 6: Connect the Audio 42 Activation 55 Using Your Starmate 5 59 The Main Display 60 My Channels 61 Navigation Basics 62 Listening to Satellite Radio 65 FM Presets 70 Special Features 71 Pause & ...Replay 72 S-Seek 74 Parental Control 81 Where Else Can You Use Your Starmate 5 85 Configuring Your Starmate 5 . . . 85 Sirius ID 87 Find Available FM Channels in Your Area 89 FM Transmitter 92 Set and Select an FM ...
... Antenna Cable 29 Step 5: Connect the Magnetic Mount Antenna and PowerConnect Power Adapter 41 Step 6: Connect the Audio 42 Activation 55 Using Your Starmate 5 59 The Main Display 60 My Channels 61 Navigation Basics 62 Listening to Satellite Radio 65 FM Presets 70 Special Features 71 Pause & ...Replay 72 S-Seek 74 Parental Control 81 Where Else Can You Use Your Starmate 5 85 Configuring Your Starmate 5 . . . 85 Sirius ID 87 Find Available FM Channels in Your Area 89 FM Transmitter 92 Set and Select an FM ...

User Guide
Page 6
...change the channel you the best audio reception when using PowerConnect. • Parental controls: Easily lock and unlock channels with mature content. The Starmate 5 has these exciting features to enhance your overall experience: • Easy to read, wide-screen display: View artist name, song title..., and channel information on your purchase of the Starmate 5! Introduction Features Congratulations, on an easy to read the entire User Guide before using your favorite channels. • FM preset button: ...
...change the channel you the best audio reception when using PowerConnect. • Parental controls: Easily lock and unlock channels with mature content. The Starmate 5 has these exciting features to enhance your overall experience: • Easy to read, wide-screen display: View artist name, song title..., and channel information on your purchase of the Starmate 5! Introduction Features Congratulations, on an easy to read the entire User Guide before using your favorite channels. • FM preset button: ...
User Guide
Page 9
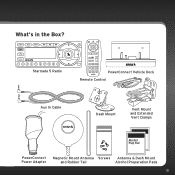
Starmate 5 Radio PowerConnect Vehicle Dock Remote Control Aux In Cable Dash Mount Vent Mount and Extended Vent Clamps PowerConnect Magnetic Mount Antenna Screws Antenna & Dash Mount Power Adapter and Rubber Tail Alcohol Preparation Pads 9 What's in the Box?
Starmate 5 Radio PowerConnect Vehicle Dock Remote Control Aux In Cable Dash Mount Vent Mount and Extended Vent Clamps PowerConnect Magnetic Mount Antenna Screws Antenna & Dash Mount Power Adapter and Rubber Tail Alcohol Preparation Pads 9 What's in the Box?

User Guide
Page 10
... Press to switch between the favorite channel preset banks. or access a favorite channel. also enter a channel number. FM also when in a menu or list; Introduction Starmate 5 Functions FM Menu Button Button Access Press to advanced access features and and cycle configuration through the channel lineup; Display Button Customize the way you...
... Press to switch between the favorite channel preset banks. or access a favorite channel. also enter a channel number. FM also when in a menu or list; Introduction Starmate 5 Functions FM Menu Button Button Access Press to advanced access features and and cycle configuration through the channel lineup; Display Button Customize the way you...

User Guide
Page 12
... Dock makes it simple to see what goes where. Just match the colors on the cable ends to the colors on the rear of the Starmate 5 to secure the radio. 12 Direct Adapter (sold separately). Docking Rails Fits into slots on the dock to connect.
... Dock makes it simple to see what goes where. Just match the colors on the cable ends to the colors on the rear of the Starmate 5 to secure the radio. 12 Direct Adapter (sold separately). Docking Rails Fits into slots on the dock to connect.

User Guide
Page 16
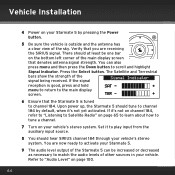
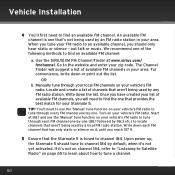
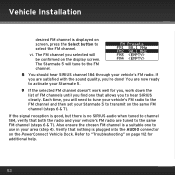
Option 2 A. 16 Several examples of the Starmate 5 mounted in direct sunlight, which will not block your vehicle, choose a location where it will be in a vehicle are shown: A is the on dash method ... not be located where it will affect the visibility of the display screen. Option 1 A. Vehicle Installation Step 1: Choose a Location for Your Radio When installing the Starmate 5 in your vision, interfere with the controls, or obstruct any air bags.
Option 2 A. 16 Several examples of the Starmate 5 mounted in direct sunlight, which will not block your vehicle, choose a location where it will be in a vehicle are shown: A is the on dash method ... not be located where it will affect the visibility of the display screen. Option 1 A. Vehicle Installation Step 1: Choose a Location for Your Radio When installing the Starmate 5 in your vision, interfere with the controls, or obstruct any air bags.

User Guide
Page 18
... for the location you are unsure about your dash surface), and make sure the air temperature is ample room for the PowerConnect Vehicle Dock and Starmate 5 when installed. 2 Set the orientation of the Dash I . • Option 2 should be oriented as II. 3 Attach the Dash Mount to the PowerConnect Vehicle Dock using...
... for the location you are unsure about your dash surface), and make sure the air temperature is ample room for the PowerConnect Vehicle Dock and Starmate 5 when installed. 2 Set the orientation of the Dash I . • Option 2 should be oriented as II. 3 Attach the Dash Mount to the PowerConnect Vehicle Dock using...
User Guide
Page 42
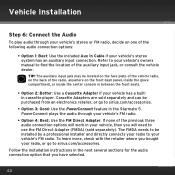
... audio through your vehicle's stereo or FM radio, decide on the front dash panel, inside the glove compartment, or inside the center console in the Starmate 5. The FMDA needs to be located on the face plate of the vehicle radio, on the back of the radio, anywhere on one of the...
... audio through your vehicle's stereo or FM radio, decide on the front dash panel, inside the glove compartment, or inside the center console in the Starmate 5. The FMDA needs to be located on the face plate of the vehicle radio, on the back of the radio, anywhere on one of the...

User Guide
Page 43
Option 1: Aux In Cable Installation Instructions 1 Plug one end of the radio. 43 AUDIO ANT 2 Plug the other end into the auxiliary input jack connection of your vehicle's stereo system. 3 Insert your Starmate 5 into the dock, aligning the radio against the rear of the dock so that the rails on the dock fit into the mounting slots in the back of the Aux In Cable into the green AUDIO connector on the dock.
Option 1: Aux In Cable Installation Instructions 1 Plug one end of the radio. 43 AUDIO ANT 2 Plug the other end into the auxiliary input jack connection of your vehicle's stereo system. 3 Insert your Starmate 5 into the dock, aligning the radio against the rear of the dock so that the rails on the dock fit into the mounting slots in the back of the Aux In Cable into the green AUDIO connector on the dock.
User Guide
Page 44
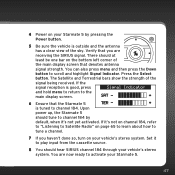
.... Refer to "Audio Level" on your vehicle's stereo system. Vehicle Installation 4 Power on the bottom left corner of the main display screen that the Starmate 5 is tuned to channel 184. There should at least be increased or decreased as necessary to match the audio levels of the signal being received... hold menu to return to tune a channel. 7 Turn on page 100. 44 The Satellite and Terrestrial bars show the strength of other sources in your Starmate 5 by default, when it 's not on channel 184, refer to "Listening to Satellite Radio" on page 65 to learn about how to the main...
.... Refer to "Audio Level" on your vehicle's stereo system. Vehicle Installation 4 Power on the bottom left corner of the main display screen that the Starmate 5 is tuned to channel 184. There should at least be increased or decreased as necessary to match the audio levels of the signal being received... hold menu to return to tune a channel. 7 Turn on page 100. 44 The Satellite and Terrestrial bars show the strength of other sources in your Starmate 5 by default, when it 's not on channel 184, refer to "Listening to Satellite Radio" on page 65 to learn about how to the main...

User Guide
Page 46
Vehicle Installation Option 2: Cassette Adapter Installation Instructions 1 Plug the Cassette Adapter into the green AUDIO connector on the dock fit into the dock, aligning the radio against the rear of the dock so that the rails on the dock. 2 Insert the Cassette AUDIO ANT Adapter in the back of the radio. 46 You may need to turn on your vehicle's stereo system in order to do so. 3 Insert your Starmate 5 into the mounting slots in the vehicle's cassette deck.
Vehicle Installation Option 2: Cassette Adapter Installation Instructions 1 Plug the Cassette Adapter into the green AUDIO connector on the dock fit into the dock, aligning the radio against the rear of the dock so that the rails on the dock. 2 Insert the Cassette AUDIO ANT Adapter in the back of the radio. 46 You may need to turn on your vehicle's stereo system in order to do so. 3 Insert your Starmate 5 into the mounting slots in the vehicle's cassette deck.
User Guide
Page 47
... a channel. 7 If you haven't done so, turn on your vehicle's stereo system. Press the Select button. If it 's not yet activated. Upon power up, the Starmate 5 should at least be one bar on the bottom left corner of the signal being received. You are receiving the SIRIUS signal. You can also... press menu and then press the Down button to channel 184. Verify that you are now ready to activate your Starmate 5 by default, when it 's not on channel 184, refer to "Listening to Satellite Radio" on page 65 to learn about how to play input from...
... a channel. 7 If you haven't done so, turn on your vehicle's stereo system. Press the Select button. If it 's not yet activated. Upon power up, the Starmate 5 should at least be one bar on the bottom left corner of the signal being received. You are receiving the SIRIUS signal. You can also... press menu and then press the Down button to channel 184. Verify that you are now ready to activate your Starmate 5 by default, when it 's not on channel 184, refer to "Listening to Satellite Radio" on page 65 to learn about how to play input from...

User Guide
Page 48
If the signal reception is good, but there is set to the correct source, i.e., cassette source (step 7). Refer to "Audio Level" on page 112 for additional help. 48 Refer to "Troubleshooting" on page 100. Also be sure that the audio level is set high enough to be sure the vehicle's stereo system is no audio when tuned to match the audio levels of other sources in your vehicle. Vehicle Installation 9 The audio level output of the Starmate 5 can be increased or decreased as necessary to channel 184, be heard (step 9).
If the signal reception is good, but there is set to the correct source, i.e., cassette source (step 7). Refer to "Audio Level" on page 112 for additional help. 48 Refer to "Troubleshooting" on page 100. Also be sure that the audio level is set high enough to be sure the vehicle's stereo system is no audio when tuned to match the audio levels of other sources in your vehicle. Vehicle Installation 9 The audio level output of the Starmate 5 can be increased or decreased as necessary to channel 184, be heard (step 9).
User Guide
Page 49
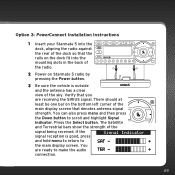
.... The Satellite and Terrestrial bars show the strength of the main display screen that denotes antenna signal strength. Option 3: PowerConnect Installation Instructions 1 Insert your Starmate 5 into the mounting slots in the back of the radio. 2 Power on the bottom left corner of the signal being received. Press the Select .... If the signal reception is outside and the antenna has a clear view of the sky. There should at least be one bar on Starmate 5 radio by pressing the Power button. 3 Be sure the vehicle is good, press and hold menu to return to the main display screen.
.... The Satellite and Terrestrial bars show the strength of the main display screen that denotes antenna signal strength. Option 3: PowerConnect Installation Instructions 1 Insert your Starmate 5 into the mounting slots in the back of the radio. 2 Power on the bottom left corner of the signal being received. Press the Select .... If the signal reception is outside and the antenna has a clear view of the sky. There should at least be one bar on Starmate 5 radio by pressing the Power button. 3 Be sure the vehicle is good, press and hold menu to return to the main display screen.
User Guide
Page 50
...following methods to an available channel, you will suggest a list of channels that provides the best match for your Starmate 5. Manually tune through every FM channel one-by-one that the Starmate 5 is tuned to locate channels that aren't being used by a local FM radio station. Once you have ...'s FM radio to tune through each FM channel that has only static or silence on your vehicle's FM radio. OR b. Upon power up, the Starmate 5 should only hear static or silence - If it's not on channel 184, refer to "Listening to Satellite Radio" on your vehicle's FM radio...
...following methods to an available channel, you will suggest a list of channels that provides the best match for your Starmate 5. Manually tune through every FM channel one-by-one that the Starmate 5 is tuned to locate channels that aren't being used by a local FM radio station. Once you have ...'s FM radio to tune through each FM channel that has only static or silence on your vehicle's FM radio. OR b. Upon power up, the Starmate 5 should only hear static or silence - If it's not on channel 184, refer to "Listening to Satellite Radio" on your vehicle's FM radio...

User Guide
Page 51
... on the same FM channel that you have not already done so) and tune it to this FM channel. 90.1 MATCH FM CHANNELS 7 Set your Starmate 5 to transmit on your vehicle's FM radio (if you have selected in step 4: i. When the 51 iii. Press the Down button to scroll and highlight...
... on the same FM channel that you have not already done so) and tune it to this FM channel. 90.1 MATCH FM CHANNELS 7 Set your Starmate 5 to transmit on your vehicle's FM radio (if you have selected in step 4: i. When the 51 iii. Press the Down button to scroll and highlight...
User Guide
Page 52
... ensure the chosen FM channel is no SIRIUS audio when tuned to channel 184, verify that allows you will tune to hear SIRIUS clearly. The Starmate 5 will need to tune your vehicle's FM radio to the FM channel and then set your vehicle's FM radio are now ready to transmit on... page 112 for you, work down the list of FM channels until you find one that both the radio and your Starmate 5 to activate your area (step 4). The FM channel you 're done! If the signal reception is good, but there is a suitable one to use in...
... ensure the chosen FM channel is no SIRIUS audio when tuned to channel 184, verify that allows you will tune to hear SIRIUS clearly. The Starmate 5 will need to tune your vehicle's FM radio to the FM channel and then set your vehicle's FM radio are now ready to transmit on... page 112 for you, work down the list of FM channels until you find one that both the radio and your Starmate 5 to activate your area (step 4). The FM channel you 're done! If the signal reception is good, but there is a suitable one to use in...
User Guide
Page 56
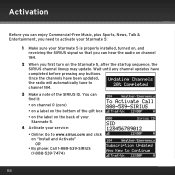
... Before you can enjoy Commercial-Free Music, plus Sports, News, Talk & Entertainment, you need to activate your Starmate 5: 1 Make sure your service: • Online: Go to channel 184. 3 Make a note of your Starmate 5. 4 Activate your Starmate 5 is properly installed, turned on, and receiving the SIRIUS signal so that you first turn on the...
... Before you can enjoy Commercial-Free Music, plus Sports, News, Talk & Entertainment, you need to activate your Starmate 5: 1 Make sure your service: • Online: Go to channel 184. 3 Make a note of your Starmate 5. 4 Activate your Starmate 5 is properly installed, turned on, and receiving the SIRIUS signal so that you first turn on the...

User Guide
Page 57
5 When your service is activated, your radio remain on until activated. 57 To continue, press any button. We recommend that your Starmate 5 will display an alert message. Thereafter, if you press the Up or Down button you can scroll and tune other channels. Activation usually takes less than 5 minutes, but sometimes may take longer.
5 When your service is activated, your radio remain on until activated. 57 To continue, press any button. We recommend that your Starmate 5 will display an alert message. Thereafter, if you press the Up or Down button you can scroll and tune other channels. Activation usually takes less than 5 minutes, but sometimes may take longer.

User Guide
Page 60
The Starmate 5's display screen will change the character size and cause the field to left. This feature is useful when viewing the display screen from right to ... the artist or title cannot be viewed in this guide. Note that the displayed text will automatically tune to the last channel you power your Starmate 5 On, it will scroll only if the length of the current channel. This screen is displayed toggles between the 2-line artist name/song title text...
The Starmate 5's display screen will change the character size and cause the field to left. This feature is useful when viewing the display screen from right to ... the artist or title cannot be viewed in this guide. Note that the displayed text will automatically tune to the last channel you power your Starmate 5 On, it will scroll only if the length of the current channel. This screen is displayed toggles between the 2-line artist name/song title text...