Operation Manual
Page 3
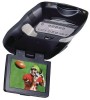
... Audiovox PROVE8 DVD Player with Switch · Backlit Controls for each component in your system to give you obtain the best results from your equipment. Features · 8 Inch (4:3) TFT (Thin Film Transistor) Active Matrix LCD (Liquid Crystal Display) Monitor · Built-in DVD Player · Built-in TV ...for IR Wireless Headphones · Headphone / Speaker Amplifier · Headphone Jacks · Forward and Side Remote Sensor · Dome Lights with Drop-Down Video Monitor. Safety Precaution For safety reasons, when changing video media it is recommended that the vehicle is not in...
... Audiovox PROVE8 DVD Player with Switch · Backlit Controls for each component in your system to give you obtain the best results from your equipment. Features · 8 Inch (4:3) TFT (Thin Film Transistor) Active Matrix LCD (Liquid Crystal Display) Monitor · Built-in DVD Player · Built-in TV ...for IR Wireless Headphones · Headphone / Speaker Amplifier · Headphone Jacks · Forward and Side Remote Sensor · Dome Lights with Drop-Down Video Monitor. Safety Precaution For safety reasons, when changing video media it is recommended that the vehicle is not in...

Operation Manual
Page 5
... control other button is used to enter the play mode. 4. Three position Dome Light Switch • Auto - Also allows the remote control to operate the PROVE8 and to the beginning of the headphone jacks. This button is depressed. 7. STOP ( ) Button. - pressing this button to wireless... wired RF modulator. Automatically switches on screen picture adjustment display cycles through "adjustment bars" for BRIGHTNESS, CONTRAST, COLOR, and TINT. DVD disc insertion slot. 2. Pressing this button is displayed, use the VOLUME UP/DOWN buttons to search in this button to make picture...
... control other button is used to enter the play mode. 4. Three position Dome Light Switch • Auto - Also allows the remote control to operate the PROVE8 and to the beginning of the headphone jacks. This button is depressed. 7. STOP ( ) Button. - pressing this button to wireless... wired RF modulator. Automatically switches on screen picture adjustment display cycles through "adjustment bars" for BRIGHTNESS, CONTRAST, COLOR, and TINT. DVD disc insertion slot. 2. Pressing this button is displayed, use the VOLUME UP/DOWN buttons to search in this button to make picture...

Operation Manual
Page 6
... LCD Panel. 20.Auxiliary Audio Right Input. 21.Auxiliary Audio Left Input. 22.Auxiliary Video Input. 23.Side Remote Sensor Eye - Allows the remote control to operate the PROVE8 OSD (On Screen Display), control volume to the desired number. 18.Dome Lights - Allows the use of the Audiovox ... down screen. - 11.REV ( ) - Note: Audiovox recommends the use of the arrow to the desired number. 17.Channel Down ( ) Button - 10.Screen Release - Bright red when system is on, dim when off. 14.Source Select (TV, AV1, AUX, DVD). 15.TV Auto-program - Moves in a backwards direction. 12.Eject...
... LCD Panel. 20.Auxiliary Audio Right Input. 21.Auxiliary Audio Left Input. 22.Auxiliary Video Input. 23.Side Remote Sensor Eye - Allows the remote control to operate the PROVE8 OSD (On Screen Display), control volume to the desired number. 18.Dome Lights - Allows the use of the Audiovox ... down screen. - 11.REV ( ) - Note: Audiovox recommends the use of the arrow to the desired number. 17.Channel Down ( ) Button - 10.Screen Release - Bright red when system is on, dim when off. 14.Source Select (TV, AV1, AUX, DVD). 15.TV Auto-program - Moves in a backwards direction. 12.Eject...

Operation Manual
Page 7
... a fingernail, lift the battery cover off. 2) Install two "AAA" batteries as described below. 1) Turn the Remote Control face down until the cover clicks. It is observed. 3) Align the cover tabs with the remote control and press down . The remote control will not control equipment from other manufacturers. 34 33 1 2 3 4 5 6 7 8 9 10 11... 30 28 26 23 21 19 17 29 27 24 25 22 20 18 Make sure that proper polarity (+ or -) is not a universal remote control and will operate the PROVE8 and Audiovox VCP's. Remote Control Operation Battery Installation Before attempting to operate your...
... a fingernail, lift the battery cover off. 2) Install two "AAA" batteries as described below. 1) Turn the Remote Control face down until the cover clicks. It is observed. 3) Align the cover tabs with the remote control and press down . The remote control will not control equipment from other manufacturers. 34 33 1 2 3 4 5 6 7 8 9 10 11... 30 28 26 23 21 19 17 29 27 24 25 22 20 18 Make sure that proper polarity (+ or -) is not a universal remote control and will operate the PROVE8 and Audiovox VCP's. Remote Control Operation Battery Installation Before attempting to operate your...

Operation Manual
Page 8
...TV tuner will change the sources: DVD, TV, AV1 and AUX. 3. SOURCE Button* Video signals from memory. Please refer to the audio / video inputs can be displayed on TV reception. 4. When the SKIP mode is disable, the TV will store or erase the channel from video equipment connected to page 2 for more information on the monitor... button selects between SKIP and SEARCH mode. DVD Function Descriptions *Function control is available on the LCD display screen, and the erased channel numbers are displayed in "GREEN" on the unit and the remote control. 1. POWER Button* Press this button...
...TV tuner will change the sources: DVD, TV, AV1 and AUX. 3. SOURCE Button* Video signals from memory. Please refer to the audio / video inputs can be displayed on TV reception. 4. When the SKIP mode is disable, the TV will store or erase the channel from video equipment connected to page 2 for more information on the monitor... button selects between SKIP and SEARCH mode. DVD Function Descriptions *Function control is available on the LCD display screen, and the erased channel numbers are displayed in "GREEN" on the unit and the remote control. 1. POWER Button* Press this button...

Operation Manual
Page 9
... Button Switches certain function keys on VCD2.0. 12. ENTER Button Used to access the main menu. 11. Note: This function only present on the remote control for TV functions. MUTE Button Press this button to increase the channel number to the desired channel and to the menu while PBC on. Pressing the...
... Button Switches certain function keys on VCD2.0. 12. ENTER Button Used to access the main menu. 11. Note: This function only present on the remote control for TV functions. MUTE Button Press this button to increase the channel number to the desired channel and to the menu while PBC on. Pressing the...

Operation Manual
Page 11
.... FWD ( ) Button* Allows the user to point B. 24. VCP Mode Select button Switches certain function keys on the remote control for VCP functions. 23. REPEAT Button Allows the user to repeat various positions of a DVD or CD from point A to search in a forward direction at 2,4, 6 and 8 times the normal speed. 18. REV... the normal speed. 19. PLAY ( )Button* Press this button to decrease the channel number to the desired channel and to search in the menu options. DVD Mode Select button Switches certain function keys on the remote control for DVD functions. 22.
.... FWD ( ) Button* Allows the user to point B. 24. VCP Mode Select button Switches certain function keys on the remote control for VCP functions. 23. REPEAT Button Allows the user to repeat various positions of a DVD or CD from point A to search in a forward direction at 2,4, 6 and 8 times the normal speed. 18. REV... the normal speed. 19. PLAY ( )Button* Press this button to decrease the channel number to the desired channel and to search in the menu options. DVD Mode Select button Switches certain function keys on the remote control for DVD functions. 22.

Operation Manual
Page 14
... unit. Press the AUTO MEMORY button on the Remote Control Unit or the AUTO PROGRAM button on the monitor or remote control. The TV will now tune only to turn the system on... . After the unit has been turned on the Remote Control to optimize the picture quality. 4. Sliding the screen release lock forward will unlock the LCD screen and it may be necessary to city, weak...the power button on the unit or the remote control will automatically store each channel that is reached. The built-in micro-processor will turn the unit off alternately. Turning the PROVE8 On or Off 1.
... unit. Press the AUTO MEMORY button on the Remote Control Unit or the AUTO PROGRAM button on the monitor or remote control. The TV will now tune only to turn the system on... . After the unit has been turned on the Remote Control to optimize the picture quality. 4. Sliding the screen release lock forward will unlock the LCD screen and it may be necessary to city, weak...the power button on the unit or the remote control will automatically store each channel that is reached. The built-in micro-processor will turn the unit off alternately. Turning the PROVE8 On or Off 1.

Operation Manual
Page 15
...ERASE" is displayed on screen. Do not leave the vehicle unattended with the CHANNEL UP/DOWN buttons , press the SKIP/SEARCH button on the Remote Control Unit until the MANUAL MEMORY XX ADD is displayed on the bottom of the screen. 3. (B) To tune weak or marginal channels with ... by a three position slide switch. Overhead Dome Lights The Dome lights integrated into the PROVE8 are controlled by using the CHANNEL UP/DOWN buttons or go directly to the desired channel using the 0-9 buttons on the Remote Control. 4. To STORE a channel, press the button until "SKIP MODE OFF" is...
...ERASE" is displayed on screen. Do not leave the vehicle unattended with the CHANNEL UP/DOWN buttons , press the SKIP/SEARCH button on the Remote Control Unit until the MANUAL MEMORY XX ADD is displayed on the bottom of the screen. 3. (B) To tune weak or marginal channels with ... by a three position slide switch. Overhead Dome Lights The Dome lights integrated into the PROVE8 are controlled by using the CHANNEL UP/DOWN buttons or go directly to the desired channel using the 0-9 buttons on the Remote Control. 4. To STORE a channel, press the button until "SKIP MODE OFF" is...

Operation Manual
Page 16
...clean signal for use the remote control supplied with Audiovox wireless headphones (Part Number MVIRHS). In this case you must be automatically changed to its remote control at the remote sensor eye. The repeater function allows control of sight from most manufacturer's remote controls to DVD mode when a disc is...G RAM SE LE CT S EL EC T V OL UME ON OF F AU T O H EADPH ONES Remote Sensor Eye Special Operation Feature • When system power is off, the PROVE8 can then be controlled simply by pressing the EJECT button. • Source will be used within a line of ...
...clean signal for use the remote control supplied with Audiovox wireless headphones (Part Number MVIRHS). In this case you must be automatically changed to its remote control at the remote sensor eye. The repeater function allows control of sight from most manufacturer's remote controls to DVD mode when a disc is...G RAM SE LE CT S EL EC T V OL UME ON OF F AU T O H EADPH ONES Remote Sensor Eye Special Operation Feature • When system power is off, the PROVE8 can then be controlled simply by pressing the EJECT button. • Source will be used within a line of ...

Operation Manual
Page 17
..., that can be used with its power button or remote control. To access the AV1 inputs, turn the PROVE8 or the Source button on the screen. for location of these jacks). Wired FM Modulator The PROVE8 is accessed by using Audiovox headphones (part number IR2CHS) simply switch to channel B... source component on with any standard wired stereo headphones. These jacks are controlled by the volume up / down buttons on the PROVE8 remote control. The PROVE8 is on, broadcast reception on the vehicles radio will allow normal radio reception. Whenever the RF modulator is now ready to play...
..., that can be used with its power button or remote control. To access the AV1 inputs, turn the PROVE8 or the Source button on the screen. for location of these jacks). Wired FM Modulator The PROVE8 is accessed by using Audiovox headphones (part number IR2CHS) simply switch to channel B... source component on with any standard wired stereo headphones. These jacks are controlled by the volume up / down buttons on the PROVE8 remote control. The PROVE8 is on, broadcast reception on the vehicles radio will allow normal radio reception. Whenever the RF modulator is now ready to play...

Operation Manual
Page 19
.... Using the Setup Menu Using the setup display, you can do the initial setup, adjust the picture quality, and set a language for the on the remote. OSD (On-Screen Display) Language Menu The OSD Language Menu allows the user to select the language for the on-screen display and the setup... cursor ($%) buttons, and then press the ENTER button. Settings and Adjustments This chapter describes how to set and how to adjust using the on the TV screen. 2) Select the main item you want using the (▼▲)buttons select "OSD LANGUAGE".
.... Using the Setup Menu Using the setup display, you can do the initial setup, adjust the picture quality, and set a language for the on the remote. OSD (On-Screen Display) Language Menu The OSD Language Menu allows the user to select the language for the on-screen display and the setup... cursor ($%) buttons, and then press the ENTER button. Settings and Adjustments This chapter describes how to set and how to adjust using the on the TV screen. 2) Select the main item you want using the (▼▲)buttons select "OSD LANGUAGE".

Operation Manual
Page 23
... with the current track playing and the time of time left . The tracks, for that track playing, the total amount of time left on the remote to display the DISPLAY Banner. Press the DISPLAY button on the CD. TOTAL ELAPSED appears along with the current track playing and the total time...
... with the current track playing and the time of time left . The tracks, for that track playing, the total amount of time left on the remote to display the DISPLAY Banner. Press the DISPLAY button on the CD. TOTAL ELAPSED appears along with the current track playing and the total time...

Operation Manual
Page 24
... the DISPLAY button. Press DISPLAY 1x Press DISPLAY 2x Press DISPLAY 3x TIME REMAIN appears along with the amount of time left remain on the remote to see the time left in the song that is left in the song that have been encoded in MP3 format can be played on... Discs MP3 is playing. The options below show you what happens when you press DISPLAY again. TIME ELAPSED and the time will remain on your DVD player. An audio CD-quality song can be compressed into the MP3 format with the amount of time the song has played. CD-R discs that...
... the DISPLAY button. Press DISPLAY 1x Press DISPLAY 2x Press DISPLAY 3x TIME REMAIN appears along with the amount of time left remain on the remote to see the time left in the song that is left in the song that have been encoded in MP3 format can be played on... Discs MP3 is playing. The options below show you what happens when you press DISPLAY again. TIME ELAPSED and the time will remain on your DVD player. An audio CD-quality song can be compressed into the MP3 format with the amount of time the song has played. CD-R discs that...

Operation Manual
Page 25
...to the Using The Repeat Feature The default mode for the Repeat feature is OFF. Skipping Songs Use the Next ( previous song. ) button on the remote control to move to go through the folder list on to regular play mode. repeats the folder that is playing. • FOLDER- If a disc...in the folder appear on the right). 3. You can change folders and songs through the song list and highlighted the song you want . The DVD player plays the songs in the player, the Smart Navi screen appears automatically. Once the folder you want is playing, press STOP. Pressing REPEAT ...
...to the Using The Repeat Feature The default mode for the Repeat feature is OFF. Skipping Songs Use the Next ( previous song. ) button on the remote control to move to go through the folder list on to regular play mode. repeats the folder that is playing. • FOLDER- If a disc...in the folder appear on the right). 3. You can change folders and songs through the song list and highlighted the song you want . The DVD player plays the songs in the player, the Smart Navi screen appears automatically. Once the folder you want is playing, press STOP. Pressing REPEAT ...

Operation Manual
Page 28
... coded by using the IR headphones, make sure you are using remote. This DVD only plays digital video discs, audio CDs and MP3s. • Both the unit and the disc are fresh. • Verify that the remote sensor eye is not obstructed. • Verify that is affixed over the sensor ...IR power. • Make sure Modulator is ON and the proper Frequency has been selected. • You can 't be completed at the moment. 4. This DVD is not available at this time because: 1. The feature is Region Number 1. Disc won't play • Insert a disc with the label side facing up. ...
... coded by using the IR headphones, make sure you are using remote. This DVD only plays digital video discs, audio CDs and MP3s. • Both the unit and the disc are fresh. • Verify that the remote sensor eye is not obstructed. • Verify that is affixed over the sensor ...IR power. • Make sure Modulator is ON and the proper Frequency has been selected. • You can 't be completed at the moment. 4. This DVD is not available at this time because: 1. The feature is Region Number 1. Disc won't play • Insert a disc with the label side facing up. ...

Operation Manual
Page 30
Replacement Parts Remote Control 136B2154 Left Protective Cover for IR Sensor 102B3689 Right Protective Cover for Headphones Jacks 102B3690 Specifications LCD Backlighting Edge Light Tube Resolution 1440 x 234 Pixels 336,960 Operation Temperature 32 -140º F (0 - 60º C) Storage Temperature -4 - 176º F (20 - 80º C) Backlight life 10,000 Hours Video Display System NTSC Headphone Audio Output 0.03W @ 16 ohms Low Level Audio Output 620 mvp-p 1 kHz @ -15 dB Video Output 1.0Vp-p @ 75 ohms Power Source 12V DC
Replacement Parts Remote Control 136B2154 Left Protective Cover for IR Sensor 102B3689 Right Protective Cover for Headphones Jacks 102B3690 Specifications LCD Backlighting Edge Light Tube Resolution 1440 x 234 Pixels 336,960 Operation Temperature 32 -140º F (0 - 60º C) Storage Temperature -4 - 176º F (20 - 80º C) Backlight life 10,000 Hours Video Display System NTSC Headphone Audio Output 0.03W @ 16 ohms Low Level Audio Output 620 mvp-p 1 kHz @ -15 dB Video Output 1.0Vp-p @ 75 ohms Power Source 12V DC

