Operation Manual
Page 1
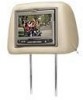
MMD7HRPKG Two Specific Vehicle Headrests With 7" LCD Monitors and Built-In DVD Player for Rear Seat Entertainment Operation Manual 128-8281
MMD7HRPKG Two Specific Vehicle Headrests With 7" LCD Monitors and Built-In DVD Player for Rear Seat Entertainment Operation Manual 128-8281
Operation Manual
Page 2
... into them. When connecting power and ground in a mobile video installation, insure that the ACC wire is not applied must be installed in "park" or when the vehicle's parking brake is connected to the rear of the following patents: Patent NOS. 7245,274 and 6,899,365 If the LCD panel or video monitor is used for television reception, video or DVD play , the LCD panel or video monitor must be visible, directly...
... into them. When connecting power and ground in a mobile video installation, insure that the ACC wire is not applied must be installed in "park" or when the vehicle's parking brake is connected to the rear of the following patents: Patent NOS. 7245,274 and 6,899,365 If the LCD panel or video monitor is used for television reception, video or DVD play , the LCD panel or video monitor must be visible, directly...
Operation Manual
Page 3
... watch the DVD movie that is playing in front of the unit. To operate the MMD7HRS screen, press M2 on the remote control. Turn on the M1 (MMD7HRM) monitor, tilt the screen forward using the source button on the front of the M2 screen, use the CH A switch setting. When sitting in the master unit or a video source plugged into the slot, disc label toward driver. 3. MMD7HRPKG The MMD7HRPKG contains two headrests. The disc will light up red. The full function remote control...
... watch the DVD movie that is playing in front of the unit. To operate the MMD7HRS screen, press M2 on the remote control. Turn on the M1 (MMD7HRM) monitor, tilt the screen forward using the source button on the front of the M2 screen, use the CH A switch setting. When sitting in the master unit or a video source plugged into the slot, disc label toward driver. 3. MMD7HRPKG The MMD7HRPKG contains two headrests. The disc will light up red. The full function remote control...
Operation Manual
Page 4
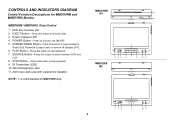
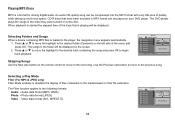
... MODE Button- Press this button to start playback. 7. SOURCE Button- STOP Button - AUX Input Jack (use with supplied AV adaptor) NOTE : 1, 2, 6 & 8 function for MMD7HRM and MMD7HRS Monitor MMD7HRM / MMD7HRS Panel Control 1. Power Indicator LED 4. Press this button to eject the disc. 3. IR Transmitter LEDS 10. CONTROLS AND INDICATORS DIAGRAM Control Function Descriptions for MMD7HRM only. DVD disc insertion slot 2. EJECT Button - PLAY Button - Press this button to select between Wide(16:9), Normal(4:3) aspect ratio or screen off (display OFF). 6. Wired...
... MODE Button- Press this button to start playback. 7. SOURCE Button- STOP Button - AUX Input Jack (use with supplied AV adaptor) NOTE : 1, 2, 6 & 8 function for MMD7HRM and MMD7HRS Monitor MMD7HRM / MMD7HRS Panel Control 1. Power Indicator LED 4. Press this button to eject the disc. 3. IR Transmitter LEDS 10. CONTROLS AND INDICATORS DIAGRAM Control Function Descriptions for MMD7HRM only. DVD disc insertion slot 2. EJECT Button - PLAY Button - Press this button to select between Wide(16:9), Normal(4:3) aspect ratio or screen off (display OFF). 6. Wired...
Operation Manual
Page 5
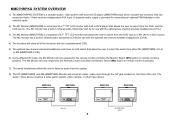
... to the Remote Control unit when the Monitor Select (M2) button on remote control is pressed. 7) The wired headphones allow the user to select the audio from either M1 (MMD7HRM, CH A) or M2 (MMD7HRS,CH B). 6) Using different IR codes, the M1 Monitor will accept an audio / video input through the 1/8" jack located on the front of a 7" TFT LCD monitor that allows the user to select from the DVD source in DVD player that allows...
... to the Remote Control unit when the Monitor Select (M2) button on remote control is pressed. 7) The wired headphones allow the user to select the audio from either M1 (MMD7HRM, CH A) or M2 (MMD7HRS,CH B). 6) Using different IR codes, the M1 Monitor will accept an audio / video input through the 1/8" jack located on the front of a 7" TFT LCD monitor that allows the user to select from the DVD source in DVD player that allows...
Operation Manual
Page 8
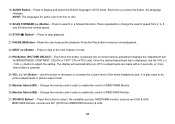
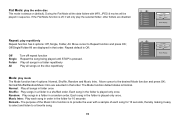
... the user to turn MMD7HRM Monitor ON, press M1 and then the power button. 1. MUTE Button - PREV (9) Button - SETUP Button - Press this button to repeat a selected Title, Chapter or Track of a DVD, CD or MP3. 8 Press this model. Press to mute the audio. POWER Button* - Press to return to the settings and Adjustments section for more information. 9. Press to change the DVD player options such as TV DISPLAY, OSD LANGUAGE, PARENTAL CONTROL etc. Refer...
... the user to turn MMD7HRM Monitor ON, press M1 and then the power button. 1. MUTE Button - PREV (9) Button - SETUP Button - Press this button to repeat a selected Title, Chapter or Track of a DVD, CD or MP3. 8 Press this model. Press to mute the audio. POWER Button* - Press to return to the settings and Adjustments section for more information. 9. Press to change the DVD player options such as TV DISPLAY, OSD LANGUAGE, PARENTAL CONTROL etc. Refer...
Operation Manual
Page 9
... 4 times Picture is playing. NUMBER Buttons - For title and chapter selection use the number buttons to enlarge the picture when playing a DVD disc. Title Chapter Subtitle 17. Each time you press the button, the subtitle language changes. Press this button to highlight the desired option. Press the cursor (pqtu) buttons to turn the selected unit IR Transmitter ON/OFF. 12. CHANNEL SELECT Button** - Press ZOOM button DVD player perform Once Enlarge the picture 1 times of...
... 4 times Picture is playing. NUMBER Buttons - For title and chapter selection use the number buttons to enlarge the picture when playing a DVD disc. Title Chapter Subtitle 17. Each time you press the button, the subtitle language changes. Press this button to highlight the desired option. Press the cursor (pqtu) buttons to turn the selected unit IR Transmitter ON/OFF. 12. CHANNEL SELECT Button** - Press ZOOM button DVD player perform Once Enlarge the picture 1 times of...
Operation Manual
Page 10
.... The display will automatically turn off if no adjustments are DVD & AUX. It is pressed, the on screen picture adjustment displays the "adjustment bar" for audio vary from disc to do picture adjustments in a forward direction. Monitor Select (M1) - MMD7HRM monitor, sources are made within 6 seconds, or if any other button is displayed, use the VOL (+) / VOL (-) button to enable the control of MMD7HRM Monitor. 26. Press to decrease or increase the volume level...
.... The display will automatically turn off if no adjustments are DVD & AUX. It is pressed, the on screen picture adjustment displays the "adjustment bar" for audio vary from disc to do picture adjustments in a forward direction. Monitor Select (M1) - MMD7HRM monitor, sources are made within 6 seconds, or if any other button is displayed, use the VOL (+) / VOL (-) button to enable the control of MMD7HRM Monitor. 26. Press to decrease or increase the volume level...
Operation Manual
Page 11
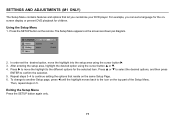
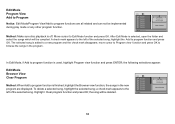
... setup area using the cursor button p or q. 4. To change to another Setup page, press t until the highlight moves back to the icon on the screen as shown per diagram. Language OSD Language : English Video Rating Subtitle Audio : Off : English Misc 2. Press p or q to select the desired options, and then press ENTER to confirm the selection. 5. For example, you customize your DVD player...
... setup area using the cursor button p or q. 4. To change to another Setup page, press t until the highlight moves back to the icon on the screen as shown per diagram. Language OSD Language : English Video Rating Subtitle Audio : Off : English Misc 2. Press p or q to select the desired options, and then press ENTER to confirm the selection. 5. For example, you customize your DVD player...

Operation Manual
Page 12
Select the subtitle you to adjust screen setting (aspect ratio). 4:3 This displays the wide picture with black bands on the upper and lower portions of the screen. 16:9 This displays a wide picture with black bands on the upper and lower portion of the disc. AUDIO SETUP Select "AUDIO" using pq button, then press u button to enter the Submenu. The bandwidth will play and display on the screen the original language contained...
Select the subtitle you to adjust screen setting (aspect ratio). 4:3 This displays the wide picture with black bands on the upper and lower portions of the screen. 16:9 This displays a wide picture with black bands on the upper and lower portion of the disc. AUDIO SETUP Select "AUDIO" using pq button, then press u button to enter the Submenu. The bandwidth will play and display on the screen the original language contained...
Operation Manual
Page 13
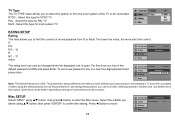
... from this type for PAL TV Multi - TV Type The TV TYPE setup allows you desire using pq button, then press "ENTER" to confirm the setting. NTSC - Language Parental : 6.Adult Video Rating Password Enter Password Misc Note: The Default Password is open. Select the subtitle you to select the system to fit to the color system of users while some discs cannot.
... from this type for PAL TV Multi - TV Type The TV TYPE setup allows you desire using pq button, then press "ENTER" to confirm the setting. NTSC - Language Parental : 6.Adult Video Rating Password Enter Password Misc Note: The Default Password is open. Select the subtitle you to select the system to fit to the color system of users while some discs cannot.
Operation Manual
Page 14
... repeatedly until you turn it off. 13 Press the DISPLAY button on the remote control to implement the selection. 3. Load Factory Load Factory allows you to reset all options to factory settings. * This function will enable the Screen Saver mode if the unit is inactive for example, repeats once that time. Title Selection Press numeric (0~9) buttons to initiate a change of title selection. Playing DVDs Language Load Factory Video Load Factory Screen Saver Yes...
... repeatedly until you turn it off. 13 Press the DISPLAY button on the remote control to implement the selection. 3. Load Factory Load Factory allows you to reset all options to factory settings. * This function will enable the Screen Saver mode if the unit is inactive for example, repeats once that time. Title Selection Press numeric (0~9) buttons to initiate a change of title selection. Playing DVDs Language Load Factory Video Load Factory Screen Saver Yes...
Operation Manual
Page 15
... Mode : Shuffle Edit Mode Music Playing :1 Album: genre Comment:- Audio data format (MP3, WMA) Photo - Video data format (AV1, MPEG , ) 1/12 00:00:21 / TRACK01 TRACK02 TRACK03 TRACK04 TRACK05 TRACK06 Filter Flat Mode Repeat : off Audio Photo Vi d e o Music Playing 14 The songs in MP3 format can be displayed. The DVD player plays the songs in the player, the navigation menu appears automatically. 1. Press p or q to move to the following formats: Audio - CD-R discs that is playing...
... Mode : Shuffle Edit Mode Music Playing :1 Album: genre Comment:- Audio data format (MP3, WMA) Photo - Video data format (AV1, MPEG , ) 1/12 00:00:21 / TRACK01 TRACK02 TRACK03 TRACK04 TRACK05 TRACK06 Filter Flat Mode Repeat : off Audio Photo Vi d e o Music Playing 14 The songs in MP3 format can be displayed. The DVD player plays the songs in the player, the navigation menu appears automatically. 1. Press p or q to move to the following formats: Audio - CD-R discs that is playing...
Operation Manual
Page 16
... Mode function and press OK; If the Flat Mode function is to provide the user with MP3, JPEG & movies will only play mode The Mode function has 4 options: Normal, Shuffle, Random and Music Intro. Normal: Play all the data folders with a sample of the Music Intro function is off repeat function Repeat the song being played until STOP is Normal. Repeat default is always on the disc...
... Mode function and press OK; If the Flat Mode function is to provide the user with MP3, JPEG & movies will only play mode The Mode function has 4 options: Normal, Shuffle, Random and Music Intro. Normal: Play all the data folders with a sample of the Music Intro function is off repeat function Repeat the song being played until STOP is Normal. Repeat default is always on the disc...
Operation Manual
Page 17
... TRACK06 Album Edit Mode Program View Add to Program Music Playing Method: Make sure disc playback is added to a new program and the check mark disappears; The selected song is off. A check mark appears to Edit Mode function and press OK. move cursor to Program view function and press OK to program function and press OK. Edit Mode Program View Add to Program Notice: Edit Mode/Program View/Add to program functions are displayed. highlight the Add...
... TRACK06 Album Edit Mode Program View Add to Program Music Playing Method: Make sure disc playback is added to a new program and the check mark disappears; The selected song is off. A check mark appears to Edit Mode function and press OK. move cursor to Program view function and press OK to program function and press OK. Edit Mode Program View Add to Program Notice: Edit Mode/Program View/Add to program functions are displayed. highlight the Add...
Operation Manual
Page 18
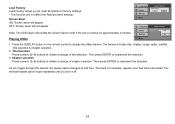
... and Play a Disc Press the Power button to turn the unit ON. Note: the following Discs CANNOT be used with this section completely. These regional codes must match in this unit. This unit's code is compatible with the player. A disc that it is region 1. The unit will play . Insert the disc with the label facing the driver. Types of Discs your DVD will display "WRONG REGION". DVD discs which contain video. •Audio discs - Audio CDs contain musical or sound...
... and Play a Disc Press the Power button to turn the unit ON. Note: the following Discs CANNOT be used with this section completely. These regional codes must match in this unit. This unit's code is compatible with the player. A disc that it is region 1. The unit will play . Insert the disc with the label facing the driver. Types of Discs your DVD will display "WRONG REGION". DVD discs which contain video. •Audio discs - Audio CDs contain musical or sound...
Operation Manual
Page 19
... view the internal DVD player. AUX - Select AUX to view the source that is connected to the AUX input* on the front of AV adapter cable (1/8-to-RCA) supplied by Audiovox. 18 Select AUX to view the source that is connected to view the DVD player from the MMD7HRM unit. Select AV1 to the AUX input* on the front of the unit. *The AUX input requires the use of the unit. AUX - Audio / Video Inputs and Outputs Audio Output The Audio output will provide the Audio signal from the MMD7HRM monitor...
... view the internal DVD player. AUX - Select AUX to view the source that is connected to the AUX input* on the front of AV adapter cable (1/8-to-RCA) supplied by Audiovox. 18 Select AUX to view the source that is connected to view the DVD player from the MMD7HRM unit. Select AV1 to the AUX input* on the front of the unit. *The AUX input requires the use of the unit. AUX - Audio / Video Inputs and Outputs Audio Output The Audio output will provide the Audio signal from the MMD7HRM monitor...
Operation Manual
Page 20
... sound SOLUTION — Verify that the batteries in the remote are fresh. — Verify that the remote sensor eye is not obstructed. — Verify that the disc label is facing towards the driver. Allow player to dry out. — Make sure your DVD is dirty. If the regional codes don't match, the disc can't be played. — The disc is connected properly. Make sure all cables...
... sound SOLUTION — Verify that the batteries in the remote are fresh. — Verify that the remote sensor eye is not obstructed. — Verify that the disc label is facing towards the driver. Allow player to dry out. — Make sure your DVD is dirty. If the regional codes don't match, the disc can't be played. — The disc is connected properly. Make sure all cables...
Operation Manual
Page 21
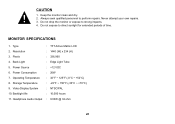
...°F (-30°C ~ +70°C) 9. Headphone Audio Output : 0.03W @ 32 ohm 20 Keep the monitor clean and dry. 2. Do not expose to perform repairs. Video Display System : NTSC/PAL 10. Type : TFT Active Matrix LCD 2. Back Light : Edge Light Tube 5. Power Source : +12 VDC 6. Pixels : 336,960 4. CAUTION 1. Do not drop the monitor or expose to strong impacts. 4. MONITOR SPECIFICATIONS 1. Operating Temperature : 32°F ~ 125°F (-0°...
...°F (-30°C ~ +70°C) 9. Headphone Audio Output : 0.03W @ 32 ohm 20 Keep the monitor clean and dry. 2. Do not expose to perform repairs. Video Display System : NTSC/PAL 10. Type : TFT Active Matrix LCD 2. Back Light : Edge Light Tube 5. Power Source : +12 VDC 6. Pixels : 336,960 4. CAUTION 1. Do not drop the monitor or expose to strong impacts. 4. MONITOR SPECIFICATIONS 1. Operating Temperature : 32°F ~ 125°F (-0°...

Operation Manual
Page 22
... liabilities. dated bill of sale), specification of defect(s), transportation prepaid, to the Company at the Company's option) without charge for installation, removal or reinstallation of the product, or to damage to digital memory/media devices, gaming devices, discs, speakers, accessories, or vehicle electrical systems. This Warranty does not apply to any product or part thereof which vary from the...
... liabilities. dated bill of sale), specification of defect(s), transportation prepaid, to the Company at the Company's option) without charge for installation, removal or reinstallation of the product, or to damage to digital memory/media devices, gaming devices, discs, speakers, accessories, or vehicle electrical systems. This Warranty does not apply to any product or part thereof which vary from the...


