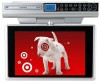
Owners Manual
Page 5
... of Contents 4 Disc Formats 5 Accessories 6 Remote Control 6 Control Reference Guide 7 - 9 Mounting Instructions 10-11 Connections 12-13 Connecting the TV Antenna 12 Connecting the Unit to a TV or other Video Equipment 12 Connecting the AM LOOP Antenna and FM Wire Antenna 12 Plugging in the Unit 13 Monitor Operation 13 ...Title/Chapter/Time 18 Locating a Specific Track 18 Setting Favorite Bookmark During Playback ..... 19 Repeat Playback 19 DVD Programmable Memory 20 DVD Programmable Memory 20 Viewing JPEG FILes 20 Play Modes for CD or JPEG Disc 21 Customizing the Function ...
... of Contents 4 Disc Formats 5 Accessories 6 Remote Control 6 Control Reference Guide 7 - 9 Mounting Instructions 10-11 Connections 12-13 Connecting the TV Antenna 12 Connecting the Unit to a TV or other Video Equipment 12 Connecting the AM LOOP Antenna and FM Wire Antenna 12 Plugging in the Unit 13 Monitor Operation 13 ...Title/Chapter/Time 18 Locating a Specific Track 18 Setting Favorite Bookmark During Playback ..... 19 Repeat Playback 19 DVD Programmable Memory 20 DVD Programmable Memory 20 Viewing JPEG FILes 20 Play Modes for CD or JPEG Disc 21 Customizing the Function ...

Owners Manual
Page 7
...2mm) spacers ...x 4 #M 5 x 69 mm screws ...x 4 #M 5 x 40 mm screws ...x 4 FM wire antenna ...x 1 AM LOOP antenna ...x 1 REMOTE CONTROL Using the Remote Control • This remote control is about 16 feet (5 meters). To Install Batteries 1. Do not mix ALKALINE, standard (CARBON-ZINC) or rechargeable (NICKEL-CADMIUM) batteries. • Always remove...ambient light source, the performance of batteries in a fire. In this case, try attaching the magnetic remote control to most refrigerators. Insert two AAA batteries. Battery Replacement When the batteries become weak. • Batteries...
...2mm) spacers ...x 4 #M 5 x 69 mm screws ...x 4 #M 5 x 40 mm screws ...x 4 FM wire antenna ...x 1 AM LOOP antenna ...x 1 REMOTE CONTROL Using the Remote Control • This remote control is about 16 feet (5 meters). To Install Batteries 1. Do not mix ALKALINE, standard (CARBON-ZINC) or rechargeable (NICKEL-CADMIUM) batteries. • Always remove...ambient light source, the performance of batteries in a fire. In this case, try attaching the magnetic remote control to most refrigerators. Insert two AAA batteries. Battery Replacement When the batteries become weak. • Batteries...

Owners Manual
Page 8
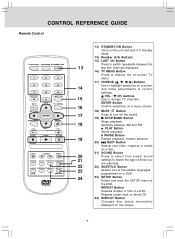
CONTROL REFERENCE GUIDE Remote Control 1) FUNCTION Button Use to select DVD, TV or RADIO mode. 2) PICTURE Button PICTURE 1 Selects from preset screen display settings to match the type of show you are watching. 6) VOLUME (+/-) Buttons DVD MENU MUTE 5 Adjusts the volume. 7) / TUNING Buttons : Fast reverse playback....all available STOP radio stations. 8) PREV Button BAND Selects previous titles, chapters or tracks on a DVD/ CD. 12 11) AUDIO Button Selects audio soundtracks of a DVD or change the output mode of a CD. MTS Button Press to select MONO sound, STEREO sound...
CONTROL REFERENCE GUIDE Remote Control 1) FUNCTION Button Use to select DVD, TV or RADIO mode. 2) PICTURE Button PICTURE 1 Selects from preset screen display settings to match the type of show you are watching. 6) VOLUME (+/-) Buttons DVD MENU MUTE 5 Adjusts the volume. 7) / TUNING Buttons : Fast reverse playback....all available STOP radio stations. 8) PREV Button BAND Selects previous titles, chapters or tracks on a DVD/ CD. 12 11) AUDIO Button Selects audio soundtracks of a DVD or change the output mode of a CD. MTS Button Press to select MONO sound, STEREO sound...
Owners Manual
Page 9
...the sound. 19) STOP/BAND Button Stops playback. 18 Switches between the 13 last two channels displayed. 16) TV MENU Button Press to display the on-screen TV menu. 17) CURSOR ( , , , ) Buttons Use to highlight selections on a screen 14 and make adjustments...languages programmed on a DVD. 24 23) SETUP Button Enters and exits the SETUP menu of a DVD. REPEAT Button Repeats chapter or title of the DVD. buttons 15 Use to change TV channels. CONTROL REFERENCE GUIDE Remote Control PICTURE 1 4 7 EXIT 2 3 5 6 8 9 LAST CH 0 TV MENU RETURN DVD MENU MUTE STOP BAND ...
...the sound. 19) STOP/BAND Button Stops playback. 18 Switches between the 13 last two channels displayed. 16) TV MENU Button Press to display the on-screen TV menu. 17) CURSOR ( , , , ) Buttons Use to highlight selections on a screen 14 and make adjustments...languages programmed on a DVD. 24 23) SETUP Button Enters and exits the SETUP menu of a DVD. REPEAT Button Repeats chapter or title of the DVD. buttons 15 Use to change TV channels. CONTROL REFERENCE GUIDE Remote Control PICTURE 1 4 7 EXIT 2 3 5 6 8 9 LAST CH 0 TV MENU RETURN DVD MENU MUTE STOP BAND ...
Owners Manual
Page 10
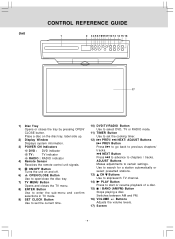
.... Place a disc on the disc tray, label side up. 2) Display Window Displays system information. 3) POWER ON Indicators DVD : DVD indicator TV : TV indicator RADIO : RADIO indicator 4) Remote Sensor Receives the remote control unit signals. 5) ON/OFF Button Turns the unit on and off. 6) OPEN/CLOSE Button Use to open/close the ...to enter the sub-menu and confirm selections in TV mode. 9) SET CLOCK Button Use to set the current time. 10) DVD/TV/RADIO Button Use to select DVD, TV or RADIO mode. 11) TIMER Button Use to set the cooking timer. 12) PREV/ NEXT/ ADJUST Buttons PREV Button Press...
.... Place a disc on the disc tray, label side up. 2) Display Window Displays system information. 3) POWER ON Indicators DVD : DVD indicator TV : TV indicator RADIO : RADIO indicator 4) Remote Sensor Receives the remote control unit signals. 5) ON/OFF Button Turns the unit on and off. 6) OPEN/CLOSE Button Use to open/close the ...to enter the sub-menu and confirm selections in TV mode. 9) SET CLOCK Button Use to set the current time. 10) DVD/TV/RADIO Button Use to select DVD, TV or RADIO mode. 11) TIMER Button Use to set the cooking timer. 12) PREV/ NEXT/ ADJUST Buttons PREV Button Press...
Owners Manual
Page 15
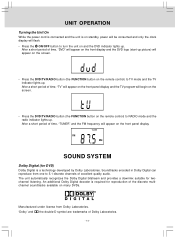
..." and the FM frequency will appear on the screen. • Press the DVD/TV/RADIO button (the FUNCTION button on the remote control) to TV mode and the TV indicator lights up. After a short period of the discrete multichannel soundtracks available on many DVDs. UNIT OPERATION Turning the Unit On While the power cord is connected and... the unit is on standby, power will be consumed and only the clock display will begin on the screen. • Press the DVD/TV/RADIO button (the FUNCTION button on the remote control) to RADIO mode and the radio indicator lights up.
..." and the FM frequency will appear on the screen. • Press the DVD/TV/RADIO button (the FUNCTION button on the remote control) to TV mode and the TV indicator lights up. After a short period of the discrete multichannel soundtracks available on many DVDs. UNIT OPERATION Turning the Unit On While the power cord is connected and... the unit is on standby, power will be consumed and only the clock display will begin on the screen. • Press the DVD/TV/RADIO button (the FUNCTION button on the remote control) to RADIO mode and the radio indicator lights up.
Owners Manual
Page 17
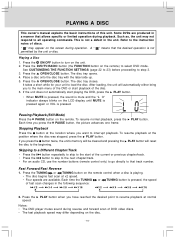
.... If the unit does not automatically start playing the DVD, press the PLAY button. • When MUTE is pressed, the sound is mute and the "L O" indicator always blinks on the LCD display until MUTE is pressed again or VOL is playing. • The disc begins fast scan at the ... (Still Mode) Press the PAUSE button on the unit. 2. Press the TUNING or TUNING button on the remote) to load the disc. Press the DVD/TV/RADIO button (the FUNCTION button on the remote control when a disc is pressed. PLAY button. To resume playback at normal speed. Press the PLAY button when ...
.... If the unit does not automatically start playing the DVD, press the PLAY button. • When MUTE is pressed, the sound is mute and the "L O" indicator always blinks on the LCD display until MUTE is pressed again or VOL is playing. • The disc begins fast scan at the ... (Still Mode) Press the PAUSE button on the unit. 2. Press the TUNING or TUNING button on the remote) to load the disc. Press the DVD/TV/RADIO button (the FUNCTION button on the remote control when a disc is pressed. PLAY button. To resume playback at normal speed. Press the PLAY button when ...

Owners Manual
Page 19
...button. 2. When a disc with only one subtitle is played back, " " is playing, press the DISPLAY button on the remote control repeatedly to display information on the remote to select the option (Track, Time or Disc Time) then press the corresponding number button(s) for the Title/Chapter/Time you ...enter correct numbers. • Some discs may not respond to display Title. 2. Press the or button on disc. Title/Chapter: The number of the DVD. - 18 - When a disc with only one angle is played back, " " is not permited by directly selecting track number. 1. Subtitle: ...
...button. 2. When a disc with only one subtitle is played back, " " is playing, press the DISPLAY button on the remote control repeatedly to display information on the remote to select the option (Track, Time or Disc Time) then press the corresponding number button(s) for the Title/Chapter/Time you ...enter correct numbers. • Some discs may not respond to display Title. 2. Press the or button on disc. Title/Chapter: The number of the DVD. - 18 - When a disc with only one angle is played back, " " is not permited by directly selecting track number. 1. Subtitle: ...
Owners Manual
Page 20
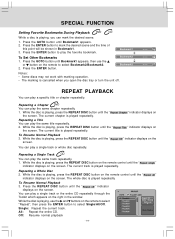
... " indicator displays on the screen. While the disc is playing, press the REPEAT DISC button on the remote control until Bookmark1 appears, then use the and buttons on the remote to mark the desired scene and the time of this point will be shown in the window. You can...- 19 - Single: Repeat the current track. All: Repeat the entire CD. While the disc is playing, press the REPEAT DISC button on the remote control until the " " indicator displays on the right in Bookmark1. 3. SPECIAL FUNCTION Setting Favorite Bookmarks During Playback While a disc is playing, you open the...
... " indicator displays on the screen. While the disc is playing, press the REPEAT DISC button on the remote control until Bookmark1 appears, then use the and buttons on the remote to mark the desired scene and the time of this point will be shown in the window. You can...- 19 - Single: Repeat the current track. All: Repeat the entire CD. While the disc is playing, press the REPEAT DISC button on the remote control until the " " indicator displays on the right in Bookmark1. 3. SPECIAL FUNCTION Setting Favorite Bookmarks During Playback While a disc is playing, you open the...
Owners Manual
Page 21
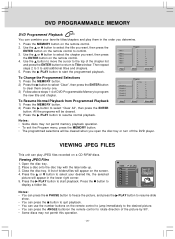
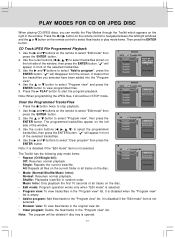
...Playback from Programmed Playback 1) Press the MEMORY button. 2) Press the button to add additional titles and chapters. 5. Press the MEMORY button on the remote control. 4. Notes: • Some discs may not permit this operation. - 20 - Viewing JPEG Files 1. All the programs will appear in the ...the disc tray. Use the or button to program the new title and chapter. A list of DVD Programmable Memory to select the chapter you want , then press the ENTER button on the remote control. 2. Place a disc onto the disc tray with the label side up. 3. Press the button ...
...Playback from Programmed Playback 1) Press the MEMORY button. 2) Press the button to add additional titles and chapters. 5. Press the MEMORY button on the remote control. 4. Notes: • Some discs may not permit this operation. - 20 - Viewing JPEG Files 1. All the programs will appear in the ...the disc tray. Use the or button to program the new title and chapter. A list of DVD Programmable Memory to select the chapter you want , then press the ENTER button on the remote control. 2. Place a disc onto the disc tray with the label side up. 3. Press the button ...
Owners Manual
Page 22
...: To view files/tracks in the original view list. • Clear program: Delete the files/tracks in the window. Press the or button on the remote control to the "Program view" list. Note: When programming the JPEG files, it should be deleted if disc tray is empty. • Add to program:...playback. " " will disappear from the screen. It means that the tracks/files you can modify the Play Modes through the Toolkit which appears on the remote control to select "Edit mode" then press the ENTER button. 2. Use the or button to select "Program view" and press the ENTER button to select ...
...: To view files/tracks in the original view list. • Clear program: Delete the files/tracks in the window. Press the or button on the remote control to the "Program view" list. Note: When programming the JPEG files, it should be deleted if disc tray is empty. • Add to program:...playback. " " will disappear from the screen. It means that the tracks/files you can modify the Play Modes through the Toolkit which appears on the remote control to select "Edit mode" then press the ENTER button. 2. Use the or button to select "Program view" and press the ENTER button to select ...
Owners Manual
Page 26
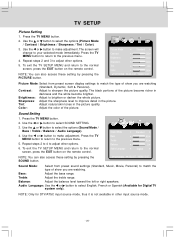
... picture quality. Use the or button to sharpen the picture quality. Press the TV MENU button to return to the normal screen, press the EXIT button on the remote control. NOTE: Only for Digital TV system only). Tint: Adjust natural skin tones in darkness and the white become ...brighter. Press the TV MENU button. 2. To exit the TV SETUP MENU and return to the previous menu. 5. Bass:...
... picture quality. Use the or button to sharpen the picture quality. Press the TV MENU button to return to the normal screen, press the EXIT button on the remote control. NOTE: Only for Digital TV system only). Tint: Adjust natural skin tones in darkness and the white become ...brighter. Press the TV MENU button. 2. To exit the TV SETUP MENU and return to the previous menu. 5. Bass:...

Owners Manual
Page 27
... Day Saving Time must be recorded automatically (for those areas observing such change to the normal screen, press the EXIT button on the remote control. Press the TV MENU button. 2. The screen will change . 3. UP/DOWN ADJUST "MENU":EXIT Time Zone / Day Saving Time / Clock 1. Misc ...Setting 1. To exit the TV SETUP MENU and return to your present settings on the remote control. Language : Select from the CLOCK & COOKING TIMER setting on screen. Set the local Time Zone, eg. Use the or...
... Day Saving Time must be recorded automatically (for those areas observing such change to the normal screen, press the EXIT button on the remote control. Press the TV MENU button. 2. The screen will change . 3. UP/DOWN ADJUST "MENU":EXIT Time Zone / Day Saving Time / Clock 1. Misc ...Setting 1. To exit the TV SETUP MENU and return to your present settings on the remote control. Language : Select from the CLOCK & COOKING TIMER setting on screen. Set the local Time Zone, eg. Use the or...
Owners Manual
Page 28
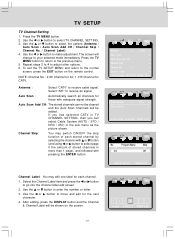
... menu as the picture shown. After editing, press the DISPLAY button and the Channel & Channel Label will be shown on the remote control. If you has selected CATV in TV CHANNEL SETTING, then you can not be cleared and the Auto Scan Channels will be added. Select the Channel Label item and... press the or button to adjust other options. 6. TV SETUP TV Channel Setting 1. Repeat steps 2 to 4 to go into the channel label edit screen. 2. Auto Scan Add CH: The stored channels can select ...
... menu as the picture shown. After editing, press the DISPLAY button and the Channel & Channel Label will be shown on the remote control. If you has selected CATV in TV CHANNEL SETTING, then you can not be cleared and the Auto Scan Channels will be added. Select the Channel Label item and... press the or button to adjust other options. 6. TV SETUP TV Channel Setting 1. Repeat steps 2 to 4 to go into the channel label edit screen. 2. Auto Scan Add CH: The stored channels can select ...


