Owners Manual
Page 2
... AC cord and refer servicing to provide reasonable protection against harmful interference in this user's manual. REPLACE ONLY WITH THE SAME OR EQUIVALENT TYPE. Let the unit stand for a Class...off and on, the user is connected. • Consult the dealer or an experienced radio/TV technician for a long period of the following measures: • Reorient or relocate the receiving... 2 PLV1615CS1- Pulling the cord may not function normally. E1-23.pmd 2 20/04/2007, 15:35 NO USER-SERVICEABLE PARTS INSIDE. However, there is warm and damp, water droplets or condensation ...
... AC cord and refer servicing to provide reasonable protection against harmful interference in this user's manual. REPLACE ONLY WITH THE SAME OR EQUIVALENT TYPE. Let the unit stand for a Class...off and on, the user is connected. • Consult the dealer or an experienced radio/TV technician for a long period of the following measures: • Reorient or relocate the receiving... 2 PLV1615CS1- Pulling the cord may not function normally. E1-23.pmd 2 20/04/2007, 15:35 NO USER-SERVICEABLE PARTS INSIDE. However, there is warm and damp, water droplets or condensation ...

Owners Manual
Page 9
... the camcorder for more information. 9 PLV1615CS1- Note: Please refer to the user manual for the VCR for more information. - E1-23.pmd 9 20/04/2007, 15:35 Connect the S-VIDEO output from the camcorder to the S-VIDEO input on this unit (S-VIDEO cable not included). Connect the S-VIDEO output from the ...
... the camcorder for more information. 9 PLV1615CS1- Note: Please refer to the user manual for the VCR for more information. - E1-23.pmd 9 20/04/2007, 15:35 Connect the S-VIDEO output from the camcorder to the S-VIDEO input on this unit (S-VIDEO cable not included). Connect the S-VIDEO output from the ...

Owners Manual
Page 10
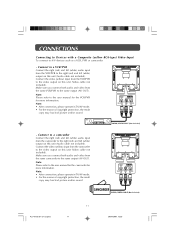
... Note: Please refer to the same input (AV IN). E1-23.pmd 10 20/04/2007, 15:35 Make sure you connect both audio and video from the camcorder to the same input (AV IN...). Connect the video (yellow) output from the same VCR to the user manual for the camcorder for more information. 10 PLV1615CS1- Make sure you connect both audio and video ...: - CONNECTIONS Connecting to Devices with a Composite (yellow RCA-type) Video Output To connect to the user manual for the VCR for more information. - Connect to a VCR Connect the right (red) and left (white) input...
... Note: Please refer to the same input (AV IN). E1-23.pmd 10 20/04/2007, 15:35 Make sure you connect both audio and video from the camcorder to the same input (AV IN...). Connect the video (yellow) output from the same VCR to the user manual for the camcorder for more information. 10 PLV1615CS1- Make sure you connect both audio and video ...: - CONNECTIONS Connecting to Devices with a Composite (yellow RCA-type) Video Output To connect to the user manual for the VCR for more information. - Connect to a VCR Connect the right (red) and left (white) input...
Owners Manual
Page 11
... the right (red) and left (white) output on this unit (Audio cable not included). E1-23.pmd 11 20/04/2007, 15:35 Note: • After connection, please operate in TV/AV mode. • For the reason of copyright protection, the result copy may has bad picture and/or sound. 11 PLV1615CS1... the camcorder for more information. Make sure you connect both audio and video from the camcorder to the user manual for the VCR/PVR for more information. Note: Please refer to the same output (AV OUT). CONNECTIONS Connecting to Devices with a Composite (yellow RCA-type) ...
... the right (red) and left (white) output on this unit (Audio cable not included). E1-23.pmd 11 20/04/2007, 15:35 Note: • After connection, please operate in TV/AV mode. • For the reason of copyright protection, the result copy may has bad picture and/or sound. 11 PLV1615CS1... the camcorder for more information. Make sure you connect both audio and video from the camcorder to the user manual for the VCR/PVR for more information. Note: Please refer to the same output (AV OUT). CONNECTIONS Connecting to Devices with a Composite (yellow RCA-type) ...
Owners Manual
Page 13
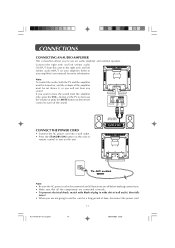
Note: To control the audio, both the TV and the amplifier must be turned on the unit or remote control to turn off before making... plug to wide slot of wall outlet, then fully insert. • When you are off the sound. button on the TV to decrease the volume or press the MUTE button on the remote control to your amplifier. To AC outlet Note: •...white) audio OUTPUT from the amplifier only, press the VOL - E1-23.pmd 13 20/04/2007, 15:36 Refer to turn on your amplifier's user manual for a long period of the amplifier must be set above 0, or you will not hear any sound....
Note: To control the audio, both the TV and the amplifier must be turned on the unit or remote control to turn off before making... plug to wide slot of wall outlet, then fully insert. • When you are off the sound. button on the TV to decrease the volume or press the MUTE button on the remote control to your amplifier. To AC outlet Note: •...white) audio OUTPUT from the amplifier only, press the VOL - E1-23.pmd 13 20/04/2007, 15:36 Refer to turn on your amplifier's user manual for a long period of the amplifier must be set above 0, or you will not hear any sound....
Owners Manual
Page 19
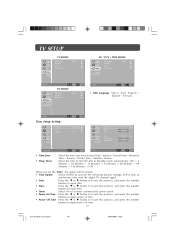
... Indiana / Central Time / Mountain Time / Arizona / Pacific Time / Aalaska / Hawaii. : Select the time to turn the unit to activate the following manual settings; When you set the 'Time', the option will be shown: • Time Update : Select On/Off to Standby mode automatically: Off -> 5 Minutes... -> 10 Minutes -> 15 Minutes -> 30 Minutes -> 60 Minutes -> 90 Minutes -> 120 Minutes -> Off. Setup Time Setup Setting: Video Audio TV Setup Parental Time Zone Time Sleep Timer Select EXIT Exit Eastern Time Off Video Audio...
... Indiana / Central Time / Mountain Time / Arizona / Pacific Time / Aalaska / Hawaii. : Select the time to turn the unit to activate the following manual settings; When you set the 'Time', the option will be shown: • Time Update : Select On/Off to Standby mode automatically: Off -> 5 Minutes... -> 10 Minutes -> 15 Minutes -> 30 Minutes -> 60 Minutes -> 90 Minutes -> 120 Minutes -> Off. Setup Time Setup Setting: Video Audio TV Setup Parental Time Zone Time Sleep Timer Select EXIT Exit Eastern Time Off Video Audio...
