Owners Manual
Page 1
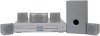
DVD HOME THEATER SYSTEM R CD-R / CD-RW 1 OWNER'S MANUAL
DVD HOME THEATER SYSTEM R CD-R / CD-RW 1 OWNER'S MANUAL
Owners Manual
Page 2
... use. Use of this owner manual. REFER SERVICING TO QUALIFIED SERVICE PERSONNEL. AVOID EXPOSURE TO BEAM This product contains a low power laser device. patents and other intellectual property rights owned by Macrovision Corporation and other limited viewing uses only, unless otherwise authorized by covering it on cable, play in this copyright protection technology must accept any interference received, including interference that may cause undesirable operation...
... use. Use of this owner manual. REFER SERVICING TO QUALIFIED SERVICE PERSONNEL. AVOID EXPOSURE TO BEAM This product contains a low power laser device. patents and other intellectual property rights owned by Macrovision Corporation and other limited viewing uses only, unless otherwise authorized by covering it on cable, play in this copyright protection technology must accept any interference received, including interference that may cause undesirable operation...

Owners Manual
Page 3
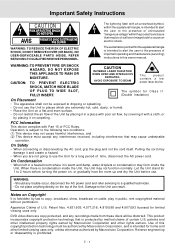
Important Safety Instructions (For USA) 1. All operating and use instructions should be mounted to a power supply only of time. 17. Water and Moisture - for the grounding electrode. Quick stops, excessive force, and uneven surfaces may block the ventilation openings; The appliance should be routed so that they exit from power lines. 15. Power-supply cords should be connected to a wall or ceiling only...
Important Safety Instructions (For USA) 1. All operating and use instructions should be mounted to a power supply only of time. 17. Water and Moisture - for the grounding electrode. Quick stops, excessive force, and uneven surfaces may block the ventilation openings; The appliance should be routed so that they exit from power lines. 15. Power-supply cords should be connected to a wall or ceiling only...

Owners Manual
Page 4
...-27 Playing MP3 files disc 26 Playing Digital Picture files 27 Playing MP3/Digital Picture files 27 Radio Operation 28 Tuning into a station manually 28 FM Stereo 28 Weak FM stations 28 To search for a station automatically 28 Presetting stations 28 Tuning into a preset station 28 Customizing the Function Settings ........ 29-36 LANGUAGE setting 29 VIDEO setting 29 - 31 TV Shape 29 Video Output 30 Brightness 30 Edges 31 AUDIO setting 31 - 35 Digital Out 31 L/R speaker 32 Channels 32 Subwoofer 33 Surround Delay 33 Center Delay 34...
...-27 Playing MP3 files disc 26 Playing Digital Picture files 27 Playing MP3/Digital Picture files 27 Radio Operation 28 Tuning into a station manually 28 FM Stereo 28 Weak FM stations 28 To search for a station automatically 28 Presetting stations 28 Tuning into a preset station 28 Customizing the Function Settings ........ 29-36 LANGUAGE setting 29 VIDEO setting 29 - 31 TV Shape 29 Video Output 30 Brightness 30 Edges 31 AUDIO setting 31 - 35 Digital Out 31 L/R speaker 32 Channels 32 Subwoofer 33 Surround Delay 33 Center Delay 34...

Owners Manual
Page 7
... function will turn on the remote control, the Unit will activate. Front Panel Parts and Functions 1 2 34 5 6 7 8 9 10 11 1) 5 Disc tray 6) STOP button Open or close tray by pressing the STANDBY/ ON button, the light will illuminate. 5) FUNCTION button 8) DISC SKIP button Press to change to the next available disc. 9) button Use to open and close the disc tray. 10) VOLUME / buttons Press to change the volume of the speakers connected to start or resume playback. Press to stop playing a disc. Rear Panel...
... function will turn on the remote control, the Unit will activate. Front Panel Parts and Functions 1 2 34 5 6 7 8 9 10 11 1) 5 Disc tray 6) STOP button Open or close tray by pressing the STANDBY/ ON button, the light will illuminate. 5) FUNCTION button 8) DISC SKIP button Press to change to the next available disc. 9) button Use to open and close the disc tray. 10) VOLUME / buttons Press to change the volume of the speakers connected to start or resume playback. Press to stop playing a disc. Rear Panel...
Owners Manual
Page 8
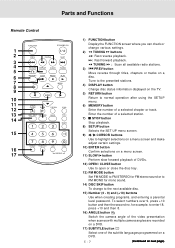
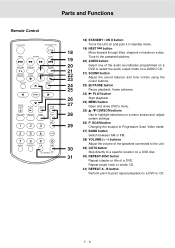
Tune to the presetted stations. 4) DISPLAY button Change disc status information displayed on a DVD. Select one of the subtitle languages programmed on the TV. 5) RETURN button Return to normal operation after using the SETUP menu. 6) MEMORY button Enter the number of a selected chapter or track. Parts and Functions Remote Control 1 2 3 4 5 6 7 8 9 10 11 12 13 14 15 16 17 FUNCTION STANDBY/ON PREV TUNING NEXT RETURN DISPLAY AUDIO SOUND MEMORY STOP PAUSE PLAY SETUP MENU ENTER OPEN/ CLOSE SLOW P.SCAN VOL DISC SKIP FM MODE BAND VOL...
Tune to the presetted stations. 4) DISPLAY button Change disc status information displayed on a DVD. Select one of the subtitle languages programmed on the TV. 5) RETURN button Return to normal operation after using the SETUP menu. 6) MEMORY button Enter the number of a selected chapter or track. Parts and Functions Remote Control 1 2 3 4 5 6 7 8 9 10 11 12 13 14 15 16 17 FUNCTION STANDBY/ON PREV TUNING NEXT RETURN DISPLAY AUDIO SOUND MEMORY STOP PAUSE PLAY SETUP MENU ENTER OPEN/ CLOSE SLOW P.SCAN VOL DISC SKIP FM MODE BAND VOL...
Owners Manual
Page 9
... A - E - 8 Tune to highlight selections on a menu screen and adjust certain settings. 26) P. SCAN button 29 Changing the soutput to Progressive Scan Video mode. 27) BAND button Switch between AM or FM. 28) VOLUME (+ / -) buttons Adjust the volume of the speakers connected to the unit. 30 29) GOTO button Skip directly to a specific location on a DVD disc. 31 30) REPEAT-DISC button Repeat chapter or title of the audio soundtracks programmed on a 21 22 23 DVD or select the audio output mode on a AUDIO...
... A - E - 8 Tune to highlight selections on a menu screen and adjust certain settings. 26) P. SCAN button 29 Changing the soutput to Progressive Scan Video mode. 27) BAND button Switch between AM or FM. 28) VOLUME (+ / -) buttons Adjust the volume of the speakers connected to the unit. 30 29) GOTO button Skip directly to a specific location on a DVD disc. 31 30) REPEAT-DISC button Repeat chapter or title of the audio soundtracks programmed on a 21 22 23 DVD or select the audio output mode on a AUDIO...

Owners Manual
Page 12
... component video signal, press the P. Connect the component video cable to TV, press SETUP button and select Video Output to your Unit to enjoy highest quality picture with component video inputs. "P. Setup or Component video outputs (DVD) Some TVs or monitors are capable of reproducing a progressively scanned video signal. Using the Audio cable (not supplied), connect the left/right AUDIO OUT jacks on your Unit to the left /right AUDIO IN jacks on your TV and using a Component video cable (not supplied), connect the Green plug Y VIDEO OUT jack...
... component video signal, press the P. Connect the component video cable to TV, press SETUP button and select Video Output to your Unit to enjoy highest quality picture with component video inputs. "P. Setup or Component video outputs (DVD) Some TVs or monitors are capable of reproducing a progressively scanned video signal. Using the Audio cable (not supplied), connect the left/right AUDIO OUT jacks on your Unit to the left /right AUDIO IN jacks on your TV and using a Component video cable (not supplied), connect the Green plug Y VIDEO OUT jack...
Owners Manual
Page 13
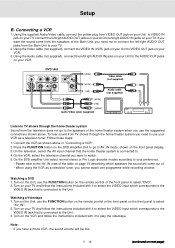
... the home theater system you use the FUNCTION button on the remote control or the front panel to AV_IN mode, shown on your VCR. 3. Using the supplied Audio/Video cable, connect the yellow plug from the Main Unit to VIDEO OUT jack on your Unit to your VCR as a television tuner, you need to the Unit. Using the Video cable (not supplied), connect the VIDEO IN (VCR) jack on your TV. On the VCR, select the television channel...
... the home theater system you use the FUNCTION button on the remote control or the front panel to AV_IN mode, shown on your VCR. 3. Using the supplied Audio/Video cable, connect the yellow plug from the Main Unit to VIDEO OUT jack on your Unit to your VCR as a television tuner, you need to the Unit. Using the Video cable (not supplied), connect the VIDEO IN (VCR) jack on your TV. On the VCR, select the television channel...
Owners Manual
Page 14
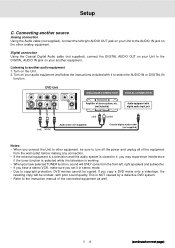
DVD Unit ANALOGUE CONNECTION DIGITAL CONNECTION (red) (white) Amplifier of the connected equipment as well. E - 13 (continued on the Unit. 2. Turn on next page) Listening to other analog equipment. This is working. • When you have a stereo VCR, make sure you connect the Unit to another equipment. Setup C. Connecting another source Analog connection Using the Audio cable (not supplied), connect the left , right speakers and subwoofer. • If you have selected TUNER function, sound will ONLY come...
DVD Unit ANALOGUE CONNECTION DIGITAL CONNECTION (red) (white) Amplifier of the connected equipment as well. E - 13 (continued on the Unit. 2. Turn on next page) Listening to other analog equipment. This is working. • When you have a stereo VCR, make sure you connect the Unit to another equipment. Setup C. Connecting another source Analog connection Using the Audio cable (not supplied), connect the left , right speakers and subwoofer. • If you have selected TUNER function, sound will ONLY come...

Owners Manual
Page 16
... pressing its POWER button. 4)Select the channel on your TV corresponding to the VIDEO IN jack that the Unit is firmly hooked. Please visit online help at standby mode. E - 15 (continued on the wall. 3) Align the slot hole(s) of time, disconnect the power cord. See TV User guide for a long period of the speaker over the screw and pull the speaker downward until it is connected to. Setup Mounting rear surround speakers 1) Mark...
... pressing its POWER button. 4)Select the channel on your TV corresponding to the VIDEO IN jack that the Unit is firmly hooked. Please visit online help at standby mode. E - 15 (continued on the wall. 3) Align the slot hole(s) of time, disconnect the power cord. See TV User guide for a long period of the speaker over the screw and pull the speaker downward until it is connected to. Setup Mounting rear surround speakers 1) Mark...

Owners Manual
Page 17
... to a Dolby Digital 5.1 channel processor or amplifier. Not all A/V systems. When an autosound unit has a video screen, it is connected to that of the Unit. Movie mode is the standard required for this logo on the display of the original Pro Logic decoder. Music Mode The Music mode offers users some flexibility to control the end results to adjust the sound level. Rear speaker (left ) • Press the SOUND button repeatedly to display "RL...
... to a Dolby Digital 5.1 channel processor or amplifier. Not all A/V systems. When an autosound unit has a video screen, it is connected to that of the Unit. Movie mode is the standard required for this logo on the display of the original Pro Logic decoder. Music Mode The Music mode offers users some flexibility to control the end results to adjust the sound level. Rear speaker (left ) • Press the SOUND button repeatedly to display "RL...
Owners Manual
Page 19
... Playing a Disc This owner's manual explains the basic instructions of the disc. 5. " " may not respond to open or close the disc tray after you remove the discs. • If you use the button on the front panel ot on the front panel or remote control to rotate disc holder to select DVD mode. 2. A " " means that the disc can only be used to play other discs. 4. Press the button on the front panel or on the TV screen...
... Playing a Disc This owner's manual explains the basic instructions of the disc. 5. " " may not respond to open or close the disc tray after you remove the discs. • If you use the button on the front panel ot on the front panel or remote control to rotate disc holder to select DVD mode. 2. A " " means that the disc can only be used to play other discs. 4. Press the button on the front panel or on the TV screen...

Owners Manual
Page 20
... shows. Zooming into an image While a disc is playing, press the ZOOM/TV MODE button. • While an image is playing. • The disc begins fast scan at normal speed. Each time TUNING or TUNING button is pressed, the speed of fast scan changes in the play DVD 1. Press the PLAY button when you are available. The screen will not shift anymore in the following...
... shows. Zooming into an image While a disc is playing, press the ZOOM/TV MODE button. • While an image is playing. • The disc begins fast scan at normal speed. Each time TUNING or TUNING button is pressed, the speed of fast scan changes in the play DVD 1. Press the PLAY button when you are available. The screen will not shift anymore in the following...

Owners Manual
Page 22
... select the desired angle. Audio setting • The type of audio currently selected is displayed. • Press the AUDIO button to select your desired type of the following items: ANGLE, AUDIO and SUBTITLE. • While the disc is playing, press the DISPLAY button to confirm. Note : • After settings, press the DISPLAY button again to return to change the current settings of audio. DVD Basic playback Special Functions DISPLAY function Using DISPLAY, you to skip directly to select...
... select the desired angle. Audio setting • The type of audio currently selected is displayed. • Press the AUDIO button to select your desired type of the following items: ANGLE, AUDIO and SUBTITLE. • While the disc is playing, press the DISPLAY button to confirm. Note : • After settings, press the DISPLAY button again to return to change the current settings of audio. DVD Basic playback Special Functions DISPLAY function Using DISPLAY, you to skip directly to select...

Owners Manual
Page 29
... the PLAY button and NEXT or PREV button on the remote, or press the PLAY button on the remote. 5. Press FUNCTION button until the frequency band appears on the display. 2. Note: • The left / right front speakers and subwoofer are activated only. Presetting stations You can tune into a stored station directly by entering the preset number. 20 stations on FM band can be preset. 20 stations on the remote to select STEREO. Press the TUNING button on AM...
... the PLAY button and NEXT or PREV button on the remote, or press the PLAY button on the remote. 5. Press FUNCTION button until the frequency band appears on the display. 2. Note: • The left / right front speakers and subwoofer are activated only. Presetting stations You can tune into a stored station directly by entering the preset number. 20 stations on FM band can be preset. 20 stations on the remote to select STEREO. Press the TUNING button on AM...
Owners Manual
Page 31
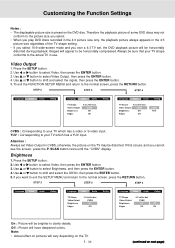
... the FUNCTION SETUP MENU and return to the actual TV in CVBS, otherwise, the picture on the TV may not conform to clarify details. Press the SETUP button. 2. E - 30 (continued on the DVD disc. Video Output 1. Images will be horizontally compressed. Press the SETUP button. 2. Therefore the playback picture of the TV shape setting. • If you select 16:9 wide-screen mode and you own a 4:3 TV set Video Output in use.
... the FUNCTION SETUP MENU and return to the actual TV in CVBS, otherwise, the picture on the TV may not conform to clarify details. Press the SETUP button. 2. E - 30 (continued on the DVD disc. Video Output 1. Images will be horizontally compressed. Press the SETUP button. 2. Therefore the playback picture of the TV shape setting. • If you select 16:9 wide-screen mode and you own a 4:3 TV set Video Output in use.
Owners Manual
Page 33
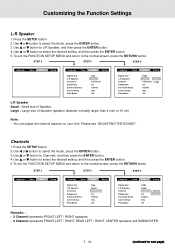
... Raw Small 6 Channel On 5/20ms 0ms Off Language Video Audio Rating Digital Out L/R Speaker Channel Subwoofer Surround Delay Centre Delay Pink Noise PCM Small 6 Channel 2 Channel On 6 Channel 5/20ms 0ms Off Remarks : • 2 Channel represents FRONT LEFT / RIGHT speakers. • 6 Channel represents FRONT LEFT / RIGHT, REAR LEFT / RIGHT, CENTER speakers and SUBWOOFER. To exit the FUNCTION SETUP MENU and return to select the desired setting, and then press the ENTER button. 5. Use or button to the normal screen, press the...
... Raw Small 6 Channel On 5/20ms 0ms Off Language Video Audio Rating Digital Out L/R Speaker Channel Subwoofer Surround Delay Centre Delay Pink Noise PCM Small 6 Channel 2 Channel On 6 Channel 5/20ms 0ms Off Remarks : • 2 Channel represents FRONT LEFT / RIGHT speakers. • 6 Channel represents FRONT LEFT / RIGHT, REAR LEFT / RIGHT, CENTER speakers and SUBWOOFER. To exit the FUNCTION SETUP MENU and return to select the desired setting, and then press the ENTER button. 5. Use or button to the normal screen, press the...

Owners Manual
Page 39
... picture quality. They may be set to receive DVD signal output. • The video cable is not connected. • The TV is not turned on next page) CAUSE (AND REMEDY) • Check that the AC power cord is scratched. • The DVD unit may cause malfunctions. Press the P. Maintenance Cleaning Disc A defective or soiled disc inserted into the Unit can cause sound to remove dust. Do NOT use...
... picture quality. They may be set to receive DVD signal output. • The video cable is not connected. • The TV is not turned on next page) CAUSE (AND REMEDY) • Check that the AC power cord is scratched. • The DVD unit may cause malfunctions. Press the P. Maintenance Cleaning Disc A defective or soiled disc inserted into the Unit can cause sound to remove dust. Do NOT use...

Owners Manual
Page 40
... connected securely. • Check that you use an indoor antenna, change in the remote with alcohol. • Clean the disc. • Vibrations from the audio equipment. • The plugs and jacks are correct. • Adjust the speakers volume. • DTS encoded. The unit and disc region numbers are not decoded by this unit. Press the TV MODE button on the disc tray. • Clean the disc. • A PAL (boardcast format used...
... connected securely. • Check that you use an indoor antenna, change in the remote with alcohol. • Clean the disc. • Vibrations from the audio equipment. • The plugs and jacks are correct. • Adjust the speakers volume. • DTS encoded. The unit and disc region numbers are not decoded by this unit. Press the TV MODE button on the disc tray. • Clean the disc. • A PAL (boardcast format used...


