
Owners Manual
Page 2
... use this product in direct sunlight or near a swimming pool ). 4. All the safety and operation instructions should be routed so that they are unable to lightning or power-line surges. 7. Do not place this product near water (e.g., near a heat source. For added protection for this product yourself as opening or removing covers may cause the Digital Photo Frame to be read...
... use this product in direct sunlight or near a swimming pool ). 4. All the safety and operation instructions should be routed so that they are unable to lightning or power-line surges. 7. Do not place this product near water (e.g., near a heat source. For added protection for this product yourself as opening or removing covers may cause the Digital Photo Frame to be read...
Owners Manual
Page 3
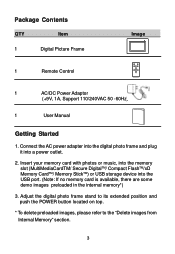
... internal memory*) 3. Insert your memory card with photos or music, into the memory slot (MultiMediaCardTM/ Secure DigitalTM/ Compact FlashTM/xD Memory CardTM/ Memory StickTM) or USB storage device into a power outlet. 2. Adjust the digital photo frame stand to its extended position and push the POWER button located on top. * To delete preloaded images, please refer to the "Delete images from Internal Memory" section.d 3 Package Contents QTY Item 1 Digital Picture Frame Image 1 Remote Control 1 AC/DC Power Adaptor (+9V, 1A, Support 110/240VAC 50 -60Hz) 1 User Manual...
... internal memory*) 3. Insert your memory card with photos or music, into the memory slot (MultiMediaCardTM/ Secure DigitalTM/ Compact FlashTM/xD Memory CardTM/ Memory StickTM) or USB storage device into a power outlet. 2. Adjust the digital photo frame stand to its extended position and push the POWER button located on top. * To delete preloaded images, please refer to the "Delete images from Internal Memory" section.d 3 Package Contents QTY Item 1 Digital Picture Frame Image 1 Remote Control 1 AC/DC Power Adaptor (+9V, 1A, Support 110/240VAC 50 -60Hz) 1 User Manual...

Owners Manual
Page 4
Photo Frame Controls and Indicators Functions Top View POWER LED POWER button PLAY/PAUSE/SELECT button MENU button UP/COPY/DELETE button DOWN/ROTATE button PREV. button NEXT button Left View Right View Volume Control CF Memory Slot SD/MMC/xD/ MS Card Slot USB Port Power Input 4
Photo Frame Controls and Indicators Functions Top View POWER LED POWER button PLAY/PAUSE/SELECT button MENU button UP/COPY/DELETE button DOWN/ROTATE button PREV. button NEXT button Left View Right View Volume Control CF Memory Slot SD/MMC/xD/ MS Card Slot USB Port Power Input 4
Owners Manual
Page 5
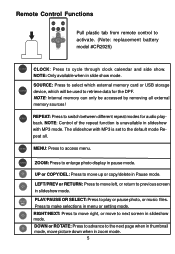
... repeat function is set to the default mode Repeat all external memory sources! MENU: Press to play or pause photo, or music files. PLAY/PAUSE OR SELECT: Press to access menu. SOURCE: Press to select which external memory card or USB storage device, which will be accessed by removing all . REPEAT: Press to switch between different repeat modes for the DPF. LEFT/PREV or RETURN: Press to move left, or return to move up or copy/delete...
... repeat function is set to the default mode Repeat all external memory sources! MENU: Press to play or pause photo, or music files. PLAY/PAUSE OR SELECT: Press to access menu. SOURCE: Press to select which external memory card or USB storage device, which will be accessed by removing all . REPEAT: Press to switch between different repeat modes for the DPF. LEFT/PREV or RETURN: Press to move left, or return to move up or copy/delete...
Owners Manual
Page 6
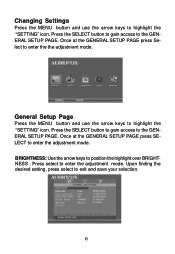
... Select to exit and save your selection. 6 Press select to position the highlight over BRIGHTNESS . BRIGHTNESS: Use the arrow keys to enter the adjustment mode. Press the SELECT button to gain access to highlight the "SETTING" icon. Changing Settings Press the MENU button and use the arrow keys to highlight the "SETTING" icon. General Setup Page Press the MENU button and use the arrow keys...
... Select to exit and save your selection. 6 Press select to position the highlight over BRIGHTNESS . BRIGHTNESS: Use the arrow keys to enter the adjustment mode. Press the SELECT button to gain access to highlight the "SETTING" icon. Changing Settings Press the MENU button and use the arrow keys to highlight the "SETTING" icon. General Setup Page Press the MENU button and use the arrow keys...
Owners Manual
Page 7
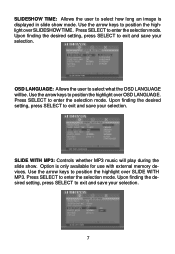
... select how long an image is only available for use with external memory devices. SLIDESHOW TIME: Allows the user to enter the selection mode. Option is displayed in slide show . OSD LANGUAGE: Allows the user to exit and save your selection. Upon finding the desired setting, press SELECT to select what the OSD LANGUAGE will play during the slide show mode. Use the arrow keys to...
... select how long an image is only available for use with external memory devices. SLIDESHOW TIME: Allows the user to enter the selection mode. Option is displayed in slide show . OSD LANGUAGE: Allows the user to exit and save your selection. Upon finding the desired setting, press SELECT to select what the OSD LANGUAGE will play during the slide show mode. Use the arrow keys to...
Owners Manual
Page 8
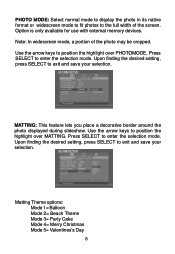
... use with external memory devices. Upon finding the desired setting, press SELECT to exit and save your selection. PHOTO MODE: Select normal mode to display the photo in its native format or widescreen mode to fit photos to position the highlight over PHOTOMODE. Note: In widescreen mode, a portion of the screen. MATTING: This feature lets you place a decorative border around the photo displayed during slideshow. Matting Theme options: Mode 1= Balloon Mode...
... use with external memory devices. Upon finding the desired setting, press SELECT to exit and save your selection. PHOTO MODE: Select normal mode to display the photo in its native format or widescreen mode to fit photos to position the highlight over PHOTOMODE. Note: In widescreen mode, a portion of the screen. MATTING: This feature lets you place a decorative border around the photo displayed during slideshow. Matting Theme options: Mode 1= Balloon Mode...
Owners Manual
Page 9
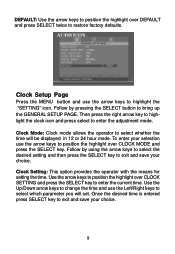
... for setting the time. Use the Up/Down arrow keys to change the time and use the Left/Right keys to select whether the time will set. Then press the right arrow key to highlight the clock icon and press select to highlight the "SETTING" icon. Once the desired time is entered press SELECT key to restore factory defaults. Clock Setup Page Press the MENU button and use the...
... for setting the time. Use the Up/Down arrow keys to change the time and use the Left/Right keys to select whether the time will set. Then press the right arrow key to highlight the clock icon and press select to highlight the "SETTING" icon. Once the desired time is entered press SELECT key to restore factory defaults. Clock Setup Page Press the MENU button and use the...
Owners Manual
Page 10
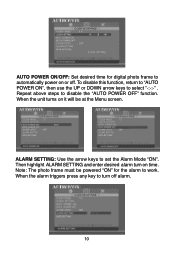
... key to set the Alarm Mode "ON". Note: The photo frame must be at the Menu screen. Repeat above steps to work. When the unit turns on it will be powered "ON" for digital photo frame to select "-:-:-" . To disable this function, return to "AUTO POWER ON", then use the UP or DOWN arrow keys to automatically power on time. AUTO POWER ON/OFF: Set desired time for the alarm to disable the "AUTO POWER OFF...
... key to set the Alarm Mode "ON". Note: The photo frame must be at the Menu screen. Repeat above steps to work. When the unit turns on it will be powered "ON" for digital photo frame to select "-:-:-" . To disable this function, return to "AUTO POWER ON", then use the UP or DOWN arrow keys to automatically power on time. AUTO POWER ON/OFF: Set desired time for the alarm to disable the "AUTO POWER OFF...
Owners Manual
Page 11
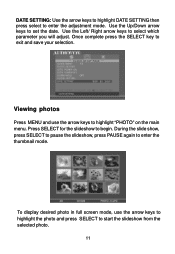
... display desired photo in full screen mode, use the arrow keys to start the slideshow from the selected photo. 11 Once complete press the SELECT key to begin. Press SELECT for the slideshow to exit and save your selection. Use the Up/Down arrow keys to select which parameter you will adjust. Use the Left/ Right arrow keys to set the date. Viewing photos Press MENU...
... display desired photo in full screen mode, use the arrow keys to start the slideshow from the selected photo. 11 Once complete press the SELECT key to begin. Press SELECT for the slideshow to exit and save your selection. Use the Up/Down arrow keys to select which parameter you will adjust. Use the Left/ Right arrow keys to set the date. Viewing photos Press MENU...
Owners Manual
Page 12
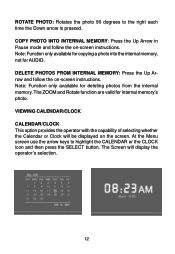
... copying a photo into the internal memory, not for AUDIO. At the Menu screen use the arrow keys to the right each time the Down arrow is pressed. DELETE PHOTOS FROM INTERNAL MEMORY: Press the Up Arrow and follow the on-screen instructions. VIEWING CALENDAR/CLOCK CALENDAR/CLOCK This option provides the operator with the capability of selecting whether the Calendar or Clock will display the operator's selection. 12 COPY PHOTO INTO INTERNAL MEMORY: Press the Up Arrow in Pause mode...
... copying a photo into the internal memory, not for AUDIO. At the Menu screen use the arrow keys to the right each time the Down arrow is pressed. DELETE PHOTOS FROM INTERNAL MEMORY: Press the Up Arrow and follow the on-screen instructions. VIEWING CALENDAR/CLOCK CALENDAR/CLOCK This option provides the operator with the capability of selecting whether the Calendar or Clock will display the operator's selection. 12 COPY PHOTO INTO INTERNAL MEMORY: Press the Up Arrow in Pause mode...
Owners Manual
Page 13
... the Digital Photo Frame before cleaning. Wipe screen with a clean, soft, lint-free cloth to a clean, soft , lint-free cloth and wipe the screen. Use the "volume" control on the external memory source as illustrated below: Use arrow keys to select the desired audio file and press SELECT to start playback. Do not use the arrow keys to highlight the AUDIO icon. Cleaning the screen: 1. proved for LCD displays) to remove...
... the Digital Photo Frame before cleaning. Wipe screen with a clean, soft, lint-free cloth to a clean, soft , lint-free cloth and wipe the screen. Use the "volume" control on the external memory source as illustrated below: Use arrow keys to select the desired audio file and press SELECT to start playback. Do not use the arrow keys to highlight the AUDIO icon. Cleaning the screen: 1. proved for LCD displays) to remove...
Owners Manual
Page 14
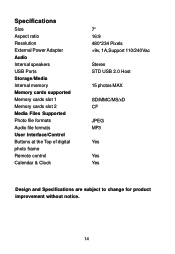
Specifications Size Aspect ratio Resolution External Power Adapter Audio Internal speakers USB Ports Storage/Media Internal memory Memory cards supported Memory cards slot 1 Memory cards slot 2 Media Files Supported Photo file formats Audio file formats User Interface/Control Buttons at the Top of digital photo frame Remote control Calendar & Clock 7" 16:9 480*234 Pixels +9v, 1A,Support 110/240Vac Stereo STD USB 2.0 Host 15 photos MAX SD/MMC/MS/xD CF JPEG MP3 Yes Yes Yes Design and Specifications are subject to change for product improvement without notice. 14
Specifications Size Aspect ratio Resolution External Power Adapter Audio Internal speakers USB Ports Storage/Media Internal memory Memory cards supported Memory cards slot 1 Memory cards slot 2 Media Files Supported Photo file formats Audio file formats User Interface/Control Buttons at the Top of digital photo frame Remote control Calendar & Clock 7" 16:9 480*234 Pixels +9v, 1A,Support 110/240Vac Stereo STD USB 2.0 Host 15 photos MAX SD/MMC/MS/xD CF JPEG MP3 Yes Yes Yes Design and Specifications are subject to change for product improvement without notice. 14
Owners Manual
Page 15
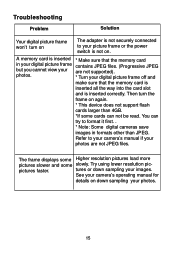
... your camera's operating manual for details on down sampling your photos are not supported). Then turn on The adapter is not securely connected to format it first. . * Note: Some digital cameras save images in your digital picture frame contains JPEG files. (Progressive JPEG but you cannot view your photos. 15 Troubleshooting Problem Solution Your digital picture frame won't turn the frame on again. * This device does not support flash cards larger than JPEG. You can not be read. Refer to your camera's manual...
... your camera's operating manual for details on down sampling your photos are not supported). Then turn on The adapter is not securely connected to format it first. . * Note: Some digital cameras save images in your digital picture frame contains JPEG files. (Progressive JPEG but you cannot view your photos. 15 Troubleshooting Problem Solution Your digital picture frame won't turn the frame on again. * This device does not support flash cards larger than JPEG. You can not be read. Refer to your camera's manual...
Owners Manual
Page 16
... the elimination of externally generated static or noise, to correction of antenna problems, to costs incurred for installation, removal or reinstallation of the product, or to damage to digital memory/media devices, gaming devices, discs, speakers,...Audiovox Video Products AUDIOVOX ELECTRONICS CORP. (the Company) warrants to the original retail purchaser of this product that should this product or any part thereof, under normal use and conditions, be proven defective in material or workmanship within the terms of this product. A game controller, if supplied, is to be repaired or replaced...
... the elimination of externally generated static or noise, to correction of antenna problems, to costs incurred for installation, removal or reinstallation of the product, or to damage to digital memory/media devices, gaming devices, discs, speakers,...Audiovox Video Products AUDIOVOX ELECTRONICS CORP. (the Company) warrants to the original retail purchaser of this product that should this product or any part thereof, under normal use and conditions, be proven defective in material or workmanship within the terms of this product. A game controller, if supplied, is to be repaired or replaced...


