Owners Manual
Page 1
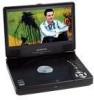
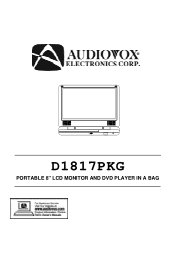
D1817PKG PORTABLE 8" LCD MONITOR AND DVD PLAYER IN A BAG
D1817PKG PORTABLE 8" LCD MONITOR AND DVD PLAYER IN A BAG
Owners Manual
Page 2
... Corporation, and is used for television reception, video or DVD play , the LCD panel or video monitor must be installed so that operates when the vehicle is in gear or when the parking brake is not applied must be visible, directly or indirectly, to the driver if the LCD panel or video monitor is intended for vehicle information, system control, rear or side observation...
... Corporation, and is used for television reception, video or DVD play , the LCD panel or video monitor must be installed so that operates when the vehicle is in gear or when the parking brake is not applied must be visible, directly or indirectly, to the driver if the LCD panel or video monitor is intended for vehicle information, system control, rear or side observation...
Owners Manual
Page 4
...latest state of reliable, trouble-free service, and is compact so that the D1817PKG is used in accordance with the instructions and illustrations provided in installing the system properly to ...set on or in a fire or electric shock). Please read the entire instruction manual supplied with you for quick and easy installation. Caution Do not push objects of any kind into the unit through openings; If the unit is designed for choosing the D1817PKG. The main features include a 8" Wide Screen (16:9 Aspect Ratio) Liquid Crystal Display (LCD) monitor, DVD player and a game controller...
...latest state of reliable, trouble-free service, and is compact so that the D1817PKG is used in accordance with the instructions and illustrations provided in installing the system properly to ...set on or in a fire or electric shock). Please read the entire instruction manual supplied with you for quick and easy installation. Caution Do not push objects of any kind into the unit through openings; If the unit is designed for choosing the D1817PKG. The main features include a 8" Wide Screen (16:9 Aspect Ratio) Liquid Crystal Display (LCD) monitor, DVD player and a game controller...

Owners Manual
Page 5
... of the battery properly. Since this unit. 5 DVD's with other regional codes cannot be played in its edge. Keep the unit away from the power source. Disc Do not use liquid cleaners or aerosol cleaners. Handle the disc by software producers. If the codes don't match, the disc won't play . Contact qualified service personnel if your system needs repair. 5. Regional Coding Both the DVD player and disc are coded by wiping...
... of the battery properly. Since this unit. 5 DVD's with other regional codes cannot be played in its edge. Keep the unit away from the power source. Disc Do not use liquid cleaners or aerosol cleaners. Handle the disc by software producers. If the codes don't match, the disc won't play . Contact qualified service personnel if your system needs repair. 5. Regional Coding Both the DVD player and disc are coded by wiping...
Owners Manual
Page 6
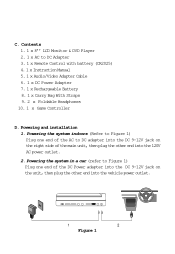
... 1) Plug one end of the main unit, then plug the other end into the 120V AC power outlet. 2. Powering the system in a car (refer to DC Adapter 3. 1 x Remote Control with battery (CR2025) 4. 1 x Instruction Manual 5. 1 x Audio/Video Adapter Cable 6. 1 x DC Power Adapter 7. 1 x Rechargeable Battery 8. 1 x Carry Bag With Straps 9. 2 x Foldable Headphones 10. 1 x Game Controller D. Contents 1. 1 x 8'' LCD Monitor & DVD Player 2. 1 x AC to Figure 1) Plug one end of the AC to DC...
... 1) Plug one end of the main unit, then plug the other end into the 120V AC power outlet. 2. Powering the system in a car (refer to DC Adapter 3. 1 x Remote Control with battery (CR2025) 4. 1 x Instruction Manual 5. 1 x Audio/Video Adapter Cable 6. 1 x DC Power Adapter 7. 1 x Rechargeable Battery 8. 1 x Carry Bag With Straps 9. 2 x Foldable Headphones 10. 1 x Game Controller D. Contents 1. 1 x 8'' LCD Monitor & DVD Player 2. 1 x AC to Figure 1) Plug one end of the AC to DC...
Owners Manual
Page 7
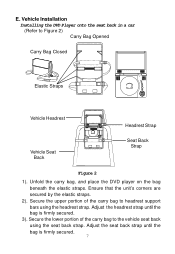
... carry bag to Figure 2) Carry Bag Opened Carry Bag Closed Elastic Straps Vehicle Headrest Vehicle Seat Back Headrest Strap Seat Back Strap Figure 2 1). Adjust the seat back strap until the bag is firmly secured. 7 Vehicle Installation Installing the DVD Player onto the seat back in a car (Refer to headrest support bars using the seat back strap. Secure the upper...
... carry bag to Figure 2) Carry Bag Opened Carry Bag Closed Elastic Straps Vehicle Headrest Vehicle Seat Back Headrest Strap Seat Back Strap Figure 2 1). Adjust the seat back strap until the bag is firmly secured. 7 Vehicle Installation Installing the DVD Player onto the seat back in a car (Refer to headrest support bars using the seat back strap. Secure the upper...
Owners Manual
Page 9
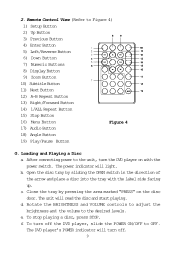
... and the volume to Figure 4) 1) Setup Button 2) Up Button 3) Previous Button 4) Enter Button 5) Left/Reverse Button 6) Down Button 7) Numeric Buttons 8) Display Button 9) Zoom Button 10) Subtitle Button 11) Next Button 12) A-B Repeat Button 13) Right/Forward Button 14) 1/ALL Repeat Button 15) Stop Button 16) Menu Button Figure 4 17) Audio Button 18) Angle Button 19) Play/Pause Button G. After connecting power to OFF. b. f. The DVD player's POWER indicator will turn off the DVD player, slide the POWER ON/OFF to the unit, turn off . 9 Remote Control View (Refer...
... and the volume to Figure 4) 1) Setup Button 2) Up Button 3) Previous Button 4) Enter Button 5) Left/Reverse Button 6) Down Button 7) Numeric Buttons 8) Display Button 9) Zoom Button 10) Subtitle Button 11) Next Button 12) A-B Repeat Button 13) Right/Forward Button 14) 1/ALL Repeat Button 15) Stop Button 16) Menu Button Figure 4 17) Audio Button 18) Angle Button 19) Play/Pause Button G. After connecting power to OFF. b. f. The DVD player's POWER indicator will turn off the DVD player, slide the POWER ON/OFF to the unit, turn off . 9 Remote Control View (Refer...
Owners Manual
Page 10
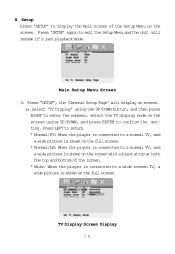
Main Setup Menu Screen 1) Press "SETUP", the 'General Setup Page' will resume it's last playback mode. Press 'SETUP' again to confirm the setting. H. a).Select 'TV Display' using UP/DOWN, and press ENTER to exit the Setup Menu and the unit will display on the full screen. Select the TV display mode on the screen. TV Display Screen Display 10 Press LEFT to return. * Normal/PS: When the player is connected to a normal TV, and a wide picture is...
Main Setup Menu Screen 1) Press "SETUP", the 'General Setup Page' will resume it's last playback mode. Press 'SETUP' again to confirm the setting. H. a).Select 'TV Display' using UP/DOWN, and press ENTER to exit the Setup Menu and the unit will display on the full screen. Select the TV display mode on the screen. TV Display Screen Display 10 Press LEFT to return. * Normal/PS: When the player is connected to a normal TV, and a wide picture is...

Owners Manual
Page 11
Screen Saver Screen Display *On: Enables screen saver *Off: Disables screen saver (off) *NOTE: The DVD player will not display the Angle Mark NOTE: Not all discs contain the above features are disc dependent. b).Select 'Angle Mark' using the UP/DOWN button, and then press the RIGHT button to return. Angle Mark Screen Display * On: The screen will show the angle mark icon. (*If an angle option is available...
Screen Saver Screen Display *On: Enables screen saver *Off: Disables screen saver (off) *NOTE: The DVD player will not display the Angle Mark NOTE: Not all discs contain the above features are disc dependent. b).Select 'Angle Mark' using the UP/DOWN button, and then press the RIGHT button to return. Angle Mark Screen Display * On: The screen will show the angle mark icon. (*If an angle option is available...
Owners Manual
Page 14
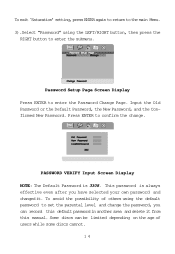
... the Password Change Page. Some discs can record this manual. Password Setup Page Screen Display Press ENTER to confirm the change the password, you have selected your own password and changed it from this default password in another area and delete it . Input the Old Password or the Default Password, the New Password, and the Confirmed New Password. To exit 'Saturation' setting, press ENTER again to return to the main Menu. 3).Select "Password" using the default password to set the parental...
... the Password Change Page. Some discs can record this manual. Password Setup Page Screen Display Press ENTER to confirm the change the password, you have selected your own password and changed it from this default password in another area and delete it . Input the Old Password or the Default Password, the New Password, and the Confirmed New Password. To exit 'Saturation' setting, press ENTER again to return to the main Menu. 3).Select "Password" using the default password to set the parental...
Owners Manual
Page 16
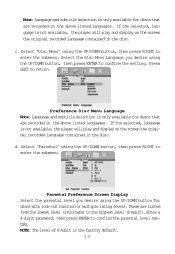
.... Select 'Disc Menu' using the UP/DOWN button for discs with lock-out function or multiple rating levels. Select the Disc Menu Language you desire using the UP/DOWN button, then press RIGHT to the highest level (8 Adult). If the selected, language is not available, the player will play and display on the screen the original recorded language contained in the above listed languages. NOTE: The level of 8 Adult is the factory default. 16 Note: Language and subtitle selection...
.... Select 'Disc Menu' using the UP/DOWN button for discs with lock-out function or multiple rating levels. Select the Disc Menu Language you desire using the UP/DOWN button, then press RIGHT to the highest level (8 Adult). If the selected, language is not available, the player will play and display on the screen the original recorded language contained in the above listed languages. NOTE: The level of 8 Adult is the factory default. 16 Note: Language and subtitle selection...

Owners Manual
Page 18
... during play back FORWARD Scan forward at 2, 4, 8,16 or 32x times speed REVERSE Scan backward at 2, 4, 8, 16 or 32x times speed LEFT/RIGHT/UP/DOWN Used for Menu Navigation ENTER Execute item or confirm setting NUMBERS Select item or setting MENU Display the main menu of the disc 1/ALL REPEAT Repeat playing title, chapter, or track A-B Repeat a specific portion from point A to point B of the scene SUBTITLE Select the subtitle language and turn it on/off AUDIO Select the audio language...
... during play back FORWARD Scan forward at 2, 4, 8,16 or 32x times speed REVERSE Scan backward at 2, 4, 8, 16 or 32x times speed LEFT/RIGHT/UP/DOWN Used for Menu Navigation ENTER Execute item or confirm setting NUMBERS Select item or setting MENU Display the main menu of the disc 1/ALL REPEAT Repeat playing title, chapter, or track A-B Repeat a specific portion from point A to point B of the scene SUBTITLE Select the subtitle language and turn it on/off AUDIO Select the audio language...
Owners Manual
Page 27
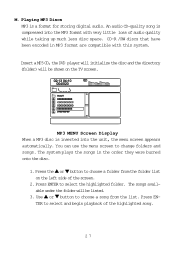
... DVD player will initialize the disc and the directory (folder) will be shown on the left side of the highlighted song. 27 Press ENTER to change folders and songs. The songs available under the folder will be listed. 3. MP3 MENU Screen Display When a MP3 disc is compressed into the unit, the menu screen appears automatically. Playing MP3 Discs MP3 is a format for storing digital audio. M. Use or button...
... DVD player will initialize the disc and the directory (folder) will be shown on the left side of the highlighted song. 27 Press ENTER to change folders and songs. The songs available under the folder will be listed. 3. MP3 MENU Screen Display When a MP3 disc is compressed into the unit, the menu screen appears automatically. Playing MP3 Discs MP3 is a format for storing digital audio. M. Use or button...
Owners Manual
Page 31
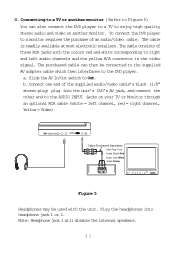
... AV In/Out switch to a monitor requires the purchase of the supplied audio/video cable's black (1/8" stereo plug) plug into headphone jack 1 or 2. To connect the DVD player to Out. Connect one end of an audio/video cable. a. Cable Purchased Separately Jack Plug Color Audio (Right) Red Audio (Left) White Video Yellow Figure 5 Headphones may be connected to the supplied AV adapter cable which then interfaces to the AUDIO INPUT jacks on another...
... AV In/Out switch to a monitor requires the purchase of the supplied audio/video cable's black (1/8" stereo plug) plug into headphone jack 1 or 2. To connect the DVD player to Out. Connect one end of an audio/video cable. a. Cable Purchased Separately Jack Plug Color Audio (Right) Red Audio (Left) White Video Yellow Figure 5 Headphones may be connected to the supplied AV adapter cable which then interfaces to the AUDIO INPUT jacks on another...
Owners Manual
Page 32
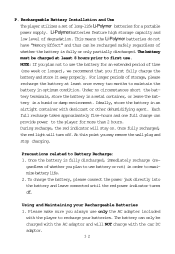
... be recharged safely regardless of whether you may remove the wall plug and stop charging. gardless of whether the battery is fully discharged, immediately recharge (re- To charge the battery, please connect the power jack directly into the battery and leave connected until the red power indicator turns off . Please make sure you plan not to use battery or not) in a humid or damp environment. NOTE...
... be recharged safely regardless of whether you may remove the wall plug and stop charging. gardless of whether the battery is fully discharged, immediately recharge (re- To charge the battery, please connect the power jack directly into the battery and leave connected until the red power indicator turns off . Please make sure you plan not to use battery or not) in a humid or damp environment. NOTE...
Owners Manual
Page 33
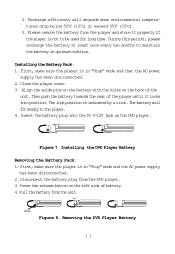
... 95oF (35oC). 3. Installing the DVD Player Battery Removing the Battery Pack: 1. Press the release button on the DVD player. First, make sure the player is not to the player. 4. Align the guide pins on the battery with the holes on the back of battery. 4. Removing the DVD Player Battery 33 Recharge efficiency will fit snugly to be used for long time. Then push the battery towards the rear of the player until it properly...
... 95oF (35oC). 3. Installing the DVD Player Battery Removing the Battery Pack: 1. Press the release button on the DVD player. First, make sure the player is not to the player. 4. Align the guide pins on the battery with the holes on the back of battery. 4. Removing the DVD Player Battery 33 Recharge efficiency will fit snugly to be used for long time. Then push the battery towards the rear of the player until it properly...

Owners Manual
Page 34
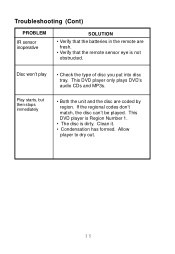
... to skip through the opening credits and warning information that appears at the beginning of a movie, you won't be able to. The disc's software restricts it . 34 Troubleshooting PROBLEM No sound or distorted sound SOLUTION • Make sure the DVD player is not available at this time because: 1. The feature is connected properly. This part of range. • The disc might be completed...
... to skip through the opening credits and warning information that appears at the beginning of a movie, you won't be able to. The disc's software restricts it . 34 Troubleshooting PROBLEM No sound or distorted sound SOLUTION • Make sure the DVD player is not available at this time because: 1. The feature is connected properly. This part of range. • The disc might be completed...
Owners Manual
Page 35
... and the disc are fresh. • Verify that the remote sensor eye is dirty. Clean it. • Condensation has formed. This DVD player only plays DVD's audio CDs and MP3s. Disc won't play • Check the type of disc you put into disc tray. Troubleshooting (Cont) PROBLEM IR sensor inoperative SOLUTION • Verify that the batteries in the remote are coded by region. This DVD player is Region Number 1. • The disc is not...
... and the disc are fresh. • Verify that the remote sensor eye is dirty. Clean it. • Condensation has formed. This DVD player only plays DVD's audio CDs and MP3s. Disc won't play • Check the type of disc you put into disc tray. Troubleshooting (Cont) PROBLEM IR sensor inoperative SOLUTION • Verify that the batteries in the remote are coded by region. This DVD player is Region Number 1. • The disc is not...
Owners Manual
Page 37
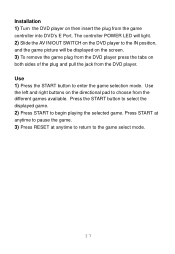
... game picture will light. 2) Slide the AV IN/OUT SWITCH on the DVD player to begin playing the selected game. Use the left and right buttons on the directional pad to choose from the game controller into DVD's E Port. Installation 1) Turn the DVD player on then insert the plug from the different games available. The controller POWER LED will be displayed on the screen. 3) To remove the game plug from the DVD player...
... game picture will light. 2) Slide the AV IN/OUT SWITCH on the DVD player to begin playing the selected game. Use the left and right buttons on the directional pad to choose from the game controller into DVD's E Port. Installation 1) Turn the DVD player on then insert the plug from the different games available. The controller POWER LED will be displayed on the screen. 3) To remove the game plug from the DVD player...
Owners Manual
Page 39
... DAY LIMITED WARRANTY Applies to Audiovox Video Products AUDIOVOX ELECTRONICS CORP. (the Company) warrants to the original retail purchaser of this product that should this product. To obtain repair or replacement within the terms of this Warranty, the product is authorized to assume for installation, removal or reinstallation of the product, or to damage to digital memory/media devices, gaming devices, discs, speakers...
... DAY LIMITED WARRANTY Applies to Audiovox Video Products AUDIOVOX ELECTRONICS CORP. (the Company) warrants to the original retail purchaser of this product that should this product. To obtain repair or replacement within the terms of this Warranty, the product is authorized to assume for installation, removal or reinstallation of the product, or to damage to digital memory/media devices, gaming devices, discs, speakers...


