Owners Manual
Page 4
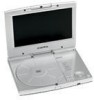
... system only. 6. Powering and installation 1. 5. Also refer to DC Adapter 3. 1 x Rechargeable Battery 4. 1 x Remote Control 5. 1 x Instruction Manual 6. 1 x Audio/Video Cable 7. 1 x DC Power Adapter 8. 1 x Headphone D. Use a cloth lightly dampened with water for cleaning the exterior of disc. C. Contents 1. 1 x 8'' LCD Monitor & DVD Player Combo 2. 1 x AC to the instructions supplied with a cleaning cloth. Powering the system in...
... system only. 6. Powering and installation 1. 5. Also refer to DC Adapter 3. 1 x Rechargeable Battery 4. 1 x Remote Control 5. 1 x Instruction Manual 6. 1 x Audio/Video Cable 7. 1 x DC Power Adapter 8. 1 x Headphone D. Use a cloth lightly dampened with water for cleaning the exterior of disc. C. Contents 1. 1 x 8'' LCD Monitor & DVD Player Combo 2. 1 x AC to the instructions supplied with a cleaning cloth. Powering the system in...

Owners Manual
Page 5
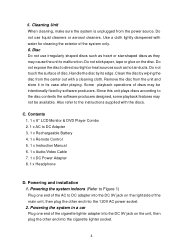
Controls, Indicators, and Connectors 1. Unit View (Refer to Figures 1and 2) 10 Source 1 11 Menu 2 12 Return 3 13 Display 4 14 Function 5 15 Up 6 16 Enter 7 17 Right 8 18 Power 9 Down Left Forward Scan Play/Pause Stop Reverse Scan Push Open LCD Cutoff SSwCiAtcNh Battery Pack Figure 1 19 DC IN 9V 20 S Video/Video 21 Audio 22 Headphone 26 23 Volume 24 Power LED Red/LED Green 25 Remote Control Sensor 26 Screen Lock * * NOTE: The Screen must be locked into position before closing. E. Figure 2 5
Controls, Indicators, and Connectors 1. Unit View (Refer to Figures 1and 2) 10 Source 1 11 Menu 2 12 Return 3 13 Display 4 14 Function 5 15 Up 6 16 Enter 7 17 Right 8 18 Power 9 Down Left Forward Scan Play/Pause Stop Reverse Scan Push Open LCD Cutoff SSwCiAtcNh Battery Pack Figure 1 19 DC IN 9V 20 S Video/Video 21 Audio 22 Headphone 26 23 Volume 24 Power LED Red/LED Green 25 Remote Control Sensor 26 Screen Lock * * NOTE: The Screen must be locked into position before closing. E. Figure 2 5

Owners Manual
Page 6
...) S VIDEO/VIDEO JACK 21) AUDIO JACK (L+R) 22) HI-FI EARPHONE JACK 23) VOLUME UP/DOWN THUMBWHEEL 24) POWER (RED/POWER LED) (GREEN/CHARGE LED) 25) REMOTE CONTROL SENSOR 6
...) S VIDEO/VIDEO JACK 21) AUDIO JACK (L+R) 22) HI-FI EARPHONE JACK 23) VOLUME UP/DOWN THUMBWHEEL 24) POWER (RED/POWER LED) (GREEN/CHARGE LED) 25) REMOTE CONTROL SENSOR 6

Owners Manual
Page 8
Remote Control Function Description Screen: Change the screen aspect ratio. Angle: Switch to next chapter or track Slow: Playback at 1/2X, 1/4X, 1/8X normal speed 4/II: Play and pause Mute: Mute speakers Setup: System setting Display: On screen display of the current disc status Vol. +/-: Volume adjustment 7: Reverse Scan at 2x, 4x or 8x normal playback speed 8: Forward Scan at 2x, 4x or 8x normal playback speed 9: Skip to the PREVIOUS chapter or track :: Skip to a different angle if the DVD contains angle options.
Remote Control Function Description Screen: Change the screen aspect ratio. Angle: Switch to next chapter or track Slow: Playback at 1/2X, 1/4X, 1/8X normal speed 4/II: Play and pause Mute: Mute speakers Setup: System setting Display: On screen display of the current disc status Vol. +/-: Volume adjustment 7: Reverse Scan at 2x, 4x or 8x normal playback speed 8: Forward Scan at 2x, 4x or 8x normal playback speed 9: Skip to the PREVIOUS chapter or track :: Skip to a different angle if the DVD contains angle options.
Owners Manual
Page 20
... OPERATION POWER OPEN PLAY SLOW PAUSE STOP NEXT PREVIOUS FORWARD REVIEW UP/DOWN/LEFT /RIGHT ENTER NUMBERS RETURN MENU REPEAT A-B Turn the unit on the remote allow the volume to be raised and lowered up to output Adjust color, brightness and display format of the audio output jack. 20 Change the...
... OPERATION POWER OPEN PLAY SLOW PAUSE STOP NEXT PREVIOUS FORWARD REVIEW UP/DOWN/LEFT /RIGHT ENTER NUMBERS RETURN MENU REPEAT A-B Turn the unit on the remote allow the volume to be raised and lowered up to output Adjust color, brightness and display format of the audio output jack. 20 Change the...


