Owners Manual
Page 1
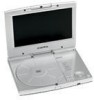
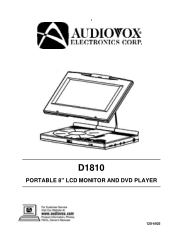
D1810 PORTABLE 8" LCD MONITOR AND DVD PLAYER 128-6925
D1810 PORTABLE 8" LCD MONITOR AND DVD PLAYER 128-6925
Owners Manual
Page 3
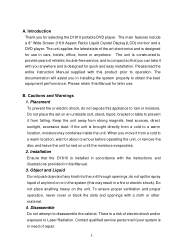
... D1810 is in need of reliable, trouble-free service, and is compact so that you can take it with the instructions and illustrations provided in a fire or electric shock). To ensure proper ventilation and proper operation, never cover or block the slots and openings with this Manual. 3. Disassemble Do not attempt to provide years of repair. 3 Do not place the set...
... D1810 is in need of reliable, trouble-free service, and is compact so that you can take it with the instructions and illustrations provided in a fire or electric shock). To ensure proper ventilation and proper operation, never cover or block the slots and openings with this Manual. 3. Disassemble Do not attempt to provide years of repair. 3 Do not place the set...
Owners Manual
Page 4
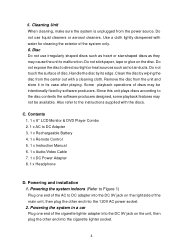
.... 4 Since this unit plays discs according to Figure 1) Plug one end of discs may not be intentionally fixed by wiping the disc from the center out with the discs. Do not expose the disc to direct sunlight or heat sources such as they may cause the unit to DC Adapter 3. 1 x Rechargeable Battery 4. 1 x Remote Control 5. 1 x Instruction Manual 6. 1 x Audio/Video Cable 7. 1 x DC Power Adapter 8. 1 x Headphone D. Contents 1. 1 x 8'' LCD Monitor & DVD Player Combo 2. 1 x AC to malfunction...
.... 4 Since this unit plays discs according to Figure 1) Plug one end of discs may not be intentionally fixed by wiping the disc from the center out with the discs. Do not expose the disc to direct sunlight or heat sources such as they may cause the unit to DC Adapter 3. 1 x Rechargeable Battery 4. 1 x Remote Control 5. 1 x Instruction Manual 6. 1 x Audio/Video Cable 7. 1 x DC Power Adapter 8. 1 x Headphone D. Contents 1. 1 x 8'' LCD Monitor & DVD Player Combo 2. 1 x AC to malfunction...

Owners Manual
Page 6
...) LEFT BUTTON 12) FORWARD SCAN BUTTON 13) PLAY/PAUSE BUTTON 14) STOP BUTTON 15) REVERSE SCAN BUTTON 16) PUSH TO OPEN BUTTON 17) POWER SAVING SWITCH (SCREEN CLOSED LCD PANEL SHUT OFF SWITCH) 18) BATTERY PACK 19) DC 9V INPUT JACK 20) S VIDEO/VIDEO JACK 21) AUDIO JACK (L+R) 22) HI-FI EARPHONE JACK 23) VOLUME UP/DOWN THUMBWHEEL 24) POWER (RED/POWER LED) (GREEN/CHARGE LED) 25) REMOTE CONTROL SENSOR 6 1) SOURCE BUTTON 2) MENU (OR SETUP WHEN IN STOP MODE) 3) RETURN BUTTON 4) DISPLAY BUTTON 5) FUNCTION BUTTON (FOR SCREEN ASPECT RATIO, COLOR AND BRIGHTNESS ADJUSTMENT) 6) UP BUTTON...
...) LEFT BUTTON 12) FORWARD SCAN BUTTON 13) PLAY/PAUSE BUTTON 14) STOP BUTTON 15) REVERSE SCAN BUTTON 16) PUSH TO OPEN BUTTON 17) POWER SAVING SWITCH (SCREEN CLOSED LCD PANEL SHUT OFF SWITCH) 18) BATTERY PACK 19) DC 9V INPUT JACK 20) S VIDEO/VIDEO JACK 21) AUDIO JACK (L+R) 22) HI-FI EARPHONE JACK 23) VOLUME UP/DOWN THUMBWHEEL 24) POWER (RED/POWER LED) (GREEN/CHARGE LED) 25) REMOTE CONTROL SENSOR 6 1) SOURCE BUTTON 2) MENU (OR SETUP WHEN IN STOP MODE) 3) RETURN BUTTON 4) DISPLAY BUTTON 5) FUNCTION BUTTON (FOR SCREEN ASPECT RATIO, COLOR AND BRIGHTNESS ADJUSTMENT) 6) UP BUTTON...

Owners Manual
Page 8
Remote Control Function Description Screen: Change the screen aspect ratio. Angle: Switch to next chapter or track Slow: Playback at 1/2X, 1/4X, 1/8X normal speed 4/II: Play and pause Mute: Mute speakers Setup: System setting Display: On screen display of the current disc status Vol. +/-: Volume adjustment 7: Reverse Scan at 2x, 4x or 8x normal playback speed 8: Forward Scan at 2x, 4x or 8x normal playback speed 9: Skip to the PREVIOUS chapter or track :: Skip to a different angle if the DVD contains angle options.
Remote Control Function Description Screen: Change the screen aspect ratio. Angle: Switch to next chapter or track Slow: Playback at 1/2X, 1/4X, 1/8X normal speed 4/II: Play and pause Mute: Mute speakers Setup: System setting Display: On screen display of the current disc status Vol. +/-: Volume adjustment 7: Reverse Scan at 2x, 4x or 8x normal playback speed 8: Forward Scan at 2x, 4x or 8x normal playback speed 9: Skip to the PREVIOUS chapter or track :: Skip to a different angle if the DVD contains angle options.
Owners Manual
Page 9
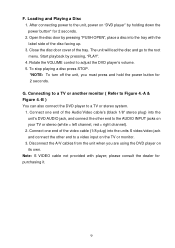
... VOLUME control to a TV or stereo system. 1. The unit will load the disc and go to the AUDIO INPUT jacks on its own. After connecting power to a video input on "DVD player" by holding down the power button* for 2 seconds. 2. To stop playing a disc press STOP. *NOTE: To turn off the unit, you are using the DVD player on your TV or stereo (white = left channel, red = right channel). 2. F. Loading and Playing a Disc 1. Open the disc door by pressing, "PLAY". 4. Start playback...
... VOLUME control to a TV or stereo system. 1. The unit will load the disc and go to the AUDIO INPUT jacks on its own. After connecting power to a video input on "DVD player" by holding down the power button* for 2 seconds. 2. To stop playing a disc press STOP. *NOTE: To turn off the unit, you are using the DVD player on your TV or stereo (white = left channel, red = right channel). 2. F. Loading and Playing a Disc 1. Open the disc door by pressing, "PLAY". 4. Start playback...

Owners Manual
Page 11
SETUP Press 'SETUP' to exit the SETUP Menu Figure 5. Press 'RETURN' or 'SETUP' to display the Main menu of the SETUP Menu on the screen. H. DISC Menu Screen 11 Main SETUP Menu Screen 1) DISC MENU Select "DISC" using the Left /Right buttons, then press 'ENTER' to enter the DISC MENU screen Figure 6.
SETUP Press 'SETUP' to exit the SETUP Menu Figure 5. Press 'RETURN' or 'SETUP' to display the Main menu of the SETUP Menu on the screen. H. DISC Menu Screen 11 Main SETUP Menu Screen 1) DISC MENU Select "DISC" using the Left /Right buttons, then press 'ENTER' to enter the DISC MENU screen Figure 6.
Owners Manual
Page 12
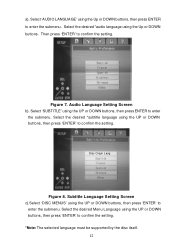
Figure 7. Audio Language Setting Screen b). Select the desired *subtitle language using the UP or DOWN buttons, then press 'ENTER' to confirm the setting. Subtitle Language Setting Screen c).Select 'DISC MENUS' using the UP or DOWN buttons, then press 'ENTER' to enter the submenu. Then press 'ENTER' to enter the submenu. a). Select 'SUBTITLE' using the Up or DOWN buttons, then press ENTER to confirm the setting. *Note: The selected language must be supported by the disc itself. 12 Disc Origin...
Figure 7. Audio Language Setting Screen b). Select the desired *subtitle language using the UP or DOWN buttons, then press 'ENTER' to confirm the setting. Subtitle Language Setting Screen c).Select 'DISC MENUS' using the UP or DOWN buttons, then press 'ENTER' to enter the submenu. Then press 'ENTER' to enter the submenu. a). Select 'SUBTITLE' using the Up or DOWN buttons, then press ENTER to confirm the setting. *Note: The selected language must be supported by the disc itself. 12 Disc Origin...

Owners Manual
Page 13
... play and display on the screen the original recorded language contained in the above listed languages. Press the NUM (number) button to switch the function buttons to enter the Password Change submenu, then select the CHANGE PASSWORD item using the UP or DOWN buttons , then press 'ENTER'. Input the Old Password or the Default Password, and press 'ENTER' to the number mode, and enter either the default password or a new password. Menu language Setting Screen *Note: Language and subtitle selection is locked". The unit will display "enter a 4 digit password...
... play and display on the screen the original recorded language contained in the above listed languages. Press the NUM (number) button to switch the function buttons to enter the Password Change submenu, then select the CHANGE PASSWORD item using the UP or DOWN buttons , then press 'ENTER'. Input the Old Password or the Default Password, and press 'ENTER' to the number mode, and enter either the default password or a new password. Menu language Setting Screen *Note: Language and subtitle selection is locked". The unit will display "enter a 4 digit password...
Owners Manual
Page 16
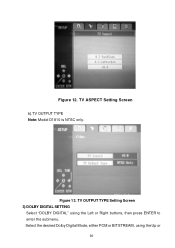
TV ASPECT Setting Screen b).TV OUTPUT TYPE Note: Model D1810 is NTSC only. Select the desired Dolby Digital Mode, either PCM or BITSTREAM, using the Left or Right buttons, then press ENTER to enter the submenu. Figure 13. Figure 12. TV OUTPUT TYPE Setting Screen 3) DOLBY DIGITAL SETTING Select "DOLBY DIGITAL" using theUp or 16
TV ASPECT Setting Screen b).TV OUTPUT TYPE Note: Model D1810 is NTSC only. Select the desired Dolby Digital Mode, either PCM or BITSTREAM, using the Left or Right buttons, then press ENTER to enter the submenu. Figure 13. Figure 12. TV OUTPUT TYPE Setting Screen 3) DOLBY DIGITAL SETTING Select "DOLBY DIGITAL" using theUp or 16

Owners Manual
Page 18
b). Setting the on-screen message to confirm the setting. Display Setting Screen Display a). Select 'ON' or 'OFF', then press 'ENTER' to "OFF" will prevent the on ENGLISH only. 4) DISPLAY SETTING Select "DISPLAY" by using the UP or DOWN buttons, then press 'ENTER" to enter the submenu. Figure 16. Select MENU LANGUAGE Note: The system operation MENU LANGUAGE is set on -screen icons from being displayed during operation. On Screen Message Setting Screen 18 Figure 15. Select 'ON SCREEN MESSAGE' using the left or right buttons, then press ENTER to enter the submenu.
b). Setting the on-screen message to confirm the setting. Display Setting Screen Display a). Select 'ON' or 'OFF', then press 'ENTER' to "OFF" will prevent the on ENGLISH only. 4) DISPLAY SETTING Select "DISPLAY" by using the UP or DOWN buttons, then press 'ENTER" to enter the submenu. Figure 16. Select MENU LANGUAGE Note: The system operation MENU LANGUAGE is set on -screen icons from being displayed during operation. On Screen Message Setting Screen 18 Figure 15. Select 'ON SCREEN MESSAGE' using the left or right buttons, then press ENTER to enter the submenu.

Owners Manual
Page 19
5) OTHER SETTING Select "OTHER" by using the UP or DOWN buttons , then press ENTER to enter the submenu. OTHER SETTING Screen Display a).Select 'LAST MEMORY' using the left or right buttons, then press ENTER to confirm. Select NO or YES by using the UP or DOWN buttons . LAST MEMORY Screen Display *NO: The unit will not retain the last position of playback. *YES: The unit will retain the last position of playback in memory. Last Memory YES Figure 17. This feature is cancelled when power is turned off. 19 Figure 18. Press ENTER to enter the submenu.
5) OTHER SETTING Select "OTHER" by using the UP or DOWN buttons , then press ENTER to enter the submenu. OTHER SETTING Screen Display a).Select 'LAST MEMORY' using the left or right buttons, then press ENTER to confirm. Select NO or YES by using the UP or DOWN buttons . LAST MEMORY Screen Display *NO: The unit will not retain the last position of playback. *YES: The unit will retain the last position of playback in memory. Last Memory YES Figure 17. This feature is cancelled when power is turned off. 19 Figure 18. Press ENTER to enter the submenu.
Owners Manual
Page 20
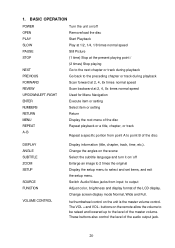
... Display the setup menu to point B of the audio output jack. 20 BASIC OPERATION POWER OPEN PLAY SLOW PAUSE STOP NEXT PREVIOUS FORWARD REVIEW UP/DOWN/LEFT /RIGHT ENTER NUMBERS RETURN MENU REPEAT A-B Turn the unit on the remote allow the volume to be raised and lowered up to output Adjust color, brightness and display format of the master volume. 1. Change the angles on the scene Select the subtitle language and turn it on the unit is the master volume control...
... Display the setup menu to point B of the audio output jack. 20 BASIC OPERATION POWER OPEN PLAY SLOW PAUSE STOP NEXT PREVIOUS FORWARD REVIEW UP/DOWN/LEFT /RIGHT ENTER NUMBERS RETURN MENU REPEAT A-B Turn the unit on the remote allow the volume to be raised and lowered up to output Adjust color, brightness and display format of the master volume. 1. Change the angles on the scene Select the subtitle language and turn it on the unit is the master volume control...
Owners Manual
Page 21
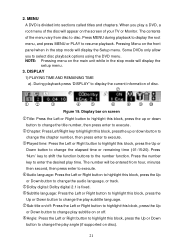
... to change the audio language, or track. Press 'Num ' key to shift the function buttons to resume playback. The contents of your TV or Monitor. Pressing Menu on disc). 21 During playback press 'DISPLAY' to select disc playback options using the DVD menu. mAudio language: Press the Left or Right button to highlight this block, press the Up or Down button to execute. MENU A DVD is fixed. DISPLAY 1) PLAYING TIME AND REMAINING TIME a). The number will display the Setup menu...
... to change the audio language, or track. Press 'Num ' key to shift the function buttons to resume playback. The contents of your TV or Monitor. Pressing Menu on disc). 21 During playback press 'DISPLAY' to select disc playback options using the DVD menu. mAudio language: Press the Left or Right button to highlight this block, press the Up or Down button to execute. MENU A DVD is fixed. DISPLAY 1) PLAYING TIME AND REMAINING TIME a). The number will display the Setup menu...
Owners Manual
Page 22
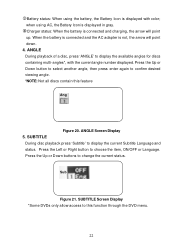
... connected and charging, the arrow will point down. 4. sCharger status: When the battery is displayed in gray. Press the Up or Down button to select another angle, then press enter again to change the current status. Press the Up or Down buttons to confirm desired viewing angle. *NOTE: Not all discs contain this function through the DVD menu. 22 ANGLE Screen Display 5. when using the battery, the Battery...
... connected and charging, the arrow will point down. 4. sCharger status: When the battery is displayed in gray. Press the Up or Down button to select another angle, then press enter again to change the current status. Press the Up or Down buttons to confirm desired viewing angle. *NOTE: Not all discs contain this function through the DVD menu. 22 ANGLE Screen Display 5. when using the battery, the Battery...
Owners Manual
Page 26
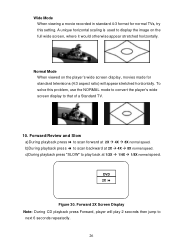
... player's wide screen display, movies made for normal TVs, try this problem, use the NORMAL mode to convert the player's wide screen display to scan backward at 2X à 4X à 8X normal speed. Forward 2X Screen Display Note: During CD playback press Forward, player will appear stretched horizontally. b)During playback press 7 to that of a Standard TV. 10. Wide Mode When viewing a movie recorded in standard 4:3 format for standard televisions (4:3 aspect ratio) will play...
... player's wide screen display, movies made for normal TVs, try this problem, use the NORMAL mode to convert the player's wide screen display to scan backward at 2X à 4X à 8X normal speed. Forward 2X Screen Display Note: During CD playback press Forward, player will appear stretched horizontally. b)During playback press 7 to that of a Standard TV. 10. Wide Mode When viewing a movie recorded in standard 4:3 format for standard televisions (4:3 aspect ratio) will play...
Owners Manual
Page 27
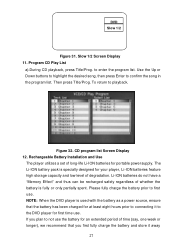
... low level of time (say, one week or longer), we recommend that the battery has been charged for at least eight hours prior to connecting it away 27 NOTE: When the DVD player is used with the battery as a power source, ensure that you plan to not use the battery for an extended period of degradation. Slow 1/2 Screen Display 11. CD program list Screen Display 12. Then press...
... low level of time (say, one week or longer), we recommend that the battery has been charged for at least eight hours prior to connecting it away 27 NOTE: When the DVD player is used with the battery as a power source, ensure that you plan to not use the battery for an extended period of degradation. Slow 1/2 Screen Display 11. CD program list Screen Display 12. Then press...
Owners Manual
Page 29
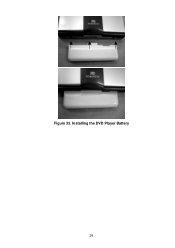
Figure 33. Installing the DVD Player Battery 29
Figure 33. Installing the DVD Player Battery 29
Owners Manual
Page 30
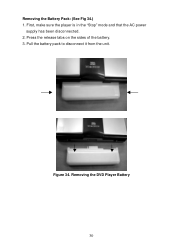
Removing the Battery Pack: (See Fig 34.) 1. Removing the DVD Player Battery 30 Press the release tabs on the sides of the battery. 3. First, make sure the player is in the "Stop" mode and that the AC power supply has been disconnected. 2. Pull the battery pack to disconnect it from the unit. Figure 34.
Removing the Battery Pack: (See Fig 34.) 1. Removing the DVD Player Battery 30 Press the release tabs on the sides of the battery. 3. First, make sure the player is in the "Stop" mode and that the AC power supply has been disconnected. 2. Pull the battery pack to disconnect it from the unit. Figure 34.

Owners Manual
Page 31
13. Specifications Disc format: DVD/CD Color system: NTSC Screen size: 8.0" Frequency response: DVD (PCM 96 kHz/24 bits ): 20Hz-44KHz DVD (PCM 48 kHz/16 bits): 20Hz-22KHz CD: 20Hz-20KHz Video output: 1.0Vp-p(at 75ohm) Video S/N: > 35dB Audio output: 2 X 0.5W Audio S/N: > 35dB Power source: DC 9V (Battery) / DC 12V (Car use) / AC 120V 60Hz (Adapter) Power consumption:
13. Specifications Disc format: DVD/CD Color system: NTSC Screen size: 8.0" Frequency response: DVD (PCM 96 kHz/24 bits ): 20Hz-44KHz DVD (PCM 48 kHz/16 bits): 20Hz-22KHz CD: 20Hz-20KHz Video output: 1.0Vp-p(at 75ohm) Video S/N: > 35dB Audio output: 2 X 0.5W Audio S/N: > 35dB Power source: DC 9V (Battery) / DC 12V (Car use) / AC 120V 60Hz (Adapter) Power consumption:


