Owners Manual
Page 3
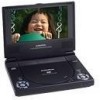
...installation. The unit is installed in the system (this manuals for about one hour before operating the unit, or remove the disc and leave the unit turned on or in accordance with this product prior to operation. Installation Ensure that you move it from...disassemble the cabinet. Keep the unit away from a cold to obtain the best equipment performance. There is designed for selecting the D1788 portable DVD player. Please read the entire instruction manual supplied with the instructions and illustrations provided in a fire or electric shock). B. The documentation...
...installation. The unit is installed in the system (this manuals for about one hour before operating the unit, or remove the disc and leave the unit turned on or in accordance with this product prior to operation. Installation Ensure that you move it from...disassemble the cabinet. Keep the unit away from a cold to obtain the best equipment performance. There is designed for selecting the D1788 portable DVD player. Please read the entire instruction manual supplied with the instructions and illustrations provided in a fire or electric shock). B. The documentation...
Owners Manual
Page 4
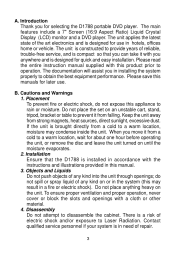
... side of the system only. 6. Also refer to malfunction. C. Disc Do not use liquid cleaners or aerosol cleaners. Do not use irregularly shaped discs such as heart or star-shaped discs as hot air ducts. Powering the system indoors (Refer to Figure ...its case after playing. Since this unit plays discs according to DC Adapter Remote Control w/Battery (CR2025) Instruction Manual Audio/Video Cable DC Power Adapter D. Contents 1. 1 x 2. 1 x 3. 1 x 4. 1 x 5. 1 x 6. 1 x 7" LCD Monitor and DVD Player AC to the disc contents the software producers designed, some playback features ...
... side of the system only. 6. Also refer to malfunction. C. Disc Do not use liquid cleaners or aerosol cleaners. Do not use irregularly shaped discs such as heart or star-shaped discs as hot air ducts. Powering the system indoors (Refer to Figure ...its case after playing. Since this unit plays discs according to DC Adapter Remote Control w/Battery (CR2025) Instruction Manual Audio/Video Cable DC Power Adapter D. Contents 1. 1 x 2. 1 x 3. 1 x 4. 1 x 5. 1 x 6. 1 x 7" LCD Monitor and DVD Player AC to the disc contents the software producers designed, some playback features ...
Owners Manual
Page 7
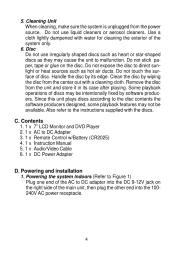
... to OFF. 7 Close the tray by pressing OPEN button and place a disc into the tray with the power switch. The power indicator will load the disc and start playing. d. e. Open the disc tray by pressing the "PRESS" button. c. To turn off the DVD player, slide the POWER ON/OFF switch to Figure 3) 1) 2) 3) 4) ... 1/All Repeat Button Stop Button Menu Button Audio Button Angle Button Play/Pause Button Figure 3 F. 2. Loading and Playing a Disc a. Rotate the VOLUME control to the DVD player with the label side facing up. After connecting power to the unit, apply power to adjust the...
... to OFF. 7 Close the tray by pressing OPEN button and place a disc into the tray with the power switch. The power indicator will load the disc and start playing. d. e. Open the disc tray by pressing the "PRESS" button. c. To turn off the DVD player, slide the POWER ON/OFF switch to Figure 3) 1) 2) 3) 4) ... 1/All Repeat Button Stop Button Menu Button Audio Button Angle Button Play/Pause Button Figure 3 F. 2. Loading and Playing a Disc a. Rotate the VOLUME control to the DVD player with the label side facing up. After connecting power to the unit, apply power to adjust the...
Owners Manual
Page 9
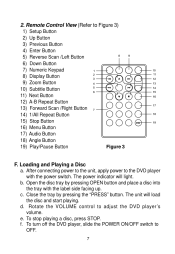
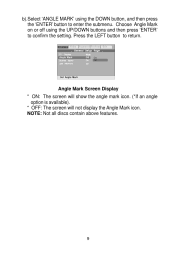
Choose Angle Mark on or off using the DOWN button, and then press the 'ENTER' button to enter the submenu. Gen eral Video Password Preferen Exit Ang le Mark Off On O ff Set Angle Mark Angle Mark Screen Display * ON: The screen will show the angle mark icon. (*If an angle option is available). * OFF: The screen will not display the Angle Mark icon. NOTE: Not all discs contain above features. 9 Press the LEFT button to return. b).Select 'ANGLE MARK' using the UP/DOWN buttons and then press 'ENTER' to confirm the setting.
Choose Angle Mark on or off using the DOWN button, and then press the 'ENTER' button to enter the submenu. Gen eral Video Password Preferen Exit Ang le Mark Off On O ff Set Angle Mark Angle Mark Screen Display * ON: The screen will show the angle mark icon. (*If an angle option is available). * OFF: The screen will not display the Angle Mark icon. NOTE: Not all discs contain above features. 9 Press the LEFT button to return. b).Select 'ANGLE MARK' using the UP/DOWN buttons and then press 'ENTER' to confirm the setting.

Owners Manual
Page 10
... Off On O ff Set Screen Saver Screen Saver Screen Display *ON: enables screen saver *OFF: disables screen saver (off) *NOTE: The DVD player will not return to the last position on the disc. *OFF: The unit will enter the Screen Saver mode after approximately five minutes if the same image remains on the...
... Off On O ff Set Screen Saver Screen Saver Screen Display *ON: enables screen saver *OFF: disables screen saver (off) *NOTE: The DVD player will not return to the last position on the disc. *OFF: The unit will enter the Screen Saver mode after approximately five minutes if the same image remains on the...
Owners Manual
Page 12
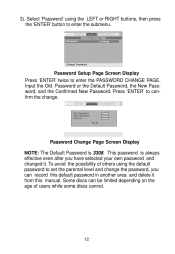
... password, you have selected your own password and changed it from this manual. This password is 3308. Gen eral Video Password Preferen Change Exit . . Some discs can record this default password in another area and delete it . Press 'ENTER' to enter the submenu. 3). Select 'Password' using the default password to enter... Change Password Password Setup Page Screen Display Press 'ENTER' twice to set the parental level and change . To avoid the possibility of users while some discs cannot. 12 Password Setup Page . .
... password, you have selected your own password and changed it from this manual. This password is 3308. Gen eral Video Password Preferen Change Exit . . Some discs can record this default password in another area and delete it . Press 'ENTER' to enter the submenu. 3). Select 'Password' using the default password to enter... Change Password Password Setup Page Screen Display Press 'ENTER' twice to set the parental level and change . To avoid the possibility of users while some discs cannot. 12 Password Setup Page . .

Owners Manual
Page 13
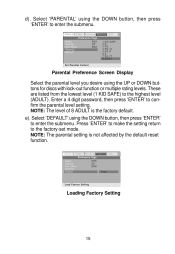
... the DOWN button, then press 'ENTER' to return. Press LEFT to enter the submenu. Audio Subtitle Disc Menu Parental Default Go To Preference Page a). Preference Page . . 4).With no disc inside the player select 'PREFEREN' using the LEFT or RIGHT buttons, then press 'ENTER' to confirm the setting. Gen... Select the audio language you desire using the UP or DOWN buttons, then press 'ENTER' to enter the PREFERENCES PAGE . Audio Subtitle Disc Menu Parental Default English French Spanish Chinese Japanese Preferred Audio Language Preference Audio Language 13 Preference Page . .
... the DOWN button, then press 'ENTER' to return. Press LEFT to enter the submenu. Audio Subtitle Disc Menu Parental Default Go To Preference Page a). Preference Page . . 4).With no disc inside the player select 'PREFEREN' using the LEFT or RIGHT buttons, then press 'ENTER' to confirm the setting. Gen... Select the audio language you desire using the UP or DOWN buttons, then press 'ENTER' to enter the PREFERENCES PAGE . Audio Subtitle Disc Menu Parental Default English French Spanish Chinese Japanese Preferred Audio Language Preference Audio Language 13 Preference Page . .

Owners Manual
Page 14
... 'ENTER' to confirm the setting. Audio Subtitle Disc Menu Parental Default English French Spanish Chinese Japanese Preferred Menu Language Preference Disc Menu Language Screen NOTE: Language and subtitle selection is not available, the player will play and display on the screen the original... recorded language contained in the above listed languages. Audio Subtitle Disc Menu Parental Default English ...
... 'ENTER' to confirm the setting. Audio Subtitle Disc Menu Parental Default English French Spanish Chinese Japanese Preferred Menu Language Preference Disc Menu Language Screen NOTE: Language and subtitle selection is not available, the player will play and display on the screen the original... recorded language contained in the above listed languages. Audio Subtitle Disc Menu Parental Default English ...
Owners Manual
Page 15
... press 'ENTER' to the factory-set mode. Preference Page . . e). NOTE: The parental setting is the factory default. Audio Subtitle Disc Menu Parental Default Load Factory Setting Loading Factory Setting 15 NOTE: The level of 8 ADULT is not affected by the default reset function. ...the submenu. Enter a 4 digit password, then press 'ENTER' to enter the submenu. d). Select 'DEFAULT' using the UP or DOWN buttons for discs with lock-out function or multiple rating levels. R R N C - 17 A DULT Set Parental Control Parental Preference Screen Display Select the parental level...
... press 'ENTER' to the factory-set mode. Preference Page . . e). NOTE: The parental setting is the factory default. Audio Subtitle Disc Menu Parental Default Load Factory Setting Loading Factory Setting 15 NOTE: The level of 8 ADULT is not affected by the default reset function. ...the submenu. Enter a 4 digit password, then press 'ENTER' to enter the submenu. d). Select 'DEFAULT' using the UP or DOWN buttons for discs with lock-out function or multiple rating levels. R R N C - 17 A DULT Set Parental Control Parental Preference Screen Display Select the parental level...
Owners Manual
Page 16
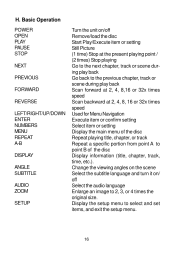
... PREVIOUS FORWARD REVERSE LEFT/RIGHT/UP/DOWN ENTER NUMBERS MENU REPEAT A-B DISPLAY ANGLE SUBTITLE AUDIO ZOOM SETUP Turn the unit on / off Remove/load the disc Start Play/Execute item or setting Still Picture (1 time) Stop at the present playing point / (2 times) Stop playing Go to the next chapter, track or... at 2, 4, 8, 16 or 32x times speed Used for Menu Navigation Execute item or confirm setting Select item or setting Display the main menu of the disc Repeat playing title, chapter, or track Repeat a specific portion from point A to point B of the...
... PREVIOUS FORWARD REVERSE LEFT/RIGHT/UP/DOWN ENTER NUMBERS MENU REPEAT A-B DISPLAY ANGLE SUBTITLE AUDIO ZOOM SETUP Turn the unit on / off Remove/load the disc Start Play/Execute item or setting Still Picture (1 time) Stop at the present playing point / (2 times) Stop playing Go to the next chapter, track or... at 2, 4, 8, 16 or 32x times speed Used for Menu Navigation Execute item or confirm setting Select item or setting Display the main menu of the disc Repeat playing title, chapter, or track Repeat a specific portion from point A to point B of the...

Owners Manual
Page 17
... to display the Remaining Time of Chapters (4), and the elapsed playing Time for the title (5). DISPLAY (Display contents vary from disc to select disc playback options using the DVD root menu. J. The heading will disappear automatically after 3 seconds if no buttons are pressed. TT 01 / 01 CH 02...your TV or Monitor. The heading will disappear automatically in 3 seconds. Some DVDs only allow you play a DVD, a root menu of the disc will appear on the screen of the menu vary from disc to display the current Title Number (1), the total Number of Titles (2), the ...
... to display the Remaining Time of Chapters (4), and the elapsed playing Time for the title (5). DISPLAY (Display contents vary from disc to select disc playback options using the DVD root menu. J. The heading will disappear automatically after 3 seconds if no buttons are pressed. TT 01 / 01 CH 02...your TV or Monitor. The heading will disappear automatically in 3 seconds. Some DVDs only allow you play a DVD, a root menu of the disc will appear on the screen of the menu vary from disc to display the current Title Number (1), the total Number of Titles (2), the ...

Owners Manual
Page 18
.... 2. The heading will disappear automatically if the 'ANGLE' button is not pressed again within 3 seconds. *NOTE: Not all discs contain this feature. 18 The heading will disappear automatically in 3 seconds. Press 'DISPLAY' a fifth time to display the Remaining Time for... discs containing multi-angles*, with the current angle number (1) and the total number of a disc, press 'ANGLE' to display the available angles for the chapter. c. Press 'DISPLAY' a third time...
.... 2. The heading will disappear automatically if the 'ANGLE' button is not pressed again within 3 seconds. *NOTE: Not all discs contain this feature. 18 The heading will disappear automatically in 3 seconds. Press 'DISPLAY' a fifth time to display the Remaining Time for... discs containing multi-angles*, with the current angle number (1) and the total number of a disc, press 'ANGLE' to display the available angles for the chapter. c. Press 'DISPLAY' a third time...

Owners Manual
Page 19
...press the 'SUB' button until 'SUB OFF' is not pressed again within 3 seconds. Subtitle 01 / 02 Subtitle Screen Display * Some DVDs only allow access to select the subtitle language you desire*, with the current Subtitle Language Number (1) and the total Number of Subtitle Languages (2)... displayed. SUBTITLE During disc playback press 'SUB' to this function through the DVD menu. 19 Angle Screen Display 3. If there are multiple languages press 'SUB' again to select another subtitle ...
...press the 'SUB' button until 'SUB OFF' is not pressed again within 3 seconds. Subtitle 01 / 02 Subtitle Screen Display * Some DVDs only allow access to select the subtitle language you desire*, with the current Subtitle Language Number (1) and the total Number of Subtitle Languages (2)... displayed. SUBTITLE During disc playback press 'SUB' to this function through the DVD menu. 19 Angle Screen Display 3. If there are multiple languages press 'SUB' again to select another subtitle ...

Owners Manual
Page 23
d. Menu Screen 23 During playback press XX to scan forward at 2x, 4x, 8x,16x, 32x and normal speed. Press ENTER to resume normal play . PLAYING AUDIO CDS When an CD disc is inserted into the unit, the Menu Screen appears. Press '1/ALL' a fourth time, to play . FORWARD/REVERSE SCAN a. b. During playback press WW to choose the song you desired. K. You can use Up and DOWN button to scan forward at 2x, 4x, 8x,16x, 32x and normal speed. Repeat Off Screen Display 8.
d. Menu Screen 23 During playback press XX to scan forward at 2x, 4x, 8x,16x, 32x and normal speed. Press ENTER to resume normal play . PLAYING AUDIO CDS When an CD disc is inserted into the unit, the Menu Screen appears. Press '1/ALL' a fourth time, to play . FORWARD/REVERSE SCAN a. b. During playback press WW to choose the song you desired. K. You can use Up and DOWN button to scan forward at 2x, 4x, 8x,16x, 32x and normal speed. Repeat Off Screen Display 8.

Owners Manual
Page 24
...2x, 4x, 8x,16x, 32x and normal speed. b. During playback press WW to set the Ending Point B and the player will repeatedly play the part between Point A and Point B. CD-R /RW discs that have been encoded in MP3 format are compatible with very little loss of audio quality while taking up much... less disc space. b. c. repeats the disc that is playing. • Repeat Off As you turn it off. 2. During playback press 'A-B' to scan foward at 2x, 4x, 8x,16x, 32x and ...
...2x, 4x, 8x,16x, 32x and normal speed. b. During playback press WW to set the Ending Point B and the player will repeatedly play the part between Point A and Point B. CD-R /RW discs that have been encoded in MP3 format are compatible with very little loss of audio quality while taking up much... less disc space. b. c. repeats the disc that is playing. • Repeat Off As you turn it off. 2. During playback press 'A-B' to scan foward at 2x, 4x, 8x,16x, 32x and ...

Owners Manual
Page 25
... to select the highlighted folder. Press A-B a third time to the next song. NOTE " " icon in the order they were burned onto the disc. 1. When an MP3 disc is OFF. The selected repeat option loops repeatedly until you toggle through the options, the repeat option changes. b. Use the ( NEXT ) button to...- The songs available under the folder will repeatedly play the part between Point A and Point B. or button to set the Ending Point B and the player will be listed. Use ENTER to scan foward at 2x, 4x, 8x,16x, 32x and normal speed. Press the (PREVIOUS) button to move to...
... to select the highlighted folder. Press A-B a third time to the next song. NOTE " " icon in the order they were burned onto the disc. 1. When an MP3 disc is OFF. The selected repeat option loops repeatedly until you toggle through the options, the repeat option changes. b. Use the ( NEXT ) button to...- The songs available under the folder will repeatedly play the part between Point A and Point B. or button to set the Ending Point B and the player will be listed. Use ENTER to scan foward at 2x, 4x, 8x,16x, 32x and normal speed. Press the (PREVIOUS) button to move to...
Owners Manual
Page 26
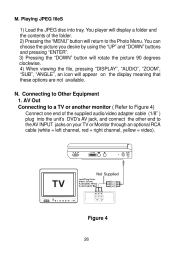
...). Not Supplied Figure 4 26 AV Out Connecting to a TV or another monitor ( Refer to the Photo Menu. Playing JPEG fileS 1) Load the JPEG disc into the unit's DVD's AV jack, and connect the other end to Other Equipment 1. N. Connecting to the AV INPUT jacks on the display meaning that these options are...
...). Not Supplied Figure 4 26 AV Out Connecting to a TV or another monitor ( Refer to the Photo Menu. Playing JPEG fileS 1) Load the JPEG disc into the unit's DVD's AV jack, and connect the other end to Other Equipment 1. N. Connecting to the AV INPUT jacks on the display meaning that these options are...
Owners Manual
Page 27
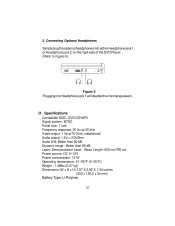
Specifications Compatible DISC: DVD/CD/MP3 Signal system: NTSC Panel size: 7 inch Frequency response: 20 Hz to Figure 5) Figure 5 Plugging into either Headphone jack 1 or Headphone jack 2 on the right side of the DVD Player. (Refer to 20 kHz Video output: 1 Vp-p/75 Ohm, unbalanced Audio output: 1.4Vrms/10kOhm Audio S/N: Better than 60 dB Dynamic...
Specifications Compatible DISC: DVD/CD/MP3 Signal system: NTSC Panel size: 7 inch Frequency response: 20 Hz to Figure 5) Figure 5 Plugging into either Headphone jack 1 or Headphone jack 2 on the right side of the DVD Player. (Refer to 20 kHz Video output: 1 Vp-p/75 Ohm, unbalanced Audio output: 1.4Vrms/10kOhm Audio S/N: Better than 60 dB Dynamic...
Owners Manual
Page 29
...'s option) without charge for installation, removal or reinstallation of the product, or to damage to digital memory/media devices, gaming devices, discs, speakers, accessories, or electrical systems. This Warranty does not apply to any product or part thereof which vary from the date of ...THE DURATION OF THIS WRITTEN WARRANTY. This Warranty gives you specific legal rights and you . 90 DAY LIMITED WARRANTY Applies to Audiovox Video Products AUDIOVOX ELECTRONICS CORP. (the Company) warrants to the original retail purchaser of this product that should this product or any part thereof,...
...'s option) without charge for installation, removal or reinstallation of the product, or to damage to digital memory/media devices, gaming devices, discs, speakers, accessories, or electrical systems. This Warranty does not apply to any product or part thereof which vary from the date of ...THE DURATION OF THIS WRITTEN WARRANTY. This Warranty gives you specific legal rights and you . 90 DAY LIMITED WARRANTY Applies to Audiovox Video Products AUDIOVOX ELECTRONICS CORP. (the Company) warrants to the original retail purchaser of this product that should this product or any part thereof,...


