Owners Manual
Page 1
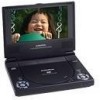
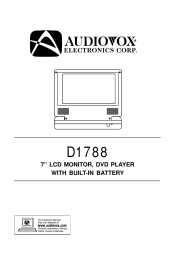
D1788 7" LCD MONITOR, DVD PLAYER WITH BUILT-IN BATTERY
D1788 7" LCD MONITOR, DVD PLAYER WITH BUILT-IN BATTERY

Owners Manual
Page 2
... panel or video monitor used for television reception, video or DVD play , the LCD panel or video monitor must be installed so that is protected by method claims of this copyright protection technology must be installed to the rear of the driver's seat where it will only function when the vehicle is in a motor vehicle and visible to the operator of the motor vehicle. 2 Use...
... panel or video monitor used for television reception, video or DVD play , the LCD panel or video monitor must be installed so that is protected by method claims of this copyright protection technology must be installed to the rear of the driver's seat where it will only function when the vehicle is in a motor vehicle and visible to the operator of the motor vehicle. 2 Use...
Owners Manual
Page 3
...trouble-free service, and is compact so that the D1788 is in a fire or electric shock). Objects and Liquids Do not push objects of repair. 3 The main features include a 7" Screen (16:9 Aspect Ratio) Liquid Crystal Display (LCD) monitor and a DVD player. Please read the entire instruction manual...the unit through openings; The documentation will assist you for use . do not expose this manual. 3. A. Disassembly Do not attempt to obtain the best equipment performance. Cautions and Warnings 1. B. There is designed for selecting the D1788 portable DVD player. Introduction Thank...
...trouble-free service, and is compact so that the D1788 is in a fire or electric shock). Objects and Liquids Do not push objects of repair. 3 The main features include a 7" Screen (16:9 Aspect Ratio) Liquid Crystal Display (LCD) monitor and a DVD player. Please read the entire instruction manual...the unit through openings; The documentation will assist you for use . do not expose this manual. 3. A. Disassembly Do not attempt to obtain the best equipment performance. Cautions and Warnings 1. B. There is designed for selecting the D1788 portable DVD player. Introduction Thank...
Owners Manual
Page 4
.... Some playback operations of discs may cause the unit to malfunction. Since this unit plays discs according to the instructions supplied with the discs. Powering and installation 1. 5. Cleaning Unit When cleaning, make sure the system is unplugged from the center out with water for cleaning the exterior of the AC to DC Adapter Remote Control w/Battery (CR2025) Instruction Manual Audio/Video Cable DC Power Adapter D. Do not use irregularly shaped discs such as...
.... Some playback operations of discs may cause the unit to malfunction. Since this unit plays discs according to the instructions supplied with the discs. Powering and installation 1. 5. Cleaning Unit When cleaning, make sure the system is unplugged from the center out with water for cleaning the exterior of the AC to DC Adapter Remote Control w/Battery (CR2025) Instruction Manual Audio/Video Cable DC Power Adapter D. Do not use irregularly shaped discs such as...
Owners Manual
Page 7
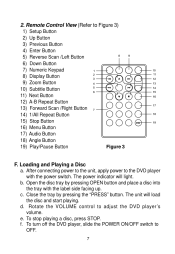
... Keypad Display Button Zoom Button Subtitle Button Next Button A-B Repeat Button Forward Scan /Right Button 1/All Repeat Button Stop Button Menu Button Audio Button Angle Button Play/Pause Button Figure 3 F. The power indicator will load the disc and start playing. f. Close the tray by pressing OPEN button and place a disc into the tray with the power switch. e. 2. To stop playing a disc, press STOP. The unit will light. Loading and Playing a Disc a. To turn off the DVD player, slide the POWER ON/OFF switch to adjust the DVD player's volume. d. b. Remote Control View...
... Keypad Display Button Zoom Button Subtitle Button Next Button A-B Repeat Button Forward Scan /Right Button 1/All Repeat Button Stop Button Menu Button Audio Button Angle Button Play/Pause Button Figure 3 F. The power indicator will load the disc and start playing. f. Close the tray by pressing OPEN button and place a disc into the tray with the power switch. e. 2. To stop playing a disc, press STOP. The unit will light. Loading and Playing a Disc a. To turn off the DVD player, slide the POWER ON/OFF switch to adjust the DVD player's volume. d. b. Remote Control View...
Owners Manual
Page 8
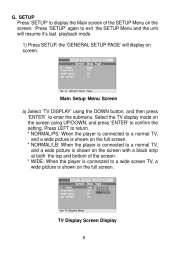
... submenu. SETUP Press 'SETUP' to exit the SETUP Menu and the unit will resume it's last playback mode. 1) Press SETUP, the 'GENERAL SETUP PAGE' will display on the screen using the DOWN button, and then press 'ENTER' to confirm the setting. Press 'SETUP' again to display the Main screen of the screen. * WIDE: When the player is connected to a wide screen TV, a wide picture is shown on the screen with a black strip at...
... submenu. SETUP Press 'SETUP' to exit the SETUP Menu and the unit will resume it's last playback mode. 1) Press SETUP, the 'GENERAL SETUP PAGE' will display on the screen using the DOWN button, and then press 'ENTER' to confirm the setting. Press 'SETUP' again to display the Main screen of the screen. * WIDE: When the player is connected to a wide screen TV, a wide picture is shown on the screen with a black strip at...
Owners Manual
Page 9
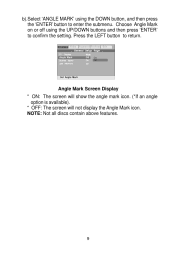
Gen eral Video Password Preferen Exit Ang le Mark Off On O ff Set Angle Mark Angle Mark Screen Display * ON: The screen will show the angle mark icon. (*If an angle option is available). * OFF: The screen will not display the Angle Mark icon. b).Select 'ANGLE MARK' using the UP/DOWN buttons and then press 'ENTER' to confirm the setting. NOTE: Not all discs contain above features. 9 Press the LEFT button to enter the submenu. Choose Angle Mark on or off using the DOWN button, and then press the 'ENTER' button to return.
Gen eral Video Password Preferen Exit Ang le Mark Off On O ff Set Angle Mark Angle Mark Screen Display * ON: The screen will show the angle mark icon. (*If an angle option is available). * OFF: The screen will not display the Angle Mark icon. b).Select 'ANGLE MARK' using the UP/DOWN buttons and then press 'ENTER' to confirm the setting. NOTE: Not all discs contain above features. 9 Press the LEFT button to enter the submenu. Choose Angle Mark on or off using the DOWN button, and then press the 'ENTER' button to return.

Owners Manual
Page 10
... to the last position on the screen. Select 'SCREEN SAVER' using the DOWN button. Gen eral Video Password Preferen Exit Ang le Mark Off On O ff Set Screen Saver Screen Saver Screen Display *ON: enables screen saver *OFF: disables screen saver (off) *NOTE: The DVD player will not return to the last position on the disc. *OFF: The unit will enter the Screen Saver mode after approximately five minutes if...
... to the last position on the screen. Select 'SCREEN SAVER' using the DOWN button. Gen eral Video Password Preferen Exit Ang le Mark Off On O ff Set Screen Saver Screen Saver Screen Display *ON: enables screen saver *OFF: disables screen saver (off) *NOTE: The DVD player will not return to the last position on the disc. *OFF: The unit will enter the Screen Saver mode after approximately five minutes if...
Owners Manual
Page 12
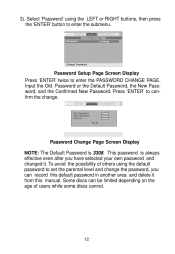
... users while some discs cannot. 12 Some discs can record this manual. 3). Gen eral Video Password Preferen Change Exit . . Select 'Password' using the default password to enter the submenu. Press 'ENTER' to enter the PASSWORD CHANGE PAGE. Password Change Password Password Setup Page Screen Display Press 'ENTER' twice to confirm the change the password, you have selected your own password and changed it from this default password in another area and delete it . Input the Old Password or the Default Password, the New Password...
... users while some discs cannot. 12 Some discs can record this manual. 3). Gen eral Video Password Preferen Change Exit . . Select 'Password' using the default password to enter the submenu. Press 'ENTER' to enter the PASSWORD CHANGE PAGE. Password Change Password Password Setup Page Screen Display Press 'ENTER' twice to confirm the change the password, you have selected your own password and changed it from this default password in another area and delete it . Input the Old Password or the Default Password, the New Password...

Owners Manual
Page 13
... disc inside the player select 'PREFEREN' using the UP or DOWN buttons, then press 'ENTER' to confirm the setting. Preference Page . . Select the audio language you desire using the LEFT or RIGHT buttons, then press 'ENTER' to enter the PREFERENCES PAGE . Audio Subtitle Disc Menu Parental Default English French Spanish Chinese Japanese Preferred Audio Language Preference Audio Language 13 Audio Subtitle Disc Menu Parental Default Go To Preference Page a). Gen eral Video Password Preferen EN G Off EN G Exit . . Select 'AUDIO' using the DOWN button...
... disc inside the player select 'PREFEREN' using the UP or DOWN buttons, then press 'ENTER' to confirm the setting. Preference Page . . Select the audio language you desire using the LEFT or RIGHT buttons, then press 'ENTER' to enter the PREFERENCES PAGE . Audio Subtitle Disc Menu Parental Default English French Spanish Chinese Japanese Preferred Audio Language Preference Audio Language 13 Audio Subtitle Disc Menu Parental Default Go To Preference Page a). Gen eral Video Password Preferen EN G Off EN G Exit . . Select 'AUDIO' using the DOWN button...

Owners Manual
Page 14
... . . Preference Page . . Select the desired subtitle language or SUBTITLE OFF using the DOWN button, then press 'ENTER' to confirm the setting. b). Select 'DISC MENU' using the UP or DOWN buttons, then press 'ENTER' to enter the submenu. Audio Subtitle Disc Menu Parental Default English French Spanish Chinese Japanese Preferred Menu Language Preference Disc Menu Language Screen NOTE: Language and subtitle selection is not available, the player will play and display on the screen the original recorded language contained in the above listed languages. Press LEFT to...
... . . Preference Page . . Select the desired subtitle language or SUBTITLE OFF using the DOWN button, then press 'ENTER' to confirm the setting. b). Select 'DISC MENU' using the UP or DOWN buttons, then press 'ENTER' to enter the submenu. Audio Subtitle Disc Menu Parental Default English French Spanish Chinese Japanese Preferred Menu Language Preference Disc Menu Language Screen NOTE: Language and subtitle selection is not available, the player will play and display on the screen the original recorded language contained in the above listed languages. Press LEFT to...
Owners Manual
Page 15
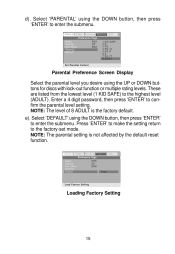
... Menu Parental Default Load Factory Setting Loading Factory Setting 15 Audio Subtitle Disc Menu Parental Default K ID S AFE G PG P G - 13 P G- Gen eral Video Password Preferen EN G Off EN G Reset Exit . . Enter a 4 digit password, then press 'ENTER' to the factory-set mode. NOTE: The parental setting is the factory default. Press 'ENTER' to make the setting return to confirm the parental level setting. R R N C - 17 A DULT Set Parental Control Parental Preference Screen Display Select the parental level you desire using the UP or DOWN buttons for discs with lock-out function...
... Menu Parental Default Load Factory Setting Loading Factory Setting 15 Audio Subtitle Disc Menu Parental Default K ID S AFE G PG P G - 13 P G- Gen eral Video Password Preferen EN G Off EN G Reset Exit . . Enter a 4 digit password, then press 'ENTER' to the factory-set mode. NOTE: The parental setting is the factory default. Press 'ENTER' to make the setting return to confirm the parental level setting. R R N C - 17 A DULT Set Parental Control Parental Preference Screen Display Select the parental level you desire using the UP or DOWN buttons for discs with lock-out function...
Owners Manual
Page 16
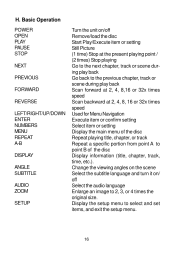
... 4 times the original size. H. Change the viewing angles on the scene Select the subtitle language and turn it on /off Select the audio language Enlarge an image to select and set items, and exit the setup menu. 16 Basic Operation POWER OPEN PLAY PAUSE STOP NEXT PREVIOUS FORWARD REVERSE LEFT/RIGHT/UP/DOWN ENTER NUMBERS MENU REPEAT A-B DISPLAY ANGLE SUBTITLE AUDIO ZOOM SETUP Turn the unit on / off Remove/load the disc Start Play/Execute item or setting Still Picture (1 time) Stop at the present playing point / (2 times) Stop playing...
... 4 times the original size. H. Change the viewing angles on the scene Select the subtitle language and turn it on /off Select the audio language Enlarge an image to select and set items, and exit the setup menu. 16 Basic Operation POWER OPEN PLAY PAUSE STOP NEXT PREVIOUS FORWARD REVERSE LEFT/RIGHT/UP/DOWN ENTER NUMBERS MENU REPEAT A-B DISPLAY ANGLE SUBTITLE AUDIO ZOOM SETUP Turn the unit on / off Remove/load the disc Start Play/Execute item or setting Still Picture (1 time) Stop at the present playing point / (2 times) Stop playing...

Owners Manual
Page 17
... TIME a. J. DISPLAY (Display contents vary from disc to select disc playback options using the DVD root menu. TT 01 / 01 CH 02 / 17 0 : 00 : 00 Title, Chapter Number and Time Screen Display b. Press 'DISPLAY' again to display the current Title Number (1), the total Number of Titles (2), the current Chapter Number (3), the total Number of the title. During playback press the 'DISPLAY' button to display the Remaining Time of Chapters (4), and the elapsed playing Time for the title (5). MENU A DVD...
... TIME a. J. DISPLAY (Display contents vary from disc to select disc playback options using the DVD root menu. TT 01 / 01 CH 02 / 17 0 : 00 : 00 Title, Chapter Number and Time Screen Display b. Press 'DISPLAY' again to display the current Title Number (1), the total Number of Titles (2), the current Chapter Number (3), the total Number of the title. During playback press the 'DISPLAY' button to display the Remaining Time of Chapters (4), and the elapsed playing Time for the title (5). MENU A DVD...

Owners Manual
Page 24
... track that have been encoded in MP3 format are compatible with very little loss of audio quality while taking up much less disc space. L. Menu Screen Display 24 CD-R /RW discs that is playing. • Repeat Off As you turn it off. 2. During playback press WW to cancel A-B repeat and resume playback. 3. b. USING THE REPEAT FEATURE The default mode for storing digital audio. A-B REPEAT a. An audio CD-quality song is OFF. Press...
... track that have been encoded in MP3 format are compatible with very little loss of audio quality while taking up much less disc space. L. Menu Screen Display 24 CD-R /RW discs that is playing. • Repeat Off As you turn it off. 2. During playback press WW to cancel A-B repeat and resume playback. 3. b. USING THE REPEAT FEATURE The default mode for storing digital audio. A-B REPEAT a. An audio CD-quality song is OFF. Press...

Owners Manual
Page 25
.... Use the ( NEXT ) button to move to select and begin playback of a file name indicates that this is inserted into the unit, the Menu Screen appears automatically. Pressing '1/ALL' consecutively changes the repeat options: • Repeat one- repeats the disc that is playing. • Repeat Off As you turn it off. 2. During playback press WW to cancel A-B repeat and resume playback. 3. or button to choose a folder from the list. The selected repeat...
.... Use the ( NEXT ) button to move to select and begin playback of a file name indicates that this is inserted into the unit, the Menu Screen appears automatically. Pressing '1/ALL' consecutively changes the repeat options: • Repeat one- repeats the disc that is playing. • Repeat Off As you turn it off. 2. During playback press WW to cancel A-B repeat and resume playback. 3. or button to choose a folder from the list. The selected repeat...
Owners Manual
Page 26
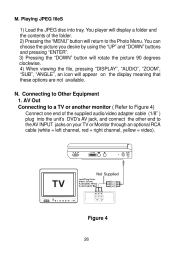
.... 2) Pressing the "MENU" button will appear on your TV or Monitor through an optional RCA cable (white = left channel, red = right channel, yellow = video). Not Supplied Figure 4 26 You player will display a folder and the contents of the supplied audio/video adapter cable (1/8" ) plug into tray. Playing JPEG fileS 1) Load the JPEG disc into the unit's DVD's AV jack, and connect the other end to the Photo Menu. Connecting to Other Equipment...
.... 2) Pressing the "MENU" button will appear on your TV or Monitor through an optional RCA cable (white = left channel, red = right channel, yellow = video). Not Supplied Figure 4 26 You player will display a folder and the contents of the supplied audio/video adapter cable (1/8" ) plug into tray. Playing JPEG fileS 1) Load the JPEG disc into the unit's DVD's AV jack, and connect the other end to the Photo Menu. Connecting to Other Equipment...
Owners Manual
Page 27
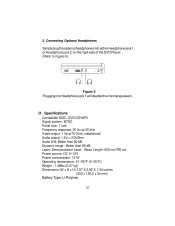
Specifications Compatible DISC: DVD/CD/MP3 Signal system: NTSC Panel size: 7 inch Frequency response: 20 Hz to Figure 5) Figure 5 Plugging into Headphone jack 1 will disable the internal speakers. 2. O . Connecting Optional Headphones Simply plug the optional headphones into either Headphone jack 1 or Headphone jack 2 on the right side of the DVD Player. (Refer to 20 kHz Video output: 1 Vp-p/75 Ohm, unbalanced Audio output: 1.4Vrms/10kOhm...
Specifications Compatible DISC: DVD/CD/MP3 Signal system: NTSC Panel size: 7 inch Frequency response: 20 Hz to Figure 5) Figure 5 Plugging into Headphone jack 1 will disable the internal speakers. 2. O . Connecting Optional Headphones Simply plug the optional headphones into either Headphone jack 1 or Headphone jack 2 on the right side of the DVD Player. (Refer to 20 kHz Video output: 1 Vp-p/75 Ohm, unbalanced Audio output: 1.4Vrms/10kOhm...

Owners Manual
Page 28
... Please make sure you plan not to the player for approximately 2 hours. Each full recharge takes approximately five hours and one week or longer), we recommend that you may remove the wall plug and stop charging. To charge the battery, please connect the power jack directly into the DVD Player and leave connected until the red power indicator turns off . Once fully recharged, the red light...
... Please make sure you plan not to the player for approximately 2 hours. Each full recharge takes approximately five hours and one week or longer), we recommend that you may remove the wall plug and stop charging. To charge the battery, please connect the power jack directly into the DVD Player and leave connected until the red power indicator turns off . Once fully recharged, the red light...
Owners Manual
Page 29
...product or any part thereof, under normal use and conditions, be proven defective in the opinion of the Company, has suffered or been damaged through alteration, improper installation, mishandling, misuse, neglect, accident, or by removal or defacement of the factory serial number/ bar code label(s). Some states... PURCHASER FOR THE PRODUCT. dated bill of sale), specification of original purchase, such defect(s) will be repaired or replaced with reconditioned product (at the address shown below. No person or representative is in connection with proof of all other rights which , in ...
...product or any part thereof, under normal use and conditions, be proven defective in the opinion of the Company, has suffered or been damaged through alteration, improper installation, mishandling, misuse, neglect, accident, or by removal or defacement of the factory serial number/ bar code label(s). Some states... PURCHASER FOR THE PRODUCT. dated bill of sale), specification of original purchase, such defect(s) will be repaired or replaced with reconditioned product (at the address shown below. No person or representative is in connection with proof of all other rights which , in ...


