User Guide
Page 1
D1718PK PORTABLE 7" LCD MONITOR AND DVD PLAYER
D1718PK PORTABLE 7" LCD MONITOR AND DVD PLAYER

User Guide
Page 3
...excessive dust. Disassembly 3 The main features include a 7" Wide Screen (16:9 Aspect Ratio) Liquid Crystal Display (LCD) monitor and a DVD player. Installation Ensure that you anywhere and is used in hotels, offices or your home. Introduction Thank you in this appliance to provide years ... openings; Please save this product prior to obtain the best equipment performance. If the unit is designed for choosing the D1718PK portable DVD player. do not expose this manual. 3. Please read the entire instruction manual supplied with the instructions and illustrations provided in...
...excessive dust. Disassembly 3 The main features include a 7" Wide Screen (16:9 Aspect Ratio) Liquid Crystal Display (LCD) monitor and a DVD player. Installation Ensure that you anywhere and is used in hotels, offices or your home. Introduction Thank you in this appliance to provide years ... openings; Please save this product prior to obtain the best equipment performance. If the unit is designed for choosing the D1718PK portable DVD player. do not expose this manual. 3. Please read the entire instruction manual supplied with the instructions and illustrations provided in...

User Guide
Page 4
... malfunction. Do not touch the surface of electric shock and/or exposure to the instructions supplied with a cleaning cloth. Regional Coding Both the DVD player and disc are coded by wiping the disc from the unit and store it in need of repair. 5. If the codes don't match,... this unit. 4 These regional codes must match in this unit plays discs according to play . Some playback operations of the system only. 6. DVD's with water for the disc to the disc contents the software producers designed, some playback features may be available. Use a cloth lightly dampened with...
... malfunction. Do not touch the surface of electric shock and/or exposure to the instructions supplied with a cleaning cloth. Regional Coding Both the DVD player and disc are coded by wiping the disc from the unit and store it in need of repair. 5. If the codes don't match,... this unit. 4 These regional codes must match in this unit plays discs according to play . Some playback operations of the system only. 6. DVD's with water for the disc to the disc contents the software producers designed, some playback features may be available. Use a cloth lightly dampened with...
User Guide
Page 5
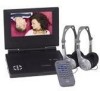
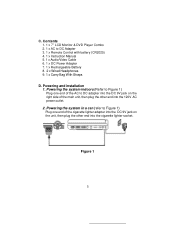
... indoors (Refer to Figure 1) Plug one end of the main unit, then plug the other end into the 120V AC power outlet. 2. Contents 1. 1 x 7'' LCD Monitor & DVD Player Combo 2. 1 x AC to DC adapter into the DC 9V jack on the right side of the cigarette lighter adapter into the DC 9V jack on...
... indoors (Refer to Figure 1) Plug one end of the main unit, then plug the other end into the 120V AC power outlet. 2. Contents 1. 1 x 7'' LCD Monitor & DVD Player Combo 2. 1 x AC to DC adapter into the DC 9V jack on the right side of the cigarette lighter adapter into the DC 9V jack on...
User Guide
Page 6
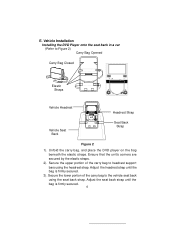
... the bag beneath the elastic straps. Adjust the seat back strap until the bag is firmly secured. 6 Vehicle Installation Installing the DVD Player onto the seat back in a car (Refer to headrest support bars using the seat back strap. Adjust the headrest strap until the bag is firmly ...
... the bag beneath the elastic straps. Adjust the seat back strap until the bag is firmly secured. 6 Vehicle Installation Installing the DVD Player onto the seat back in a car (Refer to headrest support bars using the seat back strap. Adjust the headrest strap until the bag is firmly ...
User Guide
Page 8
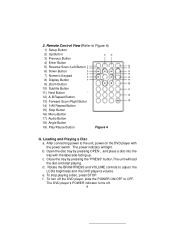
... a disc, press STOP. Close the tray by pressing OPEN , and place a disc into the tray with the power switch. 2. f. The DVD player's POWER indicator turns off the DVD player, slide the POWER ON/OFF to Figure 4) 1) Setup Button 2) Up Button 3) Previous Button 4) Enter Button 5) Reverse Scan /Left Button 6)...the disc and start playing. Loading and Playing a Disc a. d. Rotate the BRIGHTNESS and VOLUME controls to the unit, power on the DVD player with the label side facing up. To turn off . 8 Remote Control View (Refer to OFF. b. Open the disc tray by pressing...
... a disc, press STOP. Close the tray by pressing OPEN , and place a disc into the tray with the power switch. 2. f. The DVD player's POWER indicator turns off the DVD player, slide the POWER ON/OFF to Figure 4) 1) Setup Button 2) Up Button 3) Previous Button 4) Enter Button 5) Reverse Scan /Left Button 6)...the disc and start playing. Loading and Playing a Disc a. d. Rotate the BRIGHTNESS and VOLUME controls to the unit, power on the DVD player with the label side facing up. To turn off . 8 Remote Control View (Refer to OFF. b. Open the disc tray by pressing...
User Guide
Page 10
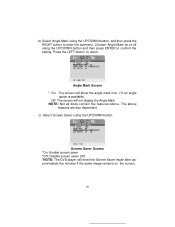
... Mark Screen * On: The screen will enter the Screen Saver mode after approximately five minutes if the same image remains on or off ) *NOTE: The DVD player will show the angle mark icon. (*If an angle option is available).
... Mark Screen * On: The screen will enter the Screen Saver mode after approximately five minutes if the same image remains on or off ) *NOTE: The DVD player will show the angle mark icon. (*If an angle option is available).
User Guide
Page 25
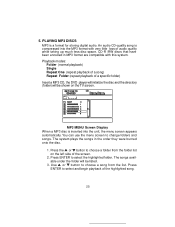
... the disc. 1. Playback modes: Folder (normal playback) Single Repeat One (repeat playback of a song) Repeat Folder (repeat playback of a specific folder) Insert a MP3 CD, the DVD player will initialize the disc and the directory (folder) will be shown on the left side of the screen. 2. Press the or button to choose a song...
... the disc. 1. Playback modes: Folder (normal playback) Single Repeat One (repeat playback of a song) Repeat Folder (repeat playback of a specific folder) Insert a MP3 CD, the DVD player will initialize the disc and the directory (folder) will be shown on the left side of the screen. 2. Press the or button to choose a song...
User Guide
Page 31
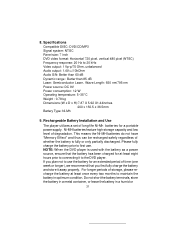
...time (one week or longer), we recommend that you plan not to the DVD player. NOTE: When the DVD player is fully or only partially discharged. Specifications Compatible DISC: DVD/CD/MP3 Signal system: NTSC Panel size: 7 inch DVD video format: Horizontal 720 pixel, vertical 480 pixel (NTSC) Frequency response:... 20 Hz to maintain the battery in a humid or 31 If you first fully charge the battery and store it to use . Rechargeable Battery Installation and Use The player utilizes a set of...
...time (one week or longer), we recommend that you plan not to the DVD player. NOTE: When the DVD player is fully or only partially discharged. Specifications Compatible DISC: DVD/CD/MP3 Signal system: NTSC Panel size: 7 inch DVD video format: Horizontal 720 pixel, vertical 480 pixel (NTSC) Frequency response:... 20 Hz to maintain the battery in a humid or 31 If you first fully charge the battery and store it to use . Rechargeable Battery Installation and Use The player utilizes a set of...
User Guide
Page 32
...full charge can provide power to maximize battery life. 2. less of whether you always use battery or not) in order to the player for a long period, please also recharge the battery at least once two months to avoid irreparable damage to use only the AC adapter... your batteries. 2. damp environment. To charge the battery, please connect the power jack directly into the DVD player and leave the POWER switch in an airtight container with the player to the player for approximately 3 hours. At this period , please recharge the battery at least once two weeks. 32...
...full charge can provide power to maximize battery life. 2. less of whether you always use battery or not) in order to the player for a long period, please also recharge the battery at least once two months to avoid irreparable damage to use only the AC adapter... your batteries. 2. damp environment. To charge the battery, please connect the power jack directly into the DVD player and leave the POWER switch in an airtight container with the player to the player for approximately 3 hours. At this period , please recharge the battery at least once two weeks. 32...
User Guide
Page 33
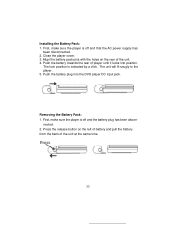
... off and that the AC power supply has been disconnected. 2. Push the battery towards the rear of player until it locks into the DVD player DC input jack. Push the battery plug into position. The lock position is off and the battery plug has been discon- Align the battery pack ... with the holes on the left of battery and pull the battery from the back of the unit. 4. The unit will fit snugly to the player. 5. Press the release button on the rear of the unit at the same time. 33 Installing the Battery Pack: 1.
... off and that the AC power supply has been disconnected. 2. Push the battery towards the rear of player until it locks into the DVD player DC input jack. Push the battery plug into position. The lock position is off and the battery plug has been discon- Align the battery pack ... with the holes on the left of battery and pull the battery from the back of the unit. 4. The unit will fit snugly to the player. 5. Press the release button on the rear of the unit at the same time. 33 Installing the Battery Pack: 1.


