User Guide
Page 1
D1718PK PORTABLE 7" LCD MONITOR AND DVD PLAYER
D1718PK PORTABLE 7" LCD MONITOR AND DVD PLAYER
User Guide
Page 2
... television reception, video or DVD play that these features will not be authorized by Macrovision Corporation. An LCD panel or video monitor used for home and other rights owners. Use of this copyright protection technology must be installed to the rear of the driver's seat where it will only function when the vehicle is in a motor vehicle and visible to the operator of certain...
... television reception, video or DVD play that these features will not be authorized by Macrovision Corporation. An LCD panel or video monitor used for home and other rights owners. Use of this copyright protection technology must be installed to the rear of the driver's seat where it will only function when the vehicle is in a motor vehicle and visible to the operator of certain...

User Guide
Page 3
... later use in installing the system properly to a warm location, moisture may result in this manual. 3. Objects and Liquids Do not push objects of the art electronics and is designed for choosing the D1718PK portable DVD player. Introduction Thank you anywhere and is designed for about one hour before operating the unit, or remove the disc and leave the unit turned...
... later use in installing the system properly to a warm location, moisture may result in this manual. 3. Objects and Liquids Do not push objects of the art electronics and is designed for choosing the D1718PK portable DVD player. Introduction Thank you anywhere and is designed for about one hour before operating the unit, or remove the disc and leave the unit turned...

User Guide
Page 4
... to the instructions supplied with other regional codes cannot be available. Do not touch the surface of repair. 5. Remove the disc from the power source. Regional Coding Both the DVD player and disc are coded by software producers. DVD's with the discs. 7. Also refer to Laser Radiation. These regional codes must match in its edge. Use a cloth lightly dampened with a cleaning cloth. Handle the disc by wiping the disc from the...
... to the instructions supplied with other regional codes cannot be available. Do not touch the surface of repair. 5. Remove the disc from the power source. Regional Coding Both the DVD player and disc are coded by software producers. DVD's with the discs. 7. Also refer to Laser Radiation. These regional codes must match in its edge. Use a cloth lightly dampened with a cleaning cloth. Handle the disc by wiping the disc from the...
User Guide
Page 5
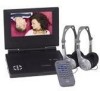
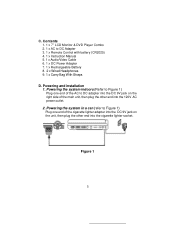
... 120V AC power outlet. 2. Figure 1 5 Powering and installation 1. Powering the system indoors (Refer to Figure 1) Plug one end of the cigarette lighter adapter into the DC 9V jack on the right side of the AC to DC Adapter 3. 1 x Remote Control with battery (CR2025) 4. 1 x Instruction Manual 5. 1 x Audio/Video Cable 6. 1 x DC Power Adapter 7. 1 x Rechargeable Battery 8. 2 x Wired Headphones 9. 1 x Carry Bag With Straps D. C. Contents 1. 1 x 7'' LCD Monitor & DVD Player Combo 2. 1 x AC to DC adapter into the...
... 120V AC power outlet. 2. Figure 1 5 Powering and installation 1. Powering the system indoors (Refer to Figure 1) Plug one end of the cigarette lighter adapter into the DC 9V jack on the right side of the AC to DC Adapter 3. 1 x Remote Control with battery (CR2025) 4. 1 x Instruction Manual 5. 1 x Audio/Video Cable 6. 1 x DC Power Adapter 7. 1 x Rechargeable Battery 8. 2 x Wired Headphones 9. 1 x Carry Bag With Straps D. C. Contents 1. 1 x 7'' LCD Monitor & DVD Player Combo 2. 1 x AC to DC adapter into the...
User Guide
Page 6
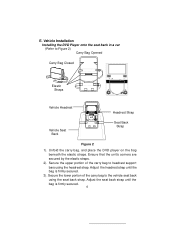
...Installation Installing the DVD Player onto the seat back in a car (Refer to the vehicle seat back using the headrest strap. Secure the lower portion of the carry bag to headrest support bars using the seat back strap. E. Secure the upper portion of the carry bag to Figure 2) Carry Bag Opened Carry Bag Closed... Elastic Straps Vehicle Headrest Headrest Strap Vehicle Seat Back Seat Back Strap Figure 2 1). Adjust the seat back...
...Installation Installing the DVD Player onto the seat back in a car (Refer to the vehicle seat back using the headrest strap. Secure the lower portion of the carry bag to headrest support bars using the seat back strap. E. Secure the upper portion of the carry bag to Figure 2) Carry Bag Opened Carry Bag Closed... Elastic Straps Vehicle Headrest Headrest Strap Vehicle Seat Back Seat Back Strap Figure 2 1). Adjust the seat back...
User Guide
Page 8
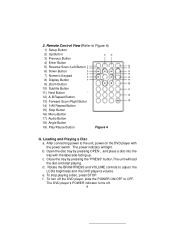
...VOLUME controls to the unit, power on the DVD player with the label side facing up. The DVD player's POWER indicator turns off the DVD player, slide the POWER ON/OFF to Figure 4) 1) Setup Button 2) Up Button 3) Previous Button 4) Enter Button 5) Reverse Scan /Left Button 6) Down Button 7) Numeric Keypad 8) Display Button 9) Zoom Button 10) Subtitle Button 11) Next Button 12) A-B Repeat Button 13) Forward Scan /Right Button 14) 1/All Repeat Button 15) Stop Button 16) Menu Button 17) Audio Button 18) Angle Button 19) Play/Pause Button Figure 4 G. c. b. Open the disc tray...
...VOLUME controls to the unit, power on the DVD player with the label side facing up. The DVD player's POWER indicator turns off the DVD player, slide the POWER ON/OFF to Figure 4) 1) Setup Button 2) Up Button 3) Previous Button 4) Enter Button 5) Reverse Scan /Left Button 6) Down Button 7) Numeric Keypad 8) Display Button 9) Zoom Button 10) Subtitle Button 11) Next Button 12) A-B Repeat Button 13) Forward Scan /Right Button 14) 1/All Repeat Button 15) Stop Button 16) Menu Button 17) Audio Button 18) Angle Button 19) Play/Pause Button Figure 4 G. c. b. Open the disc tray...
User Guide
Page 9
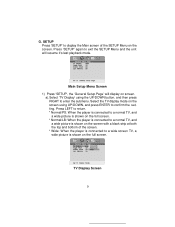
... the screen with a black strip at both the top and bottom of the SETUP Menu on the full screen. Main Setup Menu Screen 1) Press 'SETUP', the 'General Setup Page' will resume it's last playback mode. a).Select 'TV Display' using UP/DOWN, and press ENTER to exit the SETUP Menu and the unit will display on the screen using the UP/DOWN button, and then press RIGHT to a wide screen TV, a wide picture is connected...
... the screen with a black strip at both the top and bottom of the SETUP Menu on the full screen. Main Setup Menu Screen 1) Press 'SETUP', the 'General Setup Page' will resume it's last playback mode. a).Select 'TV Display' using UP/DOWN, and press ENTER to exit the SETUP Menu and the unit will display on the screen using the UP/DOWN button, and then press RIGHT to a wide screen TV, a wide picture is connected...
User Guide
Page 10
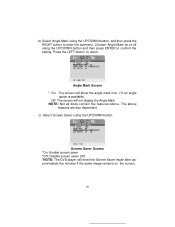
... disc dependent. Screen Saver Screen *On: Enable screen saver *Off: Disable screen saver (off) *NOTE: The DVD player will enter the Screen Saver mode after approximately five minutes if the same image remains on or off using the UP/DOWN button and then press ENTER to confirm the setting. Choose Angle Mark on the screen. 10 The above . c). Select 'Screen Saver' using the UP/DOWN button. Off: The screen...
... disc dependent. Screen Saver Screen *On: Enable screen saver *Off: Disable screen saver (off) *NOTE: The DVD player will enter the Screen Saver mode after approximately five minutes if the same image remains on or off using the UP/DOWN button and then press ENTER to confirm the setting. Choose Angle Mark on the screen. 10 The above . c). Select 'Screen Saver' using the UP/DOWN button. Off: The screen...
User Guide
Page 11
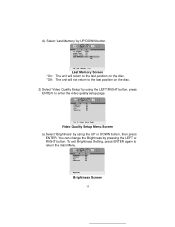
d). You can change the Brightness by using the LEFT/RIGHT button, press ENTER to enter the video quality setup page. Video Quality Setup Menu Screen a).Select 'Brightness' by pressing the LEFT or RIGHT button. Select 'Last Memory' by using the UP or DOWN button, then press ENTER. State Last Memory Screen *On: The unit will return to the last position on the disc. *Off: The unit will not return to return the main Menu. To exit Brightness Setting, press ENTER again to the last position on the disc. 2) Select 'Video Quality Setup' by UP/DOWN button. Brightness Screen 11
d). You can change the Brightness by using the LEFT/RIGHT button, press ENTER to enter the video quality setup page. Video Quality Setup Menu Screen a).Select 'Brightness' by pressing the LEFT or RIGHT button. Select 'Last Memory' by using the UP or DOWN button, then press ENTER. State Last Memory Screen *On: The unit will return to the last position on the disc. *Off: The unit will not return to return the main Menu. To exit Brightness Setting, press ENTER again to the last position on the disc. 2) Select 'Video Quality Setup' by UP/DOWN button. Brightness Screen 11
User Guide
Page 13
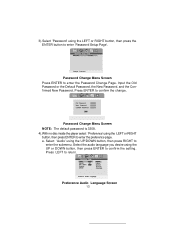
... submenu. Input the Old Password or the Default Password, the New Password, and the Confirmed New Password. a. Select 'Audio' using the UP or DOWN button, then press ENTER to confirm the setting. Press LEFT to confirm the change. Password Change Menu Screen NOTE: The default password is 3308. 4).With no disc inside the player select 'Preference' using the LEFT or RIGHT button, then press the ENTER button to enter 'Password Setup Page'. Preference Audio Language Screen 13 Password Change Menu Screen Press ENTER...
... submenu. Input the Old Password or the Default Password, the New Password, and the Confirmed New Password. a. Select 'Audio' using the UP or DOWN button, then press ENTER to confirm the setting. Press LEFT to confirm the change. Password Change Menu Screen NOTE: The default password is 3308. 4).With no disc inside the player select 'Preference' using the LEFT or RIGHT button, then press the ENTER button to enter 'Password Setup Page'. Preference Audio Language Screen 13 Password Change Menu Screen Press ENTER...
User Guide
Page 14
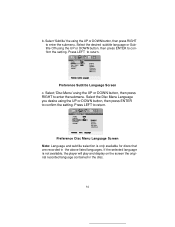
... submenu. Preference Subtitle Language Screen c. If the selected language is only available for discs that are recorded in the disc. 14 Preference Disc Menu Language Screen Note: Language and subtitle selection is not available, the player will play and display on the screen the original recorded language contained in the above listed languages. Select the Disc Menu Language you desire using the UP or DOWN button, then press ENTER to confirm the setting. Select the desired subtitle language or Subtitle Off using the UP or...
... submenu. Preference Subtitle Language Screen c. If the selected language is only available for discs that are recorded in the disc. 14 Preference Disc Menu Language Screen Note: Language and subtitle selection is not available, the player will play and display on the screen the original recorded language contained in the above listed languages. Select the Disc Menu Language you desire using the UP or DOWN button, then press ENTER to confirm the setting. Select the desired subtitle language or Subtitle Off using the UP or...
User Guide
Page 15
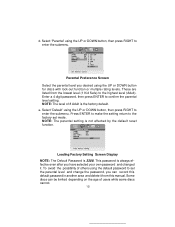
... change the password, you can be limited depending on the age of others using the UP or DOWN button for discs with lock-out function or multiple rating levels. e. Loading Factory Setting Screen Display NOTE: The Default Password is the factory default. NOTE: The parental setting is always effective even after you desired using the default password to enter the submenu. d. These are listed from this default password in another area and delete it . Select 'Default' using...
... change the password, you can be limited depending on the age of others using the UP or DOWN button for discs with lock-out function or multiple rating levels. e. Loading Factory Setting Screen Display NOTE: The Default Password is the factory default. NOTE: The parental setting is always effective even after you desired using the default password to enter the submenu. d. These are listed from this default password in another area and delete it . Select 'Default' using...

User Guide
Page 16
... scene Select the subtitle language and turn it on /off Select the audio language Enlarge an image to 2, 3, or 4 times the original size. Basic Operation POWER OPEN PLAY SLOW PAUSE STOP SKIP+(NEXT) SKIP-(PREVIOUS) FORWARD REVERSE LEFT/RIGHT/UP/DOWN ENTER NUMBERS RETURN MENU REPEAT A-B DISPLAY ANGLE SUBTITLE AUDIO ZOOM SETUP Turn the unit on / off Remove/load the disc Start Play/Execute item or setting Play at 1/2, 1/4, 1/8 or 1/16 times speed Still Picture (1 time) Stop at the present playing point / (2 times) Stop playing Go...
... scene Select the subtitle language and turn it on /off Select the audio language Enlarge an image to 2, 3, or 4 times the original size. Basic Operation POWER OPEN PLAY SLOW PAUSE STOP SKIP+(NEXT) SKIP-(PREVIOUS) FORWARD REVERSE LEFT/RIGHT/UP/DOWN ENTER NUMBERS RETURN MENU REPEAT A-B DISPLAY ANGLE SUBTITLE AUDIO ZOOM SETUP Turn the unit on / off Remove/load the disc Start Play/Execute item or setting Play at 1/2, 1/4, 1/8 or 1/16 times speed Still Picture (1 time) Stop at the present playing point / (2 times) Stop playing Go...
User Guide
Page 25
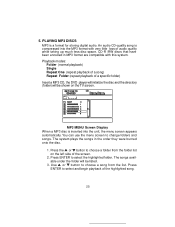
... can use the menu screen to select the highlighted folder. The system plays the songs in MP3 format are compatible with very little loss of the screen. 2. Use or button to choose a song from the folder list on the TV screen. Playback modes: Folder (normal playback) Single Repeat One (repeat playback of a song) Repeat Folder (repeat playback of the highlighted song. 25 The songs available under the folder will be listed. 3. An audio...
... can use the menu screen to select the highlighted folder. The system plays the songs in MP3 format are compatible with very little loss of the screen. 2. Use or button to choose a song from the folder list on the TV screen. Playback modes: Folder (normal playback) Single Repeat One (repeat playback of a song) Repeat Folder (repeat playback of the highlighted song. 25 The songs available under the folder will be listed. 3. An audio...
User Guide
Page 28
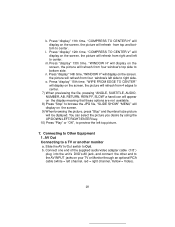
... key. 10) Press "Play" or "OK", to bottom side. Connect one end of the supplied audio/video adapter cable (1/8" ) plug into the unit's DVD's AV jack, and connect the other end to center. Press "display" 15th time, "WIPE FROM EDGE TO CENTER" will display on the screen, the picture will refresh from 4 edges to center. 7) When previewing the file, pressing "ANGLE, SUBTITLE, AUDIO, NUMBER, AB, RETURN, REW...
... key. 10) Press "Play" or "OK", to bottom side. Connect one end of the supplied audio/video adapter cable (1/8" ) plug into the unit's DVD's AV jack, and connect the other end to center. Press "display" 15th time, "WIPE FROM EDGE TO CENTER" will display on the screen, the picture will refresh from 4 edges to center. 7) When previewing the file, pressing "ANGLE, SUBTITLE, AUDIO, NUMBER, AB, RETURN, REW...
User Guide
Page 31
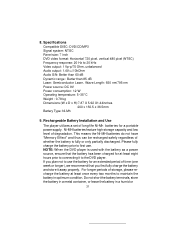
... kg Dimensions (W x D x H):7.87 X 5.92 X1.44inches 200 x 150.5 x 36.5mm Battery Type: Ni-Mh 9. Do not short the battery terminals, store the battery in a metal container, or leave the battery in optimum condition. 8. For longer periods of time (one week or longer), we recommend that the battery has been charged for a portable power supply. Rechargeable Battery Installation and Use The player utilizes a set of degradation.
... kg Dimensions (W x D x H):7.87 X 5.92 X1.44inches 200 x 150.5 x 36.5mm Battery Type: Ni-Mh 9. Do not short the battery terminals, store the battery in a metal container, or leave the battery in optimum condition. 8. For longer periods of time (one week or longer), we recommend that the battery has been charged for a portable power supply. Rechargeable Battery Installation and Use The player utilizes a set of degradation.
User Guide
Page 32
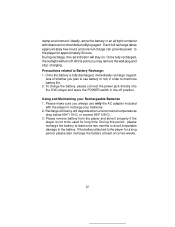
... charge the battery, please connect the power jack directly into the DVD player and leave the POWER switch in the off . Each full recharge takes approximately five-hours and one full charge can provide power to Battery Recharge: 1. Please make sure you plan to use only the AC adapter included with desiccant or other dehumidifying agent. Once fully recharged, the red light will turn off position. Please remove battery...
... charge the battery, please connect the power jack directly into the DVD player and leave the POWER switch in the off . Each full recharge takes approximately five-hours and one full charge can provide power to Battery Recharge: 1. Please make sure you plan to use only the AC adapter included with desiccant or other dehumidifying agent. Once fully recharged, the red light will turn off position. Please remove battery...
User Guide
Page 33
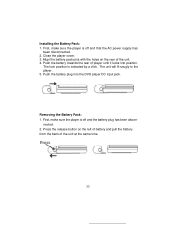
... the player. 5. Removing the Battery Pack: 1. Installing the Battery Pack: 1. Align the battery pack pins with the holes on the left of battery and pull the battery from the back of the unit at the same time. 33 Push the battery plug into position. Press the release button on the rear of player until it locks into the DVD player DC input jack. First, make sure the player is...
... the player. 5. Removing the Battery Pack: 1. Installing the Battery Pack: 1. Align the battery pack pins with the holes on the left of battery and pull the battery from the back of the unit at the same time. 33 Push the battery plug into position. Press the release button on the rear of player until it locks into the DVD player DC input jack. First, make sure the player is...
User Guide
Page 34
... or any part thereof, under normal use and conditions, be proven defective in the opinion of the Company, has suffered or been damaged through alteration, improper installation, mishandling, misuse, neglect, accident, or by removal or defacement of the factory serial number/ bar code label(s). THE EXTENT OF THE COMPANY'S LIABILITY UNDER THIS WARRANTY IS LIMITED TO THE REPAIR OR REPLACEMENT PROVIDED...
... or any part thereof, under normal use and conditions, be proven defective in the opinion of the Company, has suffered or been damaged through alteration, improper installation, mishandling, misuse, neglect, accident, or by removal or defacement of the factory serial number/ bar code label(s). THE EXTENT OF THE COMPANY'S LIABILITY UNDER THIS WARRANTY IS LIMITED TO THE REPAIR OR REPLACEMENT PROVIDED...


