User Guide
Page 1
D1718PK PORTABLE 7" LCD MONITOR AND DVD PLAYER
D1718PK PORTABLE 7" LCD MONITOR AND DVD PLAYER

User Guide
Page 3
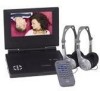
.... The main features include a 7" Wide Screen (16:9 Aspect Ratio) Liquid Crystal Display (LCD) monitor and a DVD player. Please save this manual for choosing the D1718PK portable DVD player. To ensure proper ventilation and proper operation, never cover or block the slots and openings with this may result in... fire or electric shock, do not spill or spray liquid of reliable, trouble-free service, and is compact so that the D1718PK is used in accordance with you move it with the instructions and illustrations provided in hotels, offices or your home. The documentation...
.... The main features include a 7" Wide Screen (16:9 Aspect Ratio) Liquid Crystal Display (LCD) monitor and a DVD player. Please save this manual for choosing the D1718PK portable DVD player. To ensure proper ventilation and proper operation, never cover or block the slots and openings with this may result in... fire or electric shock, do not spill or spray liquid of reliable, trouble-free service, and is compact so that the D1718PK is used in accordance with you move it with the instructions and illustrations provided in hotels, offices or your home. The documentation...

User Guide
Page 4
...producers designed, some playback features may be available. These regional codes must match in this unit plays discs according to direct sunlight or heat sources. DVD's with water for the disc to Laser Radiation. There is in its edge. Do not stick paper, tape or glue on the disc. ...the disc from the center out with the discs. 7. Some playback operations of electric shock and/or exposure to play . Regional Coding Both the DVD player and disc are coded by software producers. Do not use irregularly shaped discs such as heart or star-shaped discs as they may cause the...
...producers designed, some playback features may be available. These regional codes must match in this unit plays discs according to direct sunlight or heat sources. DVD's with water for the disc to Laser Radiation. There is in its edge. Do not stick paper, tape or glue on the disc. ...the disc from the center out with the discs. 7. Some playback operations of electric shock and/or exposure to play . Regional Coding Both the DVD player and disc are coded by software producers. Do not use irregularly shaped discs such as heart or star-shaped discs as they may cause the...
User Guide
Page 5
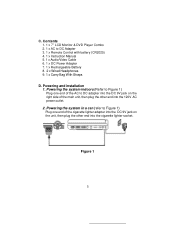
... cigarette lighter adapter into the DC 9V jack on the unit, then plug the other end into the cigarette lighter socket. Figure 1 5 Contents 1. 1 x 7'' LCD Monitor & DVD Player Combo 2. 1 x AC to Figure 1) Plug one end of the main unit, then plug the other end into the 120V AC power outlet. 2. Powering and installation...
... cigarette lighter adapter into the DC 9V jack on the unit, then plug the other end into the cigarette lighter socket. Figure 1 5 Contents 1. 1 x 7'' LCD Monitor & DVD Player Combo 2. 1 x AC to Figure 1) Plug one end of the main unit, then plug the other end into the 120V AC power outlet. 2. Powering and installation...
User Guide
Page 6
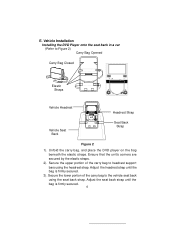
... secured. 6 Ensure that the unit's corners are secured by the elastic straps. 2). Unfold the carry bag, and place the DVD player on the bag beneath the elastic straps. E. Vehicle Installation Installing the DVD Player onto the seat back in a car (Refer to Figure 2) Carry Bag Opened Carry Bag Closed Elastic Straps Vehicle Headrest Headrest...
... secured. 6 Ensure that the unit's corners are secured by the elastic straps. 2). Unfold the carry bag, and place the DVD player on the bag beneath the elastic straps. E. Vehicle Installation Installing the DVD Player onto the seat back in a car (Refer to Figure 2) Carry Bag Opened Carry Bag Closed Elastic Straps Vehicle Headrest Headrest...
User Guide
Page 8
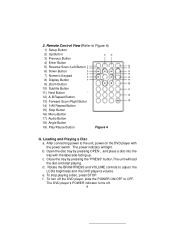
... the disc and start playing. c. Rotate the BRIGHTNESS and VOLUME controls to the unit, power on the DVD player with the label side facing up. The DVD player's POWER indicator turns off the DVD player, slide the POWER ON/OFF to Figure 4) 1) Setup Button 2) Up Button 3) Previous Button 4) Enter...16) Menu Button 17) Audio Button 18) Angle Button 19) Play/Pause Button Figure 4 G. After connecting power to adjust the LCD's brightness and the DVD player's volume. e. d. f. 2. To stop playing a disc, press STOP. b. Close the tray by pressing OPEN , and place a disc into the ...
... the disc and start playing. c. Rotate the BRIGHTNESS and VOLUME controls to the unit, power on the DVD player with the label side facing up. The DVD player's POWER indicator turns off the DVD player, slide the POWER ON/OFF to Figure 4) 1) Setup Button 2) Up Button 3) Previous Button 4) Enter...16) Menu Button 17) Audio Button 18) Angle Button 19) Play/Pause Button Figure 4 G. After connecting power to adjust the LCD's brightness and the DVD player's volume. e. d. f. 2. To stop playing a disc, press STOP. b. Close the tray by pressing OPEN , and place a disc into the ...
User Guide
Page 10
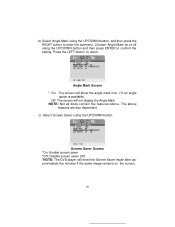
...: Not all discs contain the features above features are disc dependent. Screen Saver Screen *On: Enable screen saver *Off: Disable screen saver (off) *NOTE: The DVD player will enter the Screen Saver mode after approximately five minutes if the same image remains on or off using the UP/DOWN button and then...
...: Not all discs contain the features above features are disc dependent. Screen Saver Screen *On: Enable screen saver *Off: Disable screen saver (off) *NOTE: The DVD player will enter the Screen Saver mode after approximately five minutes if the same image remains on or off using the UP/DOWN button and then...
User Guide
Page 25
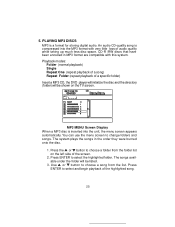
... burned onto the disc. 1. The system plays the songs in MP3 format are compatible with very little loss of a specific folder) Insert a MP3 CD, the DVD player will initialize the disc and the directory (folder) will be shown on the left side of the highlighted song. 25 The songs available under the...
... burned onto the disc. 1. The system plays the songs in MP3 format are compatible with very little loss of a specific folder) Insert a MP3 CD, the DVD player will initialize the disc and the directory (folder) will be shown on the left side of the highlighted song. 25 The songs available under the...
User Guide
Page 31
... of time (one week or longer), we recommend that the battery has been charged for at least once every two months to the DVD player. 8. Please fully charge the battery prior to first use the battery for a portable power supply. Rechargeable Battery Installation and Use The...set of degradation. Do not short the battery terminals, store the battery in a metal container, or leave the battery in optimum condition. NOTE: When the DVD player is fully or only partially discharged. Ni-MH batteries feature high storage capacity and low level of long-life Ni-Mh batteries for an extended...
... of time (one week or longer), we recommend that the battery has been charged for at least once every two months to the DVD player. 8. Please fully charge the battery prior to first use the battery for a portable power supply. Rechargeable Battery Installation and Use The...set of degradation. Do not short the battery terminals, store the battery in a metal container, or leave the battery in optimum condition. NOTE: When the DVD player is fully or only partially discharged. Ni-MH batteries feature high storage capacity and low level of long-life Ni-Mh batteries for an extended...
User Guide
Page 32
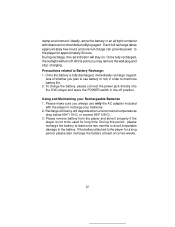
... and stop charging. damp environment. Precautions related to be used for approximately 3 hours. Please remove battery from the player and store it properly if the player is fully discharged, immediately recharge (regard- Each full recharge takes approximately five-hours and one full charge can provide ...3. less of whether you plan to maximize battery life. 2. To charge the battery, please connect the power jack directly into the DVD player and leave the POWER switch in an airtight container with the player to the player for long time. Ideally, store the battery in the off .
... and stop charging. damp environment. Precautions related to be used for approximately 3 hours. Please remove battery from the player and store it properly if the player is fully discharged, immediately recharge (regard- Each full recharge takes approximately five-hours and one full charge can provide ...3. less of whether you plan to maximize battery life. 2. To charge the battery, please connect the power jack directly into the DVD player and leave the POWER switch in an airtight container with the player to the player for long time. Ideally, store the battery in the off .
User Guide
Page 33
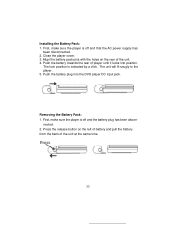
.... 3. The unit will fit snugly to the player. 5. nected. 2. Removing the Battery Pack: 1. Press the release button on the rear of the unit. 4. Push the battery towards the rear of the unit at ... battery pack pins with the holes on the left of battery and pull the battery from the back of player until it locks into the DVD player DC input jack. First, make sure the player is off and that the AC power supply has been disconnected. 2. Push the battery plug into position. Installing the...
.... 3. The unit will fit snugly to the player. 5. nected. 2. Removing the Battery Pack: 1. Press the release button on the rear of the unit. 4. Push the battery towards the rear of the unit at ... battery pack pins with the holes on the left of battery and pull the battery from the back of player until it locks into the DVD player DC input jack. First, make sure the player is off and that the AC power supply has been disconnected. 2. Push the battery plug into position. Installing the...


