Owners Manual
Page 1
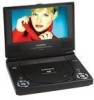
D1718 PORTABLE 7" LCD MONITOR AND DVD PLAYER
D1718 PORTABLE 7" LCD MONITOR AND DVD PLAYER

Owners Manual
Page 2
... video monitor is used for home and other rights owners. If the LCD panel or video monitor is intended for television reception, video or DVD play , the LCD panel or video monitor must be installed so that operates when the vehicle is in gear or when the parking brake is not applied must be installed to the operator of the driver's seat where it will only function...
... video monitor is used for home and other rights owners. If the LCD panel or video monitor is intended for television reception, video or DVD play , the LCD panel or video monitor must be installed so that operates when the vehicle is in gear or when the parking brake is not applied must be installed to the operator of the driver's seat where it will only function...
Owners Manual
Page 3
..., direct sunlight, excessive dust. Do not place the set on or in a fire or electric shock). If the unit is designed for quick and easy installation.Please read the entire instruction manual supplied with this product prior to a warm location, wait for selecting the D1718 portable DVD player. Installation Ensure that you for about one hour before operating the unit, or remove the disc and...
..., direct sunlight, excessive dust. Do not place the set on or in a fire or electric shock). If the unit is designed for quick and easy installation.Please read the entire instruction manual supplied with this product prior to a warm location, wait for selecting the D1718 portable DVD player. Installation Ensure that you for about one hour before operating the unit, or remove the disc and...
Owners Manual
Page 4
... main unit, then plug the other end into the DC 9V jack on the disc. Powering and installation 1. Do not stick paper, tape or glue on the right side of disc. Handle the disc by software producers. Powering the system indoors (Refer to Figure 1) Plug one end of the AC to DC Adapter Remote Control w/Battery (CR2025) Instruction Manual Audio/Video Cable DC Power Adapter Rechargeable Battery Pack D. 5.
... main unit, then plug the other end into the DC 9V jack on the disc. Powering and installation 1. Do not stick paper, tape or glue on the right side of disc. Handle the disc by software producers. Powering the system indoors (Refer to Figure 1) Plug one end of the AC to DC Adapter Remote Control w/Battery (CR2025) Instruction Manual Audio/Video Cable DC Power Adapter Rechargeable Battery Pack D. 5.

Owners Manual
Page 7
... and the DVD player's volume. Rotate the BRIGHTNESS and VOLUME controls to Figure 3) 1) 2) 3) 4) 5) 6) 7) 8) 9) 10) 11) 12) 13) 14) 15) 16) 17) 18) 19) Setup Button Up Button Previous Button Enter Button Reverse Scan /Left Button Down Button Numeric Keypad Display Button Zoom Button Subtitle Button Next Button A-B Repeat Button Forward Scan /Right Button 1/All Repeat Button Stop Button Menu Button Audio Button Angle Button Play/Pause Button Figure 3 F. To turn off . 7 The power indicator will load the disc and start playing. Loading and Playing a Disc a. Open the disc tray by...
... and the DVD player's volume. Rotate the BRIGHTNESS and VOLUME controls to Figure 3) 1) 2) 3) 4) 5) 6) 7) 8) 9) 10) 11) 12) 13) 14) 15) 16) 17) 18) 19) Setup Button Up Button Previous Button Enter Button Reverse Scan /Left Button Down Button Numeric Keypad Display Button Zoom Button Subtitle Button Next Button A-B Repeat Button Forward Scan /Right Button 1/All Repeat Button Stop Button Menu Button Audio Button Angle Button Play/Pause Button Figure 3 F. To turn off . 7 The power indicator will load the disc and start playing. Loading and Playing a Disc a. Open the disc tray by...

Owners Manual
Page 8
Main SETUP Menu Screen 1) Press "Setup", the 'GENERAL SETUP PAGE' will resume it's last playback mode. Select the TV display mode on the screen using the DOWN button, and then press RIGHT to enter the submenu. Figure 4. Figure 5. Press LEFT to display the Main screen of the SETUP Menu on screen. G. General SETUP Menu Screen a).Select TV DISPLAY using UP/DOWN, and press ENTER to exit the SETUP Menu and the unit will display on the screen. Press 'SETUP' again to confirm the setting. SETUP Press 'SETUP' to return. 8
Main SETUP Menu Screen 1) Press "Setup", the 'GENERAL SETUP PAGE' will resume it's last playback mode. Select the TV display mode on the screen using the DOWN button, and then press RIGHT to enter the submenu. Figure 4. Figure 5. Press LEFT to display the Main screen of the SETUP Menu on screen. G. General SETUP Menu Screen a).Select TV DISPLAY using UP/DOWN, and press ENTER to exit the SETUP Menu and the unit will display on the screen. Press 'SETUP' again to confirm the setting. SETUP Press 'SETUP' to return. 8
Owners Manual
Page 9
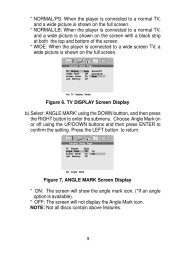
... shown on the full screen. * NORMAL/LB: When the player is connected to a normal TV, and a wide picture is shown on the screen with a black strip at both the top and bottom of the screen. * WIDE: When the player is connected to return. Choose Angle Mark on the full screen. TV DISPLAY Screen Display b).Select 'ANGLE MARK' using the UP/DOWN buttons and then press ENTER...
... shown on the full screen. * NORMAL/LB: When the player is connected to a normal TV, and a wide picture is shown on the screen with a black strip at both the top and bottom of the screen. * WIDE: When the player is connected to return. Choose Angle Mark on the full screen. TV DISPLAY Screen Display b).Select 'ANGLE MARK' using the UP/DOWN buttons and then press ENTER...
Owners Manual
Page 10
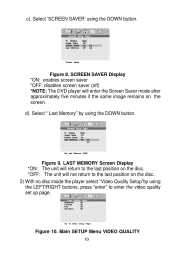
... to the last position on the screen. c). SCREEN SAVER Display *ON: enables screen saver *OFF: disables screen saver (off) *NOTE: The DVD player will not return to the last position on the disc. *OFF: The unit will enter the Screen Saver mode after approximately five minutes if the same image remains on the disc. 2) With no disc inside the player select "Video Quality Setup"by using the DOWN button.
... to the last position on the screen. c). SCREEN SAVER Display *ON: enables screen saver *OFF: disables screen saver (off) *NOTE: The DVD player will not return to the last position on the disc. *OFF: The unit will enter the Screen Saver mode after approximately five minutes if the same image remains on the disc. 2) With no disc inside the player select "Video Quality Setup"by using the DOWN button.
Owners Manual
Page 12
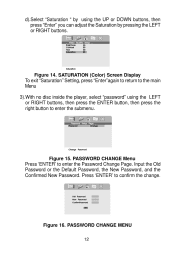
Figure 14. PASSWORD CHANGE Menu Press 'ENTER' to confirm the change. Input the Old Password or the Default Password, the New Password, and the Confirmed New Password. Press 'ENTER' to enter the Password Change Page. SATURATION (Color) Screen Display To exit "Saturation" Setting, press "Enter"again to return to the main Menu 3).With no disc inside the player, select "password" using the UP or DOWN buttons, then press "Enter" you can adjust the Saturation by...
Figure 14. PASSWORD CHANGE Menu Press 'ENTER' to confirm the change. Input the Old Password or the Default Password, the New Password, and the Confirmed New Password. Press 'ENTER' to enter the Password Change Page. SATURATION (Color) Screen Display To exit "Saturation" Setting, press "Enter"again to return to the main Menu 3).With no disc inside the player, select "password" using the UP or DOWN buttons, then press "Enter" you can adjust the Saturation by...
Owners Manual
Page 13
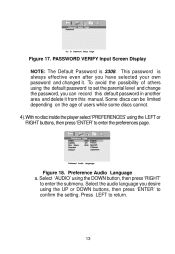
... Audio Language a. PASSWORD VERIFY Input Screen Display NOTE: The Default Password is always effective even after you can record this default password in another area and delete it . Select 'AUDIO' using the UP or DOWN buttons, then press 'ENTER' to set the parental level and change the password, you have selected your own password and changed it from this manual. To avoid the possibility of users while some discs cannot. 4).With no disc inside the player select 'PREFERENCES' using...
... Audio Language a. PASSWORD VERIFY Input Screen Display NOTE: The Default Password is always effective even after you can record this default password in another area and delete it . Select 'AUDIO' using the UP or DOWN buttons, then press 'ENTER' to set the parental level and change the password, you have selected your own password and changed it from this manual. To avoid the possibility of users while some discs cannot. 4).With no disc inside the player select 'PREFERENCES' using...

Owners Manual
Page 14
... player will play and display on the screen the original recorded language contained in the above listed languages. Select 'DISC MENU' using the DOWN button, then press RIGHT to enter the submenu. b. Select 'SUBTITLE' using the DOWN button, then press 'RIGHT' to enter the submenu. Press 'LEFT' to return. Figure 20. Select the Disc Menu Language you desire using the UP or DOWN buttons , then press 'ENTER' to confirm the setting. Select the desired subtitle language or SUBTITLE...
... player will play and display on the screen the original recorded language contained in the above listed languages. Select 'DISC MENU' using the DOWN button, then press RIGHT to enter the submenu. b. Select 'SUBTITLE' using the DOWN button, then press 'RIGHT' to enter the submenu. Press 'LEFT' to return. Figure 20. Select the Disc Menu Language you desire using the UP or DOWN buttons , then press 'ENTER' to confirm the setting. Select the desired subtitle language or SUBTITLE...

Owners Manual
Page 15
Select 'PARENTAL' using the UP or DOWN buttons for discs with lock-out function or multiple rating levels. Press ENTER to make the setting return to confirm the parental level setting. e. PARENTAL Preference Screen Display Select the parental level you desire using the DOWN button, then press RIGHT to enter the submenu. NOTE: The parental setting is the factory default. Enter a 4 digit password, then press 'ENTER' to the factory-set mode. Loading Factory Setting 15 Figure 22. These are listed from the...
Select 'PARENTAL' using the UP or DOWN buttons for discs with lock-out function or multiple rating levels. Press ENTER to make the setting return to confirm the parental level setting. e. PARENTAL Preference Screen Display Select the parental level you desire using the DOWN button, then press RIGHT to enter the submenu. NOTE: The parental setting is the factory default. Enter a 4 digit password, then press 'ENTER' to the factory-set mode. Loading Factory Setting 15 Figure 22. These are listed from the...
Owners Manual
Page 16
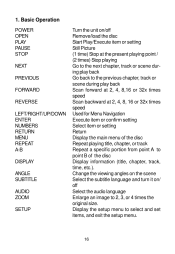
Basic Operation POWER OPEN PLAY PAUSE STOP NEXT PREVIOUS FORWARD REVERSE LEFT/RIGHT/UP/DOWN ENTER NUMBERS RETURN MENU REPEAT A-B DISPLAY ANGLE SUBTITLE AUDIO ZOOM SETUP Turn the unit on / off Remove/load the disc Start Play/Execute item or setting Still Picture (1 time) Stop at the present playing point / (2 times) Stop playing Go to the next chapter, track or scene during play back Go back to the previous chapter, track or scene during play back Scan forward at 2, 4, 8,16 or...
Basic Operation POWER OPEN PLAY PAUSE STOP NEXT PREVIOUS FORWARD REVERSE LEFT/RIGHT/UP/DOWN ENTER NUMBERS RETURN MENU REPEAT A-B DISPLAY ANGLE SUBTITLE AUDIO ZOOM SETUP Turn the unit on / off Remove/load the disc Start Play/Execute item or setting Still Picture (1 time) Stop at the present playing point / (2 times) Stop playing Go to the next chapter, track or scene during play back Go back to the previous chapter, track or scene during play back Scan forward at 2, 4, 8,16 or...

Owners Manual
Page 17
... (5). Press 'DISPLAY' again to select disc playback options using the DVD root menu. 3. The heading will disappear automatically after 3 seconds if no buttons are pressed. Press MENU during playback to disc.) 1. PLAYING TIME AND REMAINING TIME a. Figure 23. Title, Chapter Number, and Time Screen Display b. DISPLAY (Display contents vary from disc to display the current Title Number (1), the total Number of Titles (2), the current Chapter Number (3), the total Number of your TV or Monitor. MENU A DVD is divided...
... (5). Press 'DISPLAY' again to select disc playback options using the DVD root menu. 3. The heading will disappear automatically after 3 seconds if no buttons are pressed. Press MENU during playback to disc.) 1. PLAYING TIME AND REMAINING TIME a. Figure 23. Title, Chapter Number, and Time Screen Display b. DISPLAY (Display contents vary from disc to display the current Title Number (1), the total Number of Titles (2), the current Chapter Number (3), the total Number of your TV or Monitor. MENU A DVD is divided...
Owners Manual
Page 20
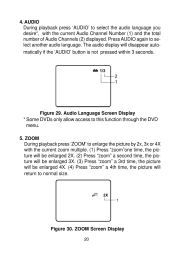
... automatically if the 'AUDIO' button is not pressed within 3 seconds. ZOOM During playback press 'ZOOM' to normal size. Figure 30. Audio Language Screen Display * Some DVDs only allow access to select another audio language. The audio display will return to enlarge the picture by 2x, 3x or 4X with the current Audio Channel Number (1) and the total number of Audio Channels (2) displayed. 4. Figure 29. ZOOM Screen Display 20 Press AUDIO again to this function through the DVD menu. 5.
... automatically if the 'AUDIO' button is not pressed within 3 seconds. ZOOM During playback press 'ZOOM' to normal size. Figure 30. Audio Language Screen Display * Some DVDs only allow access to select another audio language. The audio display will return to enlarge the picture by 2x, 3x or 4X with the current Audio Channel Number (1) and the total number of Audio Channels (2) displayed. 4. Figure 29. ZOOM Screen Display 20 Press AUDIO again to this function through the DVD menu. 5.

Owners Manual
Page 25
... be listed. 3. Press ENTER to select the highlighted folder. Playback modes: FOLDER (normal playback) SINGLE REPEAT ONE (repeat playback of a song) REPEAT FOLDER (repeat playback of a specific folder) Insert an MP3 CD, the DVD player will initialize the disc and the directory (folder) will be shown on the left side of audio quality while taking up much less disc space. The system plays the songs in MP3 format are compatible...
... be listed. 3. Press ENTER to select the highlighted folder. Playback modes: FOLDER (normal playback) SINGLE REPEAT ONE (repeat playback of a song) REPEAT FOLDER (repeat playback of a specific folder) Insert an MP3 CD, the DVD player will initialize the disc and the directory (folder) will be shown on the left side of audio quality while taking up much less disc space. The system plays the songs in MP3 format are compatible...

Owners Manual
Page 28
... picture will be diplayed. Press "display" 14th time, "WINDOW V" will refresh from top and bottom to Figure 43) a. o. Connect one end of the supplied audio/video adapter cable (1/8" ) plug into the unit's DVD's AV jack, and connect the other end to Other Equipment 1. Connecting to the AV INPUT jacks on the screen, the picture will display on your TV or Monitor through an optional RCA cable (white...
... picture will be diplayed. Press "display" 14th time, "WINDOW V" will refresh from top and bottom to Figure 43) a. o. Connect one end of the supplied audio/video adapter cable (1/8" ) plug into the unit's DVD's AV jack, and connect the other end to Other Equipment 1. Connecting to the AV INPUT jacks on the screen, the picture will display on your TV or Monitor through an optional RCA cable (white...

Owners Manual
Page 32
... red light will degrade when environmental temperatures drop below 50oF (10oC) or exceed 95oF (35oC). 3. Recharge efficiency will turn off. Please fully charge the battery prior to the player for long time. Ideally, store the battery in an airtight container with the player to the battery. To charge the battery, please connect the power jack directly into the battery. Please make sure you always use battery or not...
... red light will degrade when environmental temperatures drop below 50oF (10oC) or exceed 95oF (35oC). 3. Recharge efficiency will turn off. Please fully charge the battery prior to the player for long time. Ideally, store the battery in an airtight container with the player to the battery. To charge the battery, please connect the power jack directly into the battery. Please make sure you always use battery or not...

Owners Manual
Page 33
... the battery towards the rear of the unit. 4. Installing the Battery Removing the Battery Pack: 1. First, make sure the player is off and that the AC power supply has been disconnected. 2. Close the player cover. 3. The lock position is off and the battery plug has been disconnected. 2. Press the release button on the rear of player until it locks into the DVD player DC input jack. Figure 48. Removing the Battery 33...
... the battery towards the rear of the unit. 4. Installing the Battery Removing the Battery Pack: 1. First, make sure the player is off and that the AC power supply has been disconnected. 2. Close the player cover. 3. The lock position is off and the battery plug has been disconnected. 2. Press the release button on the rear of player until it locks into the DVD player DC input jack. Figure 48. Removing the Battery 33...

Owners Manual
Page 34
... this product or any part thereof, under normal use and conditions, be proven defective in the opinion of the Company, has suffered or been damaged through alteration, improper installation, mishandling, misuse, neglect, accident, or by removal or defacement of the factory serial number/ bar code label(s). U.S.A. : AUDIOVOX ELECTRONICS CORPORATION, 150 MARCUS BLVD. To obtain repair or replacement within the terms of...
... this product or any part thereof, under normal use and conditions, be proven defective in the opinion of the Company, has suffered or been damaged through alteration, improper installation, mishandling, misuse, neglect, accident, or by removal or defacement of the factory serial number/ bar code label(s). U.S.A. : AUDIOVOX ELECTRONICS CORPORATION, 150 MARCUS BLVD. To obtain repair or replacement within the terms of...


