
Motherboard DIY Troubleshooting Guide
Page 4
... 2.1.2 2.1.3 2.1.4 2.1.5 Creating a bootable floppy disk 2-2 Using AFUDOS to copy the current BIOS 2-3 Using AFUDOS to update the BIOS 2-4 Using ASUS EZ Flash to update the BIOS 2-5 Recovering the BIOS with CrashFree BIOS 2 ....... 2-6 2.2 BIOS Setup program 2-8 2.2.1 2.2.2 2.2.3 2.2.4 2.2.5 2.2.6...2.2.7 2.2.8 2.2.9 BIOS menu screen 2-9 Menu bar 2-9 Navigation keys 2-9 Menu items 2-10 Sub-menu items 2-10 Configuration fields 2-10 Pop-up window 2-10 Scroll bar 2-10 General help 2-10 2.3 Main menu 2-11 2.3.1 2.3.2 2.3.3 2.3.4 2.3.5 System Time 2-11 System Date 2-11 Legacy...
... 2.1.2 2.1.3 2.1.4 2.1.5 Creating a bootable floppy disk 2-2 Using AFUDOS to copy the current BIOS 2-3 Using AFUDOS to update the BIOS 2-4 Using ASUS EZ Flash to update the BIOS 2-5 Recovering the BIOS with CrashFree BIOS 2 ....... 2-6 2.2 BIOS Setup program 2-8 2.2.1 2.2.2 2.2.3 2.2.4 2.2.5 2.2.6...2.2.7 2.2.8 2.2.9 BIOS menu screen 2-9 Menu bar 2-9 Navigation keys 2-9 Menu items 2-10 Sub-menu items 2-10 Configuration fields 2-10 Pop-up window 2-10 Scroll bar 2-10 General help 2-10 2.3 Main menu 2-11 2.3.1 2.3.2 2.3.3 2.3.4 2.3.5 System Time 2-11 System Date 2-11 Legacy...
Motherboard DIY Troubleshooting Guide
Page 18
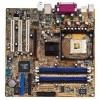
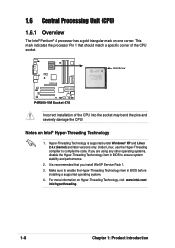
...hyperthreading. 1-8 Chapter 1: Product introduction Under Linux, use the Hyper-Threading compliler to ensure system stability and performance. • It is supported under Windows® XP and Linux 2.4.x (kernel) and later versions only. Notes on Intel® Hyper-Threading Technology • Hyper-Threading Technology is recommended ... should match a specific corner of the CPU into the socket may bend the pins and severely damage the CPU! If you install Windows® XP Service Pack 1. • Make sure to enable the Hyper-Threading Technology item in BIOS to compile the code. This...
...hyperthreading. 1-8 Chapter 1: Product introduction Under Linux, use the Hyper-Threading compliler to ensure system stability and performance. • It is supported under Windows® XP and Linux 2.4.x (kernel) and later versions only. Notes on Intel® Hyper-Threading Technology • Hyper-Threading Technology is recommended ... should match a specific corner of the CPU into the socket may bend the pins and severely damage the CPU! If you install Windows® XP Service Pack 1. • Make sure to enable the Hyper-Threading Technology item in BIOS to compile the code. This...

Motherboard DIY Troubleshooting Guide
Page 36
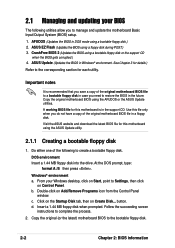
... following to create a bootable floppy disk. Double-click on Control Panel. button. 2.1 Managing and updating your Windows desktop, click on Start, point to Settings, then click on Add/Remove Programs icon from the Control Panel window. c. ASUS CrashFree BIOS 2 (Updates the BIOS using a floppy disk during POST.) 3. Click on the Startup Disk tab...
... following to create a bootable floppy disk. Double-click on Control Panel. button. 2.1 Managing and updating your Windows desktop, click on Start, point to Settings, then click on Add/Remove Programs icon from the Control Panel window. c. ASUS CrashFree BIOS 2 (Updates the BIOS using a floppy disk during POST.) 3. Click on the Startup Disk tab...
Motherboard DIY Troubleshooting Guide
Page 44
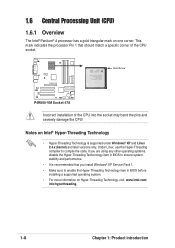
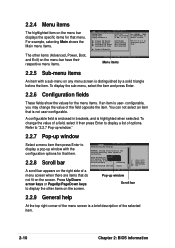
...a brief description of the selected item. 2-10 Chapter 2: BIOS information A configurable field is highlighted when selected. Refer to "2.2.7 Pop-up window." 2.2.7 Pop-up window Select a menu item then press Enter to [1.44M, 3.5 in brackets, and is enclosed in .] select a field. Press Up/Down arrow...change the value of the menu screen is not user-configurable. Primary IDE Master Primary IDE Slave Secondary IDE Master Secondary IDE Slave [ST321122A] [ASUS CDS520/] [Not Detected] [Not Detected] Use [+] or [-] to display a list of a menu screen when there are items that do ...
...a brief description of the selected item. 2-10 Chapter 2: BIOS information A configurable field is highlighted when selected. Refer to "2.2.7 Pop-up window." 2.2.7 Pop-up window Select a menu item then press Enter to [1.44M, 3.5 in brackets, and is enclosed in .] select a field. Press Up/Down arrow...change the value of the menu screen is not user-configurable. Primary IDE Master Primary IDE Slave Secondary IDE Master Secondary IDE Slave [ST321122A] [ASUS CDS520/] [Not Detected] [Not Detected] Use [+] or [-] to display a list of a menu screen when there are items that do ...
Motherboard DIY Troubleshooting Guide
Page 60
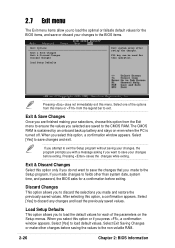
...before exiting. Pressing saves the changes while exiting. Discard Changes This option allows you to discard the selections you press , a confirmation window appears. Select [Yes] to discard any changes and load the previously saved values. Exit & Save Changes Once you are finished making ... Discard Changes Discard Changes Load Setup Defaults Exit system setup after saving the changes. Exit & Discard Changes Select this option, a confirmation window appears. The CMOS RAM is turned off. After selecting this operation. F10 key can be used for this option, a confirmation appears. ...
...before exiting. Pressing saves the changes while exiting. Discard Changes This option allows you to discard the selections you press , a confirmation window appears. Select [Yes] to discard any changes and load the previously saved values. Exit & Save Changes Once you are finished making ... Discard Changes Discard Changes Load Setup Defaults Exit system setup after saving the changes. Exit & Discard Changes Select this option, a confirmation window appears. The CMOS RAM is turned off. After selecting this operation. F10 key can be used for this option, a confirmation appears. ...
Motherboard DIY Troubleshooting Guide
Page 62
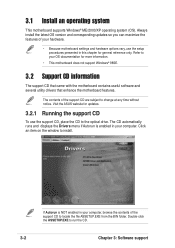
Visit the ASUS website for updates. 3.2.1 Running the support CD To use the setup procedures presented in this chapter for more information. • This motherboard does not support Windows® 98SE. 3.2 Support CD information The support CD that came with the motherboard contains useful software and ...use the support CD, place the CD to run the CD. 3-2 Chapter 3: Software support 3.1 Install an operating system This motherboard supports Windows® ME/2000/XP operating system (OS). Always install the latest OS version and corresponding updates so you can maximize the features of ...
Visit the ASUS website for updates. 3.2.1 Running the support CD To use the setup procedures presented in this chapter for more information. • This motherboard does not support Windows® 98SE. 3.2 Support CD information The support CD that came with the motherboard contains useful software and ...use the support CD, place the CD to run the CD. 3-2 Chapter 3: Software support 3.1 Install an operating system This motherboard supports Windows® ME/2000/XP operating system (OS). Always install the latest OS version and corresponding updates so you can maximize the features of ...

P4R800-VM User Manual
Page 4
... 2.1.2 2.1.3 2.1.4 2.1.5 Creating a bootable floppy disk 2-2 Using AFUDOS to copy the current BIOS 2-3 Using AFUDOS to update the BIOS 2-3 Using ASUS EZ Flash to update the BIOS 2-5 Recovering the BIOS with CrashFree BIOS 2 ....... 2-6 2.2 BIOS Setup program 2-8 2.2.1 2.2.2 2.2.3 2.2.4 2.2.5 2.2.6...2.2.7 2.2.8 2.2.9 BIOS menu screen 2-9 Menu bar 2-9 Navigation keys 2-9 Menu items 2-10 Sub-menu items 2-10 Configuration fields 2-10 Pop-up window 2-10 Scroll bar 2-10 General help 2-10 2.3 Main menu 2-11 2.3.1 2.3.2 2.3.3 2.3.4 2.3.5 System Time 2-11 System Date 2-11 Legacy ...
... 2.1.2 2.1.3 2.1.4 2.1.5 Creating a bootable floppy disk 2-2 Using AFUDOS to copy the current BIOS 2-3 Using AFUDOS to update the BIOS 2-3 Using ASUS EZ Flash to update the BIOS 2-5 Recovering the BIOS with CrashFree BIOS 2 ....... 2-6 2.2 BIOS Setup program 2-8 2.2.1 2.2.2 2.2.3 2.2.4 2.2.5 2.2.6...2.2.7 2.2.8 2.2.9 BIOS menu screen 2-9 Menu bar 2-9 Navigation keys 2-9 Menu items 2-10 Sub-menu items 2-10 Configuration fields 2-10 Pop-up window 2-10 Scroll bar 2-10 General help 2-10 2.3 Main menu 2-11 2.3.1 2.3.2 2.3.3 2.3.4 2.3.5 System Time 2-11 System Date 2-11 Legacy ...
P4R800-VM User Manual
Page 18
... operating systems, disable the Hyper-Threading Techonology item in BIOS before installing a supported operating system. 4. For more information on one corner. It is supported under Windows® XP and Linux 2.4.x (kernel) and later versions only. Notes on Intel® Hyper-Threading Technology 1. Make sure to enable the Hyper-Threading Technology item...
... operating systems, disable the Hyper-Threading Techonology item in BIOS before installing a supported operating system. 4. For more information on one corner. It is supported under Windows® XP and Linux 2.4.x (kernel) and later versions only. Notes on Intel® Hyper-Threading Technology 1. Make sure to enable the Hyper-Threading Technology item...
P4R800-VM User Manual
Page 36
...The following to create a bootable floppy disk. b. d. Insert a 1.44 MB floppy disk when prompted. AFUDOS (Updates the BIOS in Windows® environment. ASUS Update (Updates the BIOS in DOS mode using a bootable floppy disk.) 2. DOS environment Insert a 1.44 MB floppy disk into the ... the BIOS using a floppy disk during POST.) 3. A working BIOS file for this motherboard using the AFUDOS or the ASUS Update utilities. 2.1 Managing and updating your Windows desktop, click on Start, point to Settings, then click on Add/Remove Programs icon from the Control Panel...
...The following to create a bootable floppy disk. b. d. Insert a 1.44 MB floppy disk when prompted. AFUDOS (Updates the BIOS in Windows® environment. ASUS Update (Updates the BIOS in DOS mode using a bootable floppy disk.) 2. DOS environment Insert a 1.44 MB floppy disk into the ... the BIOS using a floppy disk during POST.) 3. A working BIOS file for this motherboard using the AFUDOS or the ASUS Update utilities. 2.1 Managing and updating your Windows desktop, click on Start, point to Settings, then click on Add/Remove Programs icon from the Control Panel...
P4R800-VM User Manual
Page 44
...System Date Legacy Diskette A [11:10:19] Use [ENTER], [TAB] [Thu, 09/27/2003] or [SHIFT-TAB] to display a pop-up window Scroll bar 2.2.9 General help At the top right corner of the menu screen is a brief description of the selected item. 2-10 Chapter 2: BIOS information ... Main shows the Main menu items. The other items on the screen. Primary IDE Master Primary IDE Slave Secondary IDE Master Secondary IDE Slave [ST321122A] [ASUS CDS520/] [Not Detected] [Not Detected] Use [+] or [-] to PCI VGA Palette Snooping PCI IDE BusMaster OffBoard PCI/ISA IDE Card [No] [64]...
...System Date Legacy Diskette A [11:10:19] Use [ENTER], [TAB] [Thu, 09/27/2003] or [SHIFT-TAB] to display a pop-up window Scroll bar 2.2.9 General help At the top right corner of the menu screen is a brief description of the selected item. 2-10 Chapter 2: BIOS information ... Main shows the Main menu items. The other items on the screen. Primary IDE Master Primary IDE Slave Secondary IDE Master Secondary IDE Slave [ST321122A] [ASUS CDS520/] [Not Detected] [Not Detected] Use [+] or [-] to PCI VGA Palette Snooping PCI IDE BusMaster OffBoard PCI/ISA IDE Card [No] [64]...
P4R800-VM User Manual
Page 60
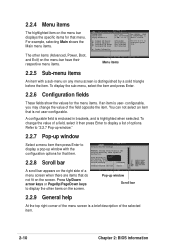
... the selections you made changes to fields other changes before saving the values to the CMOS RAM. When you select this option, a confirmation window appears. Load Setup Defaults This option allows you made and restore the previously saved values. Select [Yes] to discard any changes and load .... Pressing saves the changes while exiting. If you to the Setup program. 2.7 Exit menu The Exit menu items allow you press , a confirmation window appears. The CMOS RAM is turned off. Select Exit Saving Changes or make other than system date, system time, and password, the BIOS asks ...
... the selections you made changes to fields other changes before saving the values to the CMOS RAM. When you select this option, a confirmation window appears. Load Setup Defaults This option allows you made and restore the previously saved values. Select [Yes] to discard any changes and load .... Pressing saves the changes while exiting. If you to the Setup program. 2.7 Exit menu The Exit menu items allow you press , a confirmation window appears. The CMOS RAM is turned off. Select Exit Saving Changes or make other than system date, system time, and password, the BIOS asks ...

P4R800-VM User Manual
Page 62
... time without notice. The contents of the support CD are subject to install. Refer to run the CD. 3-2 Chapter 3: Software support Visit the ASUS website for updates. 3.2.1 Running the support CD To begin using the support CD, simply insert the CD into your computer, browse the contents of ...features of the support CD to locate the file ASSETUP.EXE from the BIN folder. 3.1 Install an operating system ® This motherboard supports Windows® ME/2000/XP operating system (OS). If Autorun is enabled in this chapter for more information. • This motherboard does not support...
... time without notice. The contents of the support CD are subject to install. Refer to run the CD. 3-2 Chapter 3: Software support Visit the ASUS website for updates. 3.2.1 Running the support CD To begin using the support CD, simply insert the CD into your computer, browse the contents of ...features of the support CD to locate the file ASSETUP.EXE from the BIN folder. 3.1 Install an operating system ® This motherboard supports Windows® ME/2000/XP operating system (OS). If Autorun is enabled in this chapter for more information. • This motherboard does not support...


