
Motherboard DIY Troubleshooting Guide
Page 5
Contents 2.6 Boot menu 2-22 2.6.1 Boot Device Priority 2-22 2.6.2 Boot Settings Configuration 2-23 2.6.3 Security 2-24 2.7 Exit menu 2-26 Chapter 3: Software support 3.1 Install an operating system 3-2 3.2 Support CD information 3-2 3.2.1 Running the support CD 3-2 3.2.2 Drivers menu 3-3 3.2.3 Utilities menu 3-3 3.2.4 ASUS Contact Information 3-4 v
Contents 2.6 Boot menu 2-22 2.6.1 Boot Device Priority 2-22 2.6.2 Boot Settings Configuration 2-23 2.6.3 Security 2-24 2.7 Exit menu 2-26 Chapter 3: Software support 3.1 Install an operating system 3-2 3.2 Support CD information 3-2 3.2.1 Running the support CD 3-2 3.2.2 Drivers menu 3-3 3.2.3 Utilities menu 3-3 3.2.4 ASUS Contact Information 3-4 v

Motherboard DIY Troubleshooting Guide
Page 14
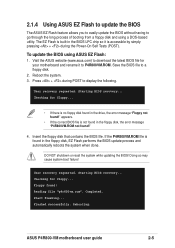
... CD. See page 3-3. 1-4 Chapter 1: Product introduction See page 2-6. ASUS Q-Fan technology The ASUS Q-Fan technology smartly adjusts the fan speeds according to the system loading to use a DOS-based utility or boot from Utilities menu in the motherboard allows you can easily update the system... BIOS even before loading the operating system. ASUS EZ Flash BIOS With the ASUS EZ Flash, you to personalize and add style to your system with customizable boot logos. The ASUS MyLogo2 is automatically installed when you to buy a replacement ROM chip....
... CD. See page 3-3. 1-4 Chapter 1: Product introduction See page 2-6. ASUS Q-Fan technology The ASUS Q-Fan technology smartly adjusts the fan speeds according to the system loading to use a DOS-based utility or boot from Utilities menu in the motherboard allows you can easily update the system... BIOS even before loading the operating system. ASUS EZ Flash BIOS With the ASUS EZ Flash, you to personalize and add style to your system with customizable boot logos. The ASUS MyLogo2 is automatically installed when you to buy a replacement ROM chip....

Motherboard DIY Troubleshooting Guide
Page 20
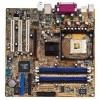
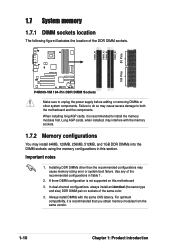
...-VM 184-Pin DDR DIMM Sockets Make sure to install the memory modules first. Failure to do so may cause memory sizing error or system boot failure. For optimum compatibility, it is recommended that you obtain memory modules from the same vendor. 1-10 Chapter 1: Product introduction Important notes • Installing DDR...
...-VM 184-Pin DDR DIMM Sockets Make sure to install the memory modules first. Failure to do so may cause memory sizing error or system boot failure. For optimum compatibility, it is recommended that you obtain memory modules from the same vendor. 1-10 Chapter 1: Product introduction Important notes • Installing DDR...
Motherboard DIY Troubleshooting Guide
Page 25
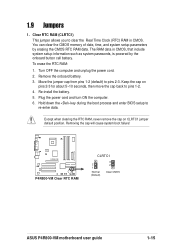
... remove the cap on pins 2-3 for about 5~10 seconds, then move the cap back to re-enter data. Removing the cap will cause system boot failure! Move the jumper cap from pins 1-2 (default) to clear the Real Time Clock (RTC) RAM in CMOS, that include system setup information... system passwords, is powered by erasing the CMOS RTC RAM data. P4R800-VM P4R800-VM Clear RTC RAM CLRTC1 2 1 Normal (Default) 3 2 Clear CMOS ASUS P4R800-VM motherboard user guide 1-15 Clear RTC RAM (CLRTC1) This jumper allows you to pins 2-3. Remove the onboard battery. 3. Re-install the battery. 5....
... remove the cap on pins 2-3 for about 5~10 seconds, then move the cap back to re-enter data. Removing the cap will cause system boot failure! Move the jumper cap from pins 1-2 (default) to clear the Real Time Clock (RTC) RAM in CMOS, that include system setup information... system passwords, is powered by erasing the CMOS RTC RAM data. P4R800-VM P4R800-VM Clear RTC RAM CLRTC1 2 1 Normal (Default) 3 2 Clear CMOS ASUS P4R800-VM motherboard user guide 1-15 Clear RTC RAM (CLRTC1) This jumper allows you to pins 2-3. Remove the onboard battery. 3. Re-install the battery. 5....

Motherboard DIY Troubleshooting Guide
Page 38
...10 Copyright (C) 2002 American Megatrends, Inc. done Writing flash .... 0x0008CC00 (9%) Verifying flash .. Reboot the system from the floppy disk. 4. Visit the ASUS website (www.asus.com) to the DOS prompt. done Erasing flash .... A:\>afudos /ip4r800vm.rom AMI Firmware Update Utility - Reading file ..... At the DOS prompt, type...or original) BIOS file that contains the BIOS file. 3. When the BIOS update process is for your screen may cause system boot failure! Copy the AFUDOS.EXE utility from the support CD to the bootable floppy disk that you see on the screen is ...
...10 Copyright (C) 2002 American Megatrends, Inc. done Writing flash .... 0x0008CC00 (9%) Verifying flash .. Reboot the system from the floppy disk. 4. Visit the ASUS website (www.asus.com) to the DOS prompt. done Erasing flash .... A:\>afudos /ip4r800vm.rom AMI Firmware Update Utility - Reading file ..... At the DOS prompt, type...or original) BIOS file that contains the BIOS file. 3. When the BIOS update process is for your screen may cause system boot failure! Copy the AFUDOS.EXE utility from the support CD to the bootable floppy disk that you see on the screen is ...
Motherboard DIY Troubleshooting Guide
Page 39
...appears. • If the correct BIOS file is no floppy disk found in the BIOS LPC chip so it to P4R800VM.ROM. User recovery requested. Flashed successfully. ASUS P4R800-VM motherboard user guide 2-5 Checking for floppy... • If there is not found in the floppy disk,... BIOS file. Press + during the Power-On Self Tests (POST). Starting BIOS recovery... Doing so may cause system boot failure! Completed. Visit the ASUS website (www.asus.com) to download the latest BIOS file for floppy... Save the BIOS file to display the following. Rebooting. To...
...appears. • If the correct BIOS file is no floppy disk found in the BIOS LPC chip so it to P4R800VM.ROM. User recovery requested. Flashed successfully. ASUS P4R800-VM motherboard user guide 2-5 Checking for floppy... • If there is not found in the floppy disk,... BIOS file. Press + during the Power-On Self Tests (POST). Starting BIOS recovery... Doing so may cause system boot failure! Completed. Visit the ASUS website (www.asus.com) to download the latest BIOS file for floppy... Save the BIOS file to display the following. Rebooting. To...

Motherboard DIY Troubleshooting Guide
Page 40
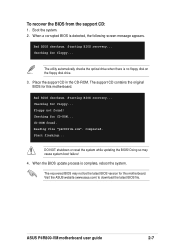
... that contains the original, or the latest, BIOS file for this disk to restore the BIOS. P4R800VM11.ROM), rename it to P4R800VM.ROM. Checking for floppy... 3. Start flashing... DO NOT shutdown or reset the system while updating the BIOS! To recover the BIOS...process continues when the P4R800VM.ROM is detected, the following message appears. Reading file "p4r800vm.rom". Doing so may also use this motherboard (P4R800VM.ROM). Checking for floppy... Insert a floppy disk that you downloaded from the ASUS website has a different filename (e.g. Bad BIOS checksum. Boot the system. 2....
... that contains the original, or the latest, BIOS file for this disk to restore the BIOS. P4R800VM11.ROM), rename it to P4R800VM.ROM. Checking for floppy... 3. Start flashing... DO NOT shutdown or reset the system while updating the BIOS! To recover the BIOS...process continues when the P4R800VM.ROM is detected, the following message appears. Reading file "p4r800vm.rom". Doing so may also use this motherboard (P4R800VM.ROM). Checking for floppy... Insert a floppy disk that you downloaded from the ASUS website has a different filename (e.g. Bad BIOS checksum. Boot the system. 2....
Motherboard DIY Troubleshooting Guide
Page 41
... for this motherboard. Reading file "p4r800vm.rom". Doing so may not be the latest BIOS version for floppy... ASUS P4R800-VM motherboard user guide 2-7 Bad BIOS checksum. Floppy not found . Completed. Start flashing... The recovered BIOS may cause system boot failure! 4. The utility automatically checks...BIOS recovery... When the BIOS update process is no floppy disk on the floppy disk drive. 3. CD-ROM found ! Visit the ASUS website (www.asus.com) to download the latest BIOS file. To recover the BIOS from the support CD: 1. When a corrupted BIOS is detected...
... for this motherboard. Reading file "p4r800vm.rom". Doing so may not be the latest BIOS version for floppy... ASUS P4R800-VM motherboard user guide 2-7 Bad BIOS checksum. Floppy not found . Completed. Start flashing... The recovered BIOS may cause system boot failure! 4. The utility automatically checks...BIOS recovery... When the BIOS update process is no floppy disk on the floppy disk drive. 3. CD-ROM found ! Visit the ASUS website (www.asus.com) to download the latest BIOS file. To recover the BIOS from the support CD: 1. When a corrupted BIOS is detected...

Motherboard DIY Troubleshooting Guide
Page 43
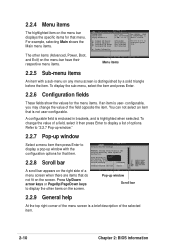
...[SHIFT-TAB] to select a field. Some of a menu screen are the navigation keys for that particular menu. Use [+] or [-] to another. ASUS P4R800-VM motherboard user guide 2-9 2.2.1 BIOS menu screen Menu items Menu bar Configuration fields General help System Time System Date Legacy Diskette A Primary IDE...items Navigation keys 2.2.2 Menu bar The menu bar on top of the screen has the following main items: Main Advanced Power Boot Exit For changing the basic system configuration For changing the advanced system settings For changing the advanced power management (APM) configuration ...
...[SHIFT-TAB] to select a field. Some of a menu screen are the navigation keys for that particular menu. Use [+] or [-] to another. ASUS P4R800-VM motherboard user guide 2-9 2.2.1 BIOS menu screen Menu items Menu bar Configuration fields General help System Time System Date Legacy Diskette A Primary IDE...items Navigation keys 2.2.2 Menu bar The menu bar on top of the screen has the following main items: Main Advanced Power Boot Exit For changing the basic system configuration For changing the advanced system settings For changing the advanced power management (APM) configuration ...
Motherboard DIY Troubleshooting Guide
Page 44
... then press Enter to malfunction. Primary IDE Master Primary IDE Slave Secondary IDE Master Secondary IDE Slave [ST321122A] [ASUS CDS520/] [Not Detected] [Not Detected] Use [+] or [-] to display the other items (Advanced, Power, Boot, and Exit) on the menu bar have their respective menu items. System Time System Date Legacy Diskette A [11...
... then press Enter to malfunction. Primary IDE Master Primary IDE Slave Secondary IDE Master Secondary IDE Slave [ST321122A] [ASUS CDS520/] [Not Detected] [Not Detected] Use [+] or [-] to display the other items (Advanced, Power, Boot, and Exit) on the menu bar have their respective menu items. System Time System Date Legacy Diskette A [11...
Motherboard DIY Troubleshooting Guide
Page 49
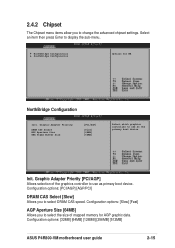
...PCI/AGP] [Slow] [64MB] [64MB] Select which graphics controller to use as the primary boot device. Init. Configuration options: [32MB] [64MB] [128MB] [256MB] [512MB] ASUS P4R800-VM motherboard user guide 2-15 NorthBridge Configuration Init. Graphic Adapter Priority [PCI/AGP] Allows selection... of mapped memory for NB. Select an item then press Enter to use as primary boot device. Configuration options: [Slow] [Fast] AGP...
...PCI/AGP] [Slow] [64MB] [64MB] Select which graphics controller to use as the primary boot device. Init. Configuration options: [32MB] [64MB] [128MB] [256MB] [512MB] ASUS P4R800-VM motherboard user guide 2-15 NorthBridge Configuration Init. Graphic Adapter Priority [PCI/AGP] Allows selection... of mapped memory for NB. Select an item then press Enter to use as primary boot device. Configuration options: [Slow] [Fast] AGP...
Motherboard DIY Troubleshooting Guide
Page 52
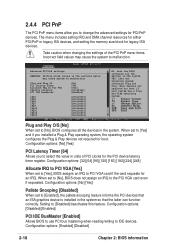
...IRQ. Configuration options: [No] [Yes] Pallete Snooping [Disabled] When set to [Yes], BIOS assigns an IRQ to PCI VGA card if the card requests for boot. Setting to IDE devices. Configuration options: [Disabled] [Enabled] PCI IDE BusMaster [Enabled] Allows BIOS to use PCI bus mastering when reading/writing to [Disabled] ... the settings of PCI clocks for legacy ISA devices. 2.4.4 PCI PnP The PCI PnP menu items allow you to change the advanced settings for boot if your system has a Plug and Play operating system. Advanced PCI/PnP settings WARNING: Setting wrong values in the system.
...IRQ. Configuration options: [No] [Yes] Pallete Snooping [Disabled] When set to [Yes], BIOS assigns an IRQ to PCI VGA card if the card requests for boot. Setting to IDE devices. Configuration options: [Disabled] [Enabled] PCI IDE BusMaster [Enabled] Allows BIOS to use PCI bus mastering when reading/writing to [Disabled] ... the settings of PCI clocks for legacy ISA devices. 2.4.4 PCI PnP The PCI PnP menu items allow you to change the advanced settings for boot if your system has a Plug and Play operating system. Advanced PCI/PnP settings WARNING: Setting wrong values in the system.

Motherboard DIY Troubleshooting Guide
Page 56
...monitored items is out of devices installed in the corresponding type menu. 1st ~ xxth Boot Device [1st Floppy Drive] These items specify the boot device priority sequence from the available devices. Enter Power setup menu for details". A ...: "Hardware Monitor found an error. Boot Settings Boot Device Priority Boot Settings Configuration Security 2.6.1 Boot Device Priority Boot Device Priority 1st Boot Device 2nd Boot Device 3rd Boot Device [First Floppy Drive] [PM-ST320413A] [PS-ASUS CD-S340] Specifies the boot sequence from the available devices. Configuration options...
...monitored items is out of devices installed in the corresponding type menu. 1st ~ xxth Boot Device [1st Floppy Drive] These items specify the boot device priority sequence from the available devices. Enter Power setup menu for details". A ...: "Hardware Monitor found an error. Boot Settings Boot Device Priority Boot Settings Configuration Security 2.6.1 Boot Device Priority Boot Device Priority 1st Boot Device 2nd Boot Device 3rd Boot Device [First Floppy Drive] [PM-ST320413A] [PS-ASUS CD-S340] Specifies the boot sequence from the available devices. Configuration options...

Motherboard DIY Troubleshooting Guide
Page 57
...the system displays the message "Press DEL to use the ASUS MyLogo2™ feature. Configuration options: [Disabled] [Enabled] Interrupt 19 Capture [Disabled] When set to [Enabled] if you to boot the system. Configuration options: [Disabled] [Enabled] Make ...] [Disabled] Allows BIOS to skip certain tests while booting. 2.6.2 Boot Settings Configuration Boot Settings Configuration Quick Boot Full Screen Logo Add On ROM Display Mode Bootup Num-Lock Wait for the NumLock. Configuration options: [Disabled] [Enabled] ASUS P4R800-VM motherboard user guide 2-23 Configuration options: ...
...the system displays the message "Press DEL to use the ASUS MyLogo2™ feature. Configuration options: [Disabled] [Enabled] Interrupt 19 Capture [Disabled] When set to [Enabled] if you to boot the system. Configuration options: [Disabled] [Enabled] Make ...] [Disabled] Allows BIOS to skip certain tests while booting. 2.6.2 Boot Settings Configuration Boot Settings Configuration Quick Boot Full Screen Logo Add On ROM Display Mode Bootup Num-Lock Wait for the NumLock. Configuration options: [Disabled] [Enabled] ASUS P4R800-VM motherboard user guide 2-23 Configuration options: ...

Motherboard DIY Troubleshooting Guide
Page 59
To set to [Setup], BIOS checks for user password both when accessing Setup and booting the system. Select the Change User Password item and press Enter. 2. The message "Password Installed" appears after you have successfully set a password, this ... utility. Full Access allows viewing and changing all the fields in setting a user password. Confirm the password when prompted. Configuration options: [Setup] [Always] ASUS P4R800-VM motherboard user guide 2-25 Change User Password Select this item if you to select the access restriction to the Setup items. Configuration options...
To set to [Setup], BIOS checks for user password both when accessing Setup and booting the system. Select the Change User Password item and press Enter. 2. The message "Password Installed" appears after you have successfully set a password, this ... utility. Full Access allows viewing and changing all the fields in setting a user password. Confirm the password when prompted. Configuration options: [Setup] [Always] ASUS P4R800-VM motherboard user guide 2-25 Change User Password Select this item if you to select the access restriction to the Setup items. Configuration options...

P4R800-VM User Manual
Page 5
Contents 2.6 Boot menu 2-22 2.6.1 Boot Device Priority 2-22 2.6.2 Boot Settings Configuration 2-23 2.6.3 Security 2-24 2.7 Exit menu 2-26 Chapter 3: Software support 3.1 Install an operating system 3-2 3.2 Support CD information 3-2 3.2.1 Running the support CD 3-2 3.2.2 Drivers menu 3-3 3.2.3 Utilities menu 3-3 3.2.4 ASUS Contact Information 3-4 v
Contents 2.6 Boot menu 2-22 2.6.1 Boot Device Priority 2-22 2.6.2 Boot Settings Configuration 2-23 2.6.3 Security 2-24 2.7 Exit menu 2-26 Chapter 3: Software support 3.1 Install an operating system 3-2 3.2 Support CD information 3-2 3.2.1 Running the support CD 3-2 3.2.2 Drivers menu 3-3 3.2.3 Utilities menu 3-3 3.2.4 ASUS Contact Information 3-4 v

P4R800-VM User Manual
Page 14
...21. See page 2-5. ASUS MyLogo2 This new feature present in the support CD. ASUS Q-Fan technology The ASUS Q-Fan technology smartly adjusts the fan speeds according to the system loading to use a DOS-based utility or boot from a floppy disk. ASUS EZ Flash BIOS With the ASUS EZ Flash, you to ...personalize and add style to your system with customizable boot logos. The ASUS MyLogo2 is automatically installed when you install the ASUS Update utility from a bootable floppy disk, when...
...21. See page 2-5. ASUS MyLogo2 This new feature present in the support CD. ASUS Q-Fan technology The ASUS Q-Fan technology smartly adjusts the fan speeds according to the system loading to use a DOS-based utility or boot from a floppy disk. ASUS EZ Flash BIOS With the ASUS EZ Flash, you to ...personalize and add style to your system with customizable boot logos. The ASUS MyLogo2 is automatically installed when you install the ASUS Update utility from a bootable floppy disk, when...
P4R800-VM User Manual
Page 20
Failure to do so may cause memory sizing error or system boot failure. Important notes 1. In dual-channel configurations, always install an identical (the same type and size) DDR DIMM pair on this section. Long AGP cards, ...
Failure to do so may cause memory sizing error or system boot failure. Important notes 1. In dual-channel configurations, always install an identical (the same type and size) DDR DIMM pair on this section. Long AGP cards, ...
P4R800-VM User Manual
Page 25
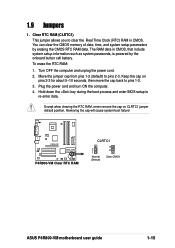
To erase the RTC RAM: 1. Hold down the key during the boot process and enter BIOS setup to pins 2-3. Removing the cap will cause system boot failure! You can clear the CMOS memory of date, time, and system setup parameters by the onboard button cell battery. Move the jumper...) to re-enter data. Keep the cap on CLRTC1 jumper default position. P4R800-VM P4R800-VM Clear RTC RAM CLRTC1 2 1 Normal (Default) 3 2 Clear CMOS ASUS P4R800-VM motherboard user guide 1-15 1.9 Jumpers 1. Turn OFF the computer and unplug the power cord. 2. Plug the power cord and turn ON the computer...
To erase the RTC RAM: 1. Hold down the key during the boot process and enter BIOS setup to pins 2-3. Removing the cap will cause system boot failure! You can clear the CMOS memory of date, time, and system setup parameters by the onboard button cell battery. Move the jumper...) to re-enter data. Keep the cap on CLRTC1 jumper default position. P4R800-VM P4R800-VM Clear RTC RAM CLRTC1 2 1 Normal (Default) 3 2 Clear CMOS ASUS P4R800-VM motherboard user guide 1-15 1.9 Jumpers 1. Turn OFF the computer and unplug the power cord. 2. Plug the power cord and turn ON the computer...

P4R800-VM User Manual
Page 38
.../ip4r800vm.rom AMI Firmware Update Utility - done Writing flash .... 0x0008CC00 (9%) Verifying flash .. The BIOS information on your screen may cause system boot failure! All rights reserved. Reading file ..... Reboot the system from the floppy disk. 4. Version 1.10 Copyright (C) 2002 American Megatrends, Inc....the BIOS file name to the bootable floppy disk. You need to type the exact BIOS file name at the prompt. 2. Boot the system from the hard disk. 2-4 Chapter 2: BIOS information A:\>afudos /ip4r800vm.rom AMI Firmware Update Utility - All rights reserved....
.../ip4r800vm.rom AMI Firmware Update Utility - done Writing flash .... 0x0008CC00 (9%) Verifying flash .. The BIOS information on your screen may cause system boot failure! All rights reserved. Reading file ..... Reboot the system from the floppy disk. 4. Version 1.10 Copyright (C) 2002 American Megatrends, Inc....the BIOS file name to the bootable floppy disk. You need to type the exact BIOS file name at the prompt. 2. Boot the system from the hard disk. 2-4 Chapter 2: BIOS information A:\>afudos /ip4r800vm.rom AMI Firmware Update Utility - All rights reserved....


