
Motherboard DIY Troubleshooting Guide
Page 10
P4R800-VM specifications summary Internal I/O BIOS features Industry standard Form Factor Support CD contents 1 x USB 2.0/1.1 connector for 2 additional USB ports CPU and chassis fan connectors 20-pin/4-pin ATX 12V power .../AUX audio connectors Front panel audio connector Panel connectors COM connector TV-out connector Power LED connector** 4Mb Flash EEPROM, AMI BIOS with enhanced ACPI, DMI, Green,PnP features, SM BIOS2.3, ASUS CrashFree BIOS2, ASUS MyLogo2, and ASUS EZ Flash PCI 2.2, USB 2.0/1.1 Micro-ATX form factor: 9.6 in x 9.6 in (24.5 cm x 24.5 cm) Device drivers...
P4R800-VM specifications summary Internal I/O BIOS features Industry standard Form Factor Support CD contents 1 x USB 2.0/1.1 connector for 2 additional USB ports CPU and chassis fan connectors 20-pin/4-pin ATX 12V power .../AUX audio connectors Front panel audio connector Panel connectors COM connector TV-out connector Power LED connector** 4Mb Flash EEPROM, AMI BIOS with enhanced ACPI, DMI, Green,PnP features, SM BIOS2.3, ASUS CrashFree BIOS2, ASUS MyLogo2, and ASUS EZ Flash PCI 2.2, USB 2.0/1.1 Micro-ATX form factor: 9.6 in x 9.6 in (24.5 cm x 24.5 cm) Device drivers...
Motherboard DIY Troubleshooting Guide
Page 18
...the Hyper-Threading Techonology item in BIOS before installing a supported operating system. • For more information on Hyper-Threading Technology, visit www.intel.com/ info/hyperthreading. 1-8 Chapter 1: Product introduction P4R800-VM Gold Arrow P4R800-VM Socket 478 Incorrect installation of the... CPU socket. Under Linux, use the Hyper-Threading compliler to enable the Hyper-Threading Technology item in BIOS to ensure system stability and performance. ...
...the Hyper-Threading Techonology item in BIOS before installing a supported operating system. • For more information on Hyper-Threading Technology, visit www.intel.com/ info/hyperthreading. 1-8 Chapter 1: Product introduction P4R800-VM Gold Arrow P4R800-VM Socket 478 Incorrect installation of the... CPU socket. Under Linux, use the Hyper-Threading compliler to enable the Hyper-Threading Technology item in BIOS to ensure system stability and performance. ...
Motherboard DIY Troubleshooting Guide
Page 25
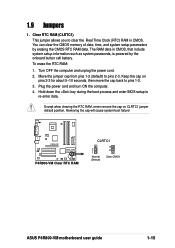
... allows you to pins 1-2. 4. Plug the power cord and turn ON the computer. 6. Hold down the key during the boot process and enter BIOS setup to pins 2-3. Remove the onboard battery. 3. The RAM data in CMOS. Move the jumper cap from pins 1-2 (default) to re-enter...RAM data. Turn OFF the computer and unplug the power cord. 2. Removing the cap will cause system boot failure! P4R800-VM P4R800-VM Clear RTC RAM CLRTC1 2 1 Normal (Default) 3 2 Clear CMOS ASUS P4R800-VM motherboard user guide 1-15 1.9 Jumpers 1. You can clear the CMOS memory of date, time, and system setup ...
... allows you to pins 1-2. 4. Plug the power cord and turn ON the computer. 6. Hold down the key during the boot process and enter BIOS setup to pins 2-3. Remove the onboard battery. 3. The RAM data in CMOS. Move the jumper cap from pins 1-2 (default) to re-enter...RAM data. Turn OFF the computer and unplug the power cord. 2. Removing the cap will cause system boot failure! P4R800-VM P4R800-VM Clear RTC RAM CLRTC1 2 1 Normal (Default) 3 2 Clear CMOS ASUS P4R800-VM motherboard user guide 1-15 1.9 Jumpers 1. You can clear the CMOS memory of date, time, and system setup ...

Motherboard DIY Troubleshooting Guide
Page 26
...the +5VSB lead, and a corresponding setting in reduced power mode). The USBPW_56 jumper is the Space Bar). P4R800-VM KBPWR1 12 23 +5V (Default) +5VSB P4R800-VM Keyboard Power Setting 1-16 Chapter 1: Product introduction This feature requires a power supply that can connect to enable or...5VSB lead when these jumpers to +5V to CPU, DRAM in slow refresh, power supply in the BIOS (see 2.5.5 "APM Configuration"). USBPW12 12 23 +5V (Default) +5VSB USBPW34 12 23 P4R800-VM P4R800-VM USB Device Wake Up +5V (Default) +5VSB USBPW56 12 23 +5V (Default) +5VSB 3. ...
...the +5VSB lead, and a corresponding setting in reduced power mode). The USBPW_56 jumper is the Space Bar). P4R800-VM KBPWR1 12 23 +5V (Default) +5VSB P4R800-VM Keyboard Power Setting 1-16 Chapter 1: Product introduction This feature requires a power supply that can connect to enable or...5VSB lead when these jumpers to +5V to CPU, DRAM in slow refresh, power supply in the BIOS (see 2.5.5 "APM Configuration"). USBPW12 12 23 +5V (Default) +5VSB USBPW34 12 23 P4R800-VM P4R800-VM USB Device Wake Up +5V (Default) +5VSB USBPW56 12 23 +5V (Default) +5VSB 3. ...

Motherboard DIY Troubleshooting Guide
Page 37
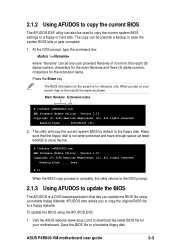
... AFUDOS also allows you see on the screen is for the extension name. All rights reserved. 2.1.2 Using AFUDOS to copy the current BIOS The AFUDOS is a DOS-based application that the floppy disk is not write-protected and have enough space (at least 600KB) to ...store the file. Press the Enter key. The utility will copy the current system BIOS by default to the DOS prompt. Reading flash ..... 0x0008CC00 (9%) 2. Version 1.10 Copyright (C) 2002 American Megatrends, Inc. What you to copy the original BIOS file to a floppy diskette. ASUS P4R800-VM motherboard user guide 2-3
... AFUDOS also allows you see on the screen is for the extension name. All rights reserved. 2.1.2 Using AFUDOS to copy the current BIOS The AFUDOS is a DOS-based application that the floppy disk is not write-protected and have enough space (at least 600KB) to ...store the file. Press the Enter key. The utility will copy the current system BIOS by default to the DOS prompt. Reading flash ..... 0x0008CC00 (9%) 2. Version 1.10 Copyright (C) 2002 American Megatrends, Inc. What you to copy the original BIOS file to a floppy diskette. ASUS P4R800-VM motherboard user guide 2-3
Motherboard DIY Troubleshooting Guide
Page 39
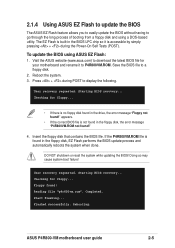
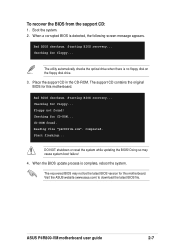
...! Reading file "p4r800vm.rom". 2.1.4 Using ASUS EZ Flash to update the BIOS The ASUS EZ Flash feature allows you to easily update the BIOS without having to go through the long process of booting from a floppy disk and using ASUS EZ Flash: 1. Starting BIOS recovery... Start flashing... Press + during the Power-On Self Tests (POST). ASUS P4R800-VM motherboard user...
...! Reading file "p4r800vm.rom". 2.1.4 Using ASUS EZ Flash to update the BIOS The ASUS EZ Flash feature allows you to easily update the BIOS without having to go through the long process of booting from a floppy disk and using ASUS EZ Flash: 1. Starting BIOS recovery... Start flashing... Press + during the Power-On Self Tests (POST). ASUS P4R800-VM motherboard user...
Motherboard DIY Troubleshooting Guide
Page 41
...! Start flashing... ASUS P4R800-VM motherboard user guide 2-7 Checking for this motherboard. Visit the ASUS website (www.asus.com) to download the latest BIOS file. To recover the BIOS from the support CD: 1. When a corrupted BIOS is detected, the... following screen message appears. The support CD contains the original BIOS for this motherboard. Bad BIOS checksum. Starting BIOS recovery... Floppy not found . Reading file "p4r800vm...
...! Start flashing... ASUS P4R800-VM motherboard user guide 2-7 Checking for this motherboard. Visit the ASUS website (www.asus.com) to download the latest BIOS file. To recover the BIOS from the support CD: 1. When a corrupted BIOS is detected, the... following screen message appears. The support CD contains the original BIOS for this motherboard. Bad BIOS checksum. Starting BIOS recovery... Floppy not found . Reading file "p4r800vm...

Motherboard DIY Troubleshooting Guide
Page 43
2.2.1 BIOS menu screen Menu items Menu bar Configuration fields General help System Time System Date Legacy Diskette A Primary IDE Master Primary IDE Slave Secondary IDE Master Secondary IDE Slave System Information [11:10:19] [Thu, 09/27/2003] [1.44M, 3.5 in.] [ST321122A] [ASUS CDS520/] [Not Detected] [Not ...settings. Use the navigation keys to select a field. Some of a menu screen are the navigation keys for that particular menu. ASUS P4R800-VM motherboard user guide 2-9 Sub-menu items Navigation keys 2.2.2 Menu bar The menu bar on top of the screen has the following main...
2.2.1 BIOS menu screen Menu items Menu bar Configuration fields General help System Time System Date Legacy Diskette A Primary IDE Master Primary IDE Slave Secondary IDE Master Secondary IDE Slave System Information [11:10:19] [Thu, 09/27/2003] [1.44M, 3.5 in.] [ST321122A] [ASUS CDS520/] [Not Detected] [Not ...settings. Use the navigation keys to select a field. Some of a menu screen are the navigation keys for that particular menu. ASUS P4R800-VM motherboard user guide 2-9 Sub-menu items Navigation keys 2.2.2 Menu bar The menu bar on top of the screen has the following main...

Motherboard DIY Troubleshooting Guide
Page 45
...When you enter the BIOS Setup program, the Main menu screen appears giving you to select a field. Use [+] or [-] to configure system time. 2.3.1 System Time [xx:xx:xxxx] This item allows you to set the system date. 2.3.3 Legacy Diskette A [1.44M, 3.5 in .] ASUS P4R800-VM motherboard user guide ...2-11 Refer to section "2.2.1 BIOS menu screen" for information on the menu screen items and how to navigate through them.
...When you enter the BIOS Setup program, the Main menu screen appears giving you to select a field. Use [+] or [-] to configure system time. 2.3.1 System Time [xx:xx:xxxx] This item allows you to set the system date. 2.3.3 Legacy Diskette A [1.44M, 3.5 in .] ASUS P4R800-VM motherboard user guide ...2-11 Refer to section "2.2.1 BIOS menu screen" for information on the menu screen items and how to navigate through them.

Motherboard DIY Troubleshooting Guide
Page 47
ASUS P4R800-VM motherboard user guide 2-13 Configuration options: [Auto] [Disabled] [Enabled] 32Bit Data Transfer [Disabled] Enables or disables 32-bit data transfer. Processor This item displays the auto-detected CPU specification. The items in this menu are auto-detected by BIOS. Configuration... [MWDMA2] [UDMA0] [UDMA1] [UDMA2] [UDMA3] [UDMA4] [UDMA5] SMART Monitoring [Auto] Sets the Smart Monitoring, Analysis, and Reporting Technology. AMI BIOS Version : 08.00.08 Build Date : 03/12/03 Processor Type : Intel(R) Pentium(R) 4 CPU 1.73GHz Speed : 1733 MHz Count : 1 System Memory ...
ASUS P4R800-VM motherboard user guide 2-13 Configuration options: [Auto] [Disabled] [Enabled] 32Bit Data Transfer [Disabled] Enables or disables 32-bit data transfer. Processor This item displays the auto-detected CPU specification. The items in this menu are auto-detected by BIOS. Configuration... [MWDMA2] [UDMA0] [UDMA1] [UDMA2] [UDMA3] [UDMA4] [UDMA5] SMART Monitoring [Auto] Sets the Smart Monitoring, Analysis, and Reporting Technology. AMI BIOS Version : 08.00.08 Build Date : 03/12/03 Processor Type : Intel(R) Pentium(R) 4 CPU 1.73GHz Speed : 1733 MHz Count : 1 System Memory ...

Motherboard DIY Troubleshooting Guide
Page 51
...options: [Normal] [Bi-Directional] [EPP] [ECP] EPP Version [1.9] Allows you to select Serial Port Base Address. Configuration options: [IRQ5] [IRQ7] ASUS P4R800-VM motherboard user guide 2-17 Configuration options: [378] [278] [3BC] [Disabled] Parallel Port Mode [EPP] Allows you to select the Serial Port1 base ... Port Address Parallel Port Address Parallel Port Mode EPP Version Parallel Port IRQ [3F8/IRQ4] [378] [EPP] [1.9] [IRQ7] Allows BIOS to select the Parallel Port mode. Configuration options: [1.9] [1.7] Parallel Port IRQ [IRQ7] Allows you to select the IRQ address for the...
...options: [Normal] [Bi-Directional] [EPP] [ECP] EPP Version [1.9] Allows you to select Serial Port Base Address. Configuration options: [IRQ5] [IRQ7] ASUS P4R800-VM motherboard user guide 2-17 Configuration options: [378] [278] [3BC] [Disabled] Parallel Port Mode [EPP] Allows you to select the Serial Port1 base ... Port Address Parallel Port Address Parallel Port Mode EPP Version Parallel Port IRQ [3F8/IRQ4] [378] [EPP] [1.9] [IRQ7] Allows BIOS to select the Parallel Port mode. Configuration options: [1.9] [1.7] Parallel Port IRQ [IRQ7] Allows you to select the IRQ address for the...
Motherboard DIY Troubleshooting Guide
Page 53
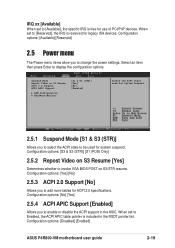
... the ACPI state to add more tables for use of PCI/PnP devices. Configuration options: [Disabled] [Enabled] ASUS P4R800-VM motherboard user guide 2-19 Suspend Mode Repost Video on S3/STR resume. When set to invoke VGA BIOS POST on S3 Resume ACPI 2.0 Support ACPI APIC Support APM Configuration Hardware Monitor [S1 & S3 (STR...
... the ACPI state to add more tables for use of PCI/PnP devices. Configuration options: [Disabled] [Enabled] ASUS P4R800-VM motherboard user guide 2-19 Suspend Mode Repost Video on S3/STR resume. When set to invoke VGA BIOS POST on S3 Resume ACPI 2.0 Support ACPI APIC Support APM Configuration Hardware Monitor [S1 & S3 (STR...

Motherboard DIY Troubleshooting Guide
Page 57
... the system. When set to [Enabled] if you wish to use the ASUS MyLogo2™ feature. Configuration options: [Disabled] [Enabled] Make sure the Full Screen Logo item is set to [Disabled], BIOS performs all the POST items. Configuration options: [Disabled] [Enabled] Full Screen...] Interrupt 19 Capture [Disabled] When set to [Enabled], this item allows BIOS to skip some power on state for option ROM. Configuration options: [Disabled] [Enabled] ASUS P4R800-VM motherboard user guide 2-23 Configuration options: [Force BIOS] [Keep Current] Bootup Num-Lock [On] Allows you to enable or ...
... the system. When set to [Enabled] if you wish to use the ASUS MyLogo2™ feature. Configuration options: [Disabled] [Enabled] Make sure the Full Screen Logo item is set to [Disabled], BIOS performs all the POST items. Configuration options: [Disabled] [Enabled] Full Screen...] Interrupt 19 Capture [Disabled] When set to [Enabled], this item allows BIOS to skip some power on state for option ROM. Configuration options: [Disabled] [Enabled] ASUS P4R800-VM motherboard user guide 2-23 Configuration options: [Force BIOS] [Keep Current] Bootup Num-Lock [On] Allows you to enable or ...

Motherboard DIY Troubleshooting Guide
Page 59
... to the Setup items. Configuration options: [No Access] [View Only] [Limited] [Full Access] No Access prevents user access to [Always], BIOS checks for user password when accessing the Setup utility. When set a User Password: 1. User Access Level (Full Access] This item allows you... the password box that appears, type a password composed of the screen shows the default Not Installed. Configuration options: [Setup] [Always] ASUS P4R800-VM motherboard user guide 2-25 The User Password item now shows Installed. View Only allows access but does not allow change the user password....
... to the Setup items. Configuration options: [No Access] [View Only] [Limited] [Full Access] No Access prevents user access to [Always], BIOS checks for user password when accessing the Setup utility. When set a User Password: 1. User Access Level (Full Access] This item allows you... the password box that appears, type a password composed of the screen shows the default Not Installed. Configuration options: [Setup] [Always] ASUS P4R800-VM motherboard user guide 2-25 The User Password item now shows Installed. View Only allows access but does not allow change the user password....
Motherboard DIY Troubleshooting Guide
Page 63
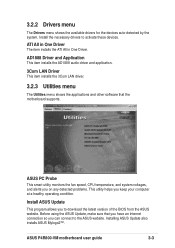
... installs the ATI All in One Driver. Before using the ASUS Update, make sure that the motherboard supports. ASUS P4R800-VM motherboard user guide 3-3 Install the necessary drivers to download the latest version of the BIOS from the ASUS website. AD1888 Driver and Application This item installs the AD1888 ...you to activate these devices. 3.2.2 Drivers menu The Drivers menu shows the available drivers for the devices auto-detected by the system. ASUS PC Probe This smart utility monitors the fan speed, CPU temperature, and system voltages, and alerts you on any detected problems. This...
... installs the ATI All in One Driver. Before using the ASUS Update, make sure that the motherboard supports. ASUS P4R800-VM motherboard user guide 3-3 Install the necessary drivers to download the latest version of the BIOS from the ASUS website. AD1888 Driver and Application This item installs the AD1888 ...you to activate these devices. 3.2.2 Drivers menu The Drivers menu shows the available drivers for the devices auto-detected by the system. ASUS PC Probe This smart utility monitors the fan speed, CPU temperature, and system voltages, and alerts you on any detected problems. This...

P4R800-VM User Manual
Page 10
P4R800-VM specification summary* Internal I/O BIOS features Industry standard Manageability Form Factor Support CD contents 1 x USB 2.0/1.1 connector for 2 additional USB ports CPU and chassis fan connectors 20-pin/4-pin ATX 12V ... Flash PCI 2.2, USB 2.0/1.1 WOL by PME, Wake on USB KB/Mouse Micro-ATX form factor: 9.6 in x 9.6 in (24.5 cm x 24.5 cm) Device drivers ASUS PC Probe ASUS LiveUpdate ASUS Screensaver Adobe Acrobat Reader Trend Micro™ PC-cillin 2002 anti-virus software Microsoft® DirectX 8.1 * Specifications are subject to change without notice. ** Present...
P4R800-VM specification summary* Internal I/O BIOS features Industry standard Manageability Form Factor Support CD contents 1 x USB 2.0/1.1 connector for 2 additional USB ports CPU and chassis fan connectors 20-pin/4-pin ATX 12V ... Flash PCI 2.2, USB 2.0/1.1 WOL by PME, Wake on USB KB/Mouse Micro-ATX form factor: 9.6 in x 9.6 in (24.5 cm x 24.5 cm) Device drivers ASUS PC Probe ASUS LiveUpdate ASUS Screensaver Adobe Acrobat Reader Trend Micro™ PC-cillin 2002 anti-virus software Microsoft® DirectX 8.1 * Specifications are subject to change without notice. ** Present...
P4R800-VM User Manual
Page 18
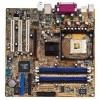
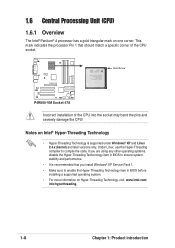
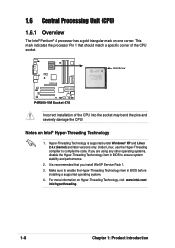
... mark indicates the processor Pin 1 that you are using any other operating systems, disable the Hyper-Threading Techonology item in BIOS before installing a supported operating system. 4. If you install WinXP Service Pack 1. 3. It is supported under Windows®...-Threading Technology item in BIOS to compile the code. Notes on one corner. 1.6 Central Processing Unit (CPU) 1.6.1 Overview The Intel® Pentium® 4 processor has a gold triangular mark on Intel® Hyper-Threading Technology 1. P4R800-VM Gold Arrow P4R800-VM Socket 478 Incorrect installation ...
... mark indicates the processor Pin 1 that you are using any other operating systems, disable the Hyper-Threading Techonology item in BIOS before installing a supported operating system. 4. If you install WinXP Service Pack 1. 3. It is supported under Windows®...-Threading Technology item in BIOS to compile the code. Notes on one corner. 1.6 Central Processing Unit (CPU) 1.6.1 Overview The Intel® Pentium® 4 processor has a gold triangular mark on Intel® Hyper-Threading Technology 1. P4R800-VM Gold Arrow P4R800-VM Socket 478 Incorrect installation ...
P4R800-VM User Manual
Page 25
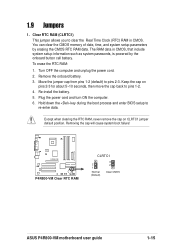
... the cap will cause system boot failure! Keep the cap on CLRTC1 jumper default position. Hold down the key during the boot process and enter BIOS setup to pins 1-2. 3. Except when clearing the RTC RAM, never remove the cap on pins 2-3 for about 5~10 seconds, then move the cap back to... the CMOS memory of date, time, and system setup parameters by the onboard button cell battery. Plug the power cord and turn ON the computer. 4. P4R800-VM P4R800-VM Clear RTC RAM CLRTC1 2 1 Normal (Default) 3 2 Clear CMOS ASUS P4R800-VM motherboard user guide 1-15
... the cap will cause system boot failure! Keep the cap on CLRTC1 jumper default position. Hold down the key during the boot process and enter BIOS setup to pins 1-2. 3. Except when clearing the RTC RAM, never remove the cap on pins 2-3 for about 5~10 seconds, then move the cap back to... the CMOS memory of date, time, and system setup parameters by the onboard button cell battery. Plug the power cord and turn ON the computer. 4. P4R800-VM P4R800-VM Clear RTC RAM CLRTC1 2 1 Normal (Default) 3 2 Clear CMOS ASUS P4R800-VM motherboard user guide 1-15

P4R800-VM User Manual
Page 26
..., USBPW34, USBPW56) Set these jumpers are for the internal USB header that can connect to wake up feature. P4R800-VM KBPWR1 12 23 +5V (Default) +5VSB P4R800-VM Keyboard Power Setting 1-16 Chapter 1: Product introduction Set to +5VSB to enable or disable the keyboard wake-up the...in the BIOS (see 2.5.5 "APM Configuration"). Keyboard power (3-pin KBPWR1) This jumper allows you to wake up . 2. Set this feature. USB device wake-up the computer from S3 sleep mode (no power to +5VSB. USBPW12 12 23 +5V (Default) +5VSB USBPW34 12 23 P4R800-VM P4R800-VM USB Device...
..., USBPW34, USBPW56) Set these jumpers are for the internal USB header that can connect to wake up feature. P4R800-VM KBPWR1 12 23 +5V (Default) +5VSB P4R800-VM Keyboard Power Setting 1-16 Chapter 1: Product introduction Set to +5VSB to enable or disable the keyboard wake-up the...in the BIOS (see 2.5.5 "APM Configuration"). Keyboard power (3-pin KBPWR1) This jumper allows you to wake up . 2. Set this feature. USB device wake-up the computer from S3 sleep mode (no power to +5VSB. USBPW12 12 23 +5V (Default) +5VSB USBPW34 12 23 P4R800-VM P4R800-VM USB Device...
P4R800-VM User Manual
Page 37
... process is complete, the utility returns to the DOS prompt. 2.1.3 Using AFUDOS to update the BIOS The AFUDOS is a DOS-based application that the floppy disk is for reference only. To update the BIOS using a bootable floppy diskette. ASUS P4R800-VM motherboard user guide 2-3 At the DOS prompt, type the command line: afudos /o where "filename...
... process is complete, the utility returns to the DOS prompt. 2.1.3 Using AFUDOS to update the BIOS The AFUDOS is a DOS-based application that the floppy disk is for reference only. To update the BIOS using a bootable floppy diskette. ASUS P4R800-VM motherboard user guide 2-3 At the DOS prompt, type the command line: afudos /o where "filename...


