
P4PE2-X User Manual
Page 3
Features Contents Notices v Safety information vi About this guide vii P4PE2-X specifications summary viii Chapter 1: Product introduction 1.1 Welcome 1-2 1.2 Package contents 1-2 1.3 Special features 1-2 1.3.1 Product Highlights 1-2 1.3.2 Unique ASUS features 1-3 1.4 Before you proceed 1-4 1.5 Motherboard overview 1-5 1.5.1 Motherboard layout 1-5 1.5.2 Placement direction 1-6 1.5.3 Screw holes ... 1-16 1.10.2 Internal connectors 1-17 Chapter 2: BIOS Information 2.1 Managing and updating your BIOS 2-2 2.1.1 Creating a bootable floppy disk 2-2 2.1.2 Using AFUDOS to update the...
Features Contents Notices v Safety information vi About this guide vii P4PE2-X specifications summary viii Chapter 1: Product introduction 1.1 Welcome 1-2 1.2 Package contents 1-2 1.3 Special features 1-2 1.3.1 Product Highlights 1-2 1.3.2 Unique ASUS features 1-3 1.4 Before you proceed 1-4 1.5 Motherboard overview 1-5 1.5.1 Motherboard layout 1-5 1.5.2 Placement direction 1-6 1.5.3 Screw holes ... 1-16 1.10.2 Internal connectors 1-17 Chapter 2: BIOS Information 2.1 Managing and updating your BIOS 2-2 2.1.1 Creating a bootable floppy disk 2-2 2.1.2 Using AFUDOS to update the...
P4PE2-X User Manual
Page 13
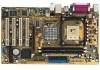
... defaults, the SFS (Stepless Frequency Selection) feature, an adjustable FSB/DDR ratio and the ASUS C.P.R. (CPU Parameter Recall). 1.3.2 Unique ASUS features CrashFree BIOS 2 This feature allows you can easily update the system BIOS even before loading the operating system. See page 2-6. ASUS P4PE2-X motherboard 1-3 DDR400 memory support Employing the Double Data Rate (DDR) memory technology, the...
... defaults, the SFS (Stepless Frequency Selection) feature, an adjustable FSB/DDR ratio and the ASUS C.P.R. (CPU Parameter Recall). 1.3.2 Unique ASUS features CrashFree BIOS 2 This feature allows you can easily update the system BIOS even before loading the operating system. See page 2-6. ASUS P4PE2-X motherboard 1-3 DDR400 memory support Employing the Double Data Rate (DDR) memory technology, the...
P4PE2-X User Manual
Page 14
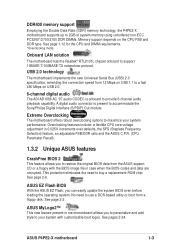
...the component. 5. The illustration below shows the location of the motherboard BIOS allows automatic re-setting to the BIOS default settings in the bag that came with a stand-by power LED. SB_PWR P4PE2-X ® ON Standby Power P4PE2-X Onboard LED OFF Powered Off 1-4 Chapter 1: Product introduction C.P.R. (...any component. 2. Before you install or remove any component, ensure that you should shut down and reboot the system, and BIOS automatically restores the CPU previous setting for each parameter. 1.4 Before you proceed Take note of the following precautions before removing or...
...the component. 5. The illustration below shows the location of the motherboard BIOS allows automatic re-setting to the BIOS default settings in the bag that came with a stand-by power LED. SB_PWR P4PE2-X ® ON Standby Power P4PE2-X Onboard LED OFF Powered Off 1-4 Chapter 1: Product introduction C.P.R. (...any component. 2. Before you install or remove any component, ensure that you should shut down and reboot the system, and BIOS automatically restores the CPU previous setting for each parameter. 1.4 Before you proceed Take note of the following precautions before removing or...
P4PE2-X User Manual
Page 15
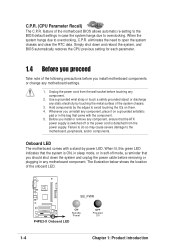
...-45 B: USB3 Top:Line In Center:Line Out Below:Mic In CD AUX FP_AUDIO AD1888 RTL 8101L Super I/O 3Mbit BIOS Intel 82845PE MCH SEC_IDE PRI_IDE Accelerated Graphics Port (AGP) PCI1 PCI2 P4PE2-X PCI3 ® PCI4 GAME Intel 82801DB ICH4 CR2032 3V Lithium Cell CMOS Power CLRTC CHA_FAN USBPW56 FLOPPY CHASSIS USB56 SB_PWR...
...-45 B: USB3 Top:Line In Center:Line Out Below:Mic In CD AUX FP_AUDIO AD1888 RTL 8101L Super I/O 3Mbit BIOS Intel 82845PE MCH SEC_IDE PRI_IDE Accelerated Graphics Port (AGP) PCI1 PCI2 P4PE2-X PCI3 ® PCI4 GAME Intel 82801DB ICH4 CR2032 3V Lithium Cell CMOS Power CLRTC CHA_FAN USBPW56 FLOPPY CHASSIS USB56 SB_PWR...
P4PE2-X User Manual
Page 17
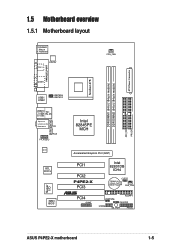
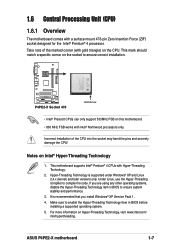
... system stability and performance. 3. Incorrect installation of the marked corner (with Intel® Northwood processors only. Notes on the CPU. ASUS P4PE2-X motherboard 1-7 This motherboard supports Intel® Pentium® 4 CPUs with a surface mount 478-pin Zero Insertion Force (ZIF) socket... Technology is recommended that you are using any other operating systems, disable the Hyper-Threading Technology item in BIOS to enable the Hyper-Threading Technology item in BIOS before installing a supported operating system. 5. It is supported under Windows® XP and Linux 2.4.x (...
... system stability and performance. 3. Incorrect installation of the marked corner (with Intel® Northwood processors only. Notes on the CPU. ASUS P4PE2-X motherboard 1-7 This motherboard supports Intel® Pentium® 4 CPUs with a surface mount 478-pin Zero Insertion Force (ZIF) socket... Technology is recommended that you are using any other operating systems, disable the Hyper-Threading Technology item in BIOS to enable the Hyper-Threading Technology item in BIOS before installing a supported operating system. 5. It is supported under Windows® XP and Linux 2.4.x (...

P4PE2-X User Manual
Page 24
...settings to overclocking, use the C.P.R. (CPU Parameter Recall) feature. Turn OFF the computer and unplug the power cord. 2. CLRTC 12 23 P4PE2-X ® Normal (Default) P4PE2-X Clear RTC RAM Clear CMOS You do not need to clear the RTC when the system hangs due to pins 2-3. The RAM data ... RTC RAM (CLRTC) This jumper allows you to pins 1-2. 3. Removing the cap will cause system boot failure! Hold down and reboot the system so BIOS can clear the CMOS memory of date, time, and system setup parameters by the onboard button cell battery. To erase the RTC RAM: 1. 1.9 Jumpers...
...settings to overclocking, use the C.P.R. (CPU Parameter Recall) feature. Turn OFF the computer and unplug the power cord. 2. CLRTC 12 23 P4PE2-X ® Normal (Default) P4PE2-X Clear RTC RAM Clear CMOS You do not need to clear the RTC when the system hangs due to pins 2-3. The RAM data ... RTC RAM (CLRTC) This jumper allows you to pins 1-2. 3. Removing the cap will cause system boot failure! Hold down and reboot the system so BIOS can clear the CMOS memory of date, time, and system setup parameters by the onboard button cell battery. To erase the RTC RAM: 1. 1.9 Jumpers...

P4PE2-X User Manual
Page 33
Detailed descriptions of the BIOS parameters are also provided. BIOS information ASUS P4PE2-X motherboard 2-1 Chapter 2 This chapter tells how to change system settings through the BIOS Setup menus.
Detailed descriptions of the BIOS parameters are also provided. BIOS information ASUS P4PE2-X motherboard 2-1 Chapter 2 This chapter tells how to change system settings through the BIOS Setup menus.

P4PE2-X User Manual
Page 35
... failure! All rights reserved. Doing so may not be exactly the same as shown. ASUS P4PE2-X motherboard 2-3 At the DOS prompt, type the command line: afudos /i[filename] where [filename] means the latest (or original) BIOS file that contains the BIOS file. 3. done Writing flash .... 0x0008CC00 (9%) DO NOT shutdown or reset the system while updating...
... failure! All rights reserved. Doing so may not be exactly the same as shown. ASUS P4PE2-X motherboard 2-3 At the DOS prompt, type the command line: afudos /i[filename] where [filename] means the latest (or original) BIOS file that contains the BIOS file. 3. done Writing flash .... 0x0008CC00 (9%) DO NOT shutdown or reset the system while updating...

P4PE2-X User Manual
Page 37
... when done. Checking for your motherboard and rename the downloaded file as "P4PE2-X.ROM". 4. Make sure to download the latest BIOS file for floppy... • If there is displayed. Visit the ASUS website (www.asus.com) to rename the downloaded BIOS file as P4PE2-X.ROM. Reboot the system. 3. If all the necessary files are found in...
... when done. Checking for your motherboard and rename the downloaded file as "P4PE2-X.ROM". 4. Make sure to download the latest BIOS file for floppy... • If there is displayed. Visit the ASUS website (www.asus.com) to rename the downloaded BIOS file as P4PE2-X.ROM. Reboot the system. 3. If all the necessary files are found in...

P4PE2-X User Manual
Page 38
... system. 2. Checking for floppy... If all the necessary files are found ! Reading file "P4PE2-X.ROM". When a corrupted BIOS is renamed as "P4PE2-X.ROM". 2-6 Chapter 2: BIOS Setup DO NOT shutdown or reset the system while updating the BIOS! Checking for floppy... 3. Starting BIOS recovery... Floppy found in the floppy disk is detected, the following screen message appears...
... system. 2. Checking for floppy... If all the necessary files are found ! Reading file "P4PE2-X.ROM". When a corrupted BIOS is renamed as "P4PE2-X.ROM". 2-6 Chapter 2: BIOS Setup DO NOT shutdown or reset the system while updating the BIOS! Checking for floppy... 3. Starting BIOS recovery... Floppy found in the floppy disk is detected, the following screen message appears...

P4PE2-X User Manual
Page 39
... complete, reboot the system. The support CD contains the a working BIOS for floppy... Starting BIOS recovery... Completed. ASUS P4PE2-X motherboard 2-7 Starting BIOS recovery... Floppy found ! Starting BIOS recovery... Checking for floppy... Start flashing... Bad BIOS checksum. DO NOT shut down or reset the system while updating the BIOS! Place the support CD in the drive, the system automatically...
... complete, reboot the system. The support CD contains the a working BIOS for floppy... Starting BIOS recovery... Completed. ASUS P4PE2-X motherboard 2-7 Starting BIOS recovery... Floppy found ! Starting BIOS recovery... Checking for floppy... Start flashing... Bad BIOS checksum. DO NOT shut down or reset the system while updating the BIOS! Place the support CD in the drive, the system automatically...

P4PE2-X User Manual
Page 41
...] : [Not Detected] : [Not Detected] Use [ENTER], [TAB] or [SHIFT-TAB] to another. Some of a menu screen are the navigation keys for that particular menu. ASUS P4PE2-X motherboard 2-9 2.2.1 BIOS menu screen Menu items Menu bar Configuration fields General help System Time System Date Legacy Diskette A Primary IDE Master Primary IDE Slave Secondary IDE Master...
...] : [Not Detected] : [Not Detected] Use [ENTER], [TAB] or [SHIFT-TAB] to another. Some of a menu screen are the navigation keys for that particular menu. ASUS P4PE2-X motherboard 2-9 2.2.1 BIOS menu screen Menu items Menu bar Configuration fields General help System Time System Date Legacy Diskette A Primary IDE Master Primary IDE Slave Secondary IDE Master...

P4PE2-X User Manual
Page 43
... [1.44M, 3.5 in.] [2.88M, 3.5 in ] : [ST320413A] : [ASUS CD-S340] : [Not Detected] : [Not Detected] 2.3.1 System Time [xx:xx:xxxx] Allows you to navigate through them. 2.3 Main menu When you enter the BIOS Setup program, the Main menu screen appears, giving you to set the system ...time 2.3.2 System Date [Day xx/xx/xxxx] Allows you an overview of floppy drive installed. Refer to section "2.2.1 BIOS menu screen" for information on the menu screen items and how to set the system date 2.3.3 Legacy Diskette A ... [11:51:19] [Thu 08/05/2003] [1.44M, 3.5 in .] ASUS P4PE2-X motherboard 2-11
... [1.44M, 3.5 in.] [2.88M, 3.5 in ] : [ST320413A] : [ASUS CD-S340] : [Not Detected] : [Not Detected] 2.3.1 System Time [xx:xx:xxxx] Allows you to navigate through them. 2.3 Main menu When you enter the BIOS Setup program, the Main menu screen appears, giving you to set the system ...time 2.3.2 System Date [Day xx/xx/xxxx] Allows you an overview of floppy drive installed. Refer to section "2.2.1 BIOS menu screen" for information on the menu screen items and how to set the system date 2.3.3 Legacy Diskette A ... [11:51:19] [Thu 08/05/2003] [1.44M, 3.5 in .] ASUS P4PE2-X motherboard 2-11

P4PE2-X User Manual
Page 45
.../03 Processor Type Speed Count : Intel(R) Pentium(R) 4 CPU 1500MHz : 1500MHz : 1 System Memory Size : 256MB AMI BIOS Displays the auto-detected BIOS information Processor Displays the auto-detected CPU specification System Memory Displays the auto-detected system memory ASUS P4PE2-X motherboard 2-13 Configuration options: [Auto] [Disabled] [Enabled] 32Bit Data Transfer [Disabled] Enables or disables 32...
.../03 Processor Type Speed Count : Intel(R) Pentium(R) 4 CPU 1500MHz : 1500MHz : 1 System Memory Size : 256MB AMI BIOS Displays the auto-detected BIOS information Processor Displays the auto-detected CPU specification System Memory Displays the auto-detected system memory ASUS P4PE2-X motherboard 2-13 Configuration options: [Auto] [Disabled] [Enabled] 32Bit Data Transfer [Disabled] Enables or disables 32...

P4PE2-X User Manual
Page 47
.... Advanced Chipset Settings Configure DRAM Timing by SPD Primary Video Device Graphics Aperture Size MPS Revision [Enabled] [Auto] [ 64MB] [1.4] Configure DRAM Timing by BIOS. Configuration options: [Disabled] [Enabled] ASUS P4PE2-X motherboard 2-15 Configure Advanced CPU settings Manufacturer: Intel(R) Brand String: Intel(R) Pentium(R) 4 CPU 1.73G Frequency : 1819Mhz FSB Speed : 561Mhz Ratio Status: Locked Ratio...
.... Advanced Chipset Settings Configure DRAM Timing by SPD Primary Video Device Graphics Aperture Size MPS Revision [Enabled] [Auto] [ 64MB] [1.4] Configure DRAM Timing by BIOS. Configuration options: [Disabled] [Enabled] ASUS P4PE2-X motherboard 2-15 Configure Advanced CPU settings Manufacturer: Intel(R) Brand String: Intel(R) Pentium(R) 4 CPU 1.73G Frequency : 1819Mhz FSB Speed : 561Mhz Ratio Status: Locked Ratio...

P4PE2-X User Manual
Page 51
... IRQ and DMA channel resources for either PCI/PnP or legacy ISA devices, and setting the memory size block for boot. When set to [No], BIOS configures all the devices in below sections may cause the system to ECP. ECP Mode DMA Channel [DMA3] Sets the ECP Mode DMA channel. Configuration... if you installed a Plug & Play operating system, the operating system configures the Plug & Play devices not required for legacy ISA devices. Configuration options: [No] [Yes] ASUS P4PE2-X motherboard 2-19 This item appears only when the Parallel Port Mode is set to malfunction.
... IRQ and DMA channel resources for either PCI/PnP or legacy ISA devices, and setting the memory size block for boot. When set to [No], BIOS configures all the devices in below sections may cause the system to ECP. ECP Mode DMA Channel [DMA3] Sets the ECP Mode DMA channel. Configuration... if you installed a Plug & Play operating system, the operating system configures the Plug & Play devices not required for legacy ISA devices. Configuration options: [No] [Yes] ASUS P4PE2-X motherboard 2-19 This item appears only when the Parallel Port Mode is set to malfunction.

P4PE2-X User Manual
Page 53
... list. Configuration options: [S1 (POS) Only] [S3 Only] [Auto] 2.5.2 Repost Video on S3 Resume [No] Determines whether to invoke VGA BIOS POST on S3 Resume ACPI 2.0 Support ACPI APIC Support APM Configuration Hardware Monitor [Auto] [No] [No] [Enabled] 2.5.1 Suspend Mode [Auto] ... Power Management (APM). When set to Enabled, the ACPI APIC table pointer is included in the ASIC. Configuration options: [Disabled] [Enabled] ASUS P4PE2-X Motherboard 2-21 Select an item then press Enter to display the configuration options. Configuration options: [No] [Yes] 2.5.4 ACPI APIC Support [...
... list. Configuration options: [S1 (POS) Only] [S3 Only] [Auto] 2.5.2 Repost Video on S3 Resume [No] Determines whether to invoke VGA BIOS POST on S3 Resume ACPI 2.0 Support ACPI APIC Support APM Configuration Hardware Monitor [Auto] [No] [No] [Enabled] 2.5.1 Suspend Mode [Auto] ... Power Management (APM). When set to Enabled, the ACPI APIC table pointer is included in the ASIC. Configuration options: [Disabled] [Enabled] ASUS P4PE2-X Motherboard 2-21 Select an item then press Enter to display the configuration options. Configuration options: [No] [Yes] 2.5.4 ACPI APIC Support [...

P4PE2-X User Manual
Page 57
...Press DEL to be pressed when error occurs. Configuration options: [Disabled] [Enabled] Interrupt 19 Capture [Disabled] When set to [Disabled], BIOS performs all the POST items. Configuration options: [Disabled] [Enabled] Full Screen Logo [Enabled] This allows you to select the power-...Wait for 'F1' If Error [Enabled] When set to [Enabled] if you to use the ASUS MyLogo™ feature. Configuration options: [Disabled] [Enabled] ASUS P4PE2-X Motherboard 2-25 AddOn ROM Display Mode [Force BIOS] Sets the display mode for PS/2 mouse. Configuration options: [Off] [On] PS/2 Mouse Support...
...Press DEL to be pressed when error occurs. Configuration options: [Disabled] [Enabled] Interrupt 19 Capture [Disabled] When set to [Disabled], BIOS performs all the POST items. Configuration options: [Disabled] [Enabled] Full Screen Logo [Enabled] This allows you to select the power-...Wait for 'F1' If Error [Enabled] When set to [Enabled] if you to use the ASUS MyLogo™ feature. Configuration options: [Disabled] [Enabled] ASUS P4PE2-X Motherboard 2-25 AddOn ROM Display Mode [Force BIOS] Sets the display mode for PS/2 mouse. Configuration options: [Off] [On] PS/2 Mouse Support...

P4PE2-X User Manual
Page 59
... [No Access] [View Only] [Limited] [Full Access] No Access prevents user access to the Setup utility. Configuration options: [Disabled] [Enabled] ASUS P4PE2-X Motherboard 2-27 The User Password item on top of at least six (6) letters and/or numbers, then press . 3. After you have set or... and press . 2. The message "Password Installed" appears after you have successfully set a User Password: 1. When set to [Always], BIOS checks for user password when accessing the Setup utility. View Only allows access but does not allow change the user password, follow the same...
... [No Access] [View Only] [Limited] [Full Access] No Access prevents user access to the Setup utility. Configuration options: [Disabled] [Enabled] ASUS P4PE2-X Motherboard 2-27 The User Password item on top of at least six (6) letters and/or numbers, then press . 3. After you have set or... and press . 2. The message "Password Installed" appears after you have successfully set a User Password: 1. When set to [Always], BIOS checks for user password when accessing the Setup utility. View Only allows access but does not allow change the user password, follow the same...


